In recent years, the number of available JavaScript frameworks has exploded. From established options like AngularJS to a constant influx of new frameworks each month, developers have a remarkable range to choose from. A few years ago, a framework called Meteor caught my eye. Unlike most frameworks that focus on specific aspects of development, Meteor aims to be a comprehensive platform for building JavaScript applications. If you’re unfamiliar with Meteor, I recommend visiting their website to learn more. Rather than providing an introduction to Meteor, this article will delve into some straightforward methods for incorporating structure into Meteor projects.

One of Meteor’s most significant advantages is its ability to facilitate rapid prototyping of sophisticated JavaScript applications. As a hybrid framework combining front-end templating and rendering with a Node-based server that interacts with MongoDB (a unified solution), Meteor handles much of the initial configuration required for creating a full-stack web app. However, this ease of development can be deceiving. Without proper care, developers can easily fall into bad habits and end up with disorganized and difficult-to-manage code. Here are a few recommendations to avoid such pitfalls.
Scaffolding: Maintaining a Manageable Directory Structure in Meteor
When building a Meteor application, maintaining a recommended folder structure is crucial. By default, Meteor allows you to place files anywhere within the project directory. You could even have all your code in a single file if desired. While this might be suitable for a quick project, managing the complexity of a production-level, scalable application without a structured approach becomes incredibly challenging.

To address this, I suggest exploring Chris Mather’s npm package, iron. This package offers various configuration options and can help you establish a well-organized project structure similar to this:
| |
However, such a granular structure might be excessive for some projects. Not every application requires this level of organization, with separate directories for collections, methods, and server-side publication code. If your project is smaller or you prefer not to introduce an additional npm package, consider this basic folder structure:
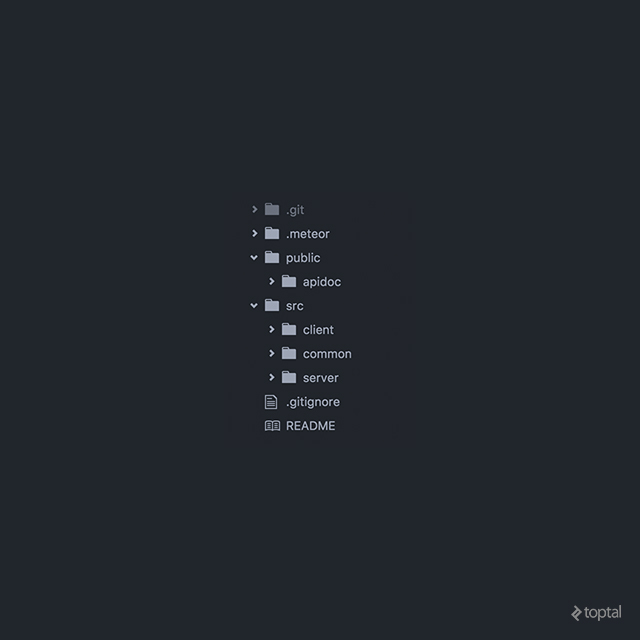
The essential components here are a “public” folder for static assets like your favicon, and dedicated “client,” “common,” and “server” folders. As their names suggest, the “client” and “server” folders should house code executed on the client and server, respectively. The “common” folder is reserved for code accessible to both the client and server, such as Schema code, which we’ll cover shortly.
There are two primary approaches to organizing files at the lowest level: by file type and by function. Organization by file type involves creating separate subfolders within directories like “client/templates” for JavaScript files, CSS files, and HTML files. For example, your HTML folder would contain all your template HTML files, such as “Login.html,” “Main.html,” and so on. Conversely, organization by function centers around grouping files based on the concepts they represent. For instance, within “client/templates,” you might have a “Login” folder containing all JavaScript, CSS, and HTML files related to the app’s login process. Personally, I prefer organization by function as it clarifies the location of specific files or code snippets. However, the ideal approach often lies somewhere between these two methods, with developers and teams adopting a hybrid approach based on their preferences and project needs.
Schema: Crucial for Your App, Even If Your Database Doesn’t Require It
The second aspect of structuring a Meteor project involves the database. This article assumes you’re using MongoDB, so while the concepts might apply to other databases, the specifics may not.
MongoDB is known for its flexibility in handling data structures. As a NoSQL document-store database, it doesn’t enforce a fixed schema for any particular data “type.” This freedom means you don’t have to worry about forcing all objects into a rigid structure. You could even store all your app’s data in a single collection if you wanted. However, for production-quality applications, this approach isn’t ideal. To manage data effectively and introduce valuable features like write-request validation, two excellent Meteor packages are available: Aldeed’s SimpleSchema and Collection2.

As its name implies, the SimpleSchema package enables reactive validation of objects within your app. For a closer look, check out the docs on GitHub. The Collection2 package builds upon SimpleSchema and empowers you to implement proper schemas for your Meteor collections. This facilitates automatic validation of both client-side and server-side write requests to any collection associated with a schema. Both packages offer extensive customization options, making it difficult to cover their full scope in a few paragraphs. For detailed information, I recommend referring to the comprehensive readmes that Aldeed has provided.
One of the most significant benefits I’ve derived from these packages is the ability to validate user form input. This is particularly useful for validating Meteor User documents generated by the Accounts package. By default, Meteor Users have a surprisingly intricate implicit schema. Here’s a glimpse of a portion of it, courtesy of Aldeed’s publicly available code:
| |
And that’s just the schema for the User’s profile object. Attempting to validate the entire User object without a specialized package like SimpleSchema would be unwieldy. While all those fields appear optional in the illustration, a properly validated User schema would likely require many of them. Moreover, elements like “Schema.UserCountry” actually reference other schemas for validation.
By attaching this schema to the User object and integrating it reactively into our forms, perhaps using a package like Aldeed’s AutoForm, we gain granular control over what data enters our databases. This saves time and effort and provides a concrete conceptual model of data handling within our application.
Roles: Managing Authorization and Access Control
My final suggestion for structuring and enhancing a Meteor project is Alanning’s Roles package package. This authorization system for Meteor allows you to control user access levels for various parts of your web app. Permissions are associated with the User profile as strings and are subsequently validated or invalidated when the user attempts to access specific Meteor methods or data published to the client. Here’s an example:

| |
Despite its relatively simple core, this package facilitates complex and granular permission management for any part of your application. Since roles are stored as strings, you can create a system as intricate as needed, such as “admin,” “admin.division1.manage,” “admin.division1.manage.group2,” and so on.
The challenge with this flexibility lies in keeping track of a highly granular roles system. While the package offers functions like “getAllRoles,” which retrieves all created roles, it’s your responsibility to manage their meanings and appropriate usage contexts.
A quick note on the distinction between “roles” and “permissions”: within the context of this package, they are essentially interchangeable.
Conclusion
Due to the broad scope of this article (each package mentioned deserves its own tutorial), it wasn’t feasible to delve into great detail about any specific package. However, I hope I’ve provided insights into how you can work towards a “standardized” Meteor application that’s robust and scalable for production use.
For further exploration, I encourage you to visit the provided links and investigate another useful tool for Meteor apps: the Restivus package. This package allows you to easily create a REST API for your application.
As a disclaimer, I am not the author of any of these packages, and I apologize if I’ve misrepresented any of their features or purposes. Thank you for reading, and I hope this article has been beneficial. Feel free to reach out with any questions or leave a comment below.