Magento holds the title of the biggest open-source eCommerce platform globally. Its adaptable and feature-rich codebase has made it a favorite for businesses of all sizes, powering a diverse range of online stores.
Magento 1 enjoyed a long reign of eight years before its successor, Magento 2, arrived in late 2015. This new iteration addressed some shortcomings of its predecessor, boasting:
- Enhanced performance
- A dedicated automated testing suite
- A more user-friendly backend interface
- A modern front-end codebase built with newer technologies
- Improved module development with a modular approach, keeping files organized within the Magento codebase
- Minimized conflicts arising from modules attempting to modify the same functionalities
Just over a year later, the progress is evident, even if not all identified issues have been completely resolved. Magento 2 undeniably stands as a more reliable and robust platform compared to its forerunner. Among its notable improvements are:
- Unit and integration tests, including official documentation and guidelines for creating them for customized modules
- Truly modularized modules with all related files neatly organized within a single directory
- A more versatile templating system empowering theme developers to create multi-level template hierarchies
- The implementation of beneficial design patterns across the codebase, enhancing code quality and reducing the chance of module-induced errors. These include, but are not limited to, automatic dependency injection, service contracts, repositories, and factories
- Seamless integration with Varnish for full-page caching and Redis for session and cache management
- Support for PHP 7
With these advancements, Magento 2 presents a steeper learning curve. This Magento 2 development guide aims to simplify this journey by demonstrating the creation of your first Magento 2 module and setting you on the right track for further exploration. So, let’s dive in!
Getting Started with Magento 2 Development: Prerequisites
Before we proceed, a solid understanding of the following technologies and concepts is essential to grasp the remainder of this article:
- Object-oriented Programming (OOP)
- PHP
- Namespaces
- MySQL
- Basic bash commands
Among these, OOP holds particular significance. Magento’s initial development team comprised experienced Java developers, and their influence is clearly reflected in the codebase. If your OOP skills are a little rusty, it’s advisable to brush up on them before delving into Magento development.
Unraveling Magento 2’s Architecture
Magento’s architecture prioritizes modularity and extensibility in its source code. This design philosophy aims to facilitate easy adaptation and customization to meet the specific needs of each project.
Customization typically involves altering the behavior of the platform’s code. In most systems, this translates to modifying the “core” code. However, Magento, when adhering to best practices, often allows you to circumvent this, enabling stores to seamlessly stay up-to-date with the latest security patches and feature releases.
Magento 2 embraces the Model View ViewModel (MVVM) architecture. Although closely related to Model View Controller (MVC), MVVM provides a more distinct separation between the Model and View layers. Let’s break down each layer in an MVVM system:
- The Model governs the business logic of the application, relying on a companion class, the ResourceModel, for database interactions. Models leverage service contracts to expose their functionality to other application layers.
- The View represents the visual structure and layout that a user encounters – the actual HTML. This is achieved through PHTML files distributed with modules. These PHTML files are linked to their corresponding ViewModels in Layout XML files, known as binders in MVVM terminology. Layout files may also associate JavaScript files for use in the final rendered page.
- The ViewModel acts as an intermediary between the Model and View layers, presenting only the essential information to the View. In Magento 2, this role is handled by the module’s Block classes. Notably, this responsibility often falls under the Controller’s purview in an MVC system. In MVVM, the controller primarily manages user flow, receiving requests and instructing the system to either render a view or redirect the user to a different route.
A Magento 2 module typically incorporates several, if not all, elements of the architecture outlined above. The overall architecture can be visualized as follows (source):
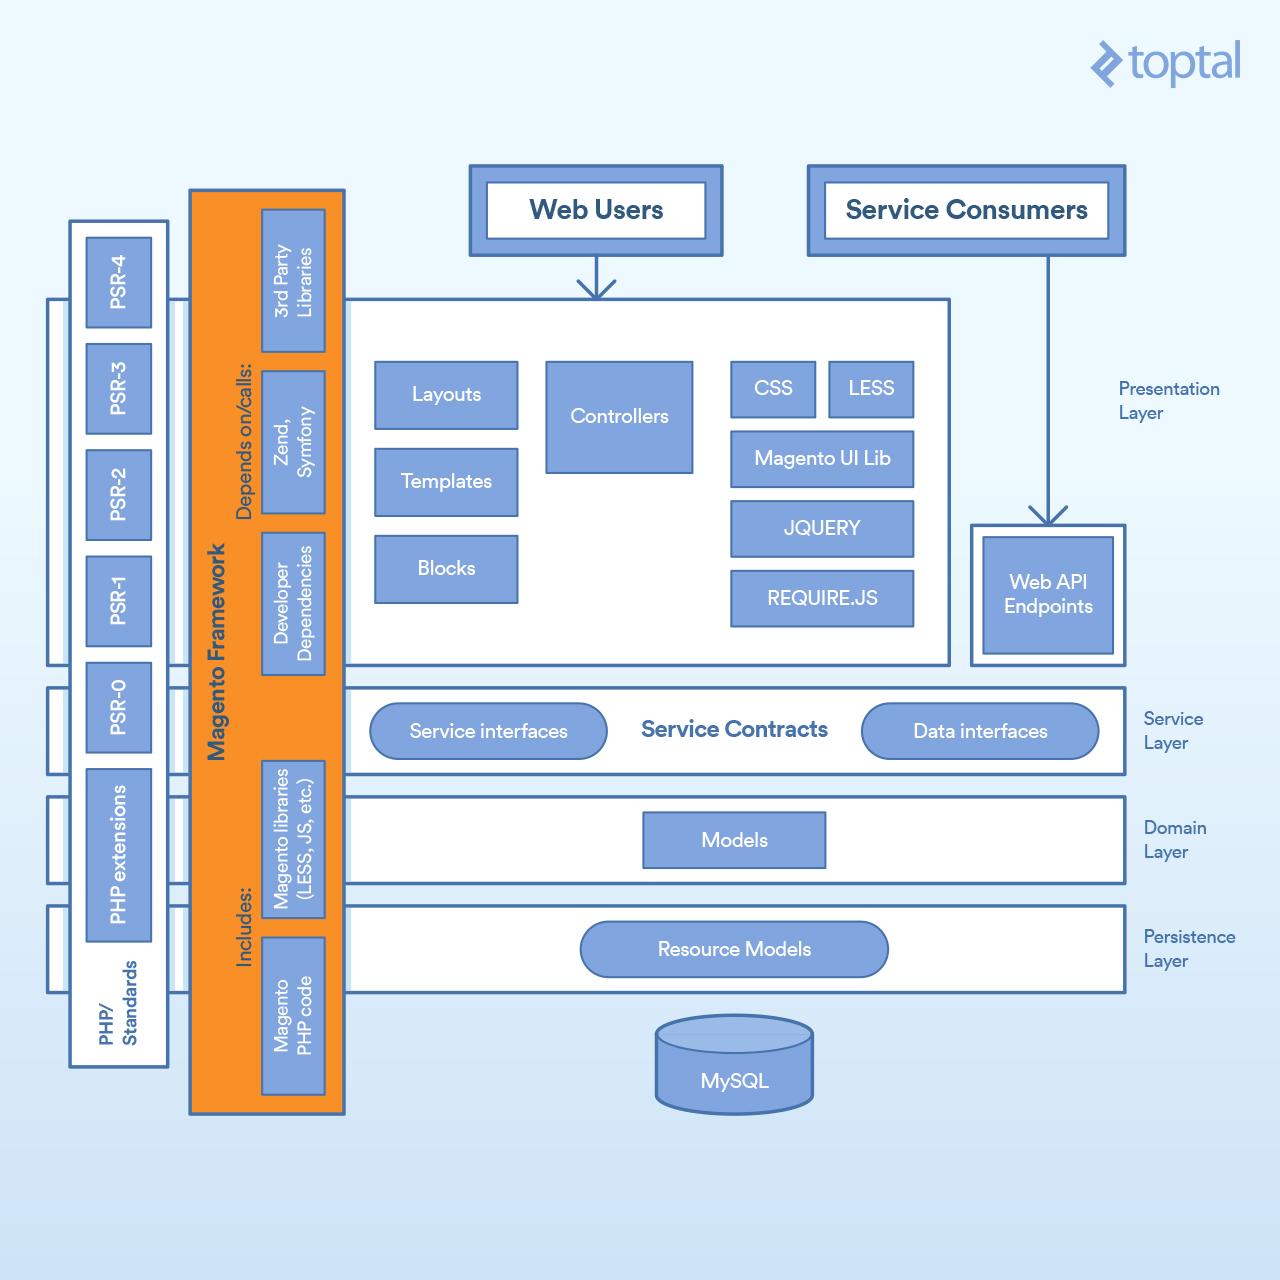
Magento 2 modules can, in turn, define external dependencies using Composer, PHP’s dependency manager. As depicted in the diagram, Magento 2 core modules rely on Zend Framework, Symfony, and other third-party libraries.
To illustrate, let’s examine the structure of Magento/Cms, a core module responsible for managing the creation of pages and static blocks.
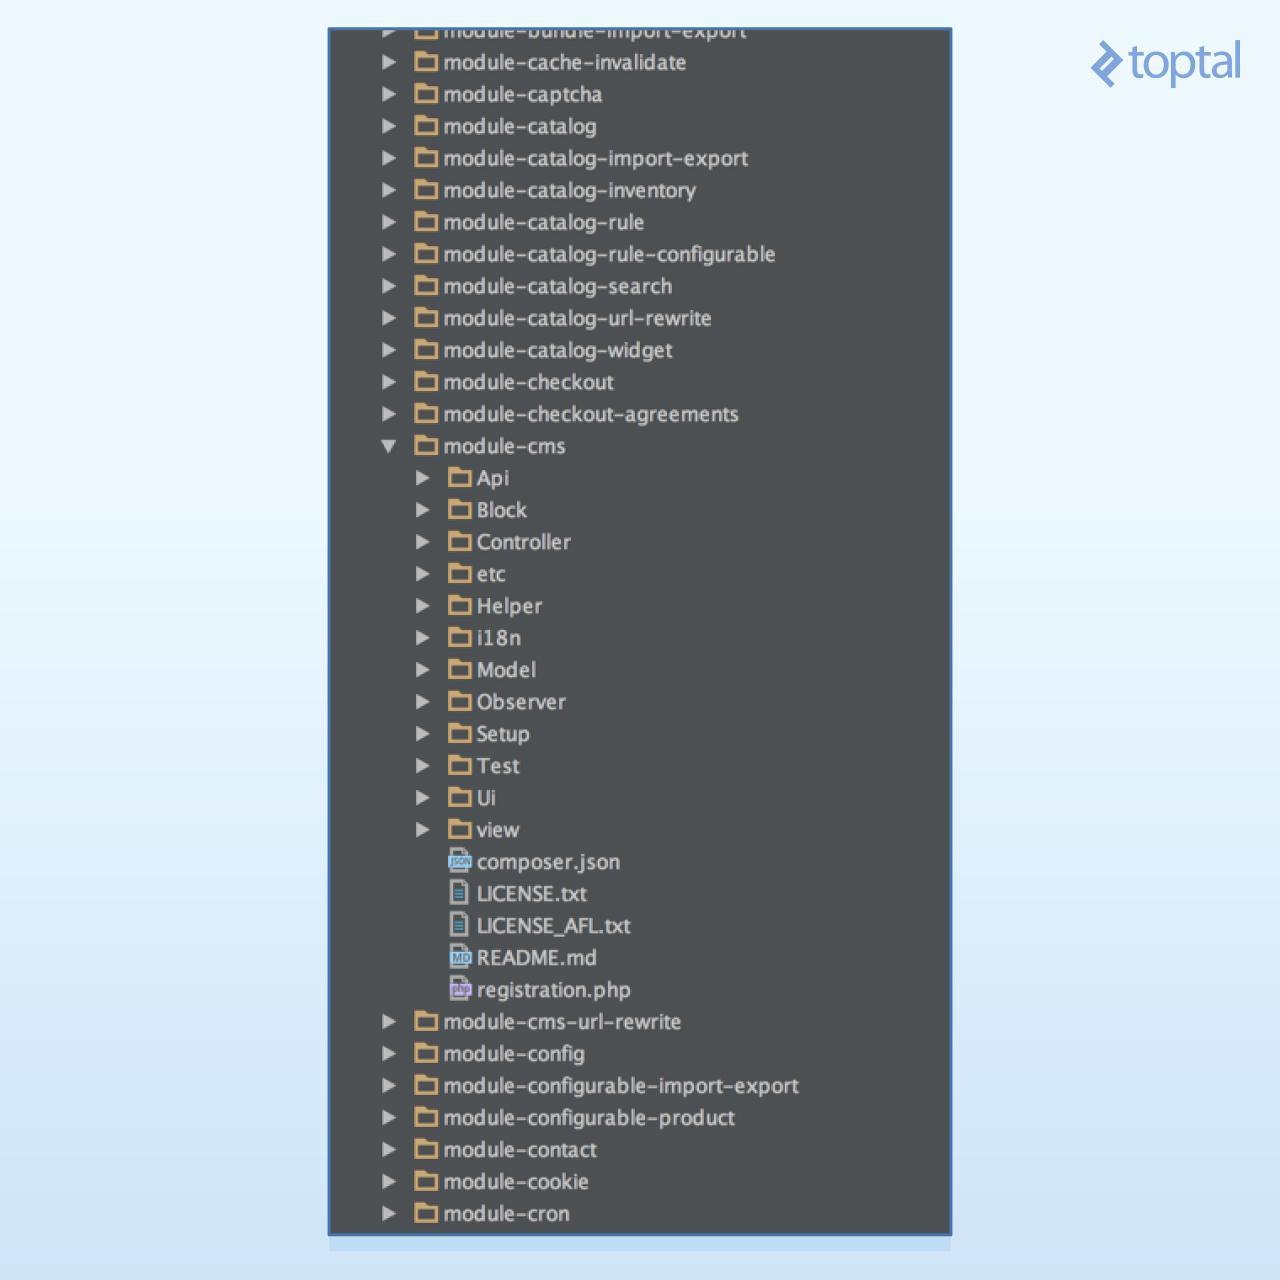
Each folder houses a specific aspect of the architecture:
- Api: Contains service contracts defining service and data interfaces
- Block: Houses the ViewModels of our MVVM architecture
- Controller: Contains controllers responsible for handling user interactions and flow within the system
- etc: Stores configuration XML files. The module defines itself and its components (routes, models, blocks, observers, cron jobs) within this folder. Non-core modules can also use etc files to override core module functionalities.
- Helper: Holds helper classes containing code used across multiple application layers. For instance, in the Cms module, helper classes prepare HTML for browser presentation.
- i18n: Stores internationalization CSV files used for translation purposes
- Model: Contains Models and ResourceModels
- Observer: Holds Observers, which are Models “observing” system events. When an event is triggered, the observer typically instantiates a Model to handle the associated business logic.
- Setup: Contains migration classes responsible for schema and data creation
- Test: Holds unit tests
- Ui: Contains UI elements like grids and forms used in the admin application
- view: Stores layout (XML) files and template (PHTML) files for both the front-end and admin application
It’s worth noting that, in practice, Magento 2’s internal workings reside entirely within modules. The image above highlights examples like Magento_Checkout, managing the checkout process, and Magento_Catalog, handling products and categories. Essentially, mastering module development is paramount to becoming a proficient Magento 2 developer.
Having covered the basics of system architecture and module structure, let’s transition to a more practical exercise. We’ll walk through a traditional Weblog tutorial to familiarize you with Magento 2 development. But first, we need to set up a development environment. Let’s get started!
Setting up Your Magento 2 Module Development Environment
At the time of this writing, the official Magento 2 DevBox, a Docker-based solution, was available. However, Docker on macOS, especially for I/O-intensive systems like Magento 2, remains less than ideal. Therefore, we’ll opt for a native installation, setting up all packages directly on our machine.
Server Setup
While a native installation might seem more involved, it yields a significantly faster Magento development environment. Trust me, bypassing Docker for Magento 2 development will save you countless hours.
This tutorial assumes a macOS environment with Brew installed. If your setup differs, the fundamental steps remain the same; you’ll only need to adjust the package installation methods accordingly. Let’s begin by installing the necessary packages:
| |
Next, start the services:
| |
Now, let’s point a domain to our loopback address. Open the hosts file using your preferred editor, ensuring you have superuser permissions. With Vim, this would be:
| |
Add the following line:
| |
Next, create a vhost in Nginx:
| |
Add the following content:
| |
If Nginx is new to you, let’s break down this file, as it also sheds light on Magento’s internal workings. The initial lines inform Nginx that we are using the default HTTP port and our domain is magento2.dev:
| |
Next, we set some environment variables. The first, $MAGE_ROOT, stores the path to our codebase. Remember to modify the root path to match your username and folder structure, wherever you intend to place the source code:
| |
The second variable, $MAGE_MODE, sets the runtime mode for our store. Since we are developing a module, we’ll use developer mode, which speeds up development by eliminating the need to compile or deploy static files while coding. Other modes include production and default, although the latter’s practical use remains somewhat unclear.
| |
With these variables defined, we specify the vhost root path. Note that we append /pub to the $MAGE_ROOT variable, exposing only a portion of our store to the web.
| |
We then designate our index file, index.php, which Nginx loads when a requested file is not found and no index is present. This script, located at $MAGE_ROOT/pub/index.php, serves as the main entry point for both the shopping cart and admin applications. Regardless of the requested URL, index.php is loaded, initiating the router dispatching process.
| |
Next, we disable a couple of Nginx features. First, we turn off autoindex, which, if enabled, would display a file listing when a folder is requested without specifying a file and no index exists. Second, we disable charset, preventing Nginx from automatically adding Charset headers to the response.
| |
We then define a few security headers:
| |
This location, /, points to our root folder $MAGE_ROOT/pub and essentially redirects any incoming request to our front controller, index.php, along with the request arguments:
| |
The following section might seem a bit puzzling but is fairly straightforward. Earlier, we defined our root as $MAGE_ROOT/pub. This is the recommended and more secure configuration, as it shields most of the code from direct web access. However, it’s not the only way to set up the webserver. In fact, many shared web servers have a default configuration where the web server points to your web folder. For such scenarios, the Magento team has included this snippet:
| |
Keep in mind that, whenever feasible, it’s best practice to have your web server point to the $MAGE_ROOT/pub folder for enhanced security.
Moving on, we have the static location $MAGE_ROOT/pub/static. This folder, initially empty, is automatically populated with static files (images, CSS, JS, etc.) from modules and themes. Here, we define cache settings for static files and, if a requested file is not found, redirect the request to $MAGE_ROOT/pub/static.php. This script, among other tasks, analyzes the request and either copies or symlinks the requested file from the corresponding module or theme, depending on the defined runtime mode. This way, your module’s static files reside within the module folder but are served directly from the vhost public folder:
| |
Next, we deny web access to certain sensitive folders and files:
| |
Finally, we load php-fpm and instruct it to execute index.php whenever a user makes a request to it:
| |
Save the file. To enable it, execute these commands:
| |
Installing Magento 2
With your machine prepped and Magento 2 requirements met, it’s time to install Magento itself. Head over to the Magento website and create an account if you haven’t already. Then, visit the download page to download the latest version (2.1.5 at the time of writing):
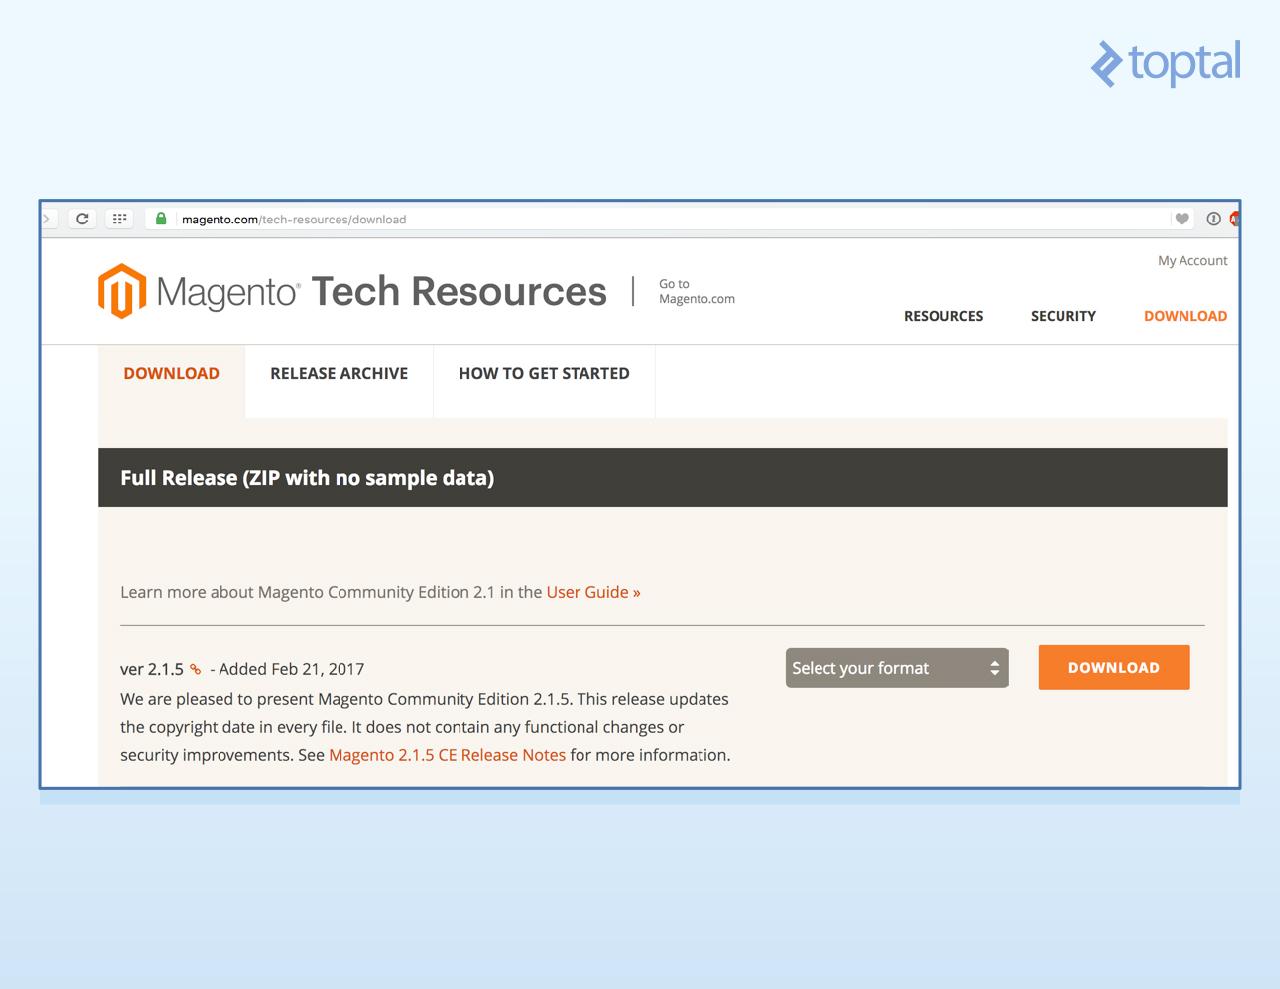
Choose the .tar.bz2 format and download the file. Extract it and set the appropriate folder and file permissions for Magento 2 to function correctly:
| |
Now, to install database tables and generate necessary configuration files, run the following command in your terminal:
| |
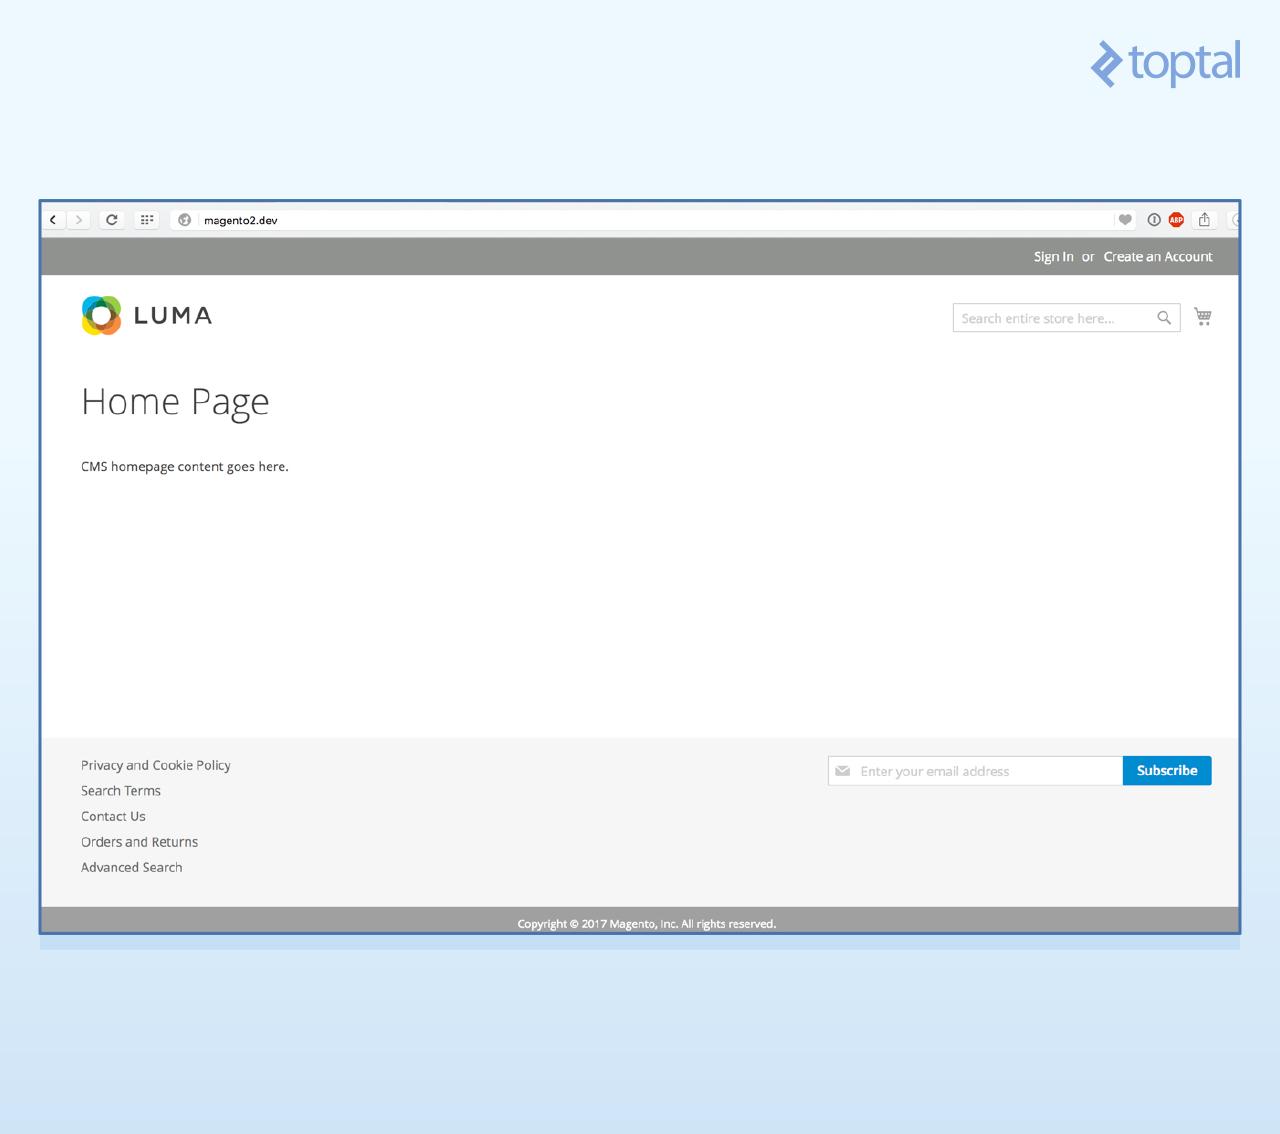
Ensure that the database name (db-name), username (db-user), and password (db-password) match the credentials you set during MySQL installation. This command installs all Magento 2 modules, creating the required tables and configuration files. Once complete, open your web browser and navigate to http://magento2.dev/. You should see a clean Magento 2 installation with the default Luma theme:
Similarly, visiting http://magento2.dev/admin should display the Admin application login page:
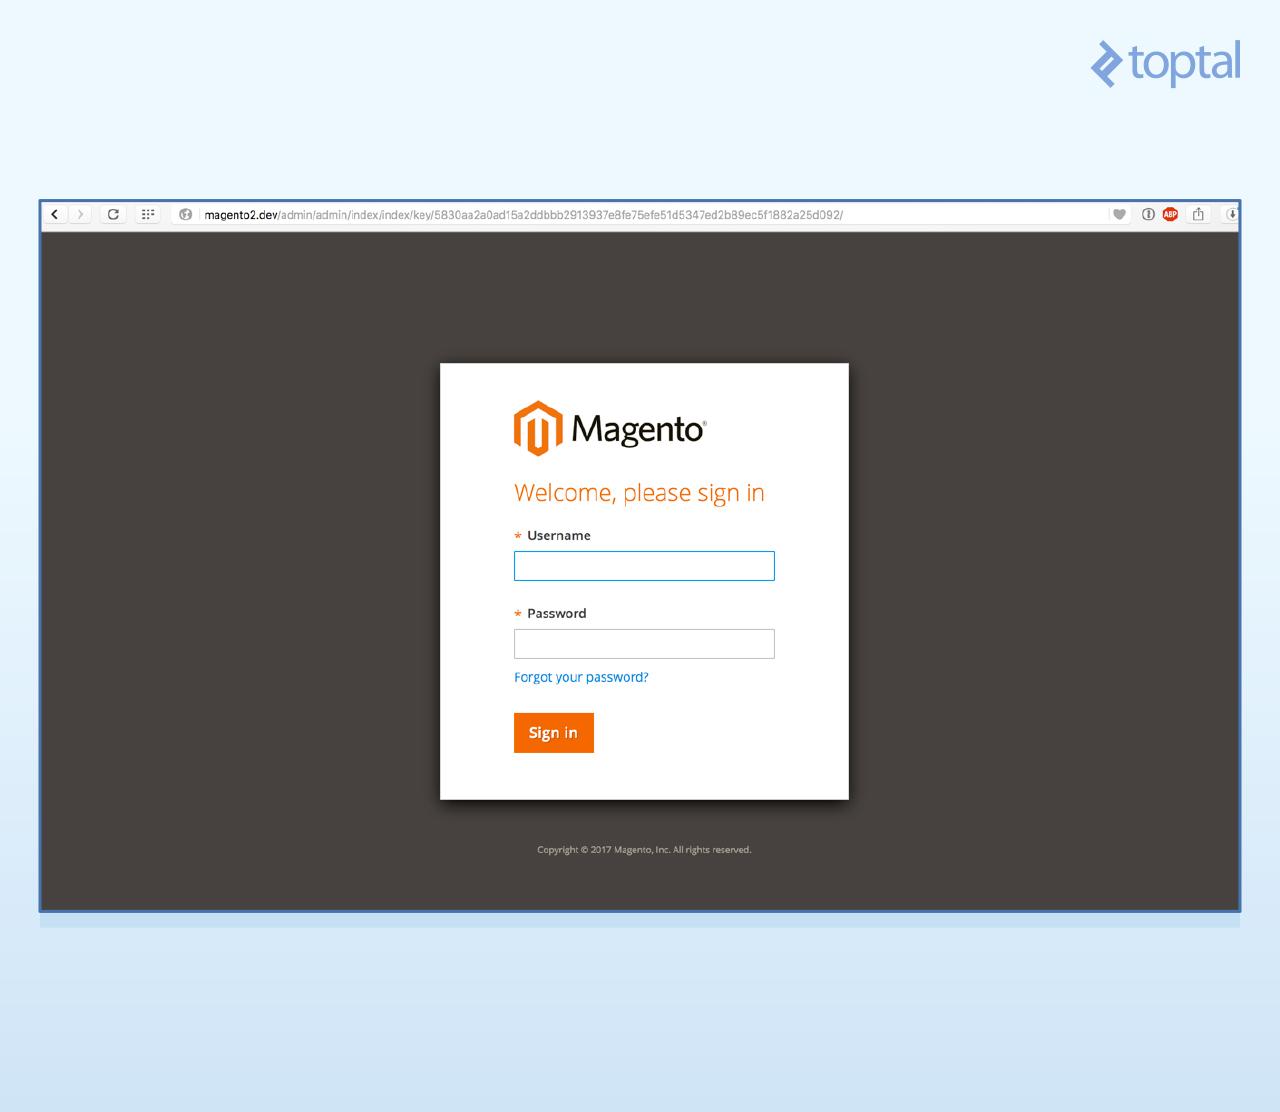
Use these credentials to log in:
Username: admin Password: admin123
With that, we are finally ready to begin coding!
Creating Your First Magento 2 Module
Our module will consist of several files, which we’ll create step-by-step. These include:
- Boilerplate registration files to introduce our Blog module to Magento
- An interface file defining the data contract for a Post
- A Post Model representing a blog post within our code, implementing the Post data interface
- A Post Resource Model linking the Post Model to the database
- A Post Collection to retrieve multiple posts from the database using the Resource Model
- Two migration classes to set up our table schema and populate it with content
- Two Actions: one to list all posts and another to display individual posts
- Two sets of Blocks, Views, and Layout files: one set for the list action and another for the view action
Let’s start by examining the core source code folder structure to determine where to place our code. In our installation, all Magento 2 core code and its dependencies reside within the composer vendor folder.

Registering the Module
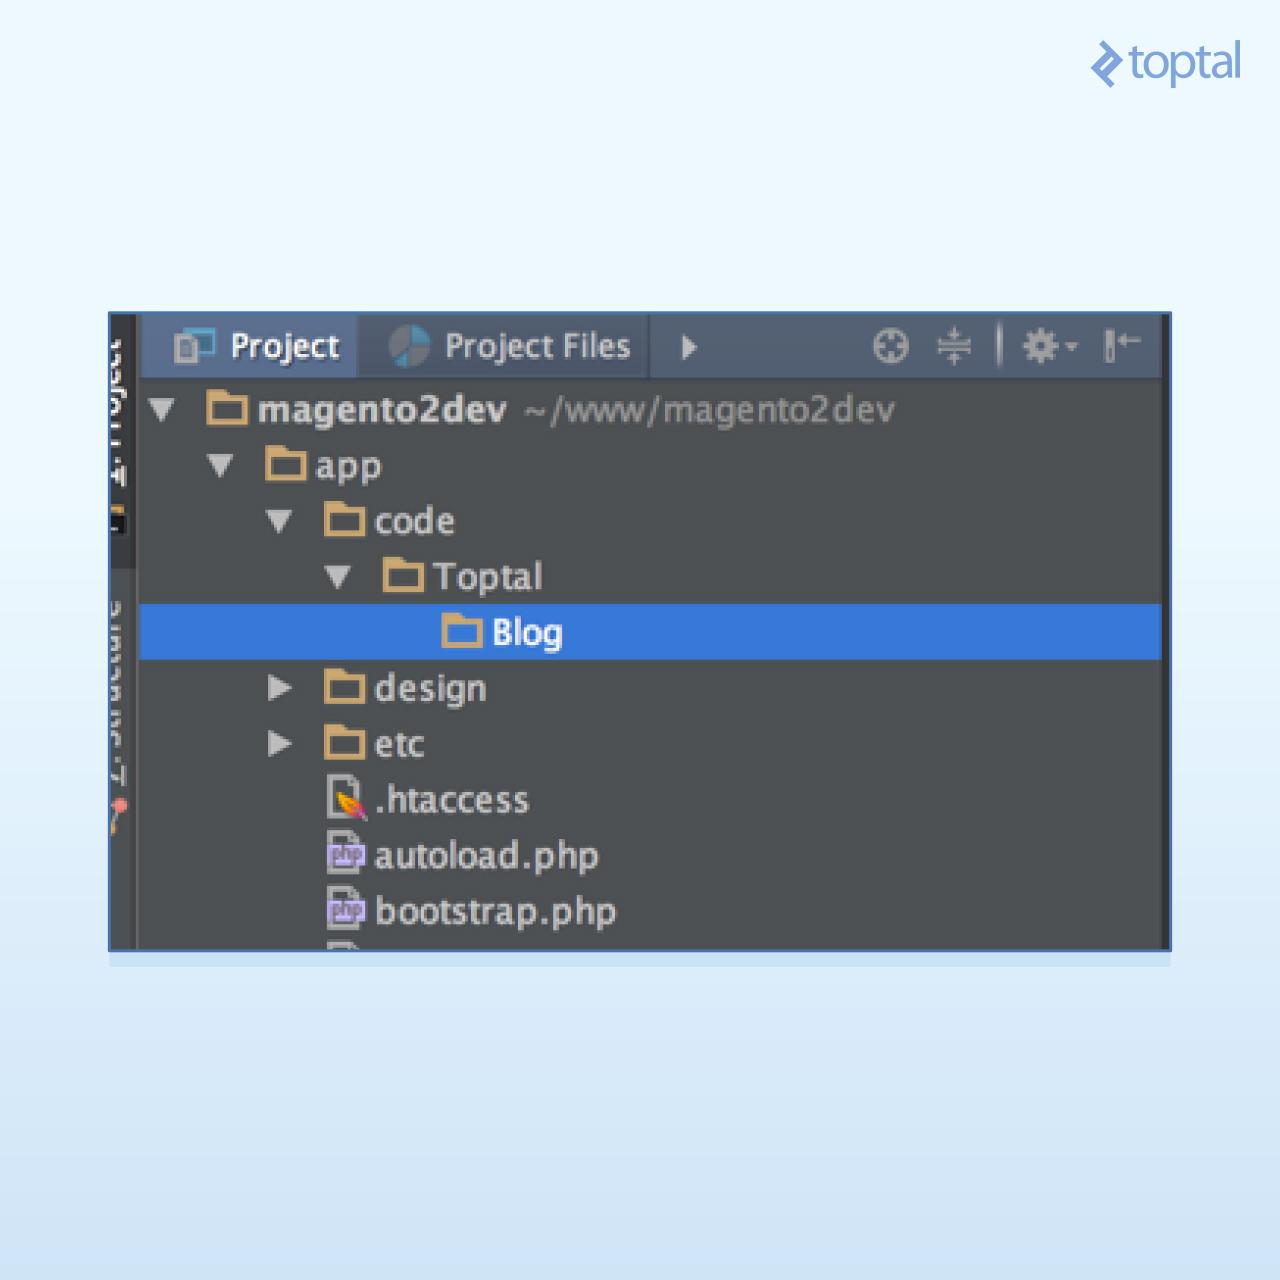
We’ll keep our code separate, in the app/code folder. Every module follows the naming convention Namespace_ModuleName, and its file system location must reflect this: app/code/Namespace/ModuleName. Accordingly, we’ll name our module Toptal_Blog and store our files under app/code/Toptal/Blog. Create this folder structure.
Now, we’ll create a few boilerplate files to register our module with Magento. First, create app/code/Toptal/Blog/composer.json:
| |
Composer reads this file every time it runs. While we won’t directly use Composer for our module, creating this file keeps Composer content.
Next, register the module with Magento. Create app/code/Toptal/Blog/registration.php:
| |
Here, we call the register method of the ComponentRegistrar class, passing two arguments: 'module', indicating the component type we are registering, and 'Toptal_Blog', our module’s name. This information enables Magento’s autoloader to recognize our namespace and locate our classes and XML files.
It’s worth noting that the component type (MODULE) is passed as an argument to \Magento\Framework\Component\ComponentRegistrar::register. We can register various component types, including themes, external libraries, and language packs, using this same method.
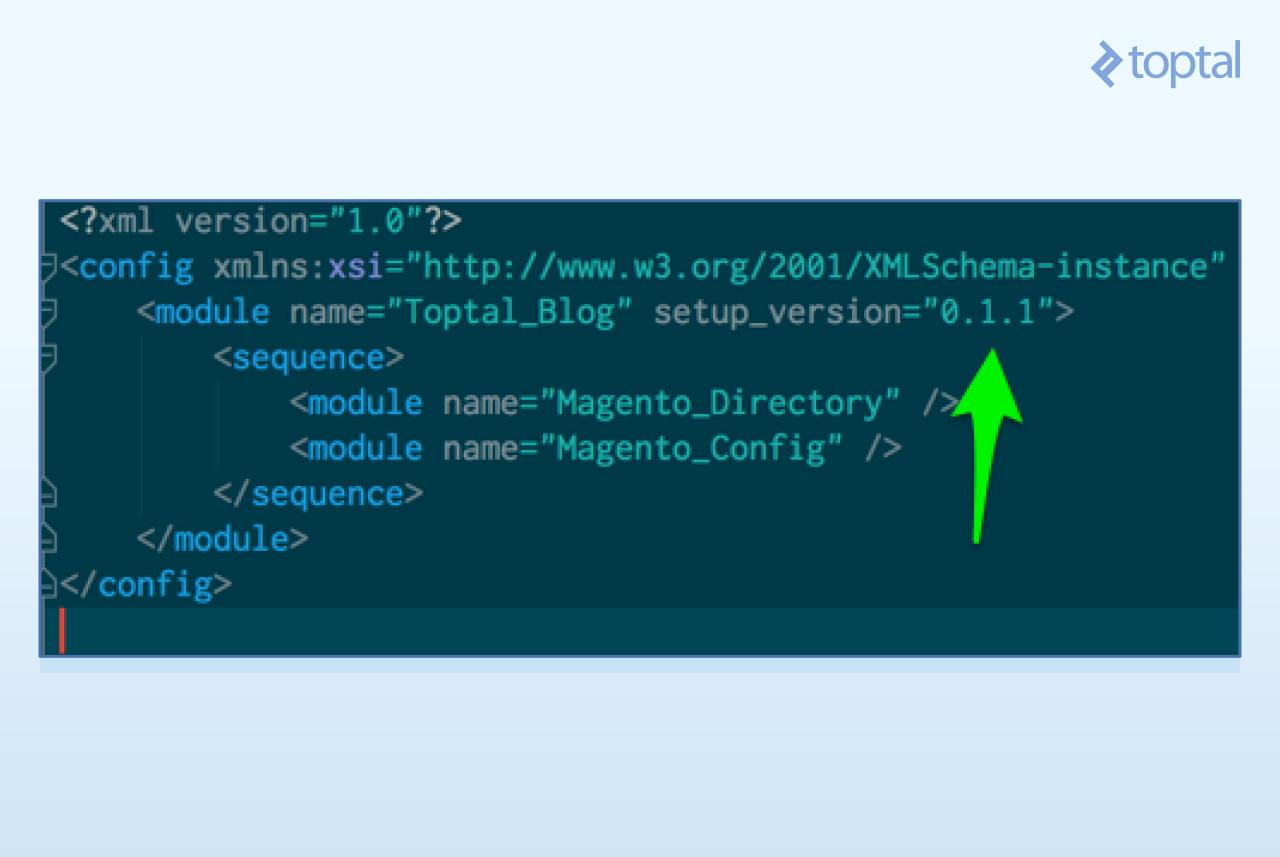
Continuing, create the final registration file, app/code/Toptal/Blog/etc/module.xml:
| |
This file contains crucial information about our module:
- The module name, exposing it to Magento’s configuration
- The Magento setup version, which Magento uses to determine when to run database migration scripts
- Our module’s dependencies. As we’re building a simple module, we depend only on two Magento core modules:
Magento_DirectoryandMagento_Config.
Our module should now be recognizable by Magento 2. Let’s verify this using the Magento 2 CLI.
First, disable Magento’s cache. While Magento’s caching mechanisms deserve their own dedicated article, for now, since we are developing a module and need Magento to instantly recognize our changes without constantly clearing the cache, we’ll simply disable it. From your terminal, run:
| |
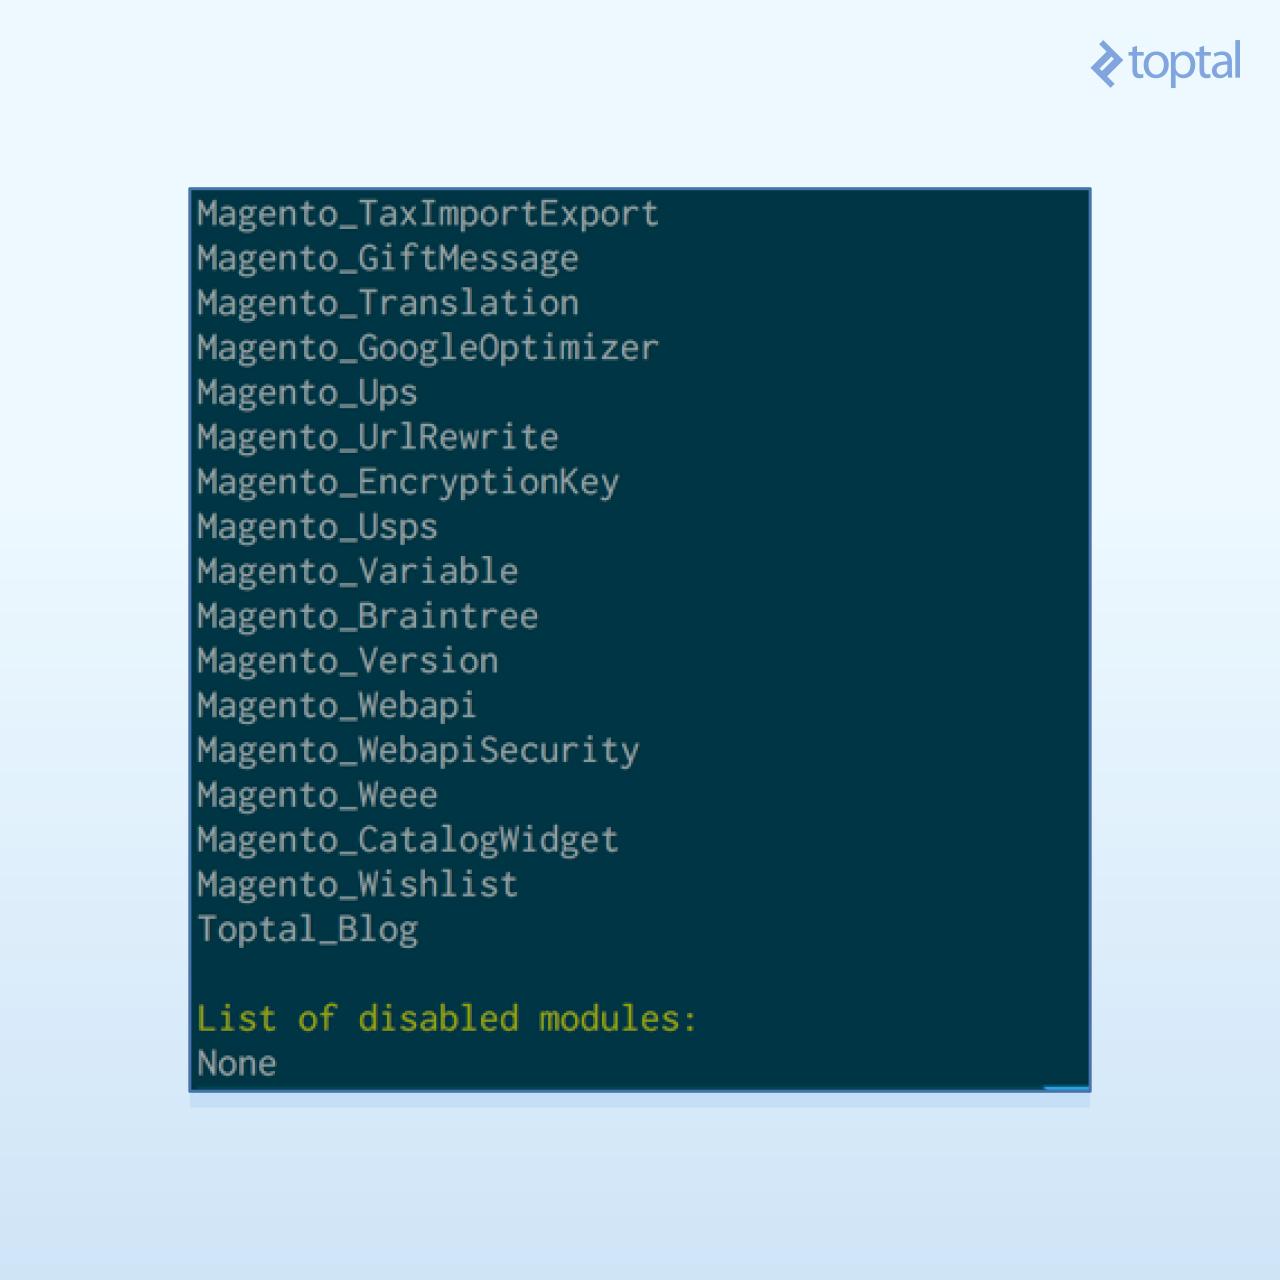
Now, let’s check if Magento acknowledges our changes by viewing the module status:
| |
The output should resemble:
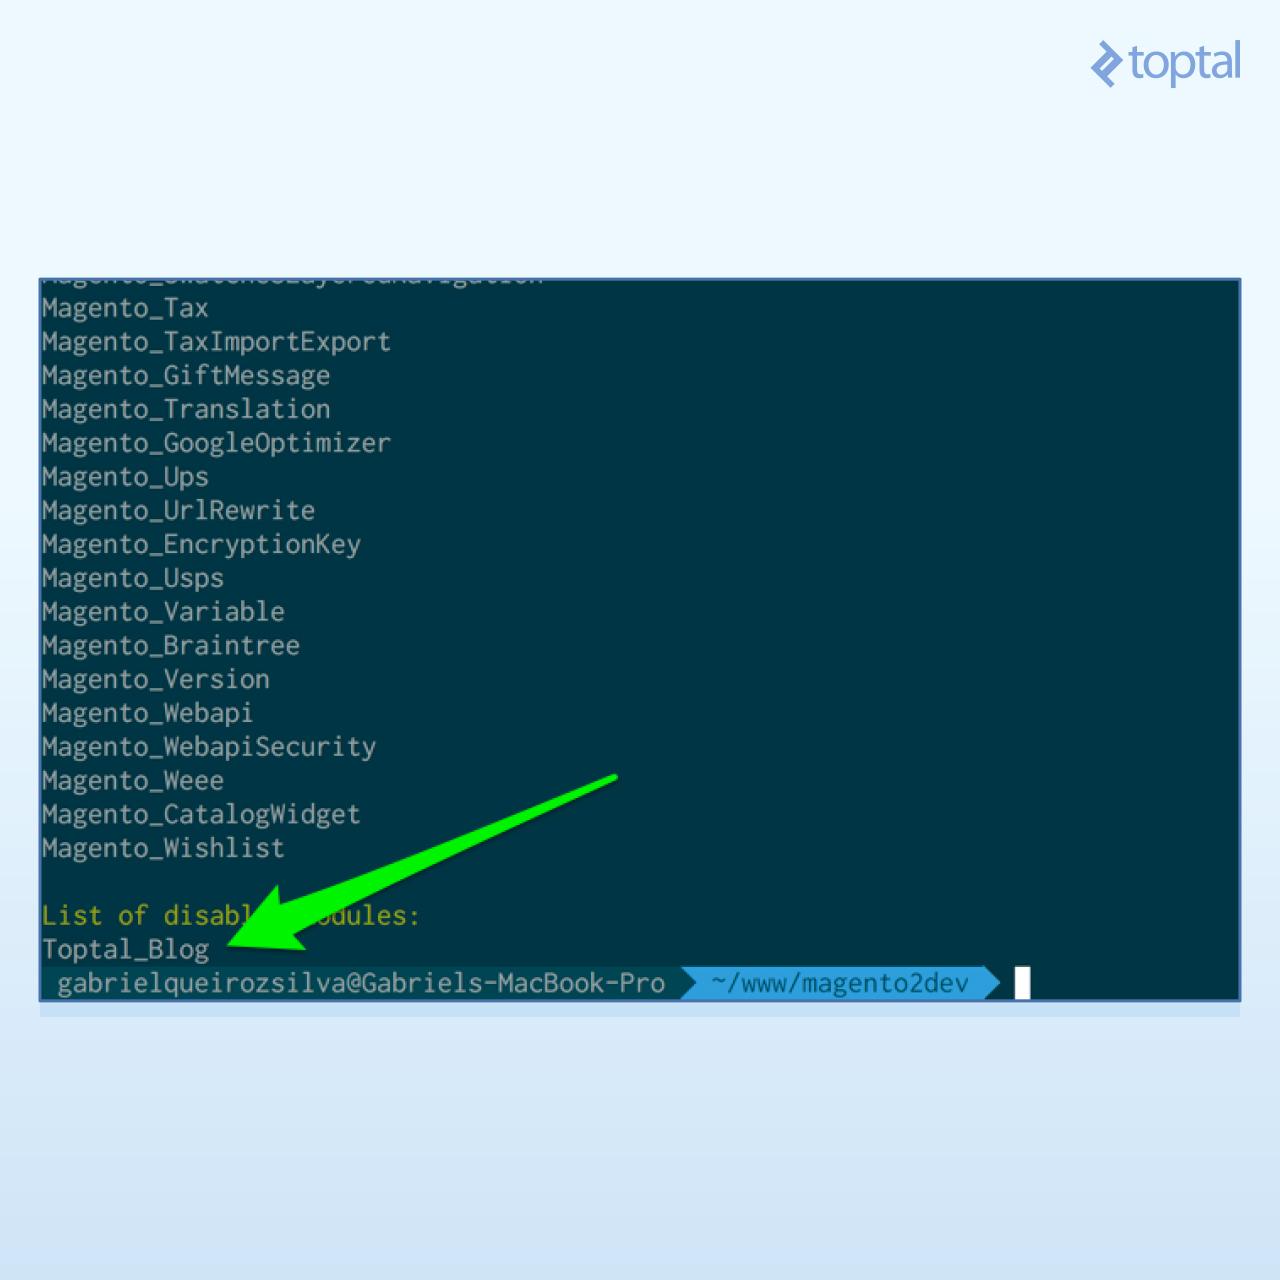
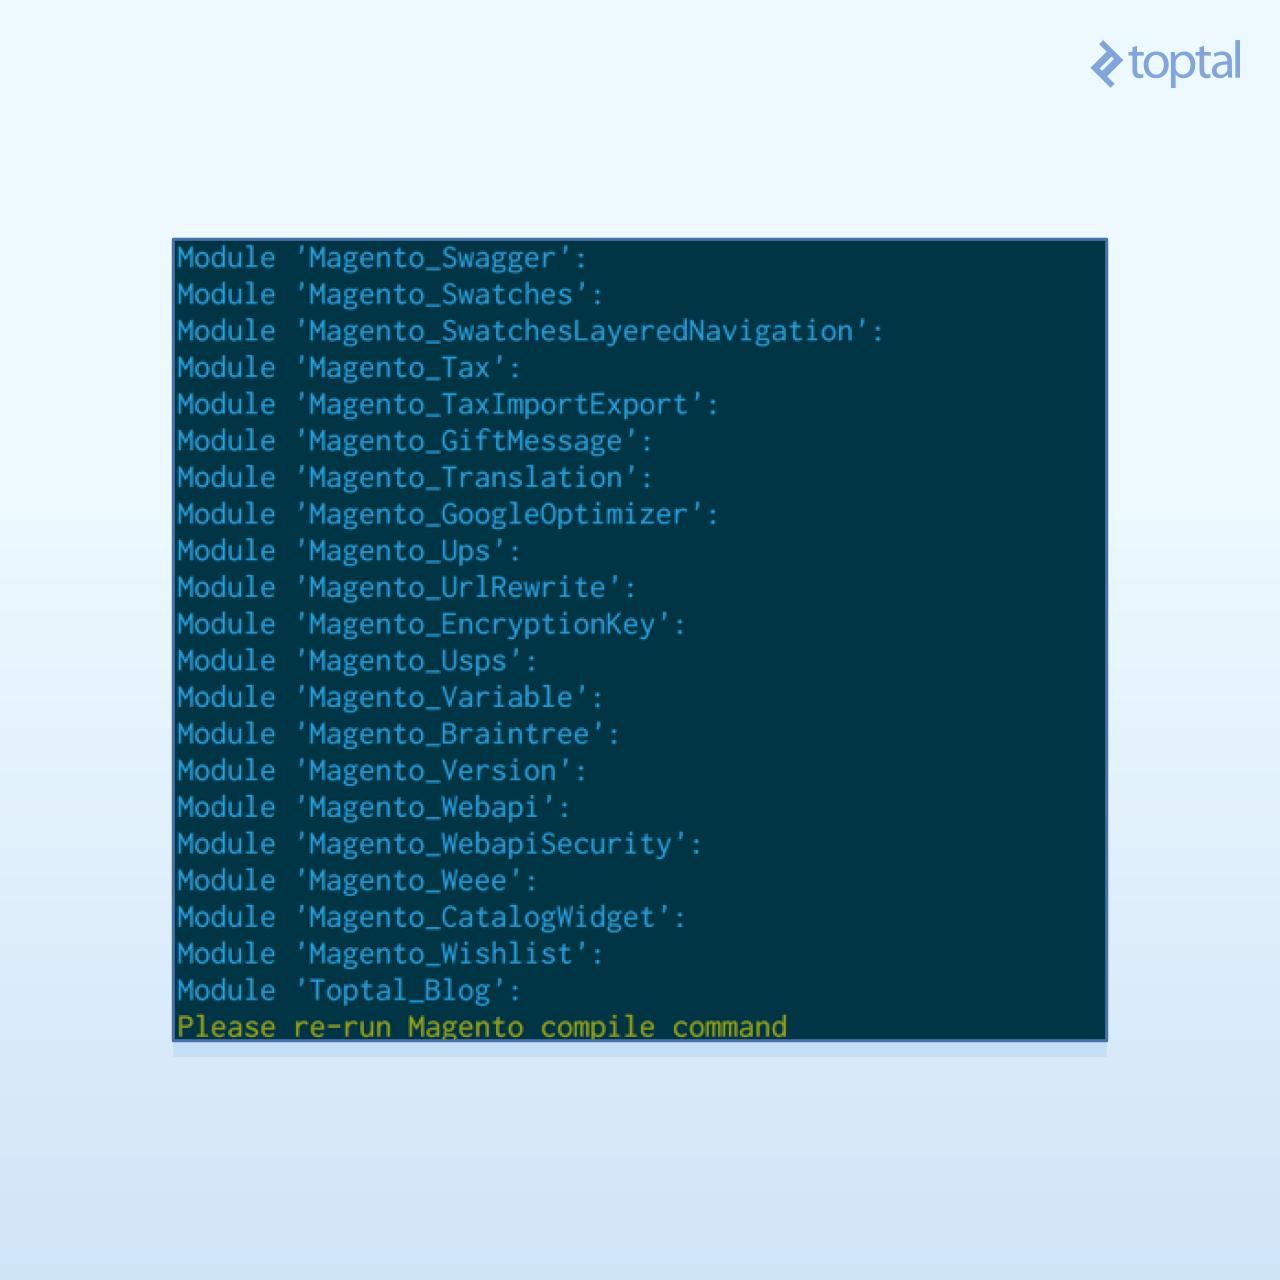
Our module is listed but, as indicated, is still disabled. To enable it, run:
| |
This should do the trick. To confirm, you can execute module:status again and look for our module’s name in the enabled list:
Data Storage Handling
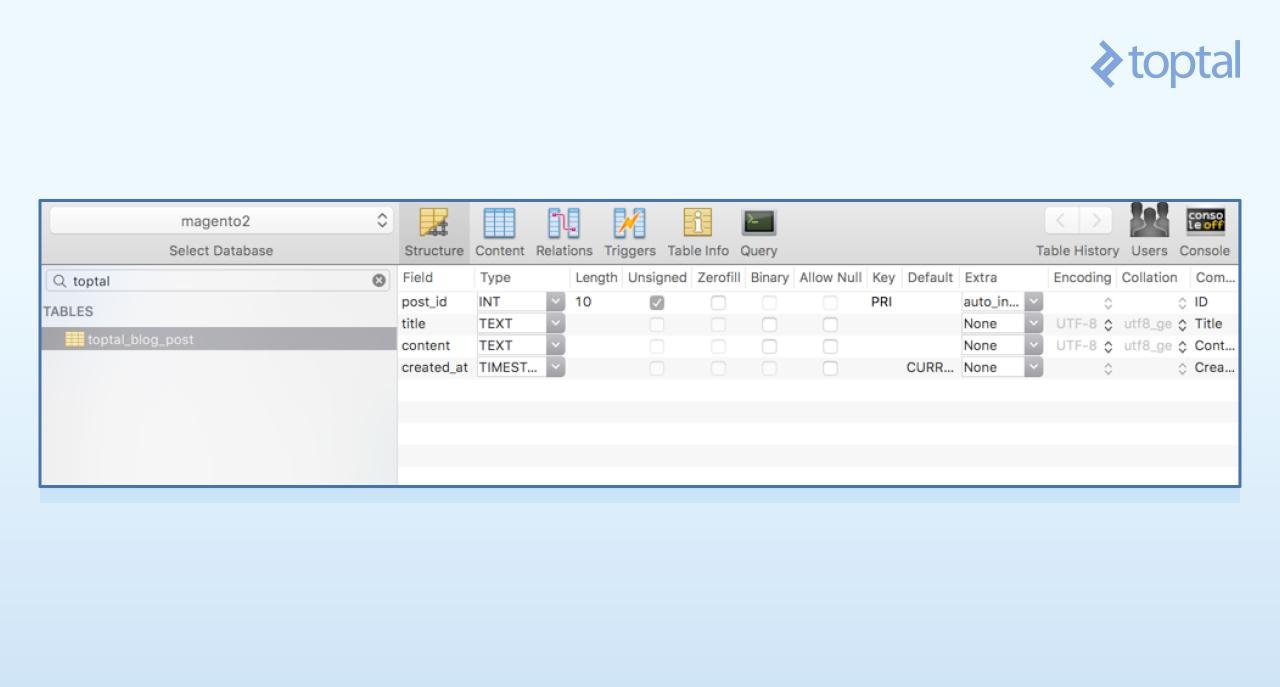
With our module enabled, let’s create the database table to store our blog posts. Here’s the desired table schema:
| Field | Type | Null | Key | Default |
|---|---|---|---|---|
| post_id | int(10) unsigned | NO | PRI | NULL |
| title | text | NO | NULL | |
| content | text | NO | NULL | |
| created_at | timestamp | NO | CURRENT_TIMESTAMP |
We’ll achieve this by creating the InstallSchema class, responsible for managing the installation of our schema migration. This file resides at app/code/Toptal/Blog/Setup/InstallSchema.php and contains the following code:
| |
The install method simply creates our table and adds columns one by one.
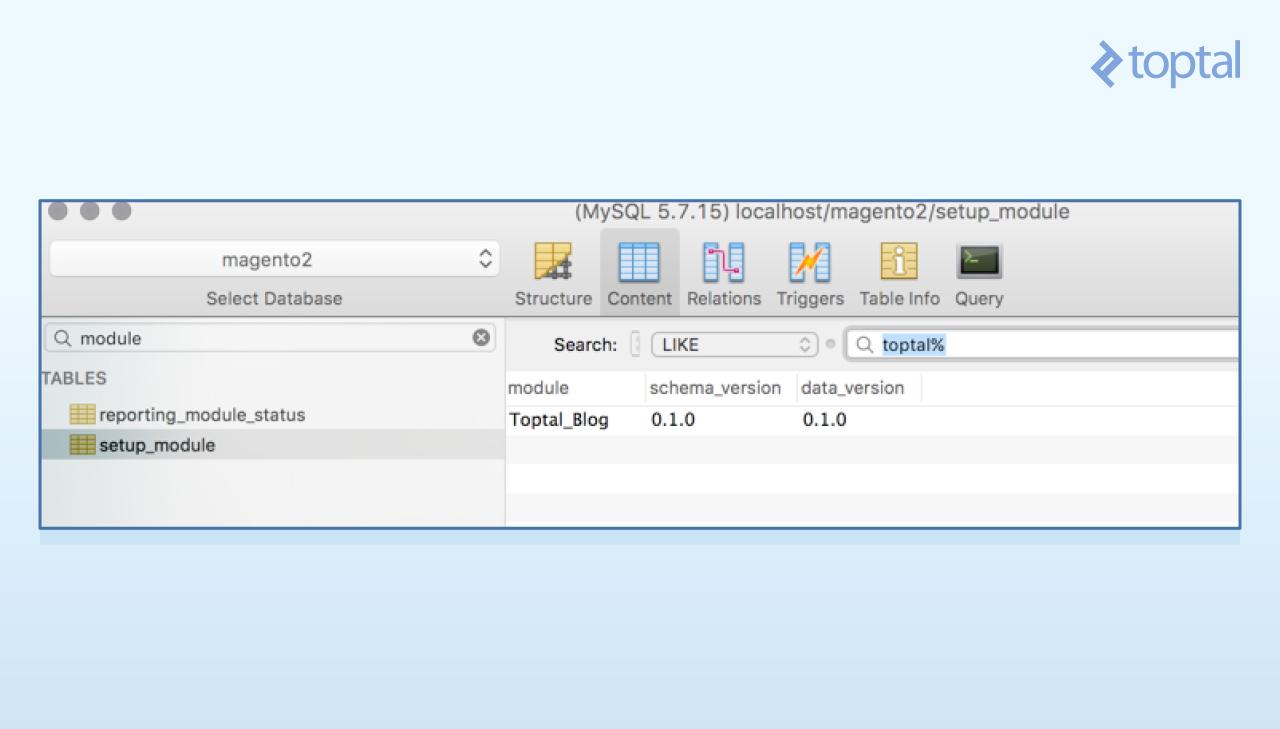
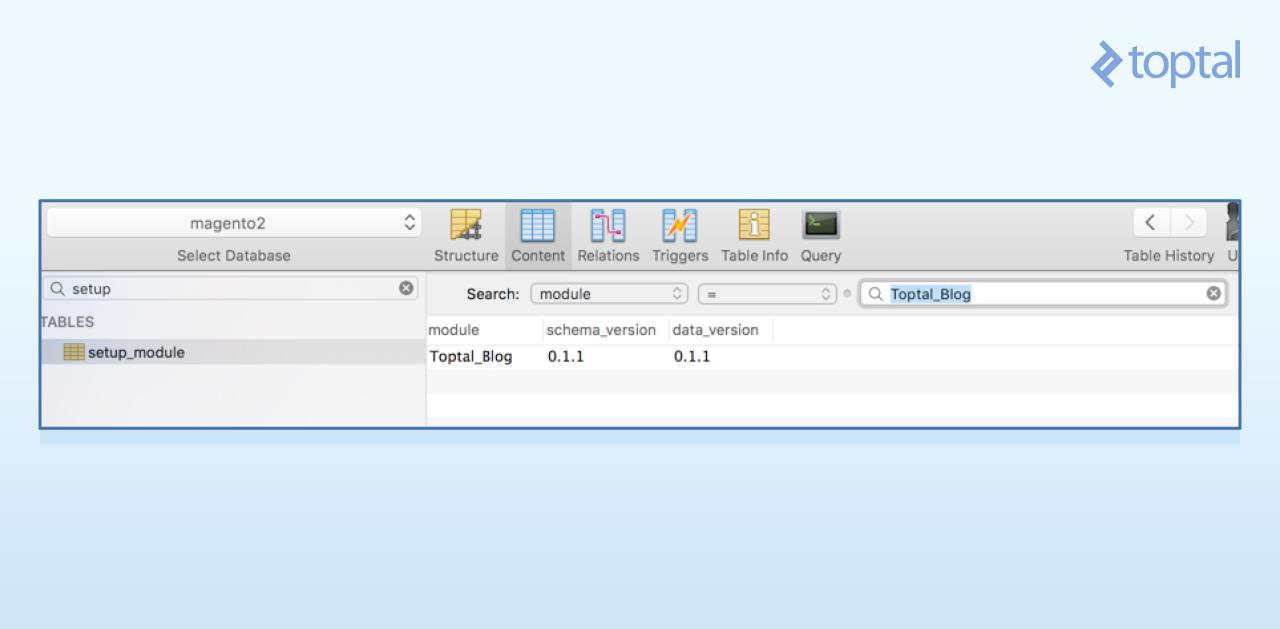
Magento keeps track of schema migrations using the setup_module table, which stores the current setup versions for each module. Whenever a module’s version changes, its migration classes are initialized. Currently, this table doesn’t reference our module. Let’s change that. From your terminal, execute:
| |
This displays a list of all modules and their executed migration scripts, including ours:
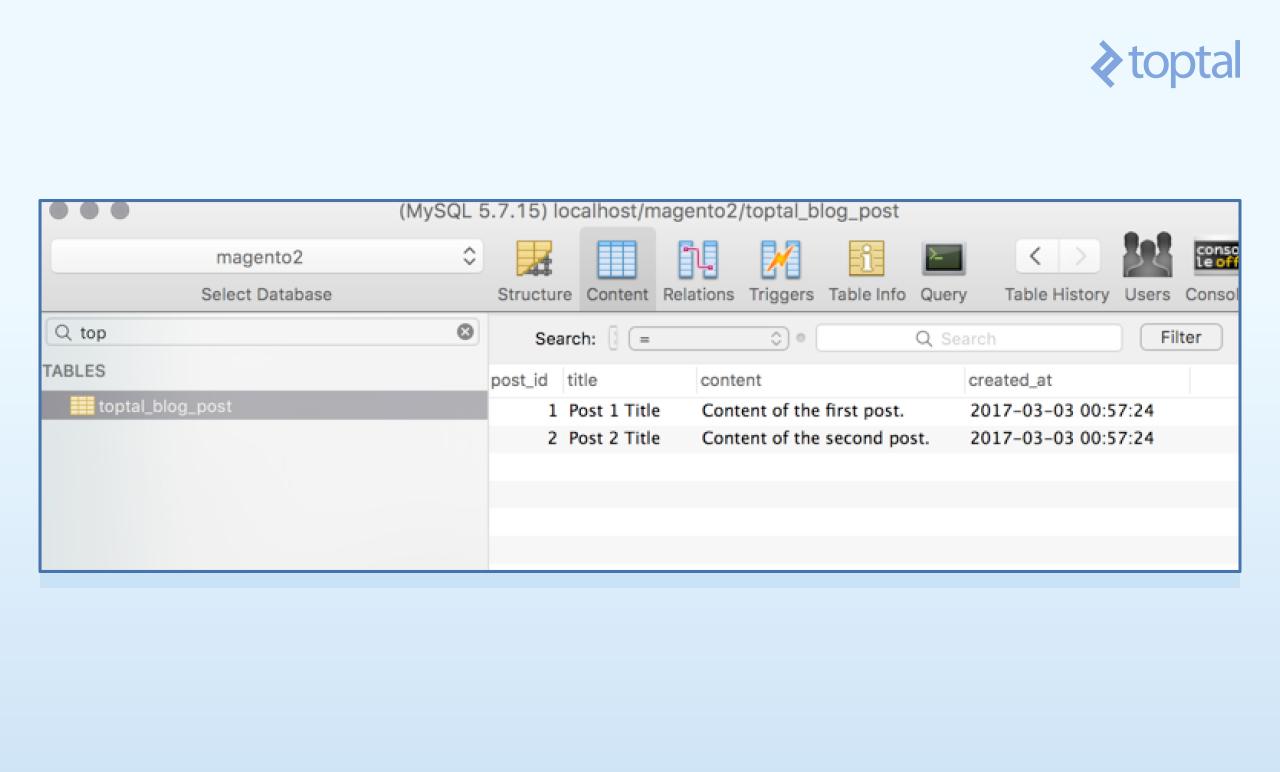
Now, using your preferred MySQL client, you can verify that the table has been created:
Additionally, the setup_module table should now include a reference to our module, its schema, and data version:
Now, let’s address schema upgrades. We’ll add some posts to our table through an upgrade to demonstrate the process. First, increment the setup_version in our etc/module.xml file:
Next, create the app/code/Toptal/Blog/Setup/UpgradeData.php file, responsible for data migrations (not schema changes):
| |
This file resembles our InstallSchema class. The key difference is that it implements UpgradeDataInterface instead of InstallSchemaInterface, and the main method is named upgrade. This method checks the currently installed module version and, if it’s lower than the target version, applies the necessary changes. In our case, we use the version_compare function to check if the current version is less than 0.1.1:
| |
The $context->getVersion() call returns 0.1.0 when the setup:upgrade CLI command is executed for the first time. Sample data is then loaded into the database, and our version is bumped to 0.1.1. To run this upgrade, execute:
| |
Check the results in the posts table:
And in the setup_module table:
While we added data to our table using the migration process, we could have modified the schema as well. The process remains the same; you would simply use the UpgradeSchemaInterface instead of UpgradeDataInterface.
Defining the Post Model
Moving up a layer, let’s implement our ViewModel and Controller. First, we’ll create the blog post ResourceModel. This simple model defines the table our Model will “connect” to and its primary key. Create the ResourceModel at app/code/Toptal/Blog/Model/ResourceModel/Post.php with the following content:
| |
Unless you need custom CRUD operations, all ResourceModel operations are handled by the parent class, AbstractDb.
We also need another ResourceModel, a Collection, responsible for querying the database for multiple posts using our ResourceModel and returning a series of instantiated and populated Models. Create the file app/code/Toptal/Blog/Model/ResourceModel/Post/Collection.php:
| |
The constructor simply specifies the Model representing the post entity throughout our code and the ResourceModel responsible for database access.
The final piece in this layer is the Post Model itself. This model should contain all attributes defined in our schema, along with any necessary business logic. Following Magento 2’s conventions, we’ll create a Data Interface that our model will extend. This interface, located at app/code/Toptal/Blog/Api/Data/PostInterface.php, should hold the table’s field names and methods for accessing them:
| |
Now, let’s implement the model at app/code/Toptal/Blog/Model/Post.php. We’ll create the methods defined in the interface, specify a cache tag using the CACHE_TAG constant, and, in the constructor, specify the ResourceModel responsible for database access.
| |
Creating Views
To define a front-end (shopping cart) application route, create the file app/code/Toptal/Blog/etc/frontend/routes.xml:
| |
Listing Posts on the Index Page
This tells Magento that our module, Toptal_Blog, handles requests to routes under http://magento2.dev/blog (note the frontName attribute of the route). Next, create the action at app/code/Toptal/Blog/Controller/Index/Index.php:
| |
Our action defines two methods:
The constructor passes the
$contextparameter to its parent and sets the$resultPageFactoryparameter as an attribute for later use. This utilizes the Dependency Injection design pattern In Magento 2, we have automatic dependency injection. During class instantiation, Magento attempts to instantiate all constructor parameters (dependencies) and inject them for you. It determines which classes to instantiate by examining the type hints, in this case,ContextandPageFactory.The
executemethod handles the action’s execution. Here, we simply instruct Magento to render the layout by returning aMagento\Framework\View\Result\Pageobject, which triggers the layout rendering process, which we’ll define shortly.
Navigating to the URL http://magento2.dev/blog/index/index should now display a blank page. We need to define the layout structure for this route, its corresponding Block (our ViewModel), and the template file to present the data to the user.
Front-end layout structures are defined under view/frontend/layout. The file name must reflect our route. Since our route is blog/index/index, the layout file will be app/code/Toptal/Blog/view/frontend/layout/blog_index_index.xml:
| |
Here, we define three crucial components of Magento’s layout structure: Blocks, Containers, and Templates.
Blocks represent the ViewModel in our MVVM architecture, acting as building blocks for our template structure.
Containers hold and output Blocks, organizing them hierarchically and providing structure during page layout processing.
Templates are PHMTL (PHP-embedded HTML) files used by a special type of Magento block. These templates can call methods of a
$blockvariable, always available in the template context. This allows you to invoke Block methods, pulling information from the ViewModel layer into the presentation.
With this understanding, let’s analyze the XML layout structure above. It instructs Magento to, when a request is made to the blog/index/index route, add a Block of type Toptal\Blog\Block\Posts to the content container and use the template Toptal_blog::post/list.phtml for rendering.
This leads us to the creation of our two remaining files. First, the Block, located at app/code/Toptal/Blog/Block/Posts.php:
| |
This class is intentionally straightforward, responsible for loading the posts to be displayed and providing a getPostUrl method to the template. However, there are a few things to note.
We haven’t explicitly defined a Toptal\Blog\Model\ResourceModel\Post\CollectionFactory class, only Toptal\Blog\Model\ResourceModel\Post\Collection. How does this work? Magento 2 automatically creates a Factory for every class you define in your module. Factories have two methods: create, which returns a new instance on each call, and get, which always returns the same instance (used to implement the Singleton pattern).
The third parameter of our Block, $data, is an optional array. Being optional and lacking a type hint, it’s not automatically injected. Importantly, optional constructor parameters must always be positioned last. For example, the constructor of our parent class, Magento\Framework\View\Element\Template, has these parameters:
| |
Since we wanted to add our CollectionFactory to the constructor parameters after extending the Template class, we had to do it before the optional parameter; otherwise, injection would fail:
| |
The getPosts method, which our template will access later, simply calls the create method from PostCollectionFactory, retrieving a new PostCollection to fetch posts from the database and send them to the response.
Finally, create the PHTML template, app/code/Toptal/Blog/view/frontend/templates/post/list.phtml:
| |
Here, the View layer accesses our ModelView ($block->getPosts()), which, in turn, utilizes a ResourceModel (the collection) to retrieve our models (Toptal\Blog\Model\Post) from the database. Remember, the $block variable is always available in templates, allowing access to the corresponding block’s methods.
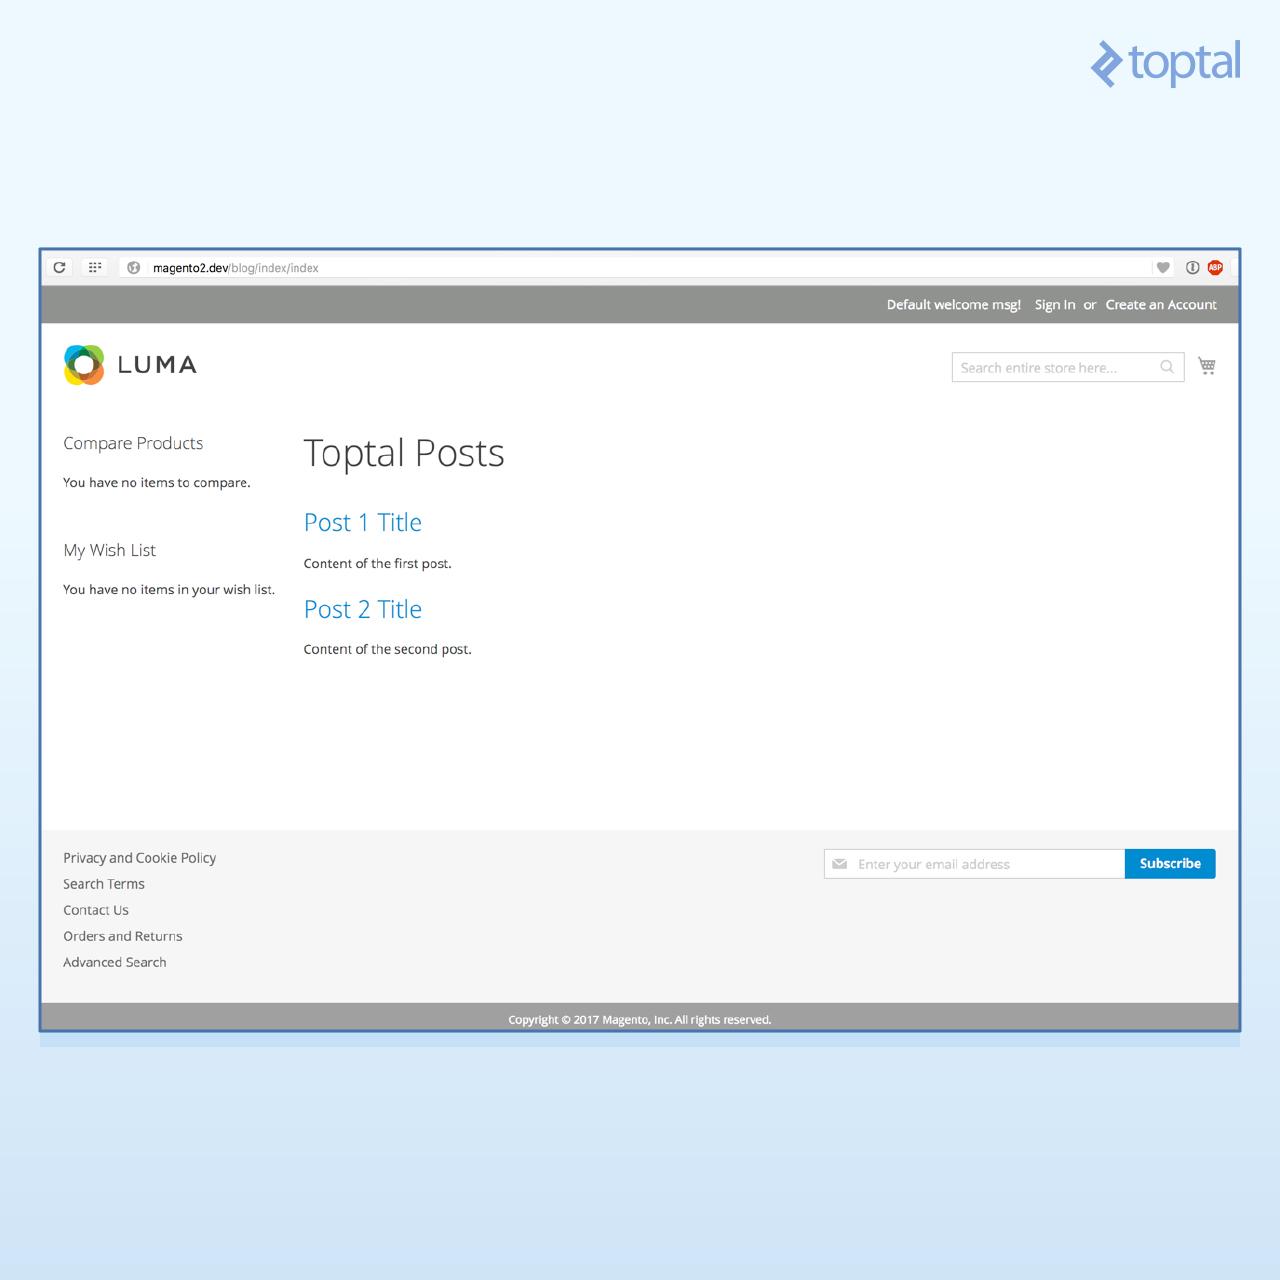
You should now see the post list by visiting our route again.
Viewing Individual Posts
Clicking a post title currently leads to a 404 error. Let’s fix that. With our existing structure, this is quite simple. We’ll create:
- A new action to handle requests to the
blog/post/viewroute - A Block to render the post
- A PHTML template for the view
- A layout file for the
blog/post/viewroute, connecting these components.
Our new action is straightforward, receiving the id parameter from the request and storing it in Magento’s core registry, a central repository for information accessible throughout a request cycle. This makes the ID available to the block later on. Create the file app/code/Toptal/Blog/Controller/Post/View.php:
| |
We’ve added the $coreRegistry parameter to our __construct, saving it as an attribute. In the execute method, we retrieve the id parameter from the request and register it using a class constant, self::REGISTRY_KEY_POST_ID, as the registry key. We’ll use this same constant in our block to reference the ID.
Next, create the block at app/code/Toptal/Blog/Block/View.php:
| |
The view block defines a protected method, _getPostId, which retrieves the post ID from the core registry. The public getPost method lazy-loads the post, throwing an exception if it doesn’t exist. While throwing an exception here might not be ideal (it displays Magento’s default error screen), we’ll keep it simple for this example.
Now, create the PHTML template, app/code/Toptal/Blog/view/frontend/templates/post/view.phtml:
| |
This template simply accesses the getPost method of our View block.
Finally, connect everything with a layout file for our new route at app/code/Toptal/Blog/view/frontend/layout/blog_post_view.xml:
| |
Like before, this adds Toptal\Blog\Block\View to the content container, using Toptal_Blog::post/view.phtml as the template.
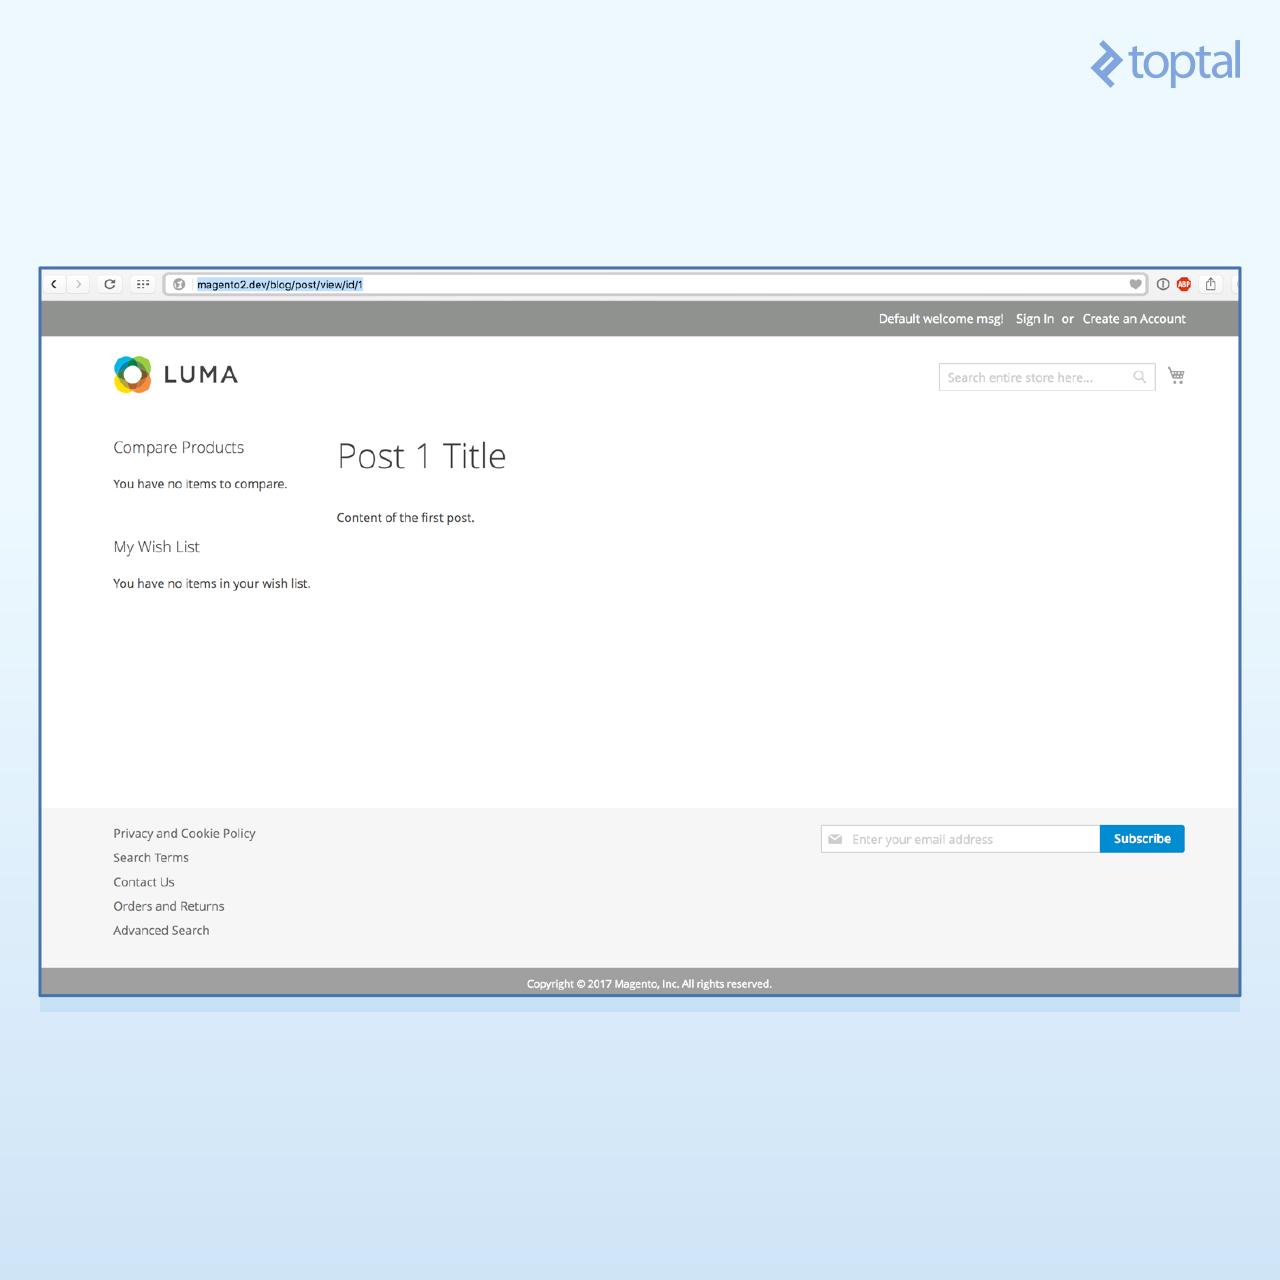
To see it in action, visit http://magento2.dev/blog/post/view/id/1 to load a post. You should see a screen similar to this:
As you can see, once the initial structure is in place, adding features becomes quite simple, and we can reuse much of our existing code.
If you’d like to test the complete module, you can find the code here.
Continuing Your Magento 2 Development Journey
Congratulations on reaching this point! You’re well on your way to becoming a Magento 2 developer. This tutorial guided you through creating a relatively advanced Magento 2 custom module. While its features are simple, we covered a lot of ground.
For the sake of brevity, some aspects were omitted, including:
- Admin edit forms and grids to manage blog content
- Blog categories, tags, and comments
- Repositories and service contracts
- Packaging modules as Magento 2 extensions
To further your knowledge, explore these resources:
- Alan Storm Blog on Magento 2 — Alan Storm’s blog offers highly educational content for learning Magento.
- Alan Kent’s Blog
- Magento documentation: The Magento 2 Dev Docs
This tutorial equipped you with a solid foundation for Magento 2 module development, a starter code example, and additional resources for further exploration. Now it’s your turn to start coding or share your thoughts in the comments.