Understanding BEM Methodology
When working on small websites, organizing styles isn’t a major concern. You create your files, write the necessary CSS, and you’re good to go. However, for larger, more intricate projects, code organization becomes essential, especially when collaborating with a team of front-end and back-end developers.

Today, numerous methodologies aim to streamline CSS code and enhance its maintainability. This article delves into one such methodology: BEM. BEM, which stands for Block Element Modifier, focuses on accelerating the development process and simplifying teamwork by structuring CSS classes into independent modules. If you’ve ever encountered a class name like header__form--search, you’ve seen BEM in action. While these class names might seem lengthy, they prioritize readability and clarity.
It’s recommended to use BEM exclusively with classes, not IDs. This is because classes permit name repetition if needed, fostering a more consistent coding structure. When structuring your website into organized modules, a consistent structure of block, element, and modifier should be followed. Each block can house multiple elements, and both blocks and elements can have multiple modifiers. Let’s break down the fundamental BEM structure with illustrative examples.
Block
In the context of your website, a block represents an object—a larger structural unit of your code. Common examples of blocks include headers, content sections, sidebars, footers, and search components. In BEM, blocks serve as the foundation for chaining CSS classes.
Consider these block examples:
- a content section
- a menu
- a search form
| |
Element
An element is a constituent of a block, responsible for a specific function. It holds significance solely within the context of its parent block:
- an article within the content section
- an item within the menu
- an input field within the search form
| |
Modifier
Modifiers enable us to represent variations of a block. A prime example from Bootstrap would be button sizes. These sizes are essentially variations of the button itself, making them modifiers:
- a featured article within the content section
- a link within the menu
- a search field with or without an icon
| |
Naming Conventions
At its core, BEM methodology aims to make CSS selector names as informative and self-explanatory as possible. The original BEM style adheres to these conventions:
Block names are typically single words like .header, but longer definitions are separated by a single hyphen -:
| |
Element names begin with a double underscore __:
| |
Modifier names begin with a single underscore _:
| |
A fundamental rule in BEM is that a modifier cannot exist independently of its owner.
Example:
| |
The modifier btn_big can only be used if header is also defined.
Incorrect example:
| |
Correct example:
| |
Beyond the original BEM styles, alternative naming schemes like Harry Roberts and CamelCase styles exist.
Harry Roberts style example:
| |
CamelCase style example:
| |
While other options are available, these two are the most prevalent. The naming convention proposed by Harry Roberts is particularly well-regarded, adhering to these rules:
- Names are written in lowercase.
- Words within BEM entity names are separated by hyphens
-. - Element names are separated from block names by double underscores
__. - Boolean modifiers are delimited by double hyphens
--. - Key-value type modifiers are not used.
This convention excels in clearly distinguishing modifier elements. In the original convention:
| |
The distinction between single and double underscores is subtle. However, double hyphens provide clear separation:
| |
BEM Across Different Formats
Beyond CSS, BEM proves valuable for organizing JSON, XML, tree files, or any format that supports nesting. Consider BEM as a methodology for structuring your UI.
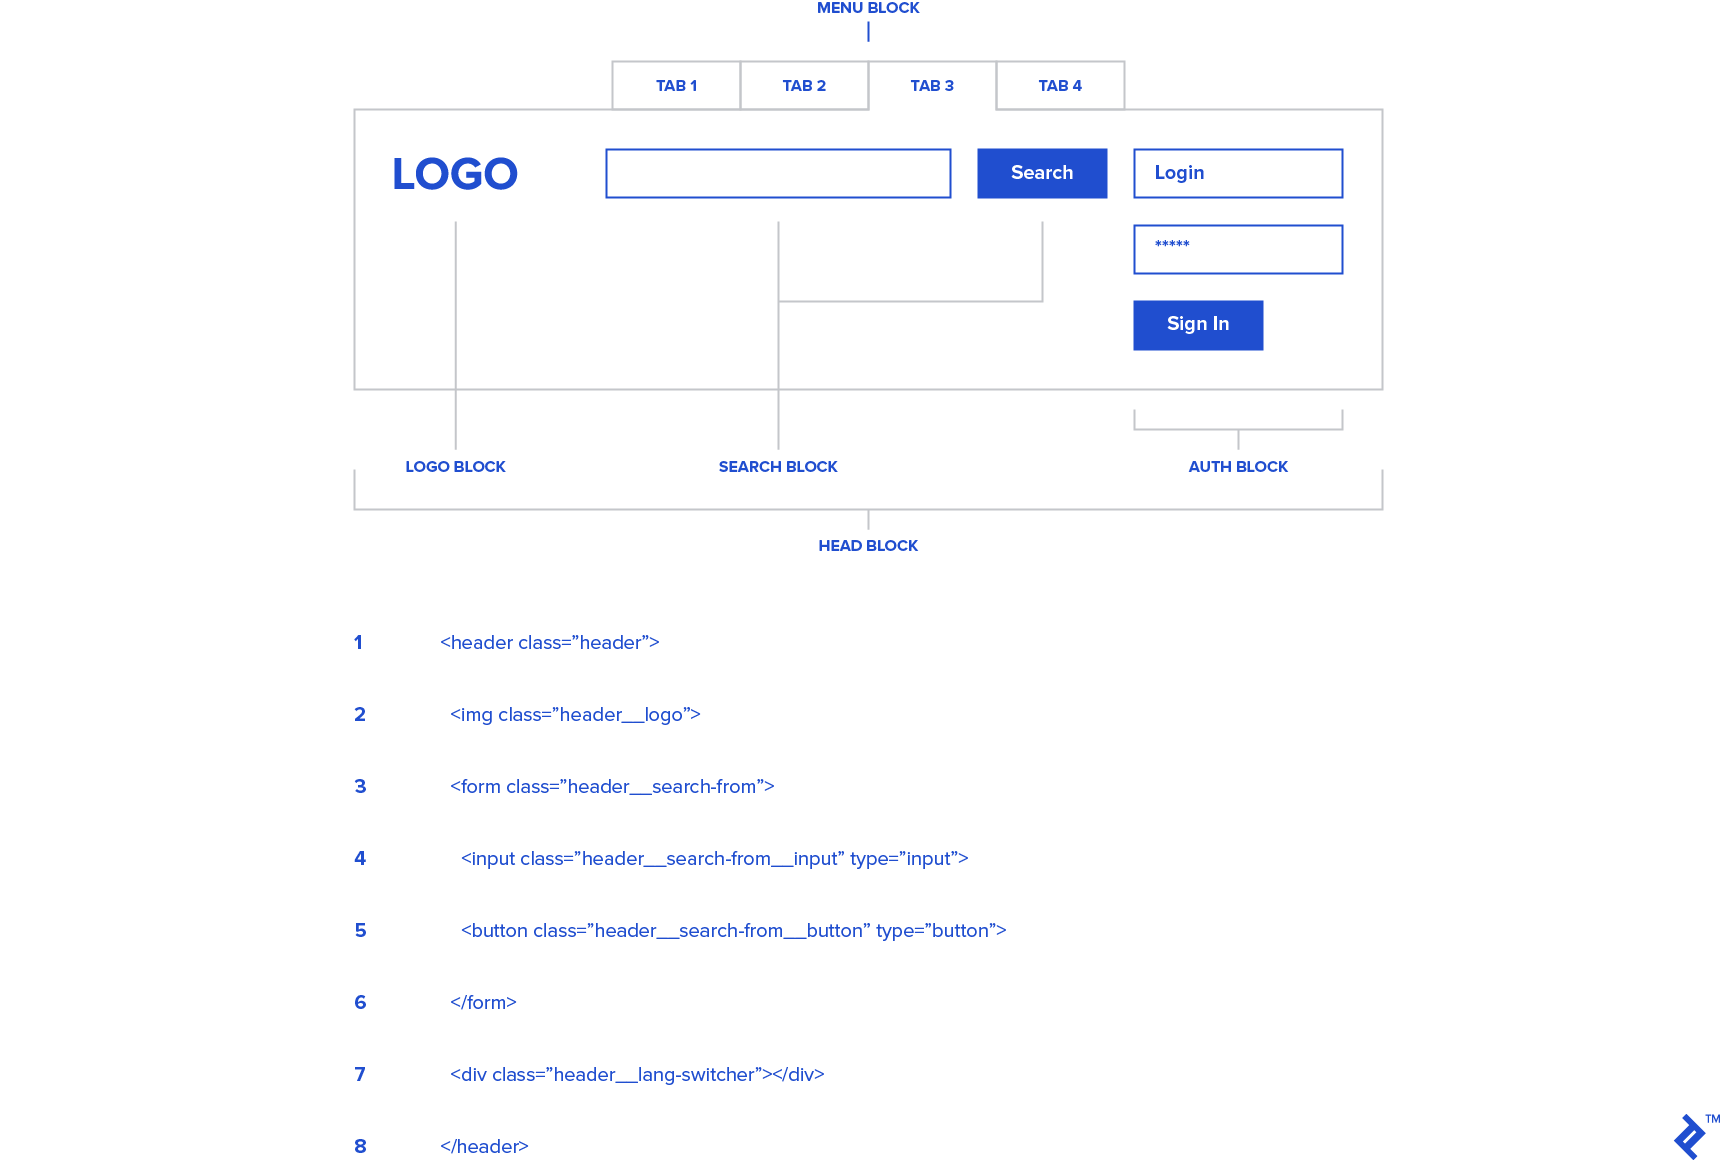
Let’s examine an HTML snippet structured using BEM:
| |
The same structure can be replicated in JSON and XML formats.
XML:
| |
JSON:
| |
File System Organization in a BEM Project
Proper file organization is crucial in BEM. Not only does BEM streamline CSS class organization and enhance their understandability, but it also promotes a highly maintainable file structure. Consider this example project using BEM file organization with SASS files:
| |
The subfolder structure within the main folder provides a clear and organized overview. This makes it incredibly easy for anyone to follow the established pattern, regardless of who’s working on the project.
Adapting BEM Projects for Different Platforms
Beyond organizing files, BEM allows for more granular control. For instance, if you’re building a responsive web project where the client requires specific blocks to appear differently on mobile and desktop, dividing your BEM folder structure based on platforms is a good practice. Here’s an example of organizing buttons for different platforms:
| |
This is merely an example of how to structure an entire project using BEM. A strict BEM file tree isn’t mandatory; you can implement BEM selectively in specific project segments. It’s not always necessary to create separate files for every element and modifier. A common approach is to create a file structure for blocks, containing declarations for their elements and modifiers.
BEM in Action
Now that you’re familiar with naming conventions, let’s see BEM in practice. Consider this HTML code:
| |
And its corresponding CSS:
| |
It’s important to note that not every instance requires a block, element, and modifier.
For example, let’s say we have a block named person. A person has legs and hands and can be either female or male. To define a male person with a right hand:
| |
This illustrates BEM’s power. We define a person whose gender acts as a modifier. Regardless of gender, a person has a hand, which is an element. Each person can have a right or left hand, again represented as modifiers.
To define a general person with a single hand:
| |
As you become more comfortable with BEM, structuring your CSS and HTML becomes intuitive.
BEM with CSS Preprocessors
CSS preprocessors have become indispensable tools, offering numerous advantages. They complement BEM methodology remarkably well.
Here’s a common example of BEM combined with SASS:
| |
This SASS code compiles into the following CSS:
| |
To further streamline your workflow, consider using handy SASS mixins for BEM:
| |
These mixins can be used like this:
| |
Producing the following CSS output:
| |
While this example is extensive, it highlights BEM’s capabilities and its suitability for both small and large-scale projects.
Initiating Your BEM Project
As explained in the official BEM documentation, the most straightforward way to begin your BEM project is to utilize existing GIT repository. Use the Git clone command:
| |
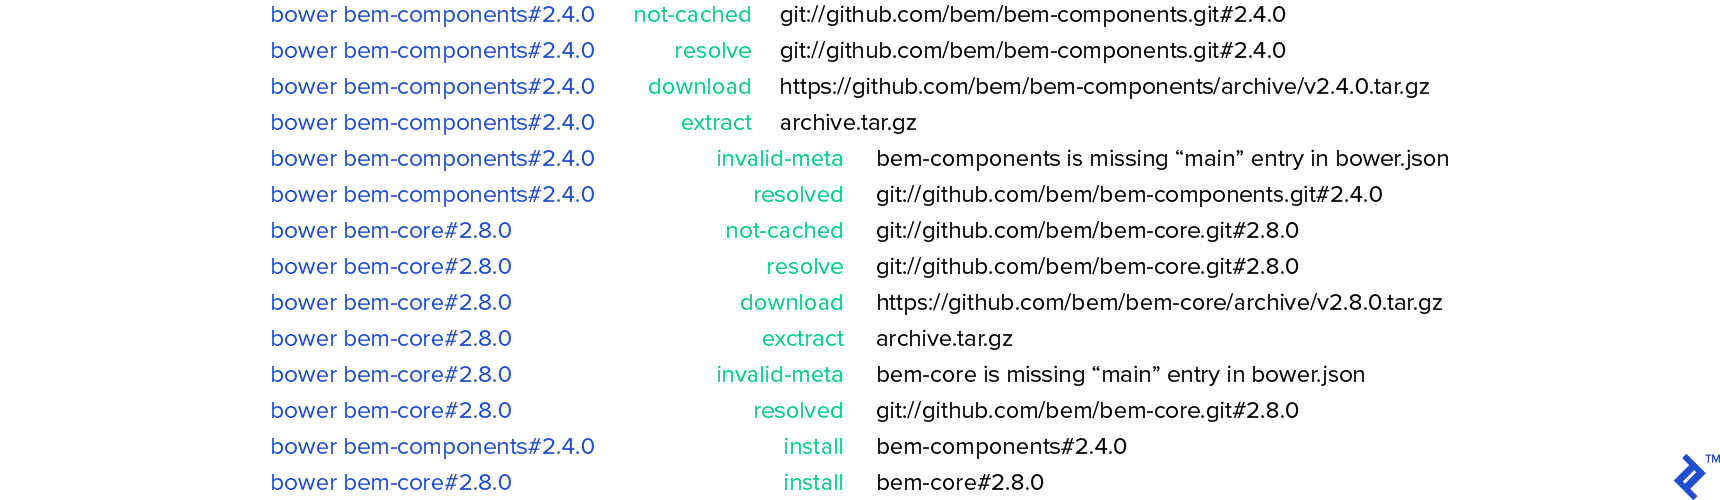
Navigate to the newly created directory and install the dependencies:
| |
This will install:
Build the project using ENB:
| |
Start the development server:
| |
You should see the following message:
| |
The server is now operational. View the results at this address:
| |
You’ll notice several pre-created elements defined in the bemjson file located here:
| |
This file generates the HTML displayed in your localhost’s index.html file. Let’s modify it to create our “Person” BEM project from the previous chapter. Replace the code in index.bemjson.js with this:
| |
This will generate the following HTML:
| |
This example uses the default BEM coding scheme provided by the framework. Numerous other commands and options are available for tasks such as creating pages, blocks, or modifying BEM HTML. Refer to the official BEM documentation for further exploration.

Advantages and Considerations
Advantages
- Maintainability: BEM excels in maintainability. No more fearing code changes in large-scale projects. BEM provides clarity on element purposes and their block contexts.
- Logical and Intuitive Class Names: Every team member can easily understand the role of an element based on its class name. BEM fosters a shared, declarative syntax.
- Elimination of Nested CSS Selectors: Each HTML element has its dedicated CSS class, making its purpose evident from its name. One selector to rule them all.
Concerns and Common Mistakes
- Excessive Nesting: Limit nesting to a maximum of two levels (parent and child).
- Block Scope Definition: Choose block scopes carefully. Starting with a block that might later have a parent block can lead to nesting issues.
- Avoiding SASS @extend: To quote Harry Roberts:
You can create a greater number of combinations in the view by not ‘tying’ classes together in Sass. The HTML has a much better paper trail in that you can see every class acting on a piece of the DOM. Your CSS stays much slimmer in that you don’t have to create new placeholder classes (or the manifest classes that combine them) every time you want to create a new piece of UI.
Conclusion
Initial reactions to BEM’s long class names might involve skepticism. However, after trying it, many developers find it indispensable. BEM enhances code maintainability, and developers new to a BEM-based project can quickly grasp the code structure.
Despite its popularity, BEM still sparks debates. Some question the necessity of long class names over nested HTML elements. While BEM isn’t mandatory, it’s widely embraced by front-end developers for its practicality.