As a machine learning engineer specializing in computer vision, I frequently utilize Flask to construct APIs and web applications. In this guide, I’ll outline practical advice and techniques for crafting a production-ready Flask application.
Our exploration encompasses these key areas:
- Configuration Management: Production applications typically progress through development, testing, and deployment stages, each necessitating distinct settings for database connections, API keys, and URLs.
- Self-Hosting with Gunicorn: While Flask includes a development server, production environments demand robust solutions like Gunicorn, a Python WSGI HTTP server, for handling client requests.
- Static File Serving and Proxying with Nginx: Gunicorn, as an application server, benefits from Nginx acting as a reverse proxy, efficiently serving static content and enabling load balancing for scalability.
- Dockerized Deployment: Containerization simplifies deployment and management. Our application will be encapsulated within Docker containers for isolation and portability.
- PostgreSQL Database Integration: Alembic will manage our database schema and migrations, while SQLAlchemy facilitates object-relational mapping.
- Celery Task Queue: Asynchronous task handling is crucial for offloading resource-intensive operations like email sending or image processing to dedicated worker processes, preventing web server bottlenecks.
Constructing the Flask Application
Let’s initiate our application’s structure and codebase. Note that this demonstration prioritizes clarity over intricate Flask application design.
Start by establishing the directory structure and a Git repository.
| |
Now, let’s populate it with code.
config/__init__.py
This module houses our lightweight configuration management system. It tailors the application’s behavior based on the APP_ENV environment variable, permitting overrides through specific environment variables.
| |
config/settings.py
Here, configuration classes align with different APP_ENV values. At runtime, __init__.py selects the appropriate class and allows environment variables to supersede defaults. This configuration object will be instrumental in initializing Flask and Celery.
| |
tasks/__init__.py
This segment handles Celery initialization, drawing settings from the config package. This structure accommodates potential Celery-specific configurations, such as task scheduling and worker timeouts.
| |
tasks/celery_worker.py
This module is dedicated to launching a Celery worker within its Docker container. It initializes the Flask application context for environment consistency, although this can be omitted if not required.
| |
api/__init__.py
Our REST API, built with Flask-Restful, is defined here. For demonstration, we’ll implement two endpoints:
/process_data: Initiates a simulated long-running Celery task, returning the task ID./tasks/<task_id>: Retrieves the status of a task using its ID.
| |
models/__init__.py
We’ll define a SQLAlchemy model for a User object and initialize the database engine. While not actively used in our demo, this ensures proper database migration and SQLAlchemy-Flask integration.
| |
Observe how UUIDs are automatically generated as primary keys.
app.py
This file contains our main Flask application logic.
| |
Key points:
- Structured logging with timestamps, log levels, and process IDs.
- Flask app creation, including API initialization and a basic “Hello, world!” route.
- An entry point for development-time execution.
wsgi.py
This module facilitates running Flask with Gunicorn:
| |
With the application code ready, we’ll proceed to Docker configuration.
Docker Containerization
Our application will be distributed across several Docker containers:
- Application Container: Serves templates and exposes API endpoints. While ideal to separate these functions in production, our demo combines them. This container runs the Gunicorn web server, communicating with Flask via WSGI.
- Celery Worker Container: Executes asynchronous tasks. Essentially the application container with a command to start Celery instead of Gunicorn.
- Celery Beat Container: Similar to the worker container, but dedicated to scheduled tasks like email confirmations.
- RabbitMQ Container: Celery requires a message broker like RabbitMQ, Redis, or Kafka for communication and task result storage.
- PostgreSQL Container: Houses our database.
Docker Compose simplifies the management of these containers. First, we’ll define a Dockerfile for our application container in the project root.
| |
This Dockerfile instructs Docker to:
- Install Python dependencies.
- Add the application code.
- Expose port 5000.
- Set the default command to launch Gunicorn, utilizing the gevent worker class for efficient asynchronous handling with Gevent. The
--workersparameter, ideally matching the server’s core count, dictates the number of worker processes.
With our application container defined, let’s create docker-compose.yml to orchestrate all containers.
| |
We’ve defined these services:
broker-rabbitmq: A RabbitMQ container with environment-based credentials.db-postgres: A PostgreSQL container with its credentials.migration: A temporary container to apply database migrations using Flask-Migrate. API containers depend on its completion.api: Our main application container.api-workerandapi-beat: Containers running Celery workers for on-demand and scheduled tasks.
The APP_ENV variable is passed to each app container during startup.
Let’s push our code to GitHub for deployment convenience.
| |
Server Setup
Assuming an AWS instance (adjust instructions for other Linux distributions) with an external IP, configured DNS, and SSL certificates, we’ll finalize our server configuration.
Security Best Practice: Configure your firewall (e.g., using iptables) to allow incoming traffic on ports 80 (HTTP), 443 (HTTPS), and 22 (SSH) only. Ensure these restrictions apply to both IPv4 and IPv6.
Dependency Installation
We’ll install Nginx, Docker, and Git:
| |
Nginx Configuration
While the default nginx.conf often suffices, we’ll create a dedicated configuration file within the conf.d directory, which Nginx automatically includes.
| |
This Flask-specific Nginx configuration features:
- SSL Enabled: Assumes valid SSL certificates, obtainable for free from providers like Let’s Encrypt.
- Canonical Domain Redirection: Redirects
www.your-site.comtoyour-site.com. - HTTPS Redirection: Enforces HTTPS connections.
- Reverse Proxy: Forwards requests to the application on port 5000.
- Static File Serving: Leverages Nginx for efficient static content delivery.
| |
After saving, reload Nginx with sudo nginx -s reload and check for errors.
GitHub Deployment Key
Creating a dedicated GitHub deployment key enhances security by avoiding the use of personal credentials and allowing for fine-grained access control.
Generate an SSH key on the server:
| |
Add the contents of ~/.ssh/id_rsa.pub as a add your public key in your GitHub account settings.
Deployment
Finally, let’s fetch the code and initiate our containers.
| |
Omitting -d (detached mode) initially can be helpful to monitor container output for errors. Use docker logs to inspect individual container logs later. Verify container status with docker ps.
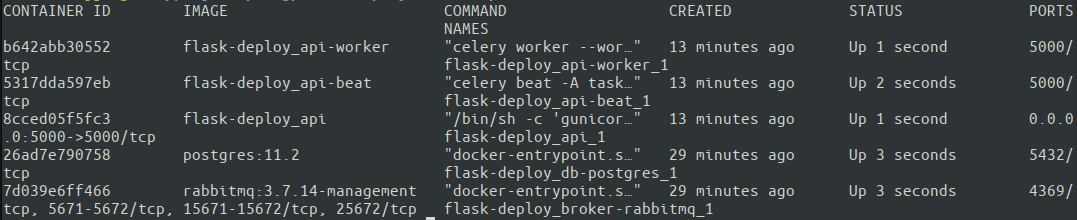
Success! All five containers are operational. Docker Compose automatically assigns names based on our docker-compose.yml configuration. Let’s test our setup from an external machine.
| |
Congratulations! We’ve successfully deployed a production-ready Flask application on AWS. The complete codebase is available on a GitHub repository.
Looking Ahead
While we’ve covered core aspects, a comprehensive production setup involves further considerations:
- Continuous Integration and Continuous Deployment (CI/CD)
- Automated Testing
- Centralized Logging
- API Monitoring and Error Tracking
- Horizontal Scaling
- Secure Credential Management
These topics are explored in resources like “Python Logging: An In-Depth Tutorial” and “How to Build an Effective Initial Deployment Pipeline” available on this blog. I encourage you to explore these areas to enhance your application’s robustness and maintainability.
Thank you for embarking on this journey towards building production-ready Flask applications!