Some time ago, a colleague introduced me to React Native. Filled with skepticism, I dismissed it as another fleeting cross-platform framework, assuming it would never succeed in practical scenarios. Little did I know how mistaken I was.
As time went on, React Native skills became highly sought after. Eager to expand my knowledge base, I decided to explore this technology. Today, I’m an enthusiastic advocate for React Native Android app development.
Cons:
- Android Studio is no longer a viable option
- React Native is not suitable for every application or feature
- Being a relatively new framework, updates can potentially impact existing codebases
- JavaScript’s lack of strict typing can be a drawback
- The reliance on a JavaScript engine for execution might lead to performance limitations
Pros:
- Gentle learning curve
- Facilitates code sharing between Android and iOS apps, requiring only minor adjustments for platform-specific experiences
- Live and hot reloading eliminate lengthy build times
- Provides native components for both major mobile platforms
- Benefits from continuous improvements
- Supported by an active and growing community
- Offers a vast collection of libraries
- Expo eliminates the need for a Mac when developing for iOS
- Reduces labor requirements—while some native Android/iOS development might still be necessary, it becomes less frequent.
While the advantages of React Native are numerous, let’s shift our focus to the main subject of this blog post. In this article, we’ll embark on building four distinct React Native Android applications:
- A simple counter application with buttons to increase and decrease the count
- An app designed to search the r/pics subreddit
- A standard login page
- An app for browsing the r/pics subreddit
IDE
As previously mentioned, traditional Android development in Android Studio isn’t feasible with React Native. We require an alternative. While React Native development is possible in virtually any modern text editor (Atom, VS Code, Sublime Text, Brackets, etc.), my preference lies with WebStorm, developed by the same company behind IntelliJ IDEA. While WebStorm is a paid application ($129 per year), a free Early Access version is available. This EAP build is generally stable. For those seeking a completely free editor, VS Code is an excellent choice, particularly with Microsoft’s dedicated React Native plugin.
Creating a New Project
Prerequisites: Android SDK, Node.js, and React Native should be installed on your system.
There are two primary methods for creating a new React Native project:
- The traditional approach, either through WebStorm’s GUI or using the terminal command:
react-native init AwesomeToptalProject - A more convenient method using Create React Native App:
create-react-native-app AwesomeToptalProject
Opting for create-react-native-app bootstraps the project with Expo. Without delving into specifics, Expo eliminates the requirement for Xcode to run the app on iOS. It simplifies client updates through expo.io’s features. However, it restricts the inclusion of native code. Consequently, for specific feature development, ejecting the app from Expo and transitioning to a regular React Native project might be necessary.
This demonstration focuses on building a React Native app for Android using the first method.
Let’s launch the project. Start an emulator or connect a physical device. If the project was created via WebStorm’s GUI, select the appropriate configuration from the drop-down menu next to the Run button in the top right corner. Choose Android and click Run or Debug. If the project was initialized through the terminal, add a new React Native configuration or use the following terminal command:
1
2
| cd AwesomeToptalProject
react-native run-android
|
If successful, you’ll be greeted with the following screen:
Structure and Basic Setup
Key elements within the project include:
android: An Android Studio project preconfigured for React Native development.ios: An Xcode project preconfigured for React Native development.node_modules: A directory containing the React Native framework and other JavaScript libraries.index.js: The entry point of our application.App.js: The initial component loaded.
Create a “src” folder at the root of the project and transfer “App.js” into it. Update the imports in “index.js” to reflect the new location of “App.js.”
1
| import App from './src/App';
|
Clear the contents of “App.js” and replace it with the following code:
1
2
3
4
5
6
7
8
9
| import React from 'react';
import {Text} from 'react-native';
export default class App extends React.Component {
render() {
return (
<Text>Hello TopTal</Text>
);
}
}
|
The code snippet above is quite simple. We define a class named “App” (inheriting from React.Component) and override the render() method, which returns a Text component. React.Component serves as the base class for building user interfaces using JSX. The export default modifier makes the “App” class accessible externally.
With this in place, we’re ready to design our layout.
Layout with Flexbox
Flexbox shares similarities with LinearLayout, but with enhanced capabilities.
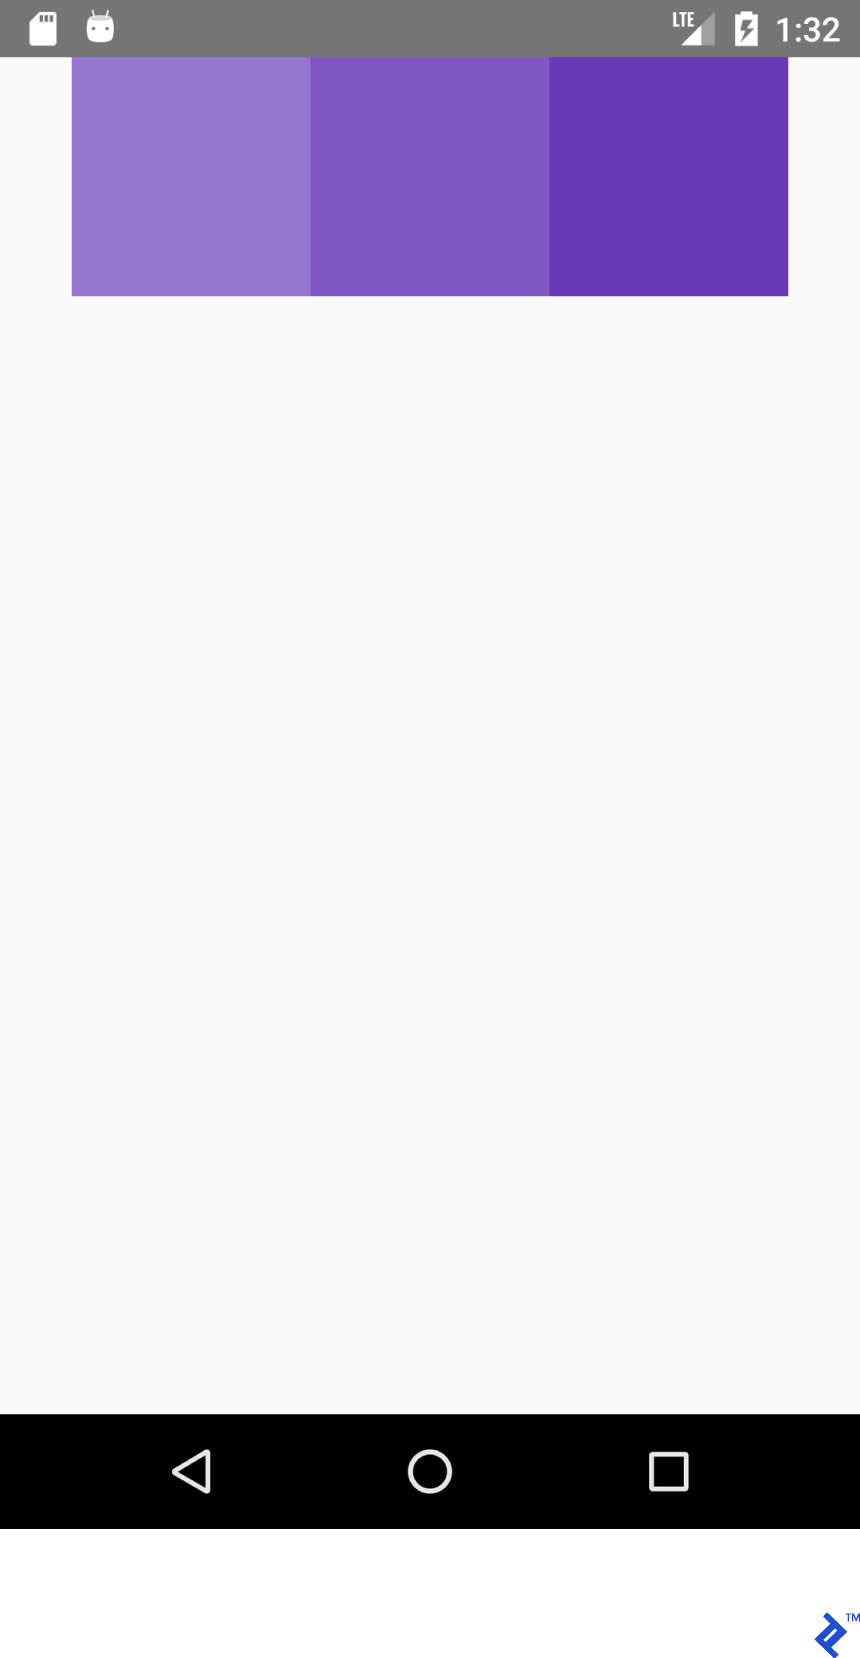
Consider the following JSX snippet:
 1
 2
 3
 4
 5
 6
 7
 8
 9
10
11
12
13
14
15
16
17
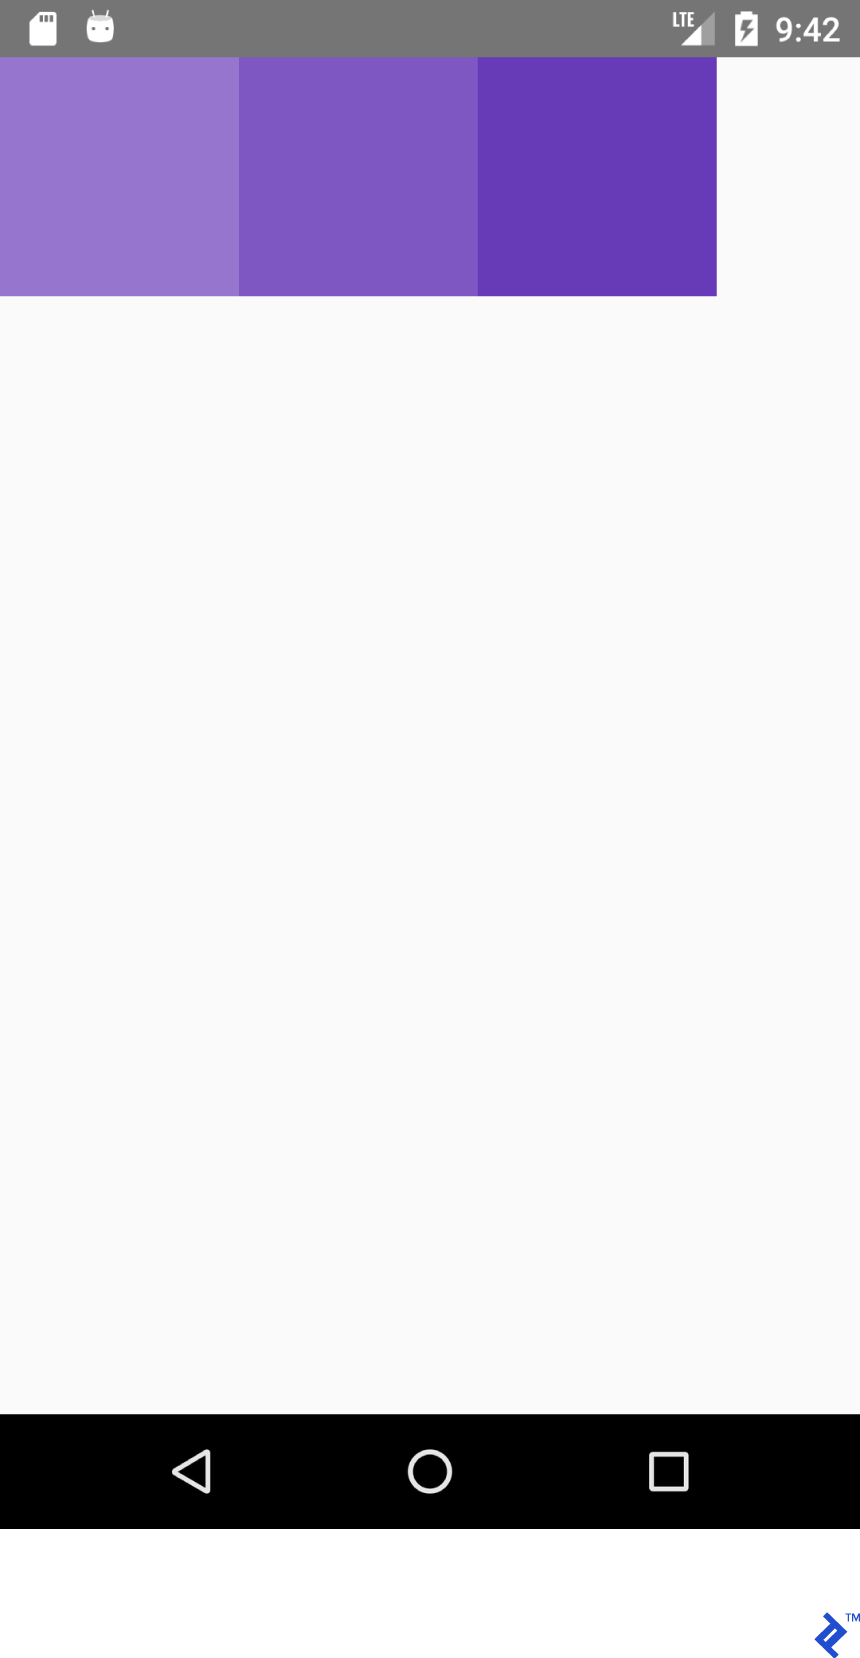
| <View style={{
flex: 1,
flexDirection: 'row'
}}>
<View style={{
width: 100, height: 100,
backgroundColor: '#9575CD'
}}/>
<View style={{
width: 100, height: 100,
backgroundColor: '#7E57C2'
}}/>
<View style={{
width: 100, height: 100,
backgroundColor: '#673AB7'
}}/>
</View>
|
It generates this layout:
Conversely, this XML code:
 1
 2
 3
 4
 5
 6
 7
 8
 9
10
11
12
13
14
15
16
17
| <LinearLayout
android:layout_width="match_parent"
android:layout_height="match_parent"
android:orientation="horizontal">
<View
android:layout_width="100dp"
android:layout_height="100dp"
android:background="#9575CD" />
<View
android:layout_width="100dp"
android:layout_height="100dp"
android:background="#7E57C2" />
<View
android:layout_width="100dp"
android:layout_height="100dp"
android:background="#673AB7" />
</LinearLayout>
|
Produces this:
Notice the resemblance in structure between JSX and Android XML. Let’s create a quick reference guide for layouts that exhibit similar visual representation in both JSX and Android XML.
Important: While the visual output might be comparable, the functionalities may differ. This guide is intended to provide a basic understanding of React Native’s layout system for those familiar with Android. For in-depth information, refer to official guide.
Let’s examine this JSX property:
Its counterpart in Android XML would be:
1
2
| android:layout_width="match_parent"
android:layout_height="match_parent"
|
The JSX snippet below:
1
2
3
4
5
6
7
8
9
10
11
12
| <View style={{flex: 1,
flexDirection: 'row'}}>
<View style={{
width: 100, height: 100,
backgroundColor: '#9575CD'}}/>
<View style={{
width: 100, height: 100,
backgroundColor: '#7E57C2'}}/>
<View style={{
width: 100, height: 100,
backgroundColor: '#673AB7'}}/>
</View>
|
And this XML code:
1
2
3
4
5
6
7
8
9
10
11
12
13
14
15
16
17
| <LinearLayout
android:layout_width="match_parent"
android:layout_height="match_parent"
android:orientation="horizontal">
<View
android:layout_width="100dp"
android:layout_height="100dp"
android:background="#9575CD" />
<View
android:layout_width="100dp"
android:layout_height="100dp"
android:background="#7E57C2" />
<View
android:layout_width="100dp"
android:layout_height="100dp"
android:background="#673AB7" />
</LinearLayout>
|
Both result in this output:
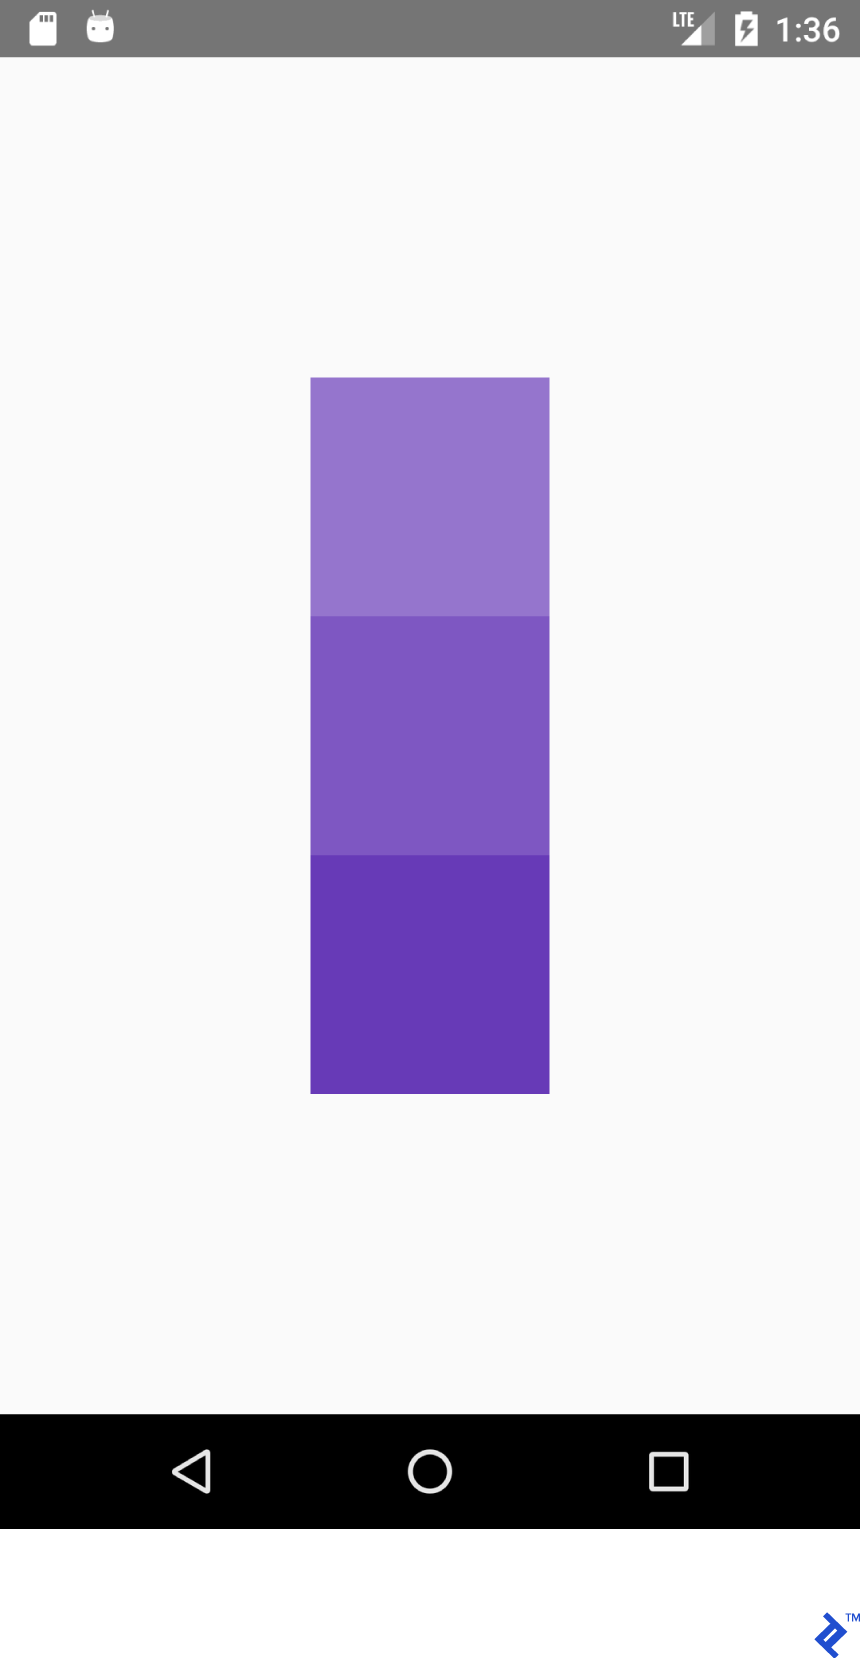
Similarly, this JSX:
 1
 2
 3
 4
 5
 6
 7
 8
 9
10
11
12
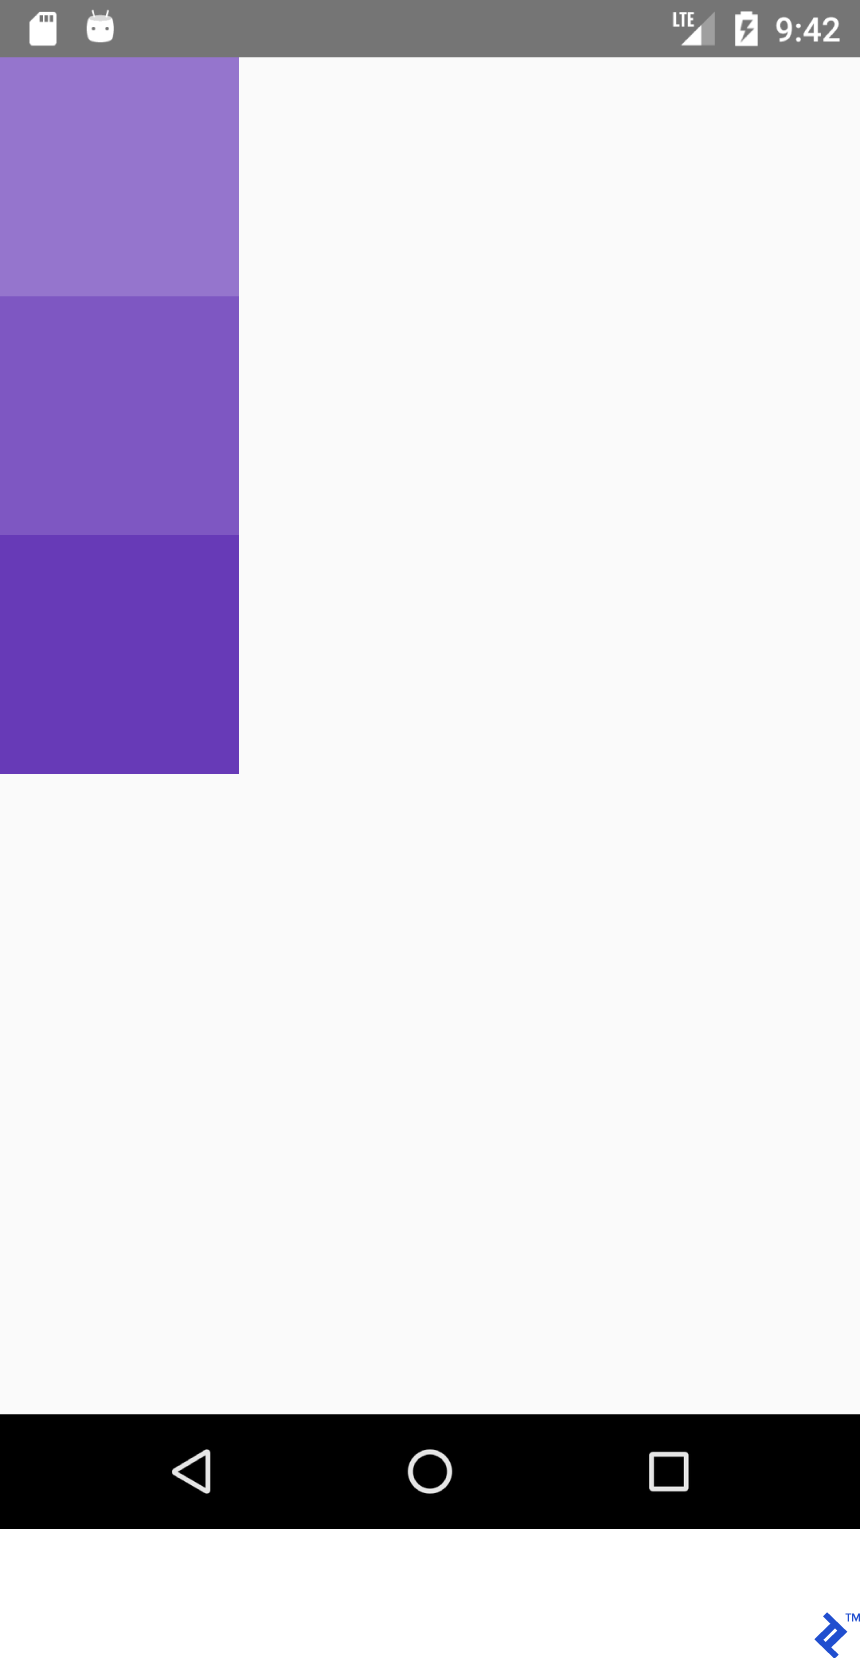
| <View style={{flex: 1,
flexDirection: 'column'}}>
<View style={{
width: 100, height: 100,
backgroundColor: '#9575CD'}}/>
<View style={{
width: 100, height: 100,
backgroundColor: '#7E57C2'}}/>
<View style={{
width: 100, height: 100,
backgroundColor: '#673AB7'}}/>
</View>
|
And this XML:
 1
 2
 3
 4
 5
 6
 7
 8
 9
10
11
12
13
14
15
16
17
| <LinearLayout
android:layout_width="match_parent"
android:layout_height="match_parent"
android:orientation="vertical">
<View
android:layout_width="100dp"
android:layout_height="100dp"
android:background="#9575CD" />
<View
android:layout_width="100dp"
android:layout_height="100dp"
android:background="#7E57C2" />
<View
android:layout_width="100dp"
android:layout_height="100dp"
android:background="#673AB7" />
</LinearLayout>
|
Produce this:
Achieving the desired positioning within a container often involves a combination of flexDirection, alignItems, and justifyContent properties.
This JSX code:
 1
 2
 3
 4
 5
 6
 7
 8
 9
10
11
12
13
| <View style={{flex: 1,
flexDirection: 'column',
alignItems: 'center'}}>
<View style={{
width: 100, height: 100,
backgroundColor: '#9575CD'}}/>
<View style={{
width: 100, height: 100,
backgroundColor: '#7E57C2'}}/>
<View style={{
width: 100, height: 100,
backgroundColor: '#673AB7'}}/>
</View>
|
Corresponds to this XML:
 1
 2
 3
 4
 5
 6
 7
 8
 9
10
11
12
13
14
15
16
17
18
| <LinearLayout
android:layout_width="match_parent"
android:layout_height="match_parent"
android:gravity="center_horizontal"
android:orientation="vertical">
<View
android:layout_width="100dp"
android:layout_height="100dp"
android:background="#9575CD" />
<View
android:layout_width="100dp"
android:layout_height="100dp"
android:background="#7E57C2" />
<View
android:layout_width="100dp"
android:layout_height="100dp"
android:background="#673AB7" />
</LinearLayout>
|
And yields this layout:
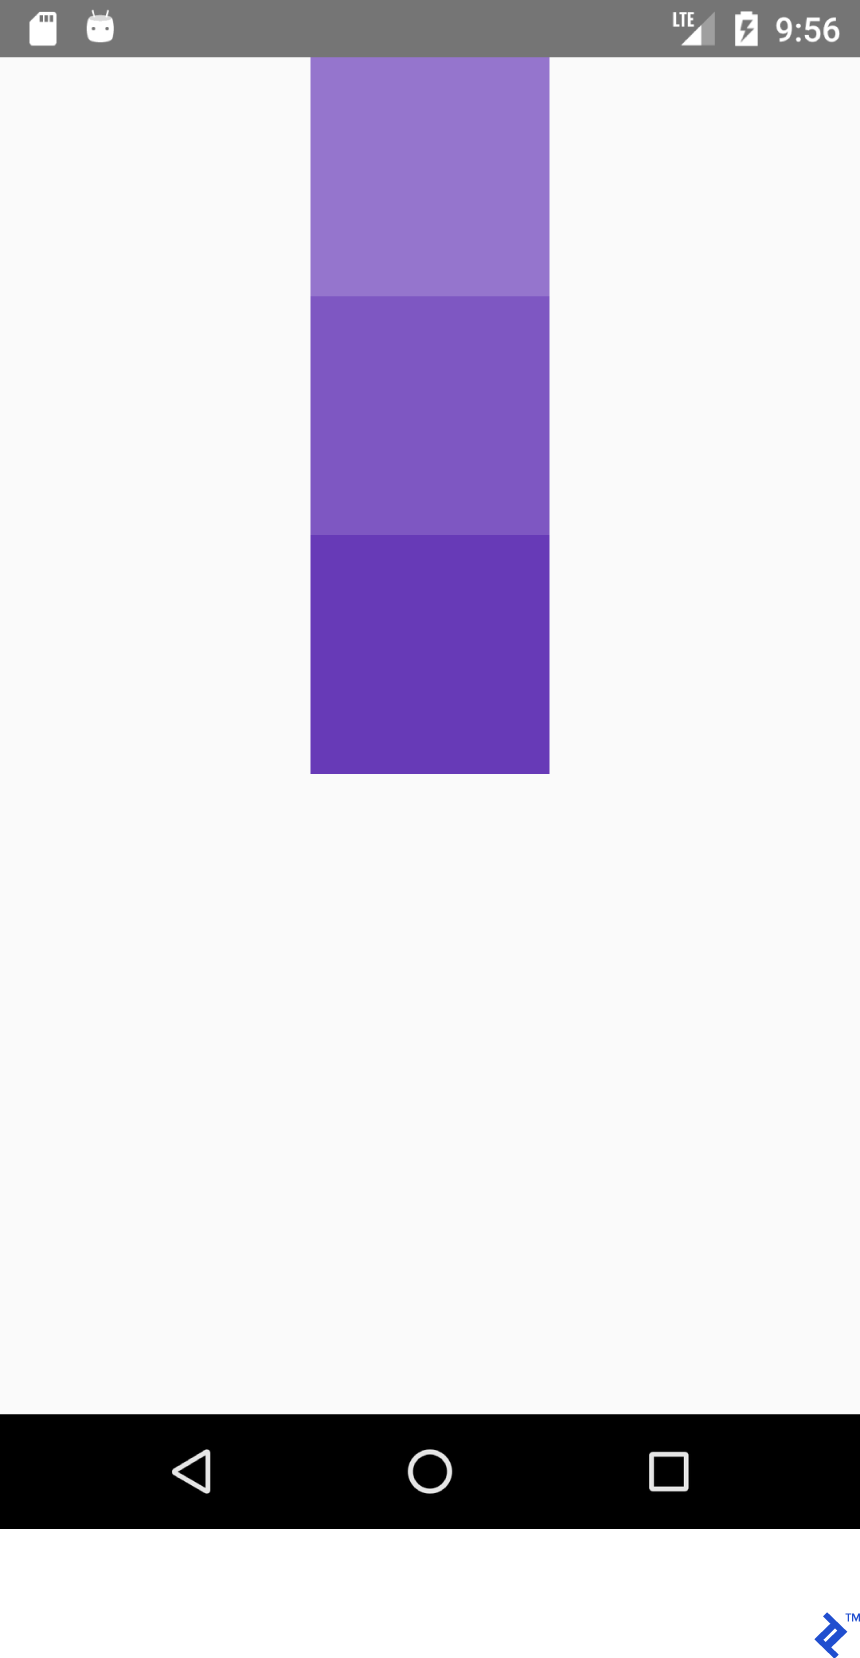
This JSX:
 1
 2
 3
 4
 5
 6
 7
 8
 9
10
11
12
13
| <View style={{flex: 1,
flexDirection: 'column',
justifyContent: 'center'}}>
<View style={{
width: 100, height: 100,
backgroundColor: '#9575CD'}}/>
<View style={{
width: 100, height: 100,
backgroundColor: '#7E57C2'}}/>
<View style={{
width: 100, height: 100,
backgroundColor: '#673AB7'}}/>
</View>
|
And this XML:
 1
 2
 3
 4
 5
 6
 7
 8
 9
10
11
12
13
14
15
16
17
18
| <LinearLayout
android:layout_width="match_parent"
android:layout_height="match_parent"
android:gravity="center_vertical"
android:orientation="vertical">
<View
android:layout_width="100dp"
android:layout_height="100dp"
android:background="#9575CD" />
<View
android:layout_width="100dp"
android:layout_height="100dp"
android:background="#7E57C2" />
<View
android:layout_width="100dp"
android:layout_height="100dp"
android:background="#673AB7" />
</LinearLayout>
|
Generate this:
This JSX:
 1
 2
 3
 4
 5
 6
 7
 8
 9
10
11
12
13
| <View style={{flex: 1,
flexDirection: 'row',
justifyContent: 'center'}}>
<View style={{
width: 100, height: 100,
backgroundColor: '#9575CD'}}/>
<View style={{
width: 100, height: 100,
backgroundColor: '#7E57C2'}}/>
<View style={{
width: 100, height: 100,
backgroundColor: '#673AB7'}}/>
</View>
|
And this XML:
 1
 2
 3
 4
 5
 6
 7
 8
 9
10
11
12
13
14
15
16
17
18
| <LinearLayout
android:layout_width="match_parent"
android:layout_height="match_parent"
android:gravity="center_horizontal"
android:orientation="horizontal">
<View
android:layout_width="100dp"
android:layout_height="100dp"
android:background="#9575CD" />
<View
android:layout_width="100dp"
android:layout_height="100dp"
android:background="#7E57C2" />
<View
android:layout_width="100dp"
android:layout_height="100dp"
android:background="#673AB7" />
</LinearLayout>
|
Produce this:
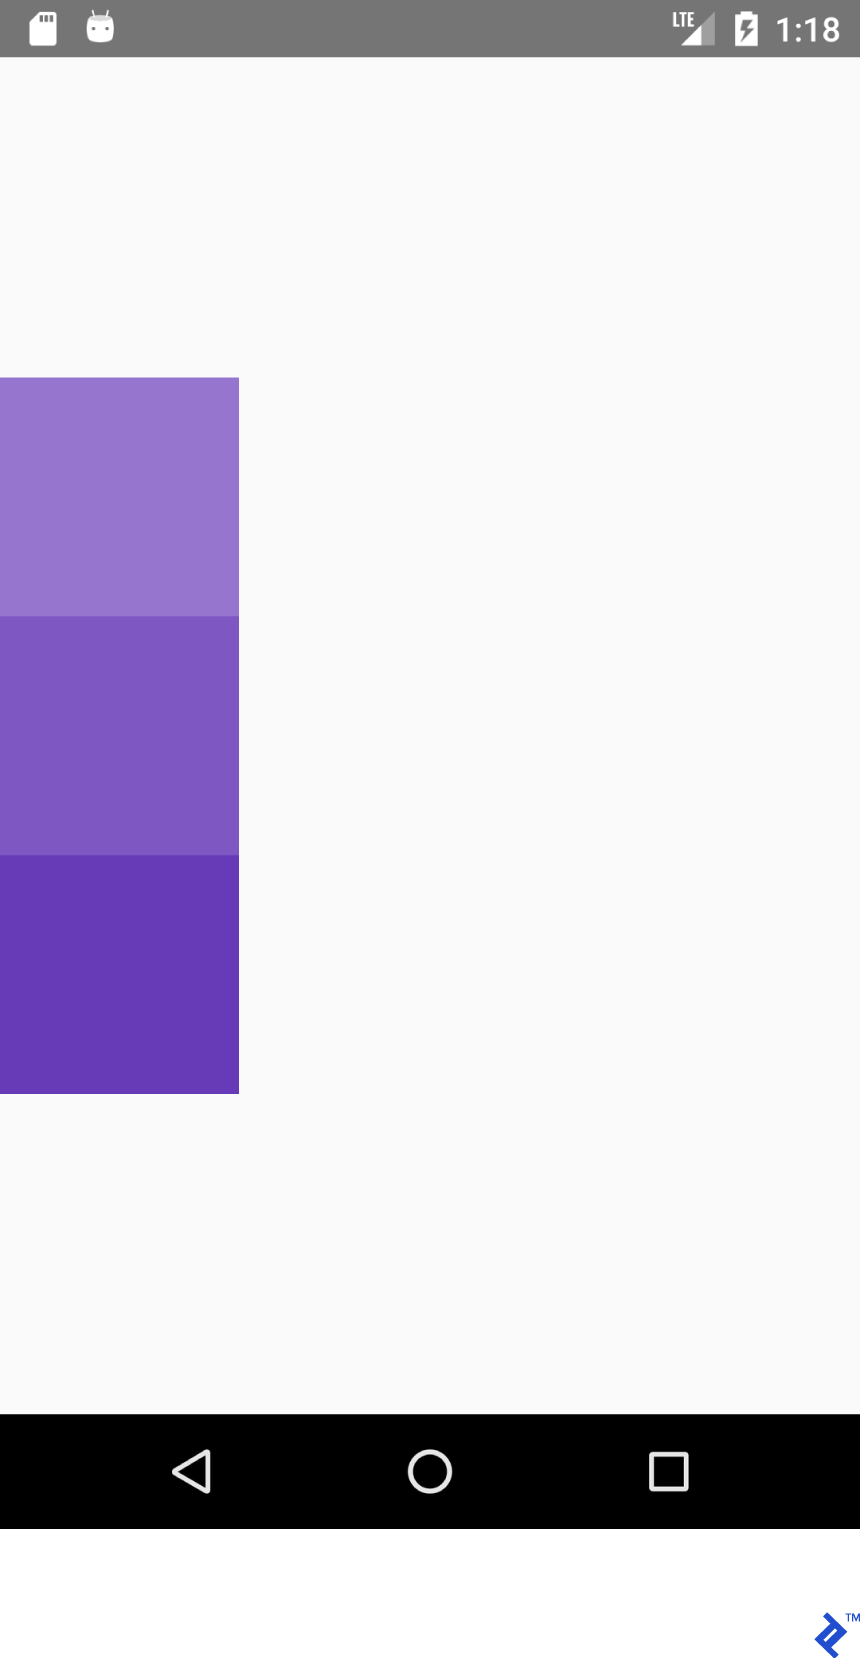
Lastly, this JSX:
 1
 2
 3
 4
 5
 6
 7
 8
 9
10
11
12
13
14
| <View style={{flex: 1,
flexDirection: 'row',
justifyContent: 'center',
alignItems: 'center'}}>
<View style={{
width: 100, height: 100,
backgroundColor: '#9575CD'}}/>
<View style={{
width: 100, height: 100,
backgroundColor: '#7E57C2'}}/>
<View style={{
width: 100, height: 100,
backgroundColor: '#673AB7'}}/>
</View>
|
And this XML:
 1
 2
 3
 4
 5
 6
 7
 8
 9
10
11
12
13
14
15
16
17
18
| <LinearLayout
android:layout_width="match_parent"
android:layout_height="match_parent"
android:gravity="center"
android:orientation="vertical">
<View
android:layout_width="100dp"
android:layout_height="100dp"
android:background="#9575CD" />
<View
android:layout_width="100dp"
android:layout_height="100dp"
android:background="#7E57C2" />
<View
android:layout_width="100dp"
android:layout_height="100dp"
android:background="#673AB7" />
</LinearLayout>
|
Result in this layout:
Key takeaway: With flexDirection: 'row', alignItems operates along the Y-axis, and justifyContent governs the X-axis. This behavior is reversed for flexDirection: 'column', where justifyContent affects the Y-axis, and alignItems manages the X-axis.
| justifyContent: 'flex-start' | gravity="start|left" |
| alignItems: 'flex-start' | gravity="start|left" |
| justifyContent: 'flex-end' | gravity="end|right" |
| alignItems: 'flex-end' | gravity="end|right" |
Experiment by modifying the value of justifyContent to 'space-around', 'space-between', and 'space-evenly'.
State Management
In React, the state variable is used to manage application state. Any update to the state triggers a re-rendering of the component (specifically, the render() method is called).
Paste the following code into your “App.js” file:
 1
 2
 3
 4
 5
 6
 7
 8
 9
10
11
12
13
14
15
16
17
18
19
20
21
22
23
24
25
26
27
28
29
30
31
32
33
34
35
36
37
38
39
40
41
42
43
44
45
46
47
48
49
| import React from 'react';
import {Button, Text, View} from 'react-native';
export default class App extends React.Component {
/*
Initialize state object
with variable 'number'
set to 0 and variable name
with value of empty string
*/
state = {number: 0};
render() {
return (
<View style={{
flexDirection: 'row',
justifyContent: 'space-between',
alignItems: 'center',
flex: 1,
padding: 20
}}>
<Button title='Decrement'
color='#e57373'
onPress={() => this.decrement()}/>
<Text>
{/*
Text will be automatically
updated whenever state.number
has changed value
*/}
Value = {this.state.number}
</Text>
<Button title='Increment'
color='#64B5F6'
{/*
Set listener for click
*/}
onPress={() => this.increment()}/>
</View>
);
}
//Declaration of decrement function
decrement() {
//To update the state we need invoke this.setState
//with new value for variable 'number'
this.setState({number: this.state.number - 1});
}
increment() {
this.setState({number: this.state.number + 1});
}
}
|
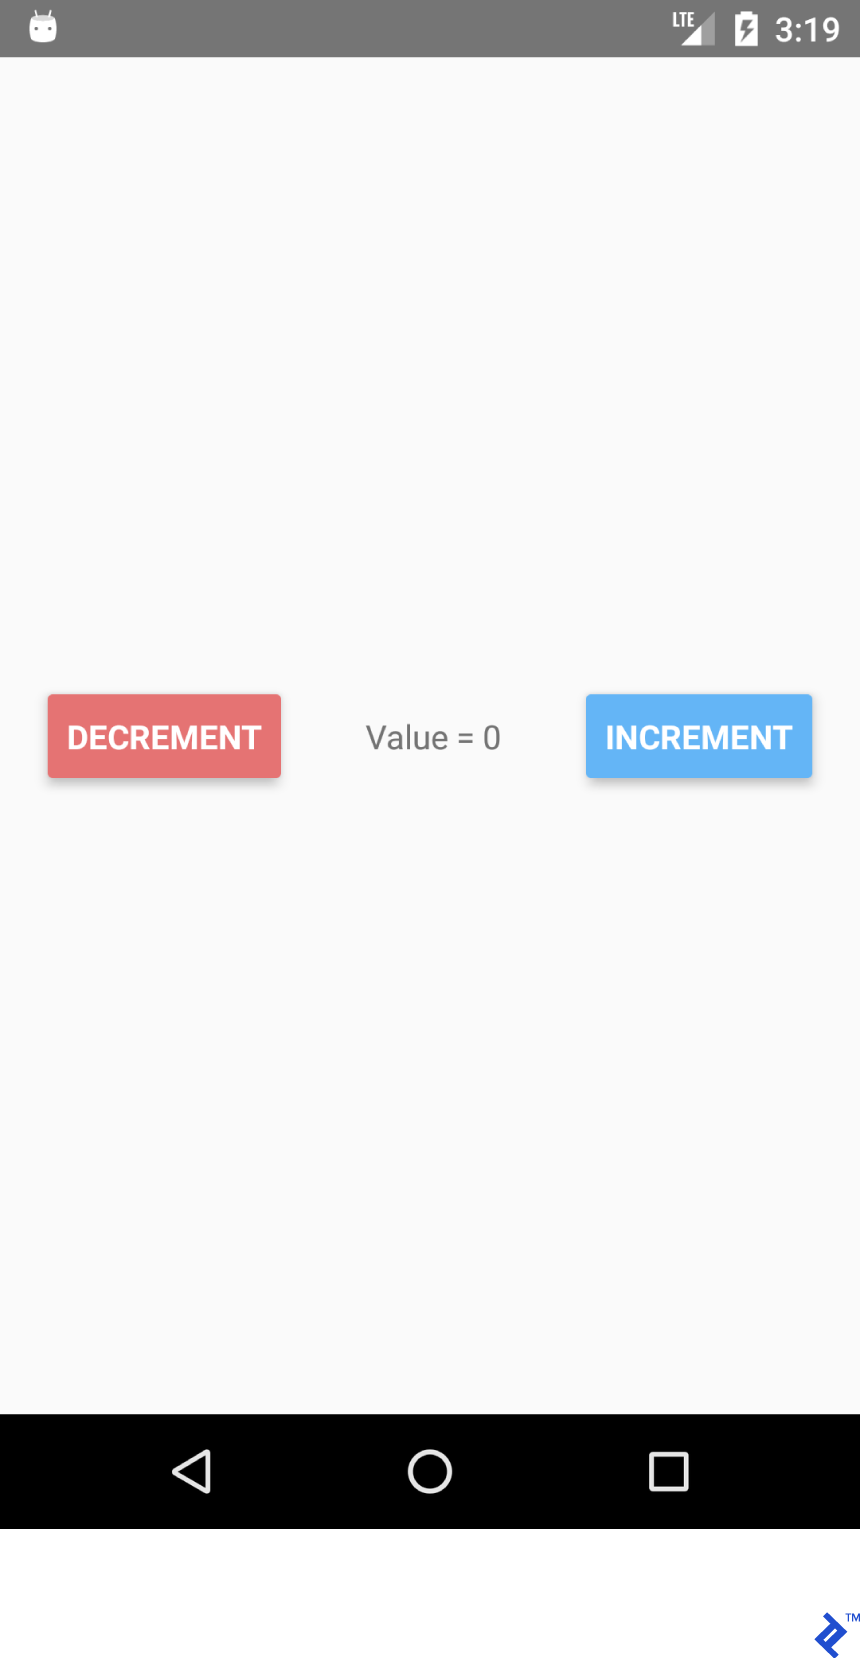
Clicking the DECREMENT and INCREMENT buttons dynamically updates the displayed text. There’s no need to manually set the text using something like textView.setText("Value " + number).
State management offers several advantages:
- Value retrieval is straightforward—you always have a clear path to access specific variable values.
- Data is not tightly coupled with specific widgets.
- Multiple widgets can depend on and react to changes in a common value.
Building a Search App for /r/pics
Having covered the basics, let’s tackle a more complex project: a search app for Reddit’s /r/pics subreddit. Reddit provides a user-friendly JSON API, simplifying our task.
React Native comes with a built-in Fetch API. However, given the familiarity and ease of use of Retrofit in the Android world, we’ll opt for Axios in this example. Install Axios using the terminal with:
yarn add axios (preferred)
or
npm install axios
Import necessary modules:
1
2
3
4
5
6
7
8
9
10
| import React from 'react';
import {
TextInput, View, Text, Image,
ActivityIndicator, Platform, StyleSheet
} from 'react-native';
import axios from 'axios';
TextInput = EditText,
ActivityIndicator = ProgressBar
Platform - Platform detecting module
StyleSheet - Module for creating stylesheets and moving them away from JSX
|
Create the main component class:
1
2
| export default class App extends React.Component {
}
|
Initialize the component’s state. We’ll need the following:
loading: To indicate when a network request is in progress.error: To display any errors encountered during API calls.imgUrl: To store the URL of the fetched image.text: To store the user’s search query.
1
| state = {text: '', loading: false, error: null, imgUrl: null};
|
Add the JSX structure for the layout. We’ll have a vertical layout containing TextInput and Image components.
 1
 2
 3
 4
 5
 6
 7
 8
 9
10
11
12
13
14
15
16
17
18
19
20
21
22
23
24
25
26
27
28
29
| render() {
return (
//Predefined style. See below
<View style={styles.containerStyle}>
{/*
returnKeyType ~ imeOptions
onSubmitEditing ~ et.OnEditorActionListener
*/}
<TextInput
style={styles.textInputStyle}
placeholder="Enter text to search an image"
returnKeyType='search'
autoFocus={true}
onChangeText={(text) => this.setState({text})}
onSubmitEditing={() => this.searchPicture()}/>
{/*
Render error Image component
if this.state.imgUrl is
not equal to null
*/}
{
this.state.imgUrl &&
<Image
source={{uri: this.state.imgUrl}}
style={{flex: 1}}/>
}
</View>
);
}
|
New elements introduced:
1
2
3
4
5
6
7
8
| onChangeText={(text) => this.setState({text})}
onSubmitEditing={() => this.searchPicture()}
{
this.state.imgUrl &&
<Image
source={{uri: this.state.imgUrl}}
style={{flex: 1}}/>
}
|
The first method mirrors the behavior of Android’s EditText with a TextWatcher. React Native’s implementation is arguably more elegant.
The second method is triggered when the return key is pressed on the keyboard, similar to et.OnEditorActionListener, after which it invokes searchPicture().
The image is rendered conditionally when imgUrl is not null or undefined, as the && operator doesn’t evaluate the second operand if the first is falsy.
You might wonder why this.state.imgUrl is initially set to false. In JavaScript, when using logical operators, any value other than '' (empty string), 0, false, null, or undefined is considered truthy. Hence, there’s no need for explicit checks beyond these values.
1
2
3
4
5
6
7
8
9
10
11
12
13
14
15
16
17
18
19
20
21
22
| searchPicture() {
//Default state
this.setState({loading: true, error: null, imgUrl: null});
axios.get('https://www.reddit.com/r/pics/search.json', {
params: { //the get param map
restrict_sr: 'on', //search only /r/pics
limit: 1, //limit to one search item
sort: 'new', //sort by creation date
q: this.state.text //our search query
}
}).then(response => { //promise is resolved and 'then' block is triggered
//set state with new values
this.setState({
imgUrl: response.data.data.children[0]
.data.preview.images[0].source.url,
error: null, loading: false
})
}).catch(error => {//Some error occurred
//set error
this.setState({error: error.message, loading: false, imgUrl: null})
})
}
|
The application should now function as intended. Enter a search term and press enter to fetch and display a relevant image.
To handle loading states and display potential errors, add the following code snippet after the Image component:
1
2
3
4
5
6
7
8
9
10
11
12
13
14
15
| {
//Separate method
this.renderProgress()
}
{/*
Render error Text component
if this.state.error is
not equal to null
*/}
{
this.state.error &&
<Text style={{margin: 16, color: 'red'}}>
{this.state.error}
</Text>
}
|
For better organization, consider moving the rendering logic of these components outside the main render() method:
1
2
3
4
5
6
7
8
9
10
11
12
13
14
| renderProgress() {
//If this.state.loading is true
//return View containing a progressbar
//View takes style array
if (this.state.loading === true) {
return (
<View style={
[styles.containerStyle,
{justifyContent: 'center'}]}>
<ActivityIndicator color='#e57373'/>
</View>
);
}
}
|
Finally, let’s add styling. Place these style definitions outside the “App” class:
1
2
3
4
5
6
7
8
9
10
11
12
13
14
15
| const styles = StyleSheet.create({
containerStyle: {
flexDirection: 'column',
flex: 1,
//Since React Native is cross platform
//let's handle both platforms.
//Add top margin to fix status bar overlap
marginTop: Platform.OS === 'ios' ? 20 : 0,
},
textInputStyle: {
marginLeft: 16,
marginRight: 16,
height: Platform.OS === 'ios' ? 30 : undefined
}
});
|
We can enhance the user experience by automatically opening the soft keyboard when the app launches.
Note: While autoFocus={true} is a simpler way to auto-focus the TextInput, we’ll explore a different approach in this example.
Add a reference to the TextInput using the ref prop:
ref={ref => this.searchInput = ref}
Override the componentDidMount() lifecycle method as follows:
1
2
3
| componentDidMount(){
this.searchInput.focus();
}
|
Reload the app, and the keyboard should automatically open.
Component Lifecycle Methods
We’ve already worked with components, but let’s delve into their lifecycle.
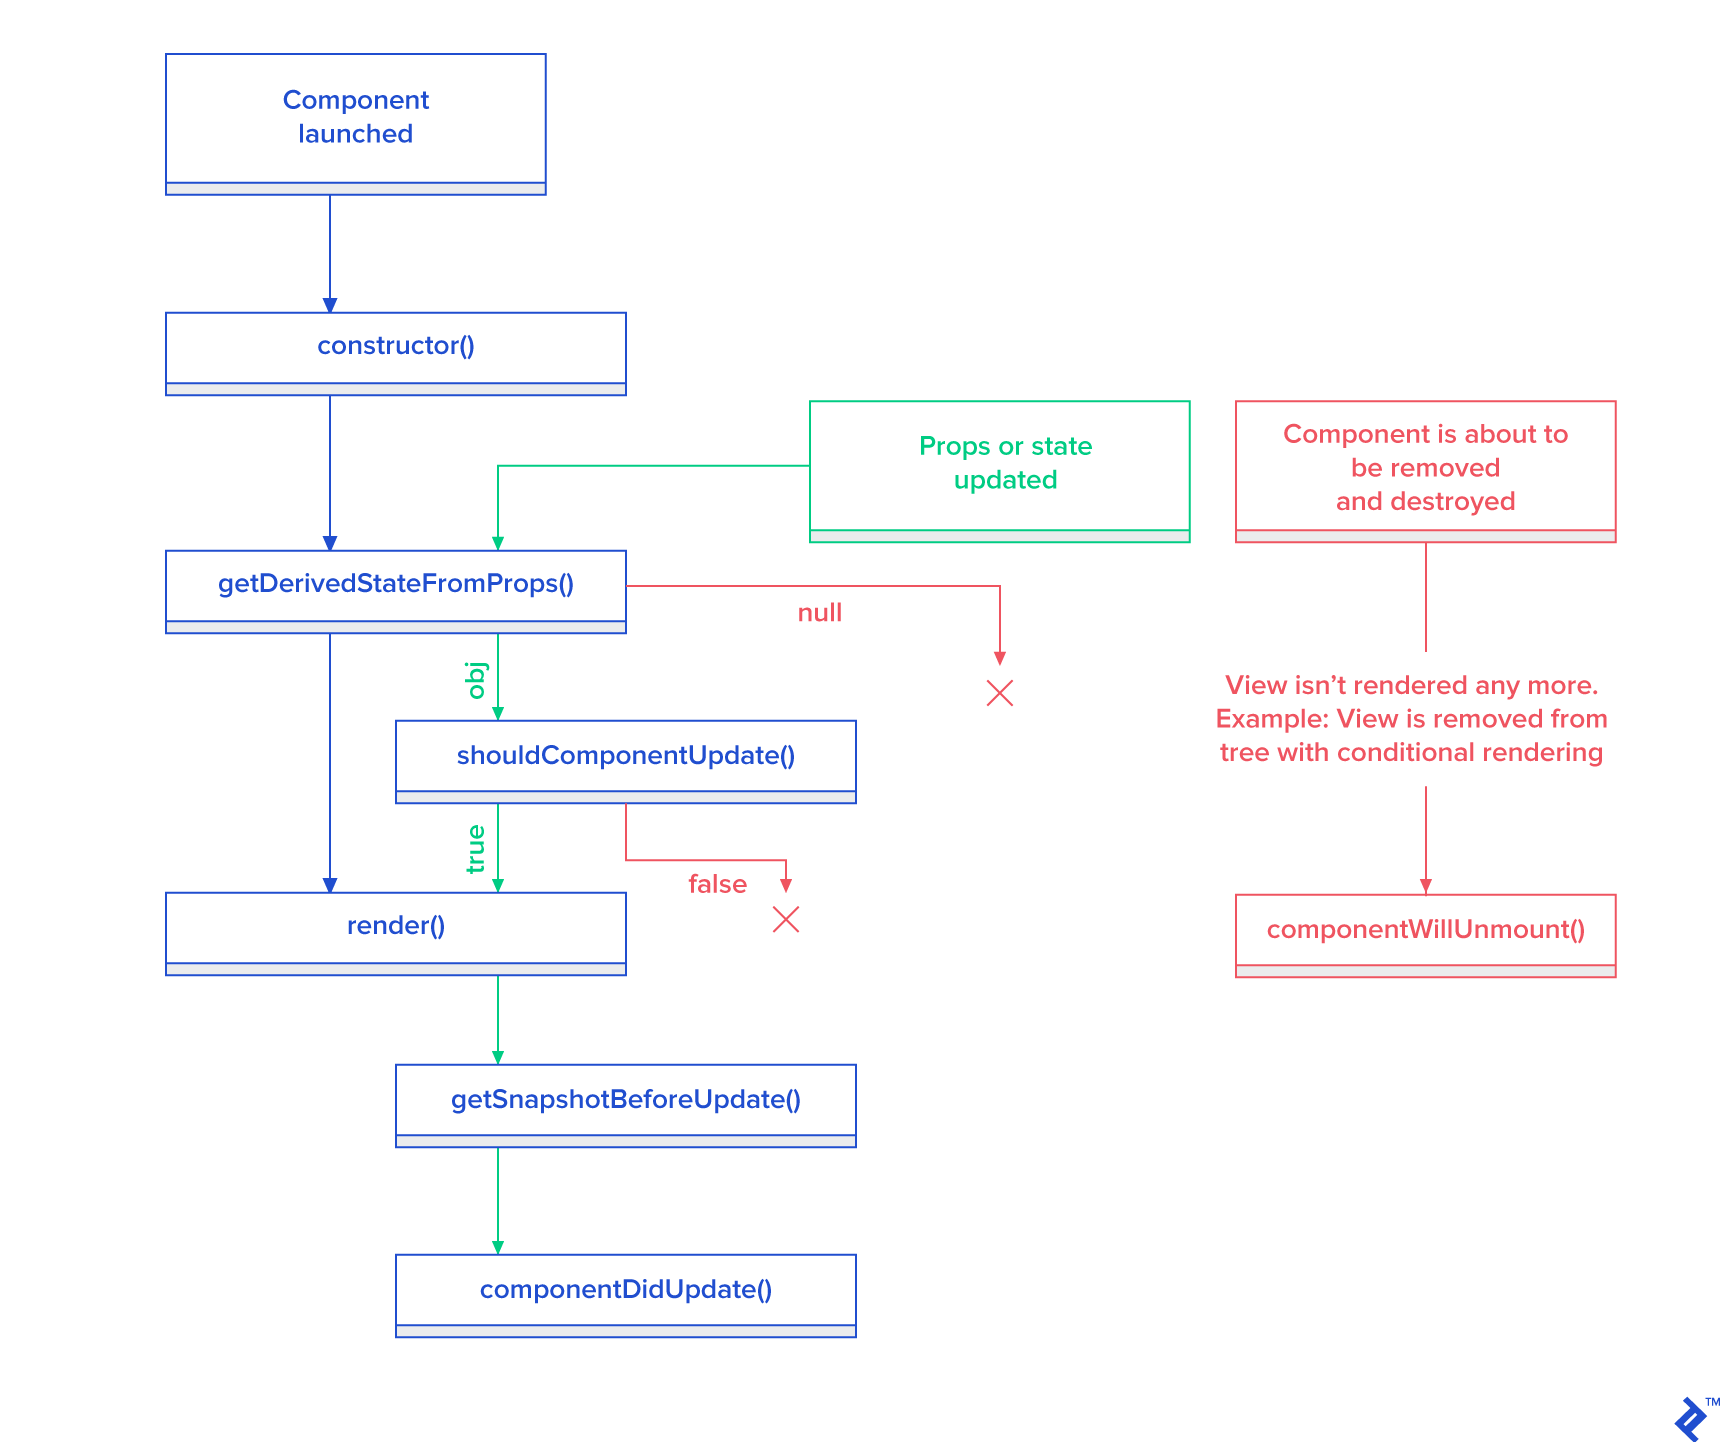
Here’s a breakdown of React’s component lifecycle:
constructor(): Called only once when the component is being created.static getDerivedStateFromProps(props, state): Invoked before rendering and after updates. Returns an object to update the state, or null to skip updates.render(): The heart of a React component, responsible for rendering the UI.componentDidMount(): Called after the component is rendered and mounted in the view hierarchy.shouldComponentUpdate(nextProps, nextState): Triggered after state or prop changes. Returns true (default) to proceed with re-rendering or false to prevent it.getSnapshotBeforeUpdate(prevProps, prevState): Called right before the rendered output is committed to the DOM.componentDidUpdate(prevProps, prevState, snapshot): Called after an update is rendered. Not invoked after the initial render().componentWillUnmount(): Called immediately before a component is unmounted and destroyed.
Reusable Components
Creating reusable components is a common practice in React Native development. There are two primary approaches:
- Define a class that extends
React.Component. This method is suitable when you need access to lifecycle methods. - Write a function that returns JSX. This provides a more concise syntax for simpler components.
Having already explored class-based components, let’s create a functional component analogous to Android’s <CardView>.
Create a new folder named “common” within the ./src directory. Inside this folder, create a file named “CardView.js” and add the following code:
1
2
3
4
5
6
7
8
9
10
11
12
13
14
15
16
17
18
19
20
21
22
23
24
25
26
27
28
29
| import React from "react";
import {View} from "react-native";
export default CardView = (props) => {
return (
//Style will be merged from default containerStyle
//and props.style. props.style attributes will override
//values if parameters are same.
<View style={{...styles.containerStyle, ...props.style}}>
{/*
props.children contain subviews
add this line if the component is container
*/}
{props.children}
</View>
);
};
const styles = {
containerStyle: {
borderRadius: 4,
margin: 5,
padding: 5,
elevation: 5,
shadowColor: 'black',
shadowRadius: 5,
shadowOpacity: 0.5,
shadowOffset: {width: 0, height: 3},
backgroundColor: 'white'
}
};
|
Now, let’s create a “LoginForm” component that utilizes our newly created “CardView.”
Create a file named “LoginForm.js” within the “common” folder and add the following content:
1
2
3
4
5
6
7
8
9
10
11
12
13
14
15
16
17
18
19
20
21
22
23
24
25
26
27
28
29
30
31
32
33
34
35
36
37
38
39
40
41
42
43
44
| import React from "react";
import {TextInput, Platform, Button, StyleSheet} from "react-native";
import CardView from "../common/components/CardView";
export default class LoginForm extends React._Component _{
render() {
return (
//Override default style
<CardView style={{
borderRadius: 4,
backgroundColor: '#fff'
}}>
<TextInput
placeholder="Email"
style={styles.textInputStyle}/>
<TextInput
placeholder="Password"
style={styles.textInputStyle}
secureTextEntry={true}/>
<Button color="#841584"
title="Login"
onPress={() => console.log("onLoginPress")}
buttonStyle={styles.buttonStyle}/>
</CardView>
);
}
}
const styles = StyleSheet.create({
buttonStyle: {
elevation: 5,
height: 40
},
textInputStyle: {
padding: 10,
//Additional params to make
//iOS inputs prettier
...Platform.select({
ios: {
borderRadius: 2,
marginTop: 5,
backgroundColor: '#eeeeee'
}
})
}
});
|
Import the “LoginForm” class into “App.js” and wrap it within a View:
1
2
3
| <View style={{flex: 1, justifyContent: 'center'}}>
<LoginForm/>
</View>
|
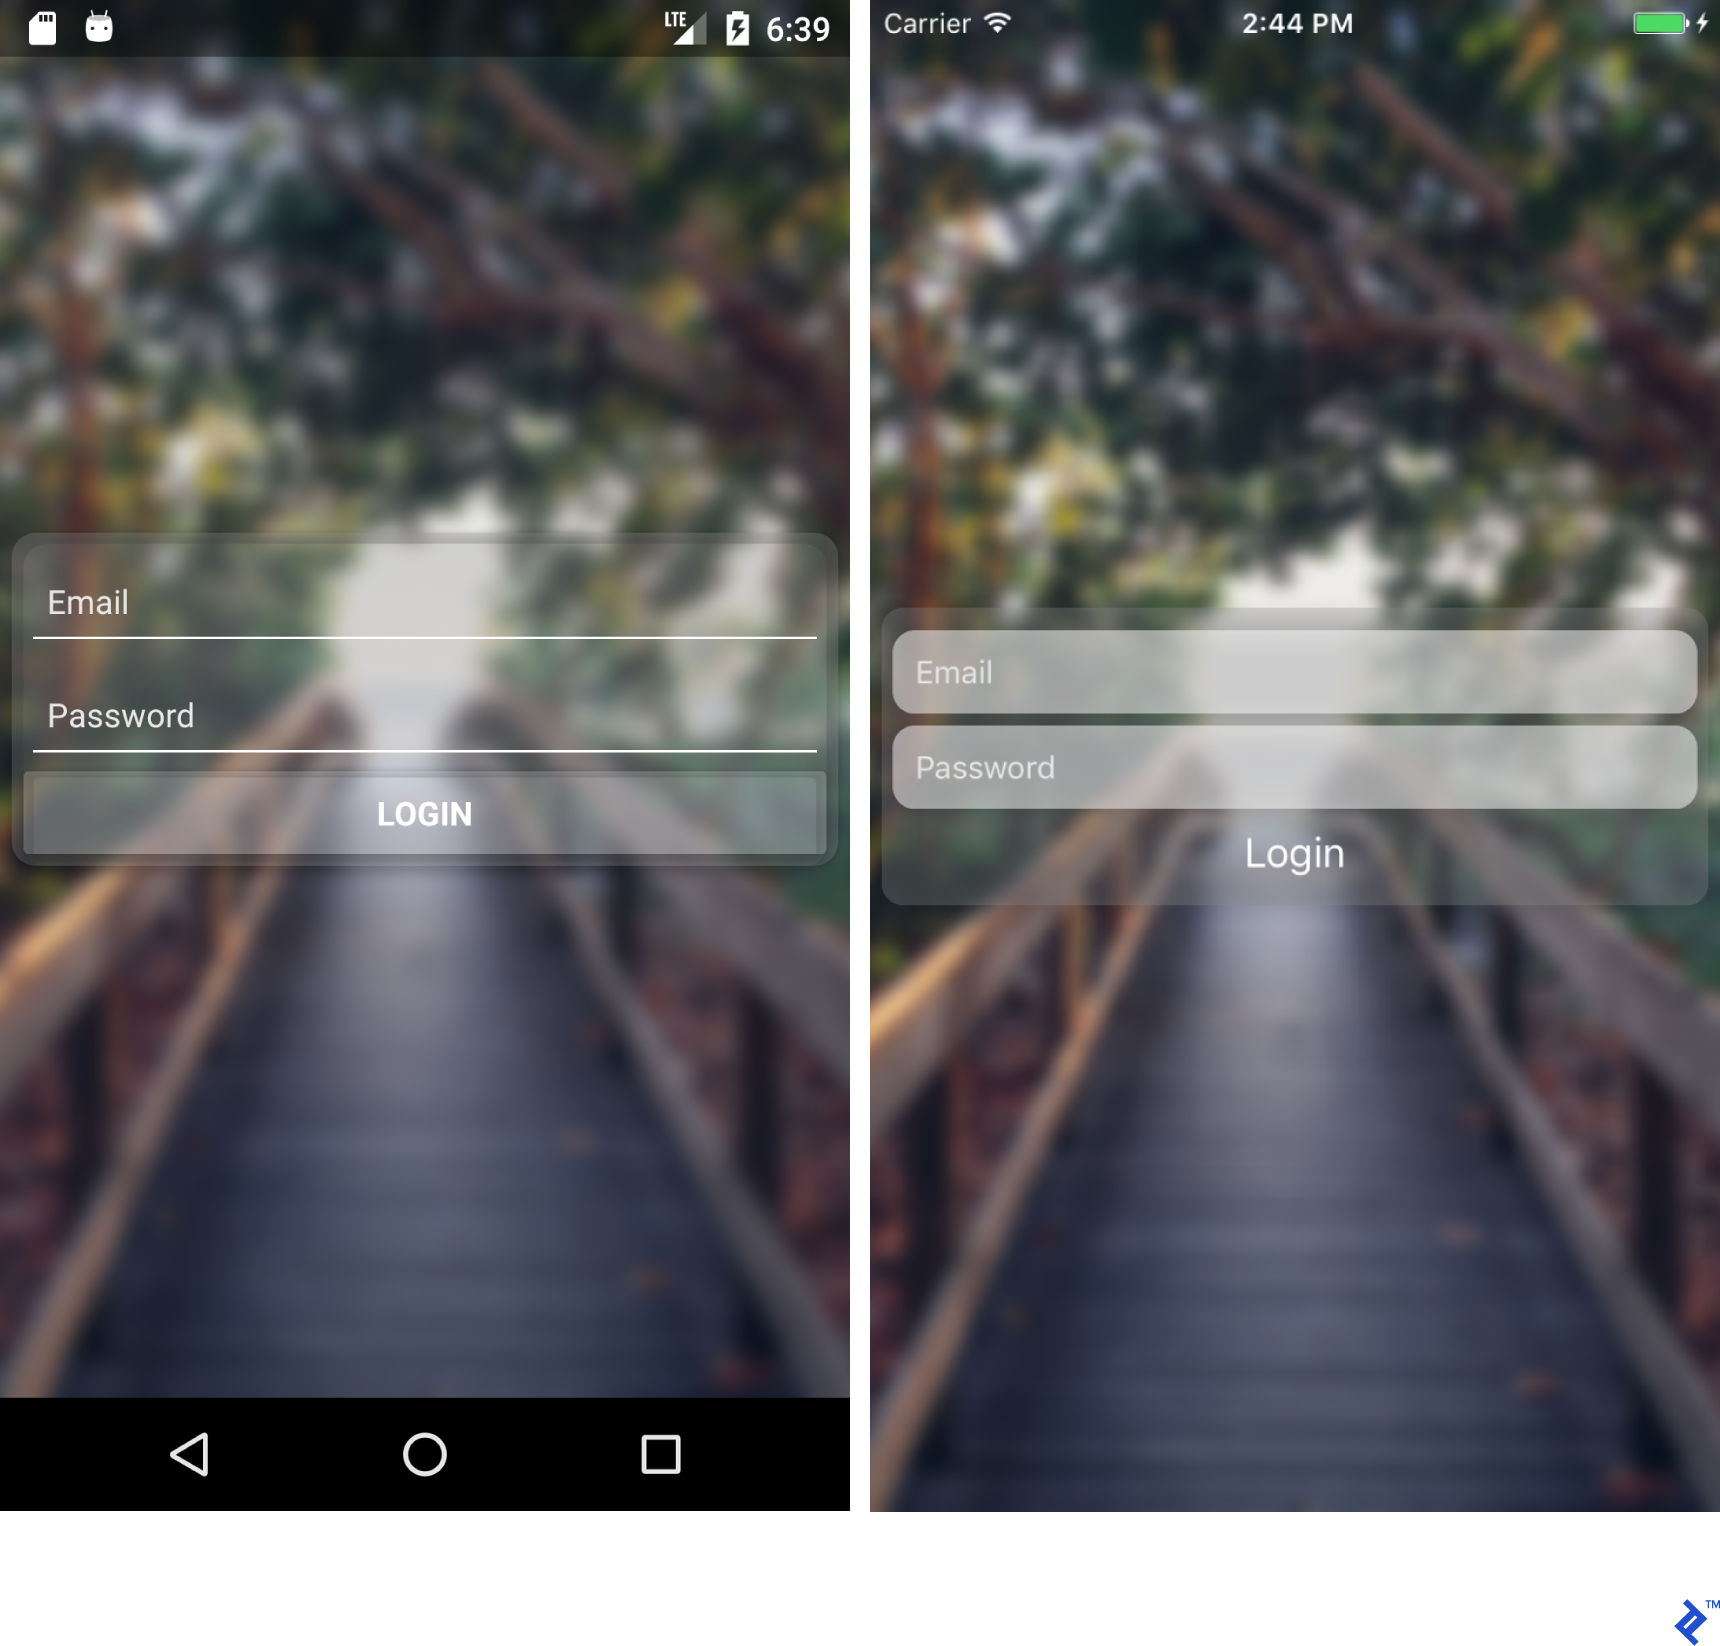
By adjusting the styling parameters, you can achieve a more visually appealing login form.
Navigation
Navigation between different screens is crucial for most applications. We’ll build a simple Reddit /r/pics browser app to demonstrate navigation.
Navigation in React Native is relatively straightforward, especially with libraries like React Navigation.
Prerequisites:
- Install
react-navigation using yarn or npm. - Ensure
axios is installed (yarn add axios or npm install axios).
Let’s start by creating two separate components: “PictureList” and “PicturePreview.”
Note: The code snippets below should look familiar. I’ll provide the complete class definitions for clarity.
PictureList.js:
 1
 2
 3
 4
 5
 6
 7
 8
 9
10
11
12
13
14
15
16
17
18
19
20
21
22
23
24
25
26
27
28
29
30
31
32
33
34
35
36
37
38
39
40
41
42
43
44
45
46
47
48
49
50
51
52
53
54
55
56
57
58
59
60
61
62
63
64
65
66
67
| import React from 'react';
import {
ActivityIndicator, FlatList,
Image, Text, TouchableHighlight, View
} from "react-native";
import axios from "axios";
import CardView from "../common/CardView";
export default class PictureList extends React.Component {
state = {loading: true, error: null, posts: null};
componentDidMount() {
axios.get('https://www.reddit.com/r/pics.json')
.then(response => {
this.setState({
posts: response.data.data.children,
loading: false
})
}).catch(error => {
this.setState({
error: error.message,
loading: false
})
})
}
render() {
return (
<View style={{flex: 1, justifyContent: 'center'}}>
// FlatList ~ ListView
// data - DataSource for the List
// renderItem - function returns View item
// keyExtractor - Unique id for items
{this.state.posts &&
<FlatList data={this.state.posts}
renderItem={this.renderItem.bind(this)}
keyExtractor={(item) => (item.data.id + '')}/>}
{this.state.loading &&
<ActivityIndicator size="large" color="#f4511e"/>}
</View>
);
}
navigateToPicture(title, url) {
this.props.navigation.navigate('PicturePreview', {
'title': title,
'url': url
})
}
renderItem(item) {
//Destructuring values from item
//Read more 'ES6 destructuring'
const {data} = item.item;
const {title} = data;
const {url} = data.preview.images[0].source;
return (
//Clickable view
<TouchableHighlight onPress={() =>
this.navigateToPicture(title, url)}>
{/Reusing our CardView/}
<CardView>
<Image style={{height: 150}}
source={{uri: url}}/>
<Text style={{padding: 5}}>{title}</Text>
</CardView>
</TouchableHighlight>
)
}
}
|
PicturePreview.js:
 1
 2
 3
 4
 5
 6
 7
 8
 9
10
11
12
13
| import React from 'react';
import {Image} from "react-native";
export default class PicturePreview extends React.Component {
//Destructure navigation
//Set title to header
static _navigationOptions = ({navigation}) => ({
title: navigation.state.params.title
});
render() {
const {url} = this.props.navigation.state.params;
return (<Image style={{flex: 1}} source={{uri: url}}/>)
}
}
|
React Navigation will automatically utilize the navigationOptions object for screen configurations.
Now, let’s modify the main App.js file to set up navigation.
Note: React Navigation offers various navigation patterns. This example focuses on StackNavigation. Refer to the official documentation for a comprehensive overview.
1
2
3
4
5
6
7
8
9
10
11
12
13
14
15
16
17
18
19
20
21
22
23
24
25
26
27
28
29
30
31
32
33
34
35
36
37
38
39
| import React from 'react';
import {createStackNavigator} from "react-navigation";
import PictureList from "./components/PictureList";
import PicturePreview from "./components/PicturePreview";
export default class App extends React.Component {
render() {
return (
<Router/>
);
}
}
//Customize the header_
const NavigationOptions = {
headerTintColor: '#fff',
headerStyle: {
backgroundColor: '#f4511e',
}
};
//Create the router.
const Router = createStackNavigator({
//Name the screen
'PictureList': {
//Link the Component
screen: PictureList,
//Additional navigation options
navigationOptions: {
title: '/r/pics Browser',
...NavigationOptions
}
},
'PicturePreview': {
screen: PicturePreview,
navigationOptions: NavigationOptions
}
}, {
//Root
initialRouterName: 'PictureList'
}
);
|
As you can see, we define a navigation stack and instruct the main app component to render it. If everything is set up correctly, you’ll have a functional Reddit /r/pics browser.
Android:
iOS:
React Native for Android Developers: Different but Powerful
My programming journey has primarily revolved around mobile development. React Native opens up possibilities beyond mobile, allowing me to target web and desktop platforms as well.
While React Native has its quirks and occasional bugs, it’s a powerful and practical choice for many projects.