Accidentally messing up with Git is surprisingly common. However, there’s no one-size-fits-all answer to the question of the best way to use it.
This is because Git only provides the building blocks for branching, leaving the specific methods—known as branching models—up to developers. These models aim to bring order to the potential chaos of software development as codebases evolve.
You, like many other developers, probably just wanted something straightforward so you could focus on coding. So you opted for Git flow, a popular branching model. Initially, its logic might have seemed sound, but then you encountered difficulties—managing multiple release branches, figuring out staging options, and so forth. Or maybe Git flow just didn’t feel quite right for your needs. After all, every project is different, and no single branching model is perfect for all situations.
Here’s the good news: Enhanced Git flow, a variation on the classic Git flow model, simplifies common Git flow actions while retaining its core benefits.
The Ups and Downs of Classic Git Flow
I’ve been a big fan of Git flow since discovering how well it handles products released in major updates (in other words, releases).
These major updates demand significant time, similar to the two-week or longer sprints typical of Scrum. If a team has already launched a product, merging the next release’s scope into the production code (e.g., the main branch) can cause complications.
During initial development—before production and users—keeping everything in the main branch is perfectly acceptable. In fact, it’s ideal: It maximizes development speed without unnecessary complexity. However, things change in production, where stability becomes crucial for real users.
Imagine a critical production bug requiring immediate fixing. Rolling back all the main branch’s work just to deploy the fix would be disastrous. And deploying untested code—whether half-baked or seemingly complete—is clearly not an option.
This is where branching models, including Git flow, come in. Any robust model should address how to separate the next release from the live version, how to update the live version with the next release, and how to implement urgent fixes (hotfixes) for the current version.
Git flow tackles these scenarios by separating “main” (production/current version) and “develop” (development/next release) branches and providing rules for using feature/release/hotfix branches. This effectively resolves many headaches in release-based development workflows.
Yet, even in projects suited to classic Git flow, I’ve encountered its common drawbacks:
- Git flow is intricate, with two permanent branches, three temporary branch types, and strict branch interaction rules. This complexity increases the likelihood of errors and the effort to fix them.
- Git flow release and hotfix branches require “double merging”—first into main, then into develop. It’s easy to forget one. While scripts or VCS GUI plugins can simplify branching, they need to be set up on every developer’s machine.
- CI/CD workflows often result in two final release builds—one from the release branch’s latest commit and another from the main merge commit. Ideally, the main one should be used, but their near-identical nature can cause confusion.
Introducing “Enhanced Git Flow”
I first used enhanced Git flow on a new, closed-source project. Working with one other developer, we initially committed directly to the main branch.
Note: Until a product’s first public release, committing directly to the main branch makes perfect sense—even for Git flow proponents—due to the speed and simplicity it offers. Without a production environment, there’s no risk of urgent production bug fixes. The branching overhead of classic Git flow is unnecessary at this stage.
As we neared the initial release, we decided we needed a more robust approach than committing directly to main. Our rapid progress and business priorities hadn’t allowed for a rock-solid development process with enough automated testing to ensure a constantly release-ready main branch.
Classic Git flow seemed appropriate. Separate main and develop branches and sufficient time between major updates meant that mostly manual QA would suffice. When I proposed Git flow, my colleague suggested a similar approach with some key differences.
Initially, I resisted. Some proposed modifications to classic Git flow felt too radical, potentially undermining the core concept and rendering the approach ineffective. Upon reflection, however, I realized that these adjustments actually enhanced Git flow without compromising its fundamental principles.
Following the modified approach’s success in that project, I used it in another closed-source project with a small team, where I was the primary developer and occasionally collaborated with outsourced developers. We launched that project after six months and have been using CI and E2E testing with monthly releases for over a year.
My experience with this new branching approach has been so positive that I wanted to share it with fellow developers to help them overcome the shortcomings of classic Git flow.
Similarities to Classic Git Flow: Development Isolation
Enhanced Git flow maintains the two long-lived branches, main and develop, for work isolation. (Hotfix and release functionalities are still available—note the emphasis on “functionalities,” as these are no longer branches. We’ll elaborate on this in the differences section.)
Neither classic nor enhanced Git flow enforces a strict naming convention for feature branches. Developers simply branch from and merge back into develop. Teams are free to use any naming scheme or trust developers to use descriptive names instead of generic ones like “my-branch.”
All features added to the develop branch up to a specific point will constitute the new release.
Squash Merges
I highly recommend using squash merges for feature branches to maintain a clear and linear history. Without them, commit graphs (from GUI tools or git log --graph) become messy even with a few feature branches:
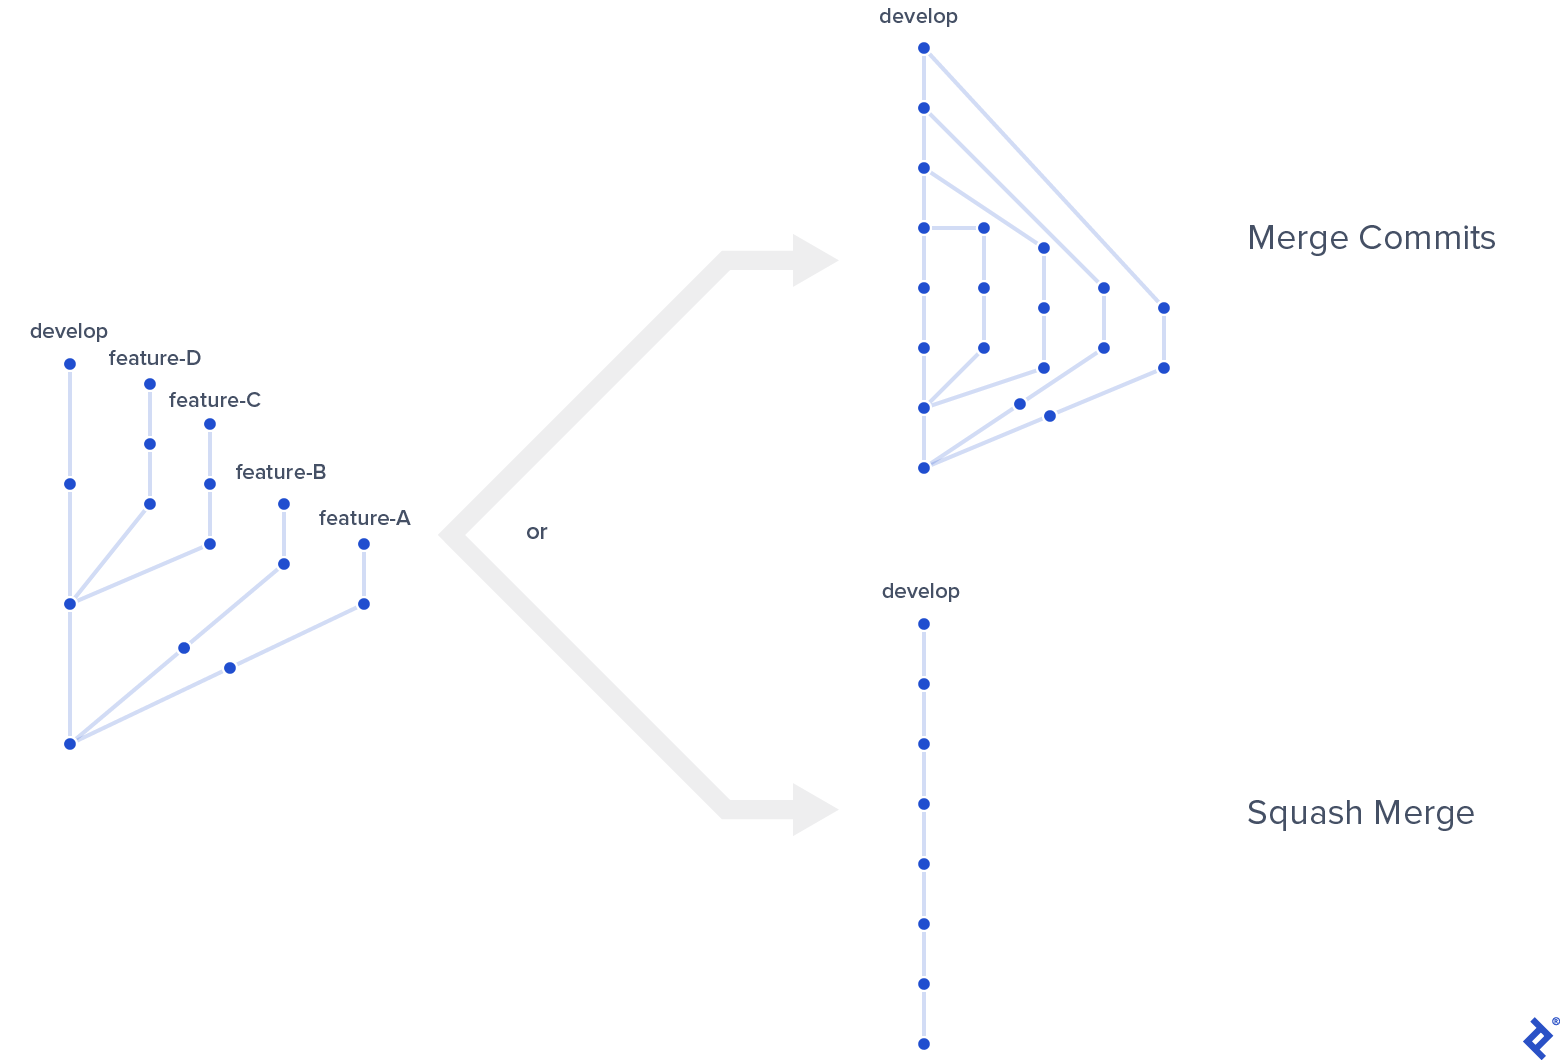
Even if you can tolerate the visual clutter, there’s another reason for squashing. Without it, commit history views—including plain git log (without --graph) and platforms like GitHub—become difficult to follow, even with the simplest merge scenarios:
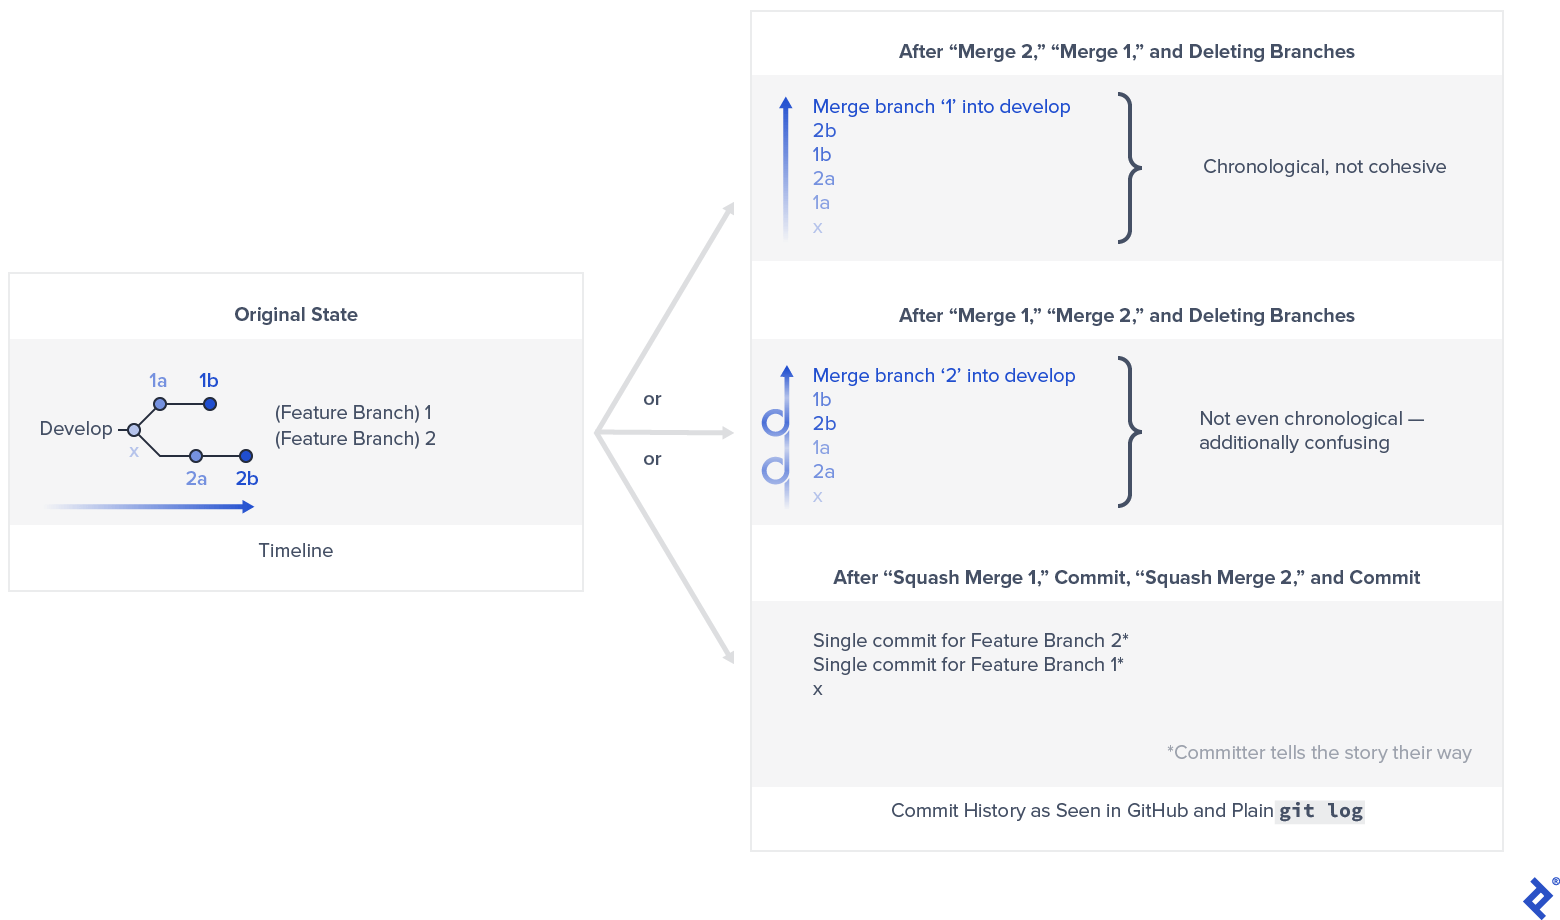
The main drawback of squash merging is that the original feature branch history is lost. However, this is mitigated by platforms like GitHub, which exposes the full original history of a feature branch even after it’s deleted, preserving the information through the pull request used for the squash merge.
Differences from Classic Git Flow: Releases and Hotfixes
Let’s walk through the release cycle, as it’s (hopefully) your primary activity. When we’re ready to release the work accumulated in develop, it’s essentially a complete superset of main. This is where the significant differences between classic and enhanced Git flow emerge.
Releases in Enhanced Git Flow
Each step of creating a release with enhanced Git flow deviates from the classic approach:
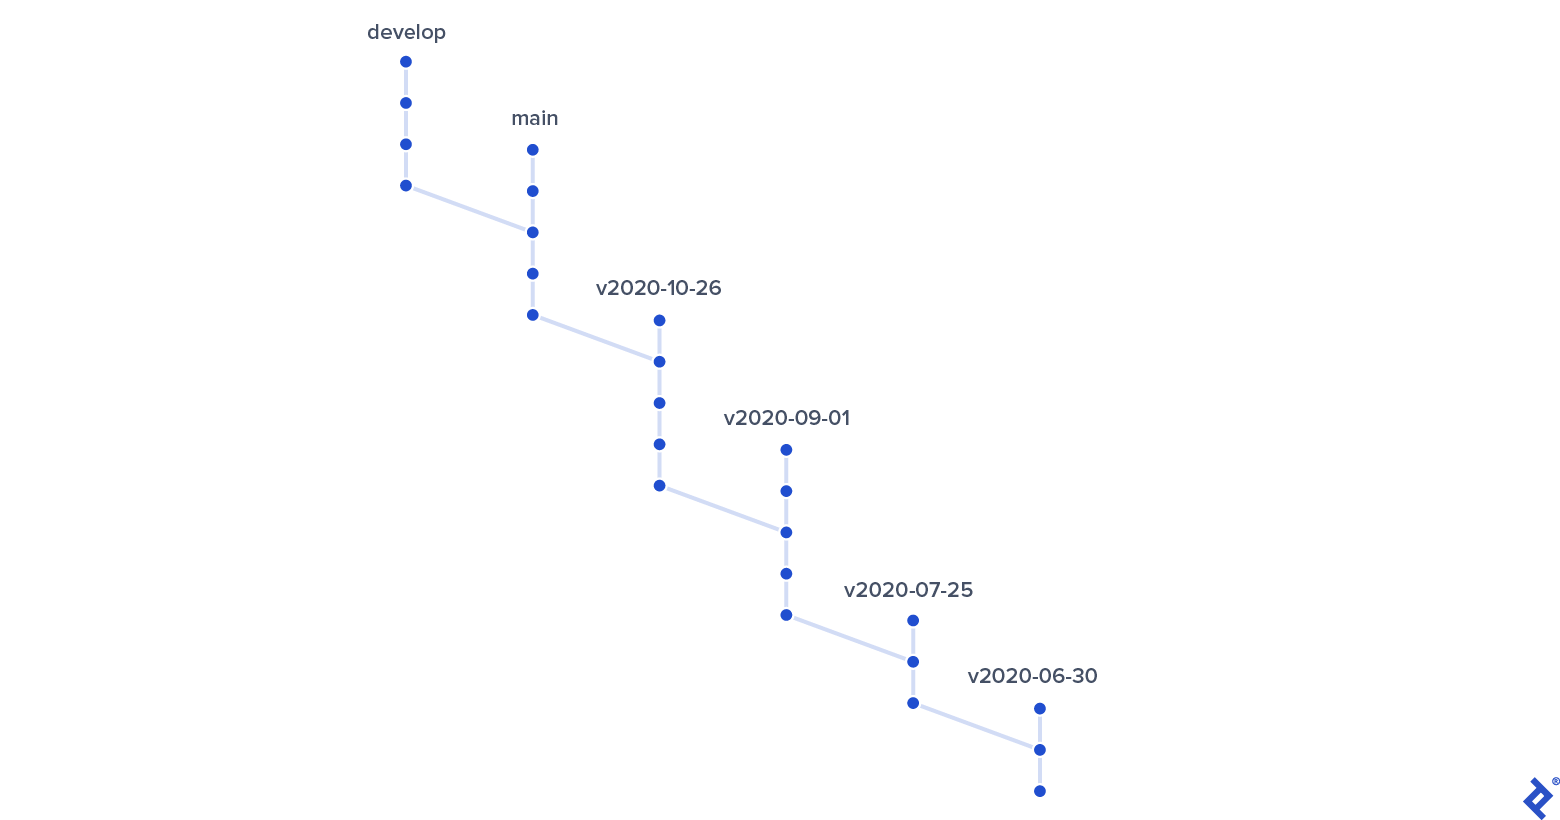
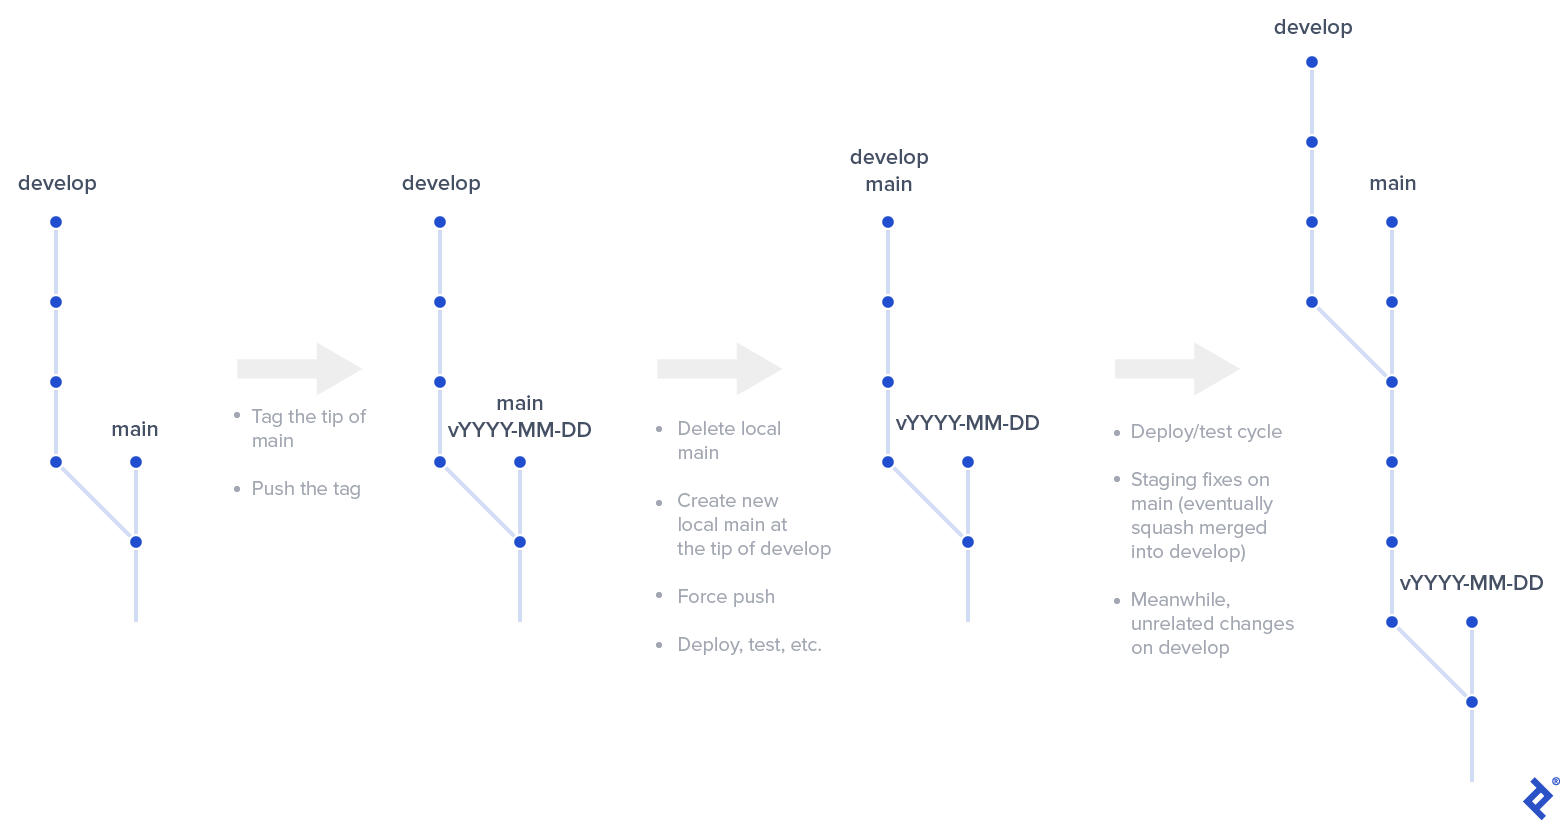
- Releases are based on main, not develop. Tag the current main branch tip with a meaningful identifier. I prefer tags based on the ISO 8601 date format prefixed with a “v”—e.g., v2020-09-09.
- For multiple releases in a day (e.g., hotfixes), append a sequential number or letter.
- Remember that these tags don’t necessarily reflect actual release dates. They serve as markers for Git to preserve the main branch’s state when a new release process initiated.
- Push the tag using
git push origin <the new tag name>. - Next, a slightly unconventional step: delete your local main branch. Don’t worry; we’ll restore it shortly.
- All commits to main remain safe, protected from deletion by the tag we created. Every commit, including hotfixes (discussed later), is part of the development history.
- Only one team member (the “release manager”) should perform this step for a given release. This role is typically assigned to the most experienced or senior team member, but it’s advisable to rotate it to share knowledge and enhance the infamous bus factor.
- Create a new local main branch at the tip of your develop branch.
- Force push this new structure using
git push --force. The remote repo won’t accept such a significant change easily. This is safer than it appears because:- We’re merely moving the main branch pointer to a different commit.
- Only one team member is making this change at a time.
- Daily development occurs on develop, so moving main won’t disrupt anyone’s work.
- (This contrasts with approaches like “Git flow without a develop branch,” where development happens directly on main.)
- Your new release is ready! Deploy it to staging for testing. (We’ll discuss convenient CI/CD patterns later.) Any fixes are committed directly to main, causing it to diverge from develop.
- Simultaneously, you can start working on the next release in develop, mirroring classic Git flow’s advantage.
- If a hotfix is needed for the production version (not the upcoming release in staging), refer to “Dealing with hotfixes during an active release…” below.
- Once the new release is deemed stable, deploy the final version to production and perform a single squash merge of main into develop to incorporate all fixes.
Hotfixes in Enhanced Git Flow
There are two hotfix scenarios. If a hotfix is needed when no active release is in progress—i.e., the team is working on a new release in develop—it’s straightforward: Commit to main, deploy and test the changes in staging, and then deploy to production.
Finally, cherry-pick the commit from main to develop, ensuring the next release includes the fix. For multiple hotfix commits, create and apply a patch (if your IDE or Git tool supports it) instead of multiple cherry-picks to save effort. Avoid squash merging main into develop after the initial release, as it’s likely to create conflicts with independent progress made in develop.
Handling hotfixes during an active release—when you’ve just force pushed main and are still preparing the new release—is enhanced Git flow’s least elegant aspect. Depending on the release cycle length and the issue’s severity, aim to include the fix in the new release itself. This is the simplest approach and won’t disrupt the overall workflow.
If that’s not feasible—the fix is urgent, and you can’t wait for the next release—prepare for a somewhat involved Git procedure:
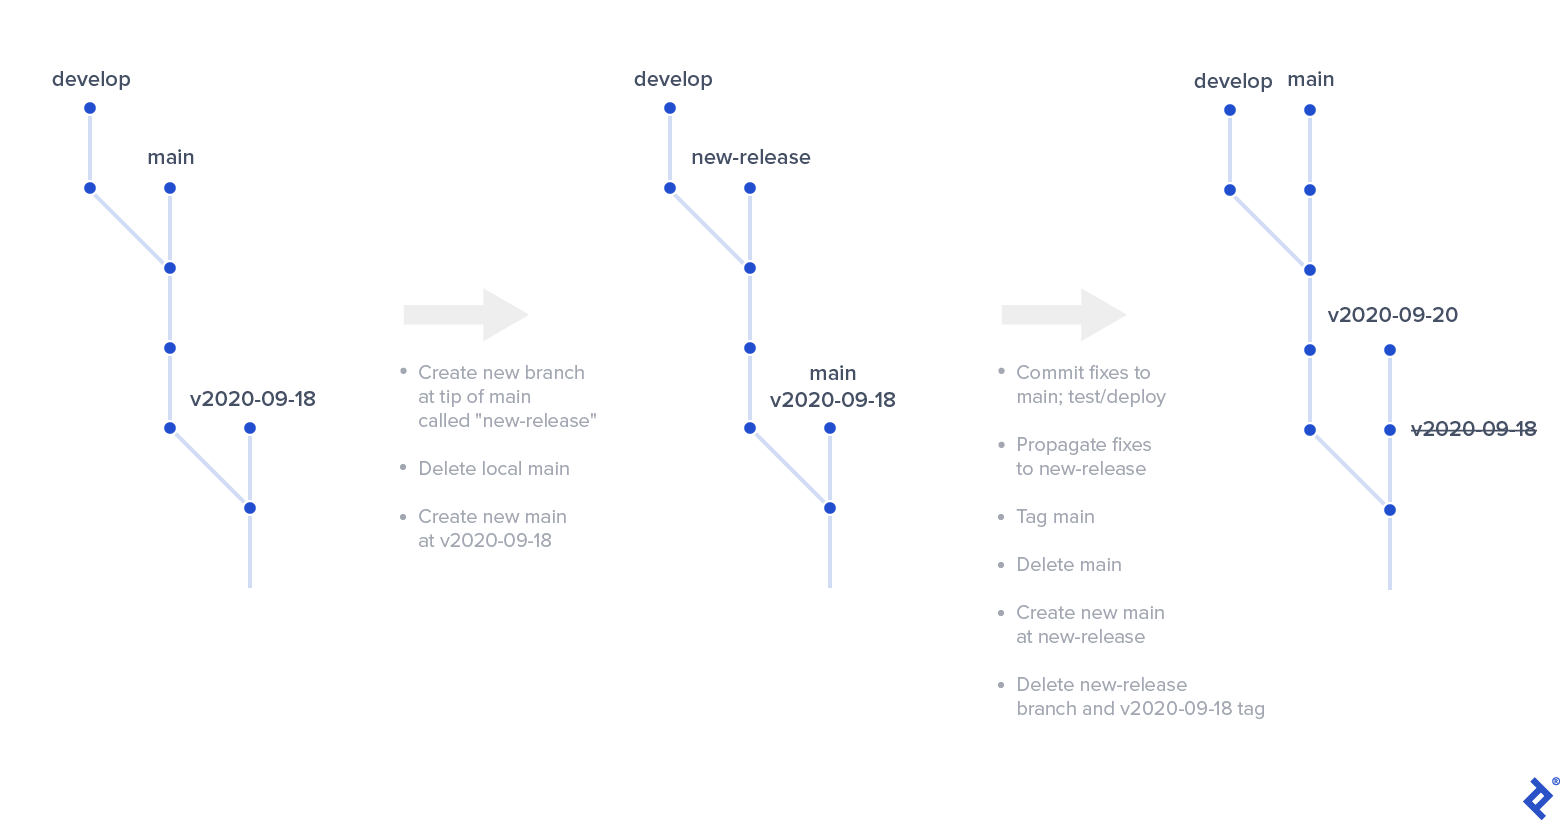
- Create a branch (let’s call it “new-release,” but any naming convention works) at the current main tip. Push new-release.
- Delete and recreate the local main branch at the commit of the tag you created earlier for the current active release. Force push main.
- Introduce the necessary fixes to main, deploy to staging, and test. Once ready, deploy to production.
- Propagate changes from main to new-release via cherry-picking or a patch.
- Repeat the release procedure: Tag the current main tip and push the tag, delete and recreate local main at the new-release branch tip, and force push main.
- You can likely remove the previous tag as it’s no longer needed.
- The new-release branch is redundant and can be removed as well.
- You should be back on track with the new release. Finish by propagating the emergency hotfixes from main to develop using cherry-picking or a patch.
With proper planning, high code quality, and a healthy development and QA culture, this method should rarely be necessary. It’s wise to have this contingency plan for enhanced Git flow, but I’ve never had to use it personally.
CI/CD Setup with Enhanced Git Flow
Not all projects require a dedicated development environment. Setting up a sophisticated local environment for each developer might suffice.
However, a dedicated development environment can foster a healthier development culture. Running tests, measuring coverage, and calculating complexity metrics on the develop branch can reduce the cost of mistakes by catching them early.
I’ve found these CI/CD patterns particularly useful with enhanced Git flow:
- For a development environment, set up CI to build, test, and deploy to it on every commit to develop. Include E2E testing if applicable and beneficial.
- Set up CI to build, test, and deploy to staging on every commit to main. E2E testing is also valuable here.
- While seemingly redundant, remember that hotfixes won’t happen in develop. Triggering E2E on commits to main tests both hotfixes and regular changes before release, while triggering on commits to develop catches bugs earlier.
- Configure CI to allow manual deployment of builds from main to production upon request.
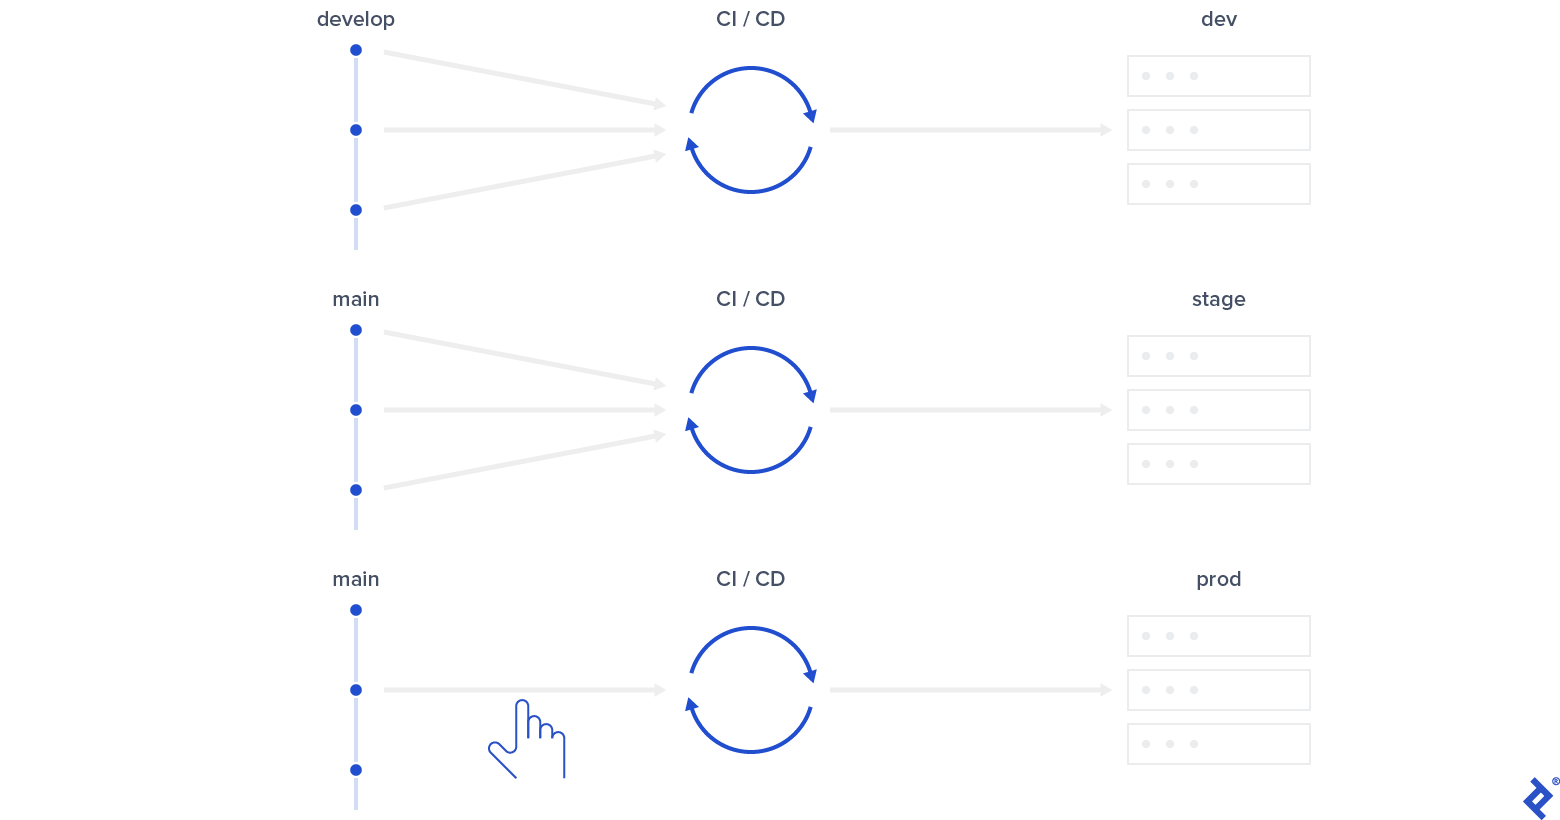
These relatively simple patterns provide a powerful mechanism for supporting daily development operations.
The Enhanced Git Flow Model: Improvements and Potential Limitations
Enhanced Git flow isn’t a universal solution. It leverages the controversial practice of force pushing the main branch, which purists might disapprove of. Practically, however, it poses no problems when done correctly.
As mentioned, hotfixes are trickier during a release but manageable. With proper QA, test coverage, and other best practices, this should be infrequent. In my view, it’s a worthwhile trade-off for enhanced Git flow’s overall benefits over the classic approach. I’m curious to see how it performs in larger teams and on more complex projects where hotfixes might be more common.
My positive experience with enhanced Git flow primarily involves closed-source commercial projects. It could be challenging for open-source projects where pull requests are often based on older release branches. While there are no technical barriers to overcome, it might demand more effort. I’d appreciate feedback from experienced open-source developers regarding its suitability in such contexts.
Special thanks to Toptal colleague Antoine Pham for his key contribution to the idea behind enhanced Git flow.

As a Microsoft Gold Partner, Toptal provides you access to a network of elite Microsoft experts. Build high-performing teams with the specialists you need - whenever and wherever you need them!