Utilizing JavaScript frameworks/libraries like Vue can greatly enhance the user experience on your website. These frameworks/libraries often provide mechanisms for dynamically updating page content without requiring a server request for each change.
However, this approach presents a challenge during the initial website load. Instead of receiving a fully formed page, the browser receives fragments of HTML, CSS, and other files, along with instructions from a JavaScript framework/library on how to assemble them. This assembly process, akin to building a bookcase before placing books on it, takes a noticeable amount of time before the browser can display anything.
The solution lies in utilizing a server-side version of the framework/library to construct a display-ready page. This complete page, accompanied by the framework/library for dynamic updates, is then sent to the browser. Similar to receiving a pre-built bookcase, users experience immediate usability while the framework/library handles dynamic content changes.
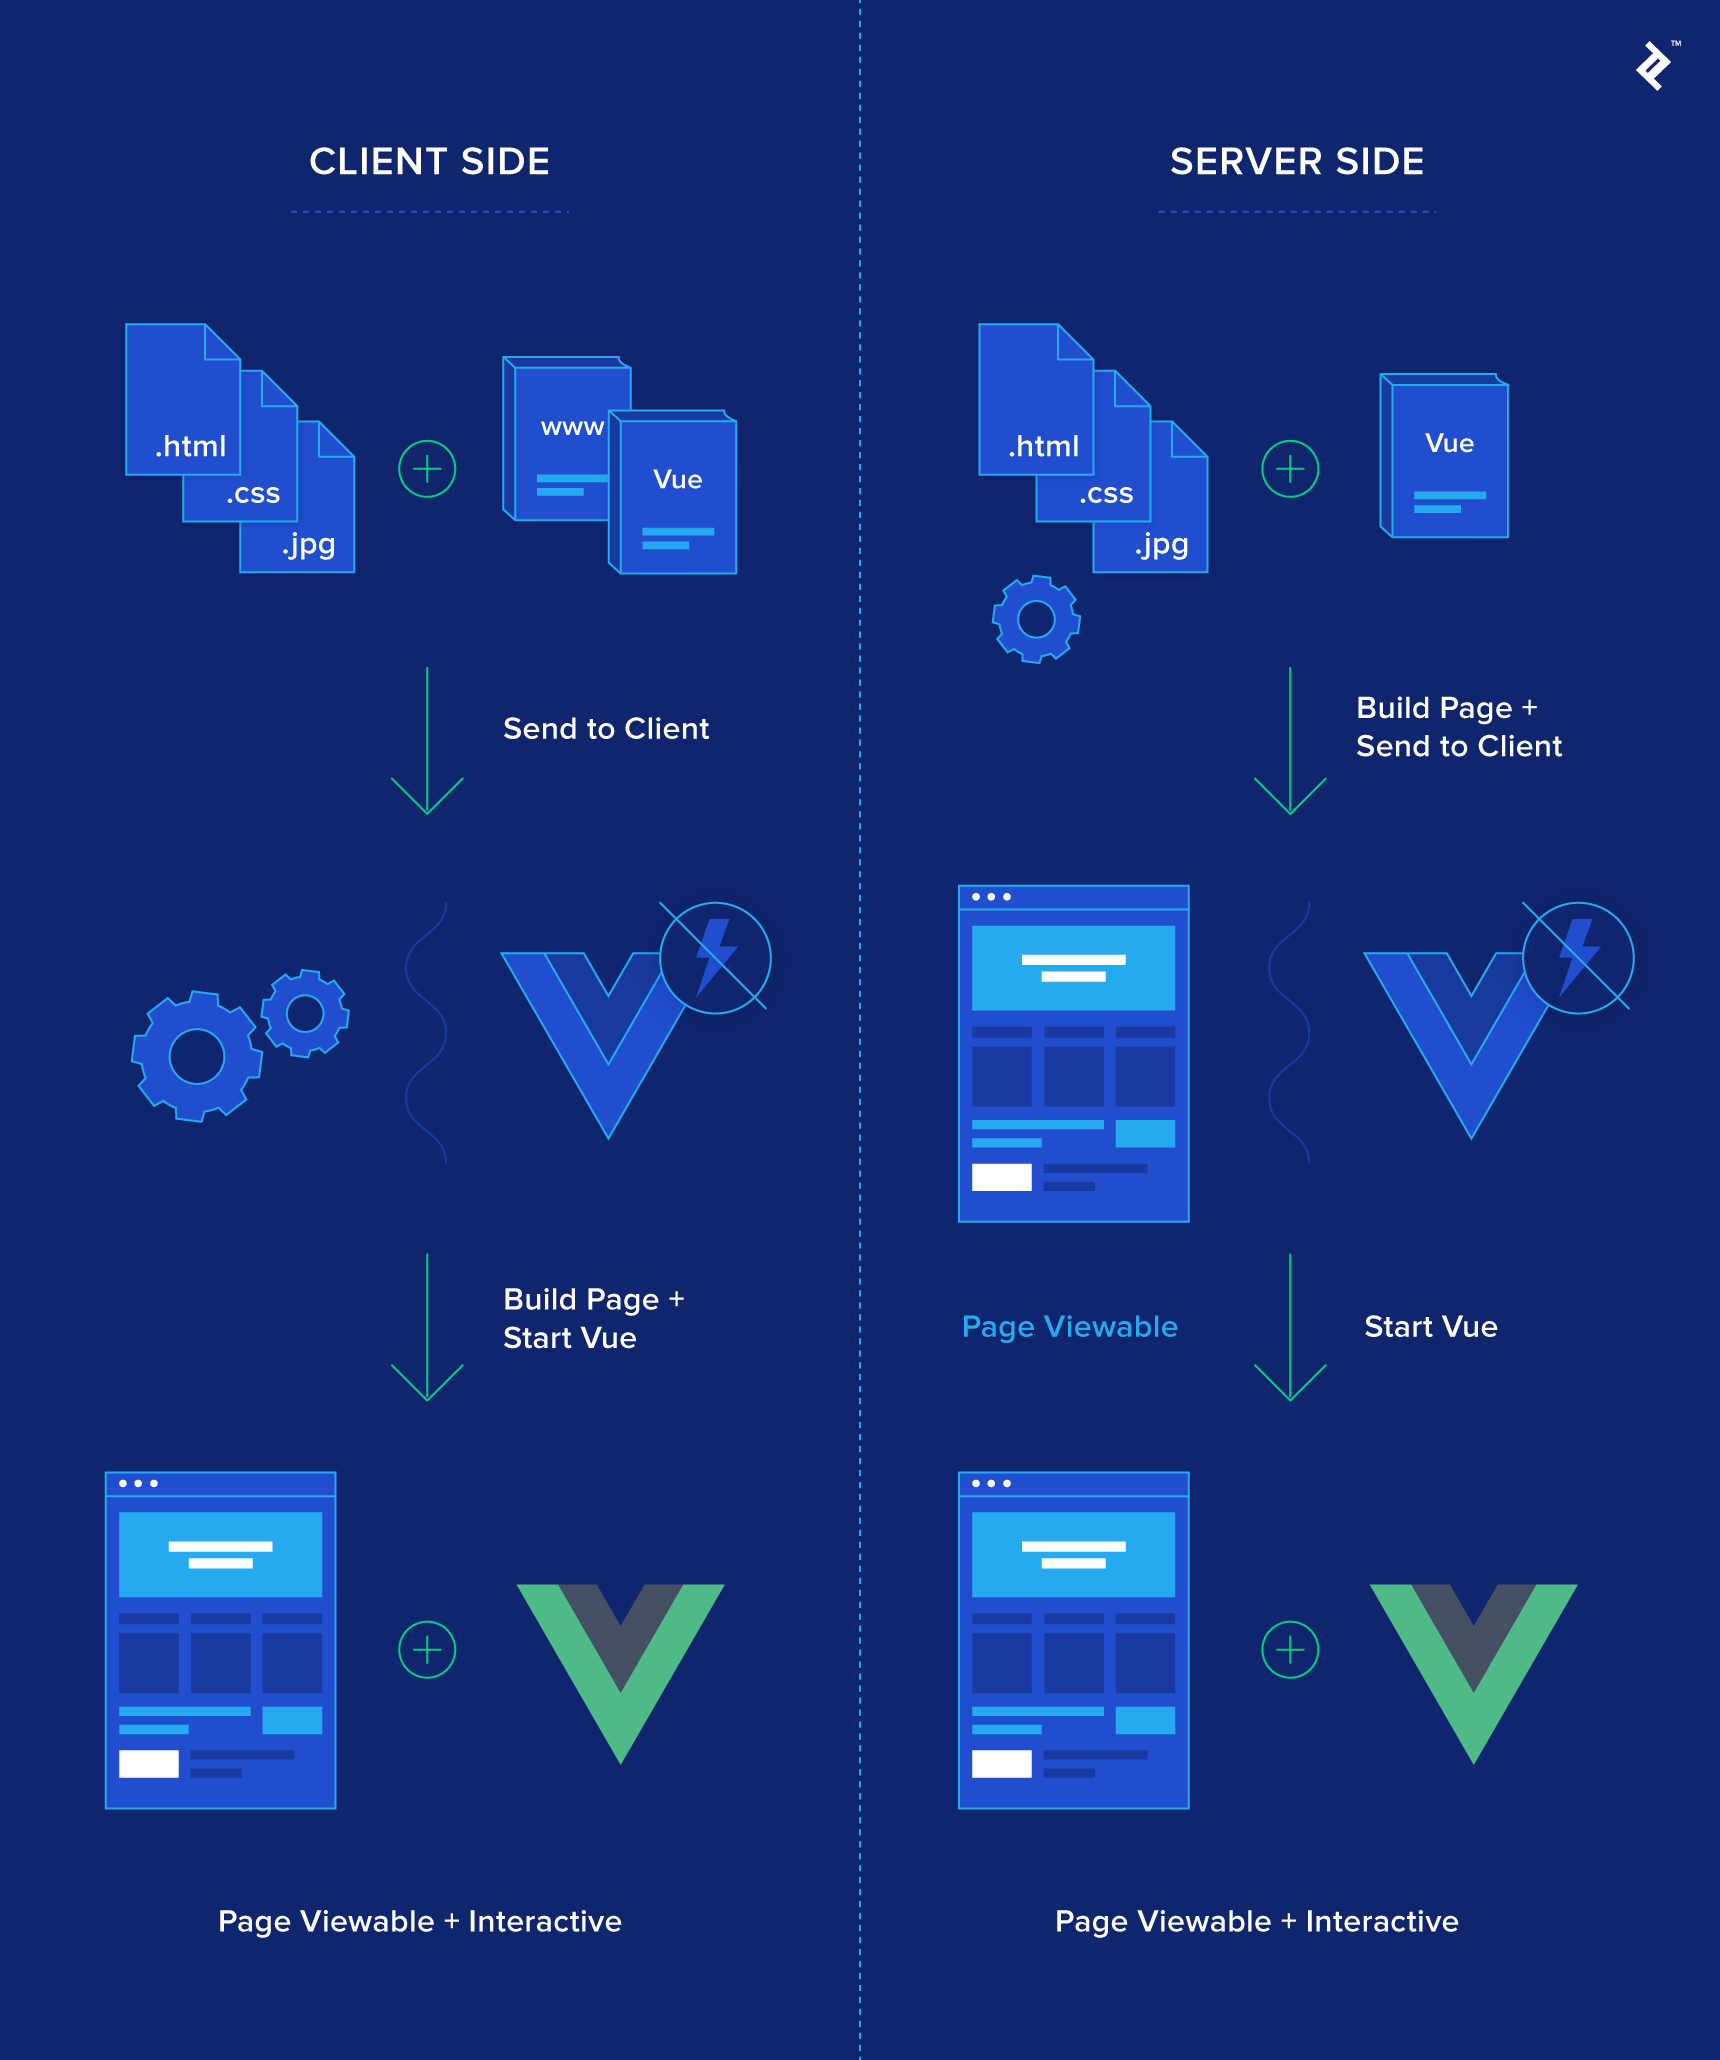
Besides this analogy, there are numerous advantages to this approach. For instance, static pages like an “About Us” page can be cached or stored server-side after initial generation, reducing redundant recreation. While seemingly minor, these speed optimizations significantly impact responsiveness, especially in environments where milliseconds matter.
For those interested in exploring the benefits of SSR within Vue, Vue’s own article on SSR is a great resource. Although various options exist, Nuxt, a recommended by the Vue team solution, stands out as the most popular choice.
Why Nuxt.js
Inspired by Next.js, a similar SSR implementation for the React library, Nuxt.js brings the advantages of this design to Vue. Developers familiar with React+Next will find similarities in Nuxt’s design and application layout. However, Nuxt distinguishes itself with Vue-specific features, creating a robust and adaptable SSR solution for Vue.
Reaching production-ready status with version 1.0 in January 2018, Nuxt enjoys the support of an active and thriving community. Building projects with Nuxt feels familiar to typical Vue projects, with the added benefit of features that streamline codebase structure and reduce development time.
It is important to note that Nuxt is not limited to SSR. Promoted as a framework for universal Vue.js applications, Nuxt includes a command (nuxt generate) for creating statically generated Vue applications from the same codebase. This allows developers hesitant about diving into SSR to leverage Nuxt’s features while generating static sites.
To illustrate Nuxt’s capabilities, let’s create a simple project. The complete source code is available hosted on GitHub, or you can explore view a live version, generated using nuxt generate and hosted on Netlify.
Creating a Nuxt Project
We’ll utilize vue-cli, a Vue project generator, to quickly set up a sample project:
| |
After a few configuration choices, a project folder, named “my-nuxt-project” or your chosen name, will be created. We can then install dependencies and start the server:
| |
Now, navigate to localhost:3000 in your browser to see the running project. The process resembles creating a Vue Webpack project. However, the app structure appears sparse compared to templates like Vue Webpack.
Examining the package.json file reveals only one dependency: Nuxt itself. This is because each Nuxt version bundles compatible versions of Vue, Vue-router, and Vuex, simplifying dependency management.
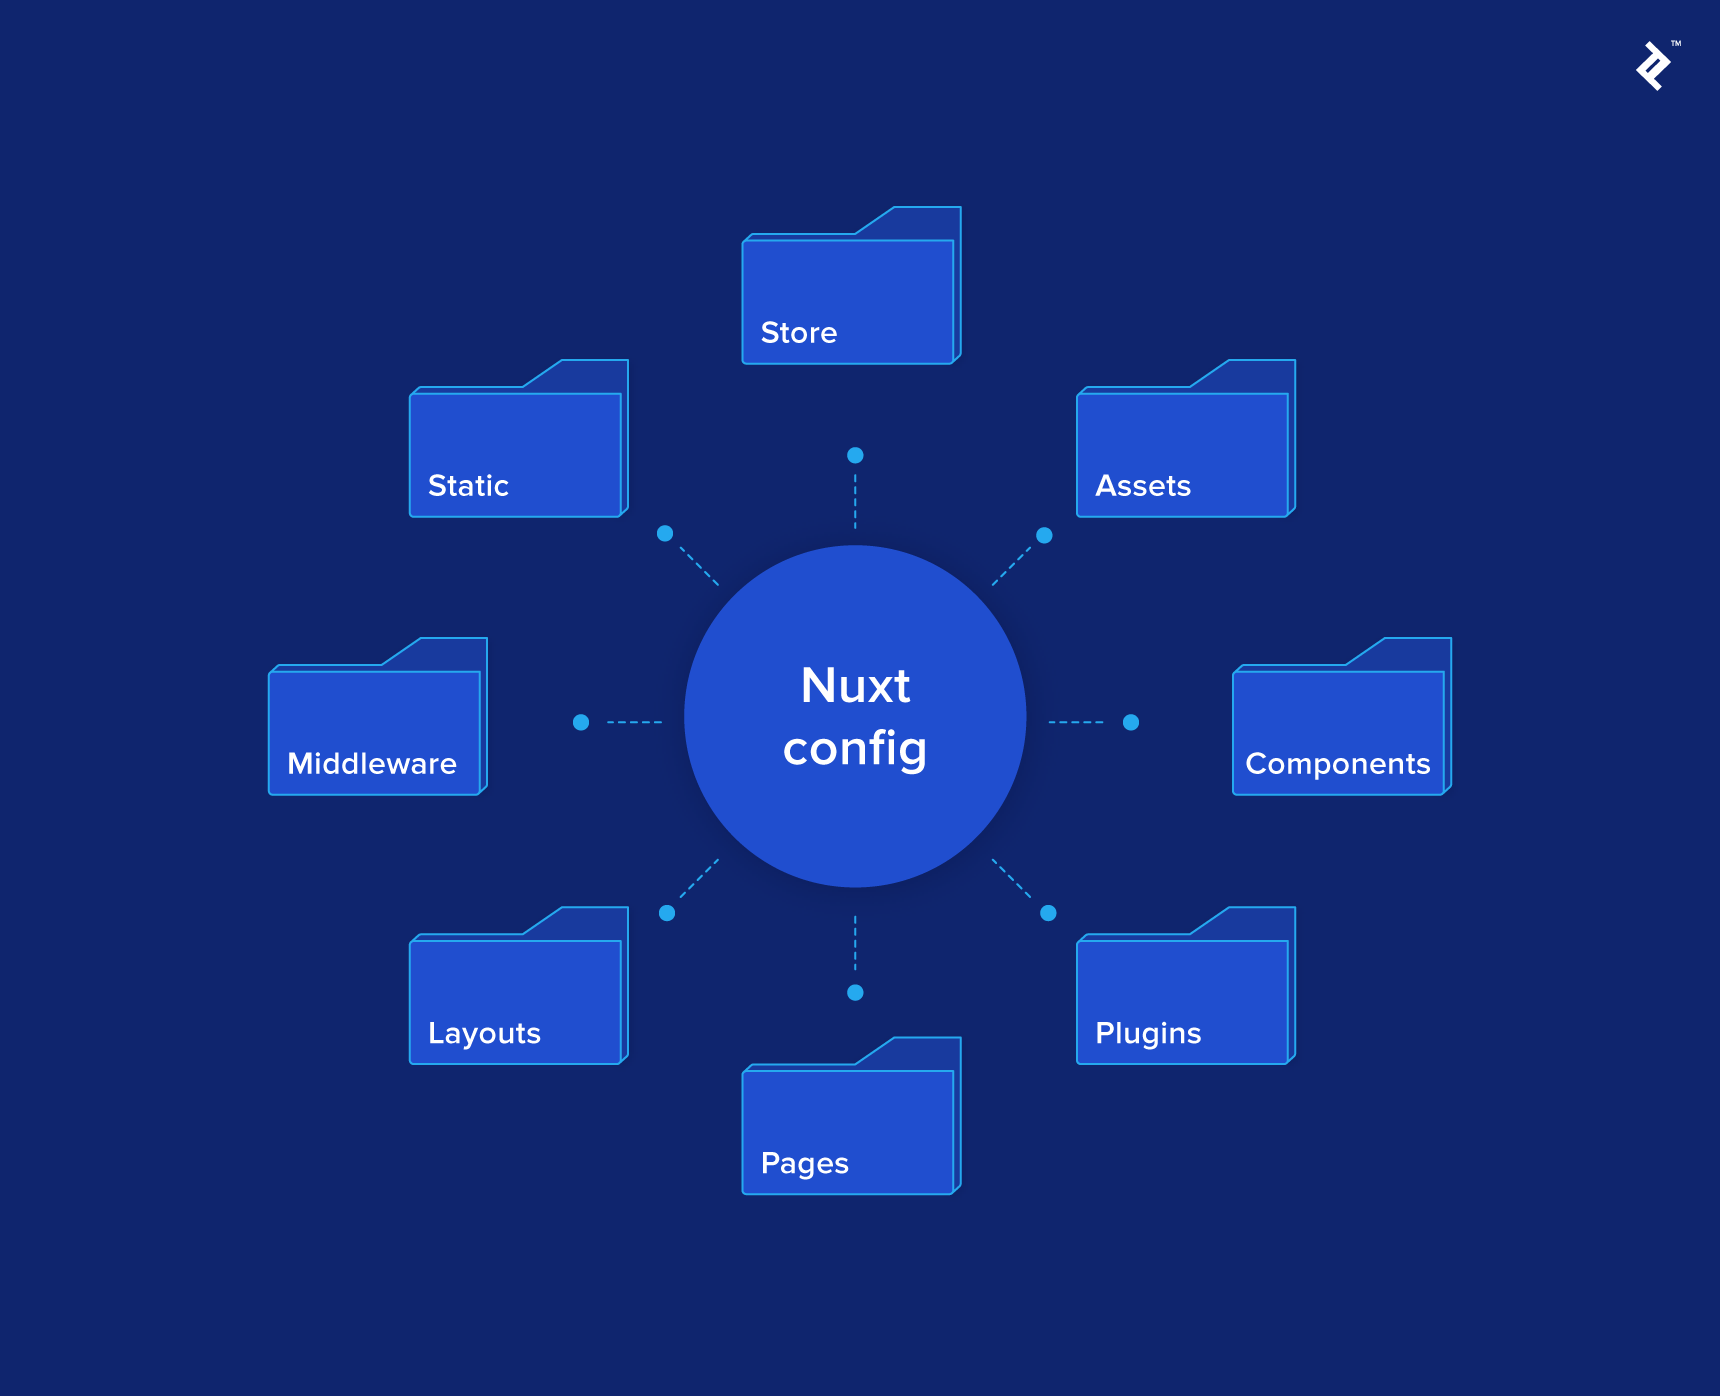
A nuxt.config.js file at the project root allows customization of various Nuxt features. By default, it configures header tags, loading bar color, and ESLint rules. For a comprehensive look at configurable options, refer to here’s the documentation. We will explore some of these options later in this article.
Let’s delve into the significance of these directories.
Project Layout
Each directory comes with a Readme file, providing a summary of its purpose and often linking to relevant documentation. This exemplifies one of Nuxt’s strengths: a predefined application structure. While experienced front-end developers often implement similar structures, the variety of approaches can lead to time-consuming discussions and decisions, especially in team settings. Nuxt eliminates this overhead by providing a standardized structure.
Nuxt examines specific directories and builds the application based on their contents. Let’s examine each directory in detail.
Pages
This mandatory directory houses Vue components that are automatically integrated into vue-router based on their filenames and directory structure, simplifying route management significantly. Normally, this involves a dedicated “Pages” directory and manual registration of each component within a separate, potentially complex router file. Nuxt streamlines this by handling the routing logic for you.
To illustrate, let’s create a about.vue component within the Pages directory, containing a basic template:
| |
Upon saving, Nuxt regenerates the routes. Since the component is named about.vue, navigating to /about will display this component.
The filename index.vue holds special significance, as it designates the root route for that directory. In the generated project, an index.vue component within the Pages directory corresponds to the homepage or landing page (e.g., localhost:3000 in development).

To structure deeper routes, sub-directories within the Pages directory come into play. For instance, to implement a “View Product” page, we can organize the Pages directory as follows:
| |
Navigating to /products/view will display the view.vue component inside the “products” directory. Conversely, navigating to /products will display the index.vue component within the same directory.
Instead of creating a dedicated products.vue component in the Pages directory like the /about page, we utilize sub-directories. While seemingly similar, there’s a crucial difference between these structures. Let’s illustrate this by adding another page.
Consider implementing an individual “About” page for each employee. For instance, an “About” page for me should be accessible at /about/ben-jones. Initially, we might attempt to structure the Pages directory like this:
| |
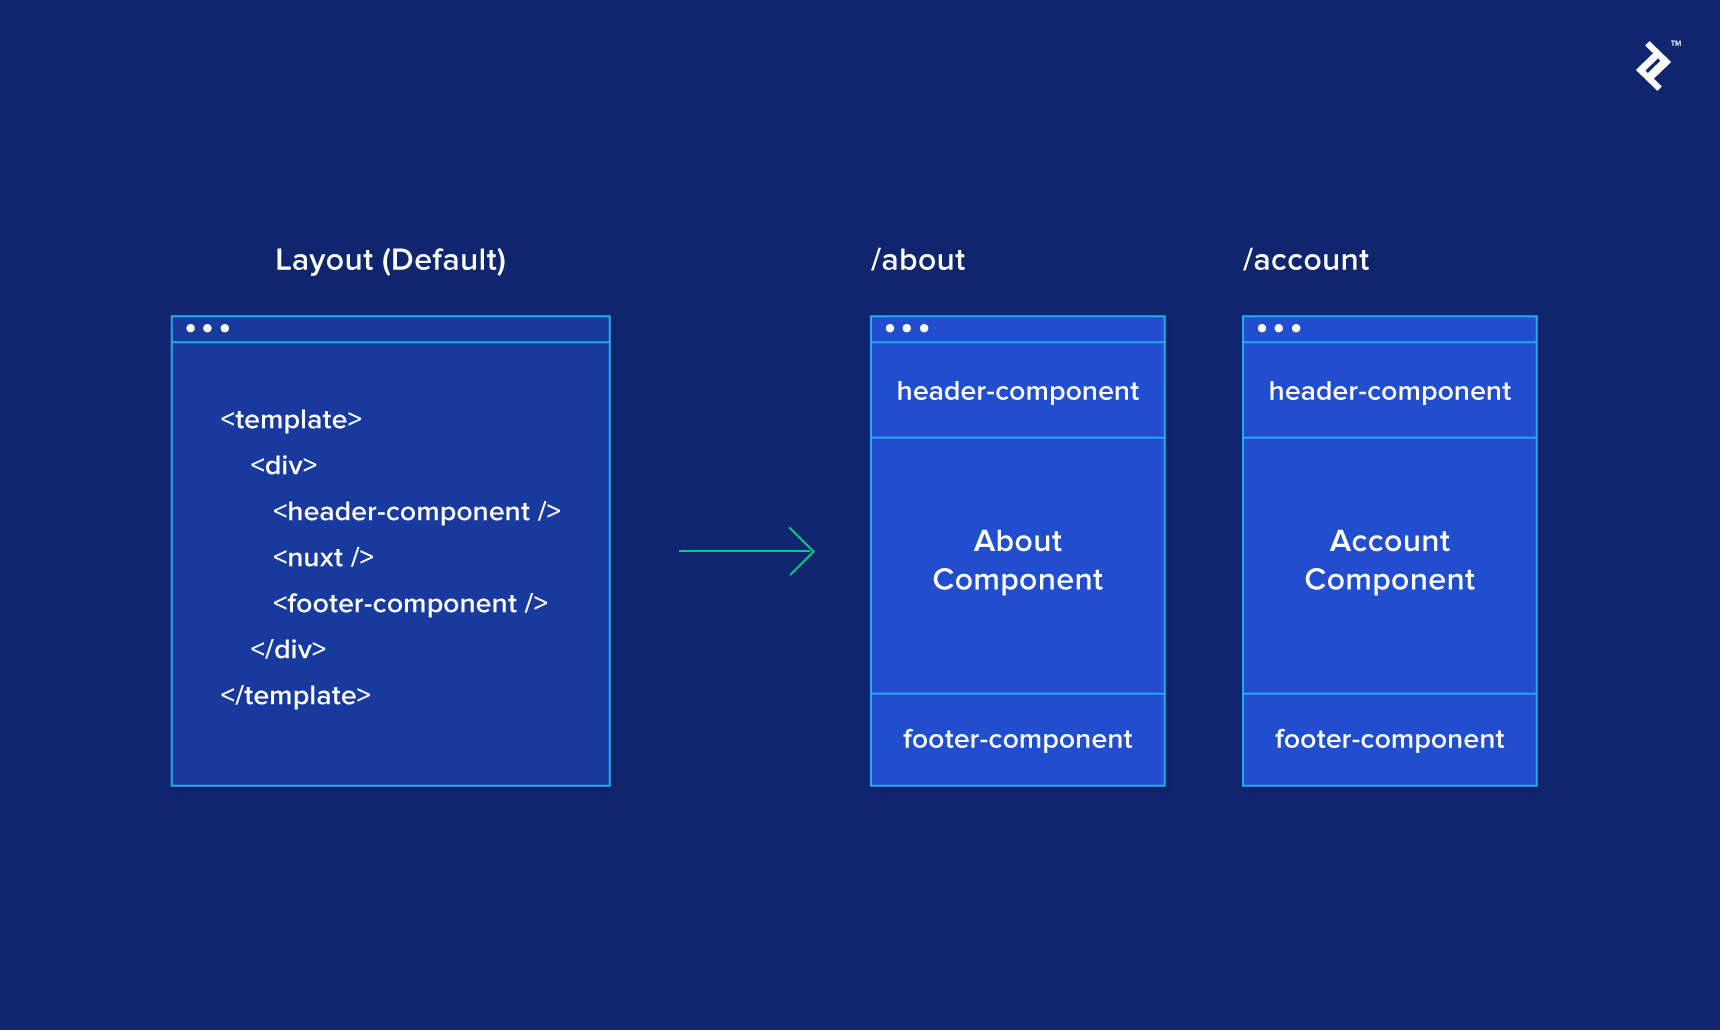
However, accessing /about/ben-jones redirects to the about.vue component, identical to /about. This is because Nuxt interprets this structure as a nested route, implying a permanent /about route with content nested within its view area. In vue-router, this is achieved using the <router-view /> component within the about.vue component. Nuxt mirrors this concept using <nuxt /> instead of <router-view />.
Let’s update the about.vue component to accommodate nested routes:
| |
Now, navigating to /about displays the original about.vue component with the title. However, navigating to /about/ben-jones displays both the title and the ben-jones.vue component rendered in place of the <nuxt/> placeholder.
While this might differ from our initial intention, the concept of an “About” page with a clickable list of employees, each revealing their information in a dedicated section, is intriguing, so we’ll retain this structure. To achieve the other option, we simply reorganize the directories. Move the about.vue component into the /about directory and rename it to index.vue, resulting in the following structure:
| |
To utilize route parameters for retrieving specific products, such as editing a product by navigating to /products/edit/64 (where 64 is the product_id), we can implement the following structure:
| |
The underscore prefix in _product_id.vue signifies a route parameter. This parameter becomes accessible through the $route.params object or the params object within Nuxt’s Context (more on this later). Note that the parameter key will be the component name without the underscore—in this case, product_id. Therefore, maintaining unique parameter names within the project is crucial. Within _product_id.vue, we might have something like:
| |
This structure allows for more complex layouts, which would be cumbersome to set up using vue-router. For instance, combining the concepts above, we can create a route like:
| |
It’s easy to understand what /categories/2/products/3 would display: the products.vue component with a nested _product_id.vue component, utilizing two route parameters: category_id and product_id. This simplifies reasoning compared to an equivalent router configuration.
While on the subject, router guards, often set up in the router config, can be implemented directly on the component itself in Nuxt using beforeRouteEnter. To validate route parameters, Nuxt provides the validate component method. For example, to ensure the product_id is a number before rendering, add the following to the script tag of _product_id.vue:
| |
Now, navigating to /categories/2/products/someproduct results in a 404 error because someproduct is not a valid number.
This concludes the overview of the Pages directory. Mastering route structuring within this directory is essential for maximizing Nuxt’s capabilities. Refer to the docs for routing for a quick reference.
If you’re concerned about losing control over the router, rest assured that this default setup works seamlessly for a wide range of well-structured projects. However, in cases where additional routes or restructuring is necessary, Nuxt provides a way to customize the router instance within the configuration. This allows for adding new routes, customizing generated routes, and even modifying the core functionality of the router instance, including Nuxt-specific additions. Therefore, you retain the flexibility to address edge cases effectively.
Store
Nuxt can automatically build the Vuex store based on the structure of the Store directory, similar to the Pages directory. If a store is not required, simply remove the directory. There are two store modes: Classic and Modules.
Classic mode mandates an index.js file within the Store directory, exporting a function that returns a Vuex instance:
| |
This mirrors Vuex usage in a typical Vue project, allowing for store creation according to your preferences.
Modules mode also requires an index.js file in the Store directory. However, this file only needs to export the root state/mutations/actions for the Vuex store. The example below illustrates a blank root state:
| |
Each file within the Store directory is added to the store as a namespaced module. For instance, to store the current product, create a product.js file in the Store directory. This makes a namespaced section of the store available at $store.product. Here’s a simple example of the file’s contents:
| |
The setTimeout within the “load” action simulates an API call, updating the store with the response after a one-second delay. Let’s utilize this in the products/view page:
| |
Key points to note: the fake API is called when the component is created. The dispatched product/load action is namespaced under “Product,” clearly indicating the affected store section. By mapping the state to a local computed property, we can easily use it within the template.
However, there’s a minor issue: the initial store state is briefly visible while the API call is in progress. We’ll address this later using Nuxt’s fetch feature.
It’s worth emphasizing that we didn’t need to manually install vuex, as it’s bundled within the Nuxt package. Adding an index.js file to the Store directory automatically enables access to all Vuex methods.
With the two main directories explained, let’s move on to the remaining, simpler directories.
Components
The Components directory houses reusable components such as navigation bars, image galleries, pagination, data tables, and more. Since components within the Pages directory are converted into routes, this dedicated directory provides a place to store these reusable elements. These components can be imported and used in pages or other components:
| |
Assets
This directory contains uncompiled assets and primarily relates to Webpack’s file loading and processing mechanisms rather than Nuxt’s core functionality. For those interested, refer to the guide in the Readme.
Static
This directory houses static files mapped to the root directory of the website. For instance, placing an image named “logo.png” in this directory makes it accessible at /logo.png. This is useful for meta files like robots.txt, favicon.ico, and other essential files.
Layouts
Vue projects often utilize a root component, typically named App.vue, to define the (usually static) application layout, including elements like a navbar, footer, and a content area for vue-router. Nuxt provides a default layout within the Layouts folder that fulfills this purpose. Initially, it consists of a div element containing a <nuxt /> component (equivalent to <router-view />), but it can be styled as needed. For demonstration, a basic navbar has been added to the example project for navigation between demonstration pages.
To use different layouts for specific sections of the app, such as a distinct CMS or admin panel, create a new layout within the Layouts directory. For example, let’s create an admin-layout.vue layout with an additional header tag and no navbar:
| |
Now, create an admin.vue page within the Pages directory and utilize Nuxt’s layout property to specify the desired layout (as a string) for that component:
| |
That’s all it takes. Page components default to the default layout unless specified otherwise. Navigating to /admin now utilizes the admin-layout.vue layout. This layout can be shared across multiple admin screens if needed. Remember that layouts must include a <nuxt /> element.
There’s one final aspect of layouts to consider. When accessing an invalid URL, an error page is displayed. This error page is, in fact, another layout. While Nuxt has its own error layout (source code here), you can customize it by creating an error.vue layout. However, the error layout must not include a <nuxt /> element. You also have access to an error object on the component, containing basic information for display. (This information is printed to the terminal running Nuxt for examination.)
Middleware
Middleware functions execute before rendering a page or layout. They are beneficial for various purposes, including route guarding, where you might check the Vuex store for a valid login or validate parameters (as an alternative to using the validate method on the component). A recent project utilized middleware to dynamically generate breadcrumbs based on the route and parameters.
These functions can be asynchronous; however, exercise caution, as rendering is delayed until the middleware resolves. Middleware functions have access to Nuxt’s Context, explained later.
Plugins
This directory allows for the registration of Vue plugins before application creation, making the plugin accessible globally within the app on the Vue instance.
Most major plugins offer Nuxt-specific versions that can be easily registered with the Vue instance by following their documentation. However, there might be instances where you need to develop a plugin or adapt an existing one for this purpose. Borrowing an example from the documentation, let’s register vue-notifications. First, install the package:
| |
Next, create a file named vue-notifications.js within the Plugins directory and add the following code:
| |
This mirrors the plugin registration process in a typical Vue environment. Finally, edit the nuxt.config.js file at the project root and add the following entry to the module.exports object:
| |
That’s it! Now you can use vue-notifications throughout your application. The example project demonstrates this at /plugin.
This concludes the directory structure rundown. While it may seem like a lot to grasp, it closely aligns with the logic already present in Vue app development. Nuxt simplifies setup, allowing you to focus on building the application.
Beyond development assistance, Nuxt enhances component functionality through various features.
Nuxt’s Supercharged Components
Nuxt boasts about its “supercharged” Page components. While this sounds impressive, it might not be immediately clear what it entails or the benefits it brings.
Essentially, all Page components in Nuxt have additional methods that provide extended functionality. We’ve already encountered one such method: validate, used for checking parameters and redirecting users if necessary.
Two key methods frequently used in Nuxt projects are asyncData and fetch. Both share similarities in concept: they run asynchronously before component generation and can populate both component data and the store. Additionally, they enable full server-side rendering of the page before sending it to the client, even when dealing with database or API calls.
So, what distinguishes asyncData from fetch?
asyncDatapopulates the Page component’s data. The returned object is merged with thedataoutput before rendering.fetchpopulates the Vuex store. If a promise is returned, Nuxt waits for its resolution before rendering.
Let’s put these methods into practice. Recall the issue on the /products/view page where the initial store state was briefly visible during the fake API call? One solution involves using a boolean flag, like loading = true, to display a loading component while the API call completes. Afterward, set loading = false and display the data.
Instead, let’s utilize fetch to populate the store before rendering. In a new page called /products/view-async, let’s replace the created method with fetch. Seems straightforward, right?
| |
However, there’s a catch. These “supercharged” methods execute before component creation, rendering this unusable as it doesn’t point to the component. So how do we access the Store in this context?
The Context API
Nuxt provides a solution in the form of the Context API. All Nuxt methods receive an argument (typically the first) containing a valuable object called the Context. This object provides access to everything you need within the app, eliminating the need to wait for Vue to create those references on the component.
The Context docs is an invaluable resource for exploring the available options. Some notable ones include app for plugin access, redirect for route changes, error for displaying the error page, and self-explanatory ones like route, query, and store.
To access the Store, destructure the Context and extract the store property. Since we need to return a promise for Nuxt to wait for before rendering, a slight adjustment to the Store action is also necessary.
| |
While this example uses async/await, you can employ alternative methods depending on your coding style. The core concept remains the same: instruct Nuxt to wait for the API call to complete and the Store to update before rendering the component. Navigating to /products/view-async no longer reveals the initial state flicker.
The usefulness of this approach extends beyond SSR to any Vue app. The Context is also accessible within all middlewares and other Nuxt methods like NuxtServerInit, a special store action that executes before Store initialization (demonstrated in the next section).
Considerations When Using SSR
Many developers, myself included, initially approach Nuxt like any other Vue project, only to encounter unexpected roadblocks where familiar patterns no longer apply. While increasing documentation helps mitigate this, the key takeaway is understanding that the client and server operate as distinct entities.
During initial page access, a request is sent to Nuxt. The server renders as much of the page and app as possible, then sends the result to the client. The client assumes responsibility for subsequent navigation and chunk loading.
While we aim to maximize server-side rendering, the server might not always have access to the necessary information, forcing client-side processing. In worse scenarios, discrepancies between server expectations and the final client-side content can trigger a complete client-side rebuild. This signals issues within the application logic. Fortunately, the browser console (in development mode) will highlight these situations.
Let’s address a common issue: session management. Imagine a Vue app with user login functionality. The session is managed using a token (e.g., JWT) stored in localStorage. Upon initial site access, you want to validate this token against an API, retrieving basic user info and populating the Store upon success.
Nuxt’s documentation introduces a convenient method called NuxtServerInit, designed for asynchronous Store population on initial load. This seems like a perfect fit! You create a user module in the Store and add the corresponding action within the index.js file in the Store directory:
| |
However, refreshing the page throws an error: localStorage is not defined. This makes sense considering the execution context. The nuxtServerInit method, running on the server, has no knowledge of client-side localStorage.
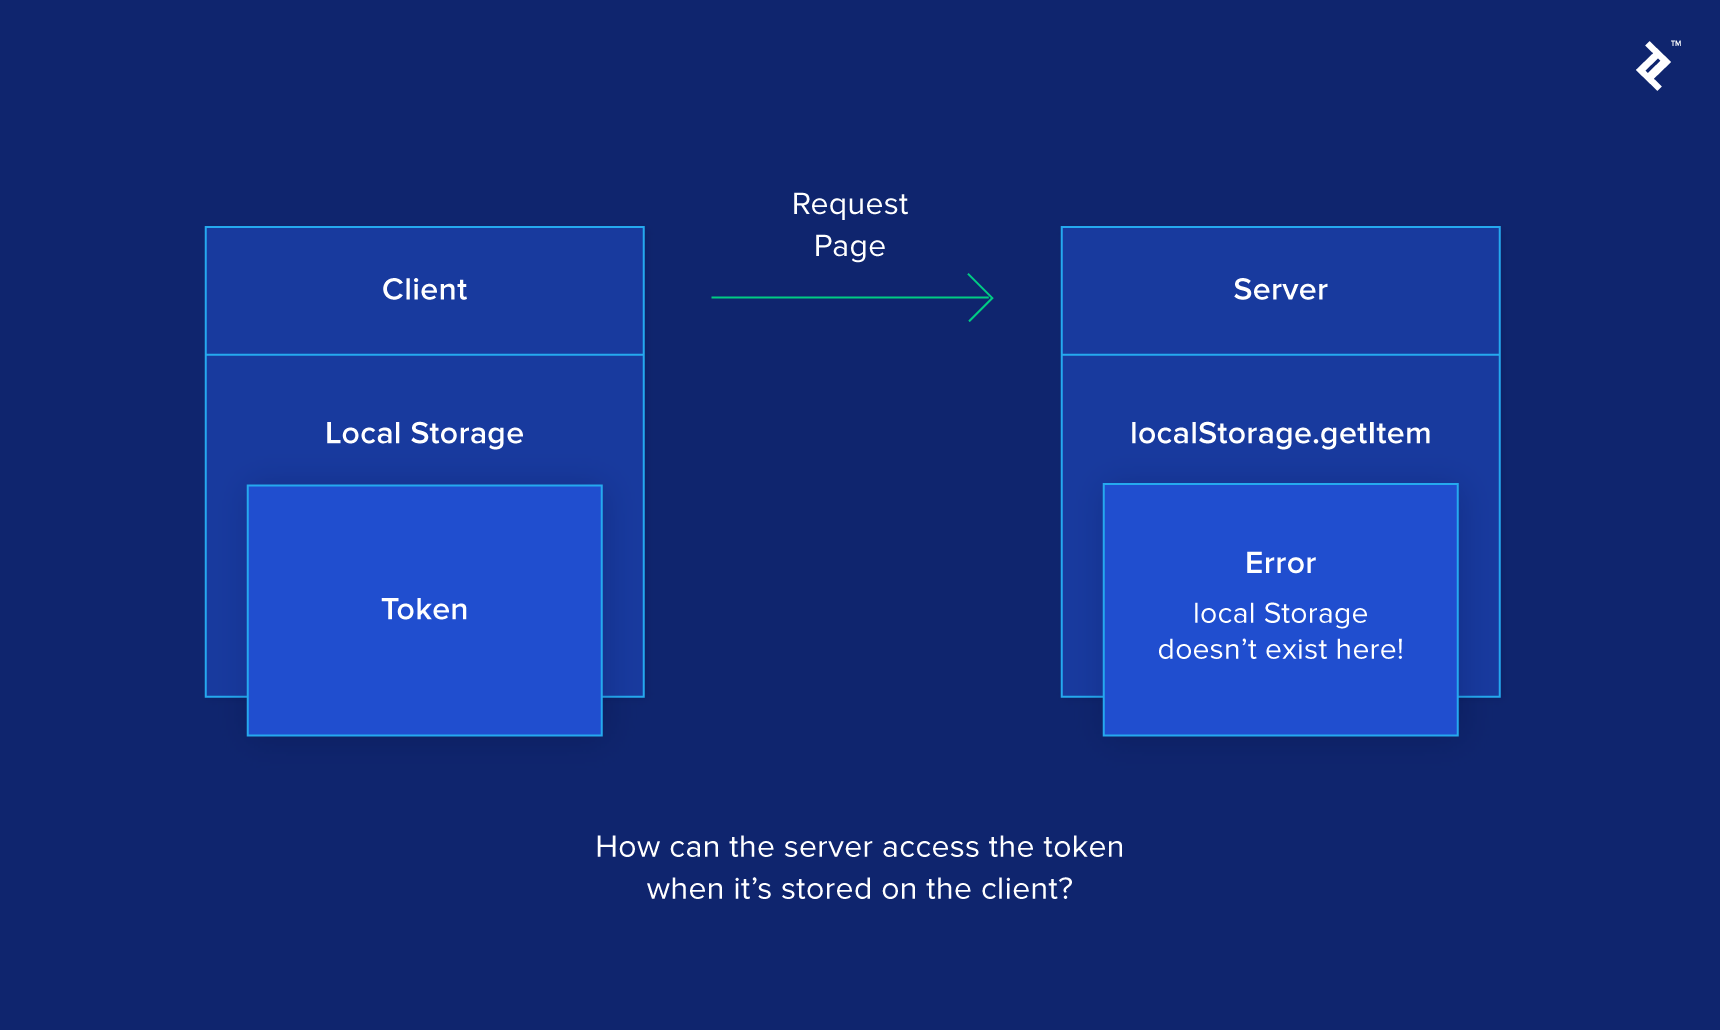
So how do we solve this? Several solutions exist. You could delegate Store initialization to the client, sacrificing SSR benefits as the client ends up performing all the work. Setting up server-side sessions for user authentication adds another layer of complexity. A more analogous solution to localStorage involves using cookies.
Nuxt has access to cookies because they are transmitted with client requests to the server. Similar to other Nuxt methods, nuxtServerInit receives the Context as an argument. However, since the first argument is reserved for the store, the Context is passed as the second argument. The Context provides access to the req object, containing headers and other information from the client request (familiar to Node.js developers).
After storing the token in a cookie named “token,” we can access it on the server:
| |
While simple, this solution might not be immediately apparent. Learning to reason about where specific actions occur (client, server, or both) and their accessible data takes time but yields significant benefits.
Deployment
Deploying Nuxt applications is incredibly straightforward. You can generate SSR apps, SPAs, or static pages from the same codebase.
Server-side Rendered App (SSR App)
This is likely the intended outcome when choosing Nuxt. The deployment process involves running the build process on your chosen platform and configuring a few settings. Let’s use Heroku as an example, following the instructions from the docs:
First, define Heroku-specific scripts in package.json:
| |
Next, set up the Heroku environment using the heroku-cli (setup instructions here):
| |
That’s all there is to it! Your SSR Vue app is now live. While other platforms might have different setups, the general process remains similar. Currently, the officially documented deployment methods include:
Single-page Application (SPA)
If you want to leverage Nuxt’s features without server-side rendering, deploying as an SPA is an option.
By default, npm run dev runs with SSR enabled. To test without SSR, modify the nuxt.config.js file by adding the following option:
| |
Now, running npm run dev disables SSR, executing the application as an SPA for testing. This setting also ensures future builds omit SSR.
Once verified, the deployment process mirrors that of an SSR app. Remember to set mode: 'spa' to inform the build process about the desired output.
Static Pages
For those who prefer static hosting services like Surge or Netlify, Nuxt allows for the generation of static pages. However, keep in mind that server-dependent code relying on req and res from the Context will require adjustments, as these are inaccessible without a server. For example, in the example project, the nuxtServerInit function throws an error during static generation because it attempts to retrieve a token from the request headers’ cookies. While this has no impact on the example project, real-world applications might require alternative data access methods.
Once addressed, deployment is simple. One crucial setting involves adding an option to the nuxt generate command to create a fallback file. This file instructs the hosting service to delegate routing to Nuxt, preventing potential 404 errors. Add the following line to nuxt.config.js:
| |
Here’s an example using Netlify, which is not currently covered in the Nuxt documentation. Note that first-time users of netlify-cli will be prompted for authentication:
| |
It’s that easy! As mentioned earlier, a statically generated version of this project is available here. You can also find official deployment documentation for the following services:
Learn More
Nuxt is under active development, and this article covers only a fraction of its features. I hope it encourages you to explore Nuxt and discover how it can empower your Vue applications, accelerating development and unlocking its powerful capabilities.
For further exploration, refer to Nuxt’s official resources:
To enhance your JavaScript skills, consider reading “The Comprehensive Guide to JavaScript Design Patterns” by fellow Toptaler Marko Mišura.