This article aims to demystify the blockchain by delving into its inner workings. While the original bitcoin whitepaper provided a starting point, I believe that practical experience is crucial for true comprehension.
Thus, I embarked on a journey to create CrystalCoin, a cryptocurrency built from the ground up using the Crystal programming language. This article won’t delve into the intricacies of algorithm selection, hash difficulty, or related concepts. Instead, it will provide a tangible example to illustrate the strengths and limitations of blockchains.
For those seeking a primer on algorithms and hashing, I recommend Demir Selmanovic’s article “Cryptocurrency for Dummies: Bitcoin and Beyond.”
Why Crystal?
I sought a language that combined the productivity of Ruby with robust performance. Cryptocurrencies demand significant computational power for tasks like mining and hashing, making compiled languages like C++ and Java popular choices. However, I wanted a language with a more elegant syntax to maintain an enjoyable development process and enhance code readability. Crystal’s performance is already quite impressive.
So, why did I opt for the Crystal programming language? Crystal’s syntax closely resembles Ruby’s, making it intuitive to grasp and write code in. This similarity translates into a gentler learning curve, particularly for seasoned Ruby developers.
The Crystal language team aptly describes it as:
Fast as C, slick as Ruby.
Unlike interpreted languages like Ruby or JavaScript, Crystal is compiled, resulting in faster execution and a reduced memory footprint. It leverages LLVM to compile code into native instructions.
Furthermore, Crystal’s static typing allows the compiler to detect type errors during compilation.
While Crystal’s merits deserve an article of their own, I encourage you to explore this article for a comprehensive overview of its capabilities.
Note: This article assumes a basic understanding of Object Oriented Programming (OOP).
Deconstructing the Blockchain
A blockchain is essentially an immutable ledger—a chain of blocks—safeguarded by cryptographic hashes, which act like digital fingerprints.
Imagine it as a linked list where each element not only points to the previous one but also incorporates its hash into its own identifier. This interdependence ensures that modifying a block necessitates recomputing all subsequent blocks.
Think of a blockchain as a series of data-containing blocks linked by a chain of hashes, where each hash depends on the previous block’s content.
This blockchain is not confined to a single server; instead, it resides on every node participating in the network, making it decentralized. Each node maintains a complete copy of the blockchain (over 149 GB for Bitcoin as of December 2017).
Hashing and Digital Signatures: The Guardians of Integrity
A hash function generates a unique fingerprint for any given input, whether it’s text or an object. Even the slightest alteration to the input drastically changes the resulting fingerprint.
This article employs the SHA256 hashing algorithm, the same one used by Bitcoin.
SHA256 consistently produces a 64-character (256-bit) hexadecimal hash, regardless of the input’s size:
| Input | Hashed Results |
|---|---|
| VERY LONG TEXT VERY LONG TEXT VERY LONG TEXT VERY LONG TEXT VERY LONG TEXT VERY LONG TEX VERY LONG TEXT VERY LONG VERY LONG TEXT VERY LONG TEXT VERY LONG TEXT VERY LONG TEXT VERY LONG TEXT VERY LONG TEXT VERY LONG TEXT VERY LONG TEXT VERY LONG TEXT VERY LONG TEXT VERY LONG TEXT | cf49bbb21c8b7c078165919d7e57c145ccb7f398e7b58d9a3729de368d86294a |
| Toptal | 2e4e500e20f1358224c08c7fb7d3e0e9a5e4ab7a013bfd6774dfa54d7684dd21 |
| Toptal. | 12075307ce09a6859601ce9d451d385053be80238ea127c5df6e6611eed7c6f0 |
Notice how adding a simple . (dot) in the last example significantly alters the hash.
In a blockchain, each block’s data is fed into the hashing algorithm to generate a unique hash that links it to the next block, creating a chain of blocks secured by their predecessors’ hashes.
Building CrystalCoin: A Practical Implementation
Let’s initiate our Crystal project and set up the SHA256 encryption mechanism.
Assuming you have Crystal programming language installed installed, we’ll use Crystal’s built-in project scaffolding tool, crystal init app [name], to create the project’s foundation:
| |
This command generates the basic project structure, including an initialized Git repository, license, and readme files. It also provides stubs for tests and a shard.yml file for project description and dependency management (shards).
Next, we’ll incorporate the openssl shard, essential for the SHA256 algorithm:
| |
Running crystal deps in your terminal will download openssl and its dependencies.
With the necessary library in place, let’s define our Block class and construct the hash function:
| |
You can test your code by executing crystal run crystal src/crystal_coin/block.cr.
| |
Crafting the Blockchain Structure
Each block stores a timestamp, an optional index, and a self-identifying hash for integrity. Mimicking Bitcoin, each block’s hash in CrystalCoin is a cryptographic hash of its index, timestamp, data, and the previous block’s hash (previous_hash). The data field can hold arbitrary information for now.
| |
Crystal replaces Ruby’s attr_accessor, attr_getter, and attr_setter methods with dedicated keywords:
| Ruby Keyword | Crystal Keyword |
|---|---|
| attr_accessor | property |
| attr_reader | getter |
| attr_writer | setter |
Additionally, Crystal encourages type hinting to guide the compiler. While type inference is present, explicit declarations improve clarity. That’s why we specified String for current_hash.
Running block.cr twice with the same data yields different hashes due to varying timestamp values:
| |
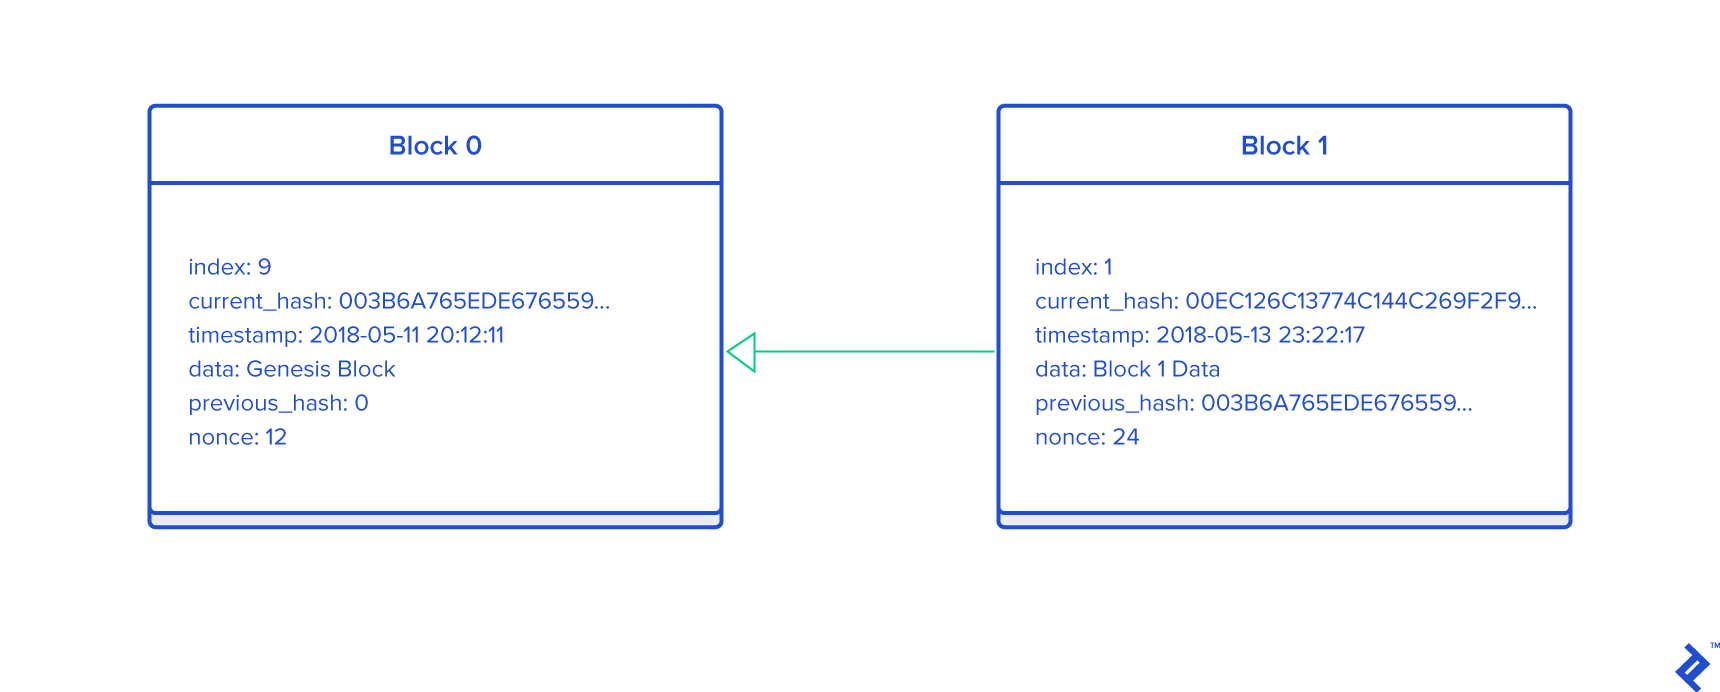
Now that we have our block structure, we need to link them into a blockchain. Each block relies on information from its predecessor, but how does the first block, the genesis block, come into existence? The genesis block is unique—it has no predecessors and is often added manually or through specific logic.
Let’s create a Block.first class method to generate the genesis block with index=0, arbitrary data, and an arbitrary previous_hash:
| |
Testing this with p CrystalCoin::Block.first yields:
| |
With the genesis block in place, we need a function to generate subsequent blocks. This function takes the previous block as input, creates the new block’s data, and returns the new block with the appropriate hash. By incorporating information from previous blocks, each new block strengthens the blockchain’s integrity.
This interdependence ensures that altering a block requires modifying all following blocks’ hashes. For example, changing the data in block 44 from LOOP to EAST necessitates changing all subsequent hashes because each hash depends on the previous_hash value.
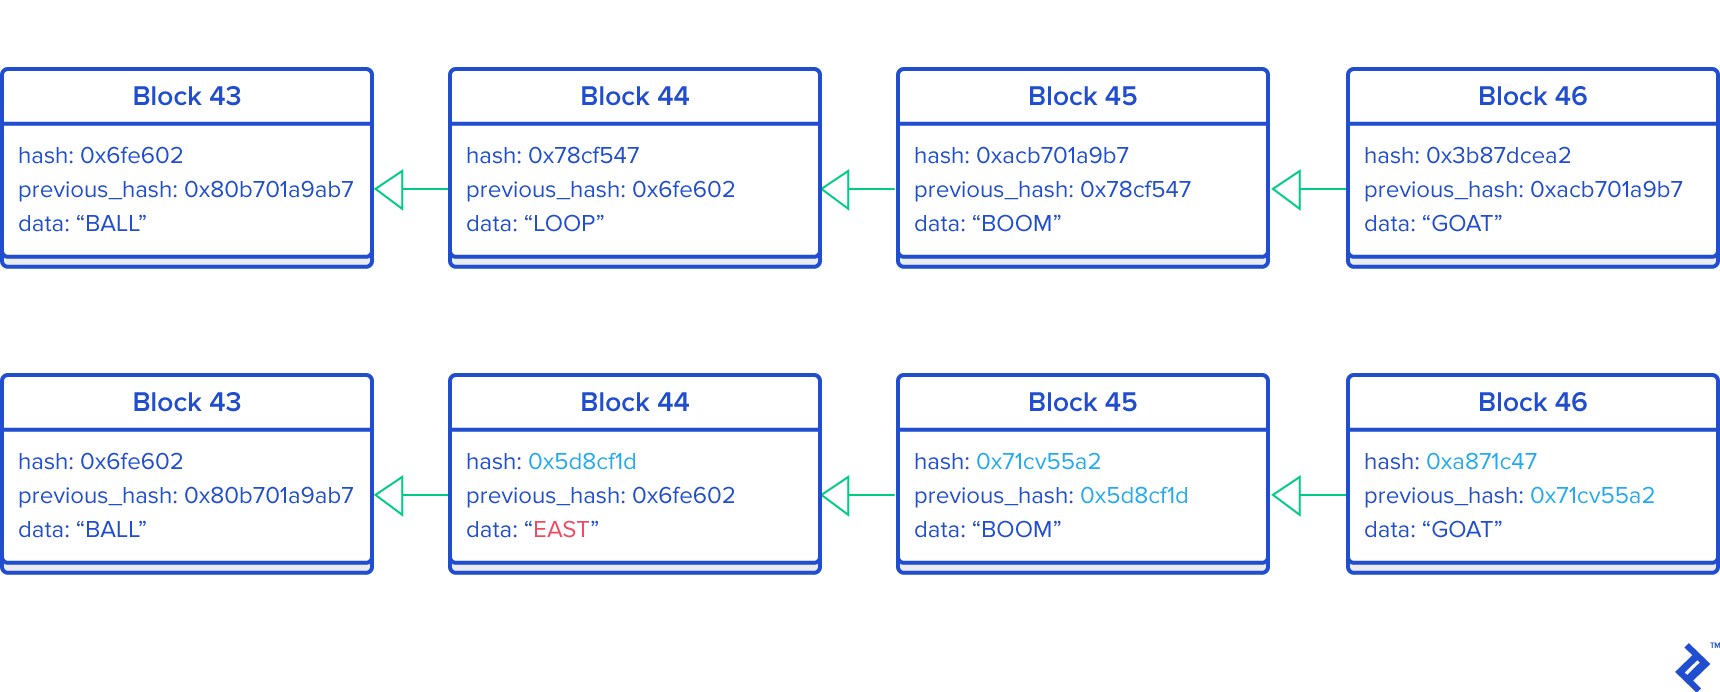
Without this mechanism, malicious actors could easily tamper with the data and replace the chain. This chain of hashes serves as cryptographic proof, ensuring the immutability of the blockchain.
Let’s implement the Block.next class method:
| |
To illustrate, we’ll create a simple blockchain starting with the genesis block and add five succeeding blocks:
| |
| |
Proof-of-Work: Securing the Network
A Proof of Work (PoW) algorithm governs the creation, or mining, of new blocks. Its purpose is to find a number that solves a computational problem—a number that is computationally expensive to find but easy to verify.
Let’s illustrate with a simplified example. Suppose a valid hash requires the hash of the product of integers x and y to start with 00:
| |
Let’s fix x to 5 and implement this in Crystal:
| |
Running the code gives us:
| |
Finding the number y=530 required brute-force computation, but verifying it is simple using the hash function.
PoW is crucial for blockchain security. In our example, a valid hash starts with 00. This criterion is the difficulty; higher difficulty increases the time to find a valid hash.
To find a valid hash, we introduce a nonce—a number incremented with each attempt. We combine the block data (date, message, previous hash, index) with a nonce, starting from 1. If the resulting hash is not valid, we increment the nonce and try again until we find a valid hash.
Bitcoin’s PoW algorithm is called Hashcash. Let’s add a proof-of-work mechanism to our Block class with a hardcoded difficulty of two leading zeros (00):
Our updated CrystalCoin Block will have these attributes:
| |
For modularity, we’ll create a separate proof_of_work.cr module:
| |
Our modified Block class:
| |
It’s worth noting some Crystal-specific aspects. Unlike Ruby, where methods are public by default, Crystal requires explicit private keywords for private methods.
Crystal offers a wider range of integer types (Int8, Int16, Int32, Int64, UInt8, UInt16, UInt32, UInt64) compared to Ruby’s Fixnum. Similarly, true and false belong to the Bool class, unlike Ruby’s TrueClass and FalseClass.
Crystal natively supports optional and named method arguments, simplifying argument handling. For instance, Block#initialize(index = 0, data = "data", previous_hash = "hash") can be called with Block.new(data: data, previous_hash: "0").
For a deeper dive into the differences between Crystal and Ruby, refer to Crystal for Rubyists.
Now, let’s create five transactions using:
| |
| |
Notice the difference? All hashes now begin with 00, demonstrating the effectiveness of proof-of-work. Our ProofOfWork module found the appropriate nonce to generate hashes meeting the difficulty requirement.
The first block required 17 nonce attempts:
| Block | Loops / Number of Hash Calculations |
|---|---|
| #0 | 17 |
| #1 | 24 |
| #2 | 61 |
| #3 | 149 |
| #4 | 570 |
| #5 | 475 |
Increasing the difficulty to four leading zeros (difficulty="0000") increases the computational effort:
| Block | Loops / Number of Hash Calculations |
|---|---|
| #1 | 26 762 |
| #2 | 68 419 |
| #3 | 23 416 |
| #4 | 15 353 |
The first block now required 26762 nonce attempts (compared to 17 with a difficulty of 00).
Exposing the Blockchain as an API
We’ve successfully implemented a basic blockchain, but it’s currently limited to a single machine. Let’s introduce decentralization by enabling our blockchain to run on multiple nodes.
From this point onward, CrystalCoin will use JSON for data exchange. Each block’s data field (now referred to as transactions) will contain a list of transactions in JSON format.
Each transaction object will detail the sender, receiver, and the amount of CrystalCoin being transferred:
| |
Let’s modify our Block class to accommodate the new transaction format:
We introduce a simple Transaction class:
| |
Transactions are grouped into blocks, with each block potentially holding multiple transactions. These blocks are added to the blockchain at regular intervals.
To manage the collection of blocks, we introduce the Blockchain class:
Blockchain maintains two arrays: chain for mined blocks and uncommitted_transactions for pending transactions yet to be included in the blockchain. Upon initialization, Blockchain creates the genesis block using Block.first and adds it to the chain array. It also initializes an empty uncommitted_transactions array.
We’ll add the Blockchain#add_transaction method to append transactions to the uncommitted_transactions array.
Let’s build the Blockchain class:
| |
We’ll update the Block class to use transactions instead of data:
| |
To facilitate adding transactions to our blockchain network, we’ll create a simple HTTP server representing a node.
Our server will expose four endpoints:
- [POST]
/transactions/new: Creates a new transaction and adds it to the uncommitted transaction pool. - [GET]
/mine: Instructs the server to mine a new block. - [GET]
/chain: Returns the entire blockchain in JSON format. - [GET]
/pending: Returns pending transactions (uncommitted_transactions).
We’ll utilize the Kemal web framework, a lightweight framework inspired by Ruby’s Sinatra. It simplifies mapping endpoints to Crystal functions. For those familiar with Ruby on Rails, Amber provides a comparable experience.
Let’s add Kemal to our shard.yml file and install it:
| |
Now, let’s construct the basic HTTP server:
| |
Let’s start the server:
| |
Verifying the server’s functionality:
| |
With the server running smoothly, let’s implement the endpoints. We’ll begin with /transactions/new and /pending:
| |
These implementations are straightforward. We create a CrystalCoin::Block::Transaction object and add it to the uncommitted_transactions array using Blockchain#add_transaction.
Currently, transactions reside in the uncommitted_transactions pool until they are mined into a block. Mining involves selecting transactions from this pool, creating a new block using the Block.next method, and finding a valid nonce that satisfies the PoW criteria.
In CrystalCoin, we’ll use our previously defined Proof-of-Work algorithm. Mining a new block involves:
- Identifying the last block in the
chain. - Retrieving pending transactions (
uncommitted_transactions). - Constructing a new block using
Block.next. - Appending the mined block to the
chainarray. - Clearing the
uncommitted_transactionspool.
Let’s implement the Blockchain#mine method to encapsulate these steps:
| |
We first check for pending transactions. Then, we retrieve the last block and select the first 25 transactions from the uncommitted_transactions pool using Array#shift(BLOCK_SIZE).
Now, let’s implement the /mine endpoint:
| |
And the /chain endpoint:
| |
Interacting with the Blockchain
We’ll use cURL to interact with our API over the network.
First, start the server:
| |
Next, create two transactions by sending POST requests to http://localhost:3000/transactions/new with the transaction data:
| |
Let’s list the pending transactions:
| |
As expected, our two transactions are in the uncommitted_transactions pool.
Now, let’s mine these transactions by sending a GET request to http://0.0.0.0:3000/mine:
| |
We’ve successfully mined the first block and added it to our chain. Let’s verify:
| |
Consensus and Decentralization: The Heart of the Blockchain
Our blockchain accepts transactions and mines new blocks, but it’s still confined to a single machine. The essence of a blockchain lies in its decentralization. But how do we maintain consistency across multiple nodes?
This is where the concept of Consensus comes into play.
We need a consensus algorithm to manage multiple nodes and ensure they all agree on the same blockchain state.
Registering New Nodes
To implement consensus, nodes need to be aware of their peers. Each node maintains a registry of other nodes in the network.
Let’s add two more endpoints:
- [POST]
/nodes/register: Accepts a list of new node URLs for registration. - [GET]
/nodes/resolve: Implements our Consensus Algorithm to resolve conflicts and ensure chain consistency.
We’ll modify our blockchain’s constructor and introduce a node registration mechanism:
| |
We use a Set data structure to store node URLs, ensuring idempotency—each node appears only once, regardless of how many times it’s added.
Let’s create a new Consensus module and implement the register_node(address) method:
| |
The register_node function parses and formats the node URL.
Now, let’s implement the /nodes/register endpoint:
| |
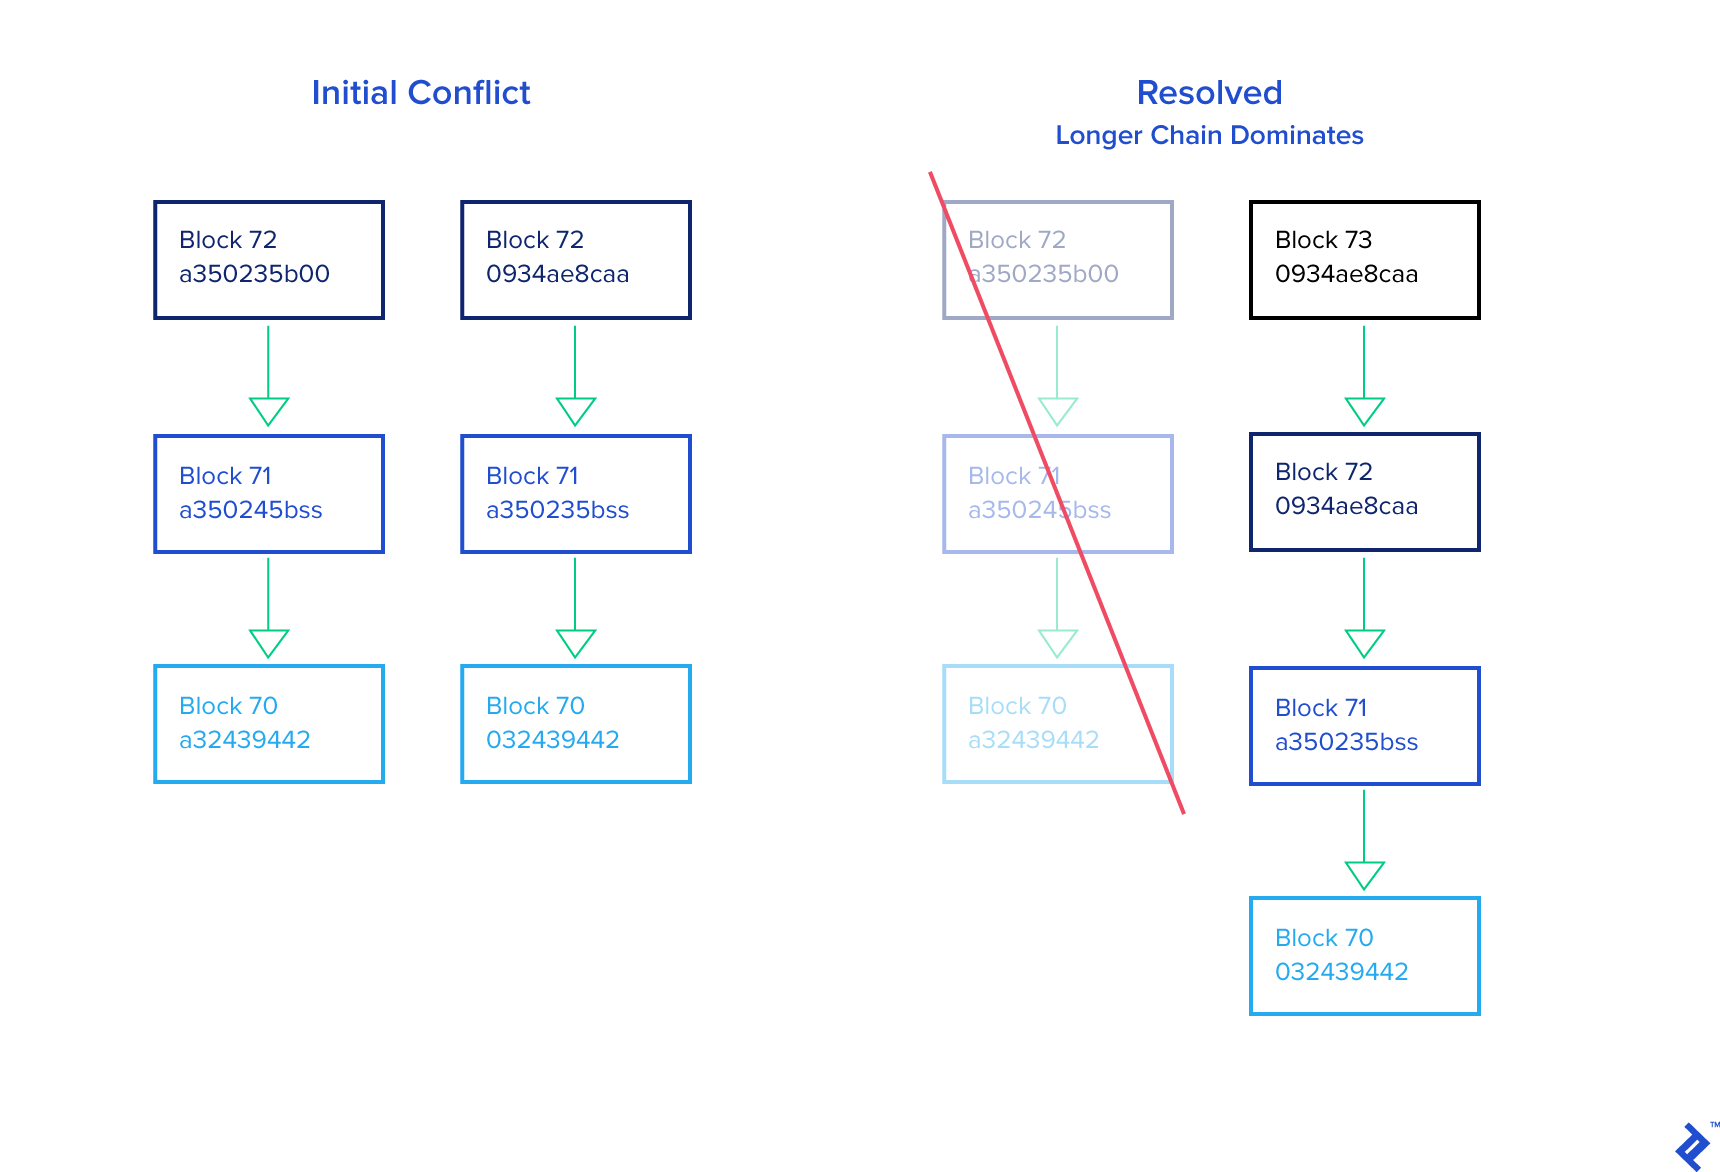
In a decentralized network, chain discrepancies might arise. Our consensus algorithm must resolve these conflicts to maintain system integrity. We’ll adopt the “longest valid chain” rule—the longest valid chain becomes the authoritative version. This approach assumes that the longest chain represents the most computational effort invested.
| |
The resolve method iterates through neighboring nodes, downloads their chains, and verifies them using the valid_chain? method. If a longer valid chain is found, it replaces the current node’s chain.
Now, let’s implement the private methods parse_chain() and valid_chain?():
| |
In parse_chain():
- We send a
GETrequest to the/chainendpoint of the target node usingHTTP::Client.get. - The
/chainJSON response is parsed usingJSON.parse. - We extract an array of
CrystalCoin::Blockobjects from the JSON data usingArray(CrystalCoin::Block).from_json(node_chain).
Crystal offers various JSON parsing methods. We’ll leverage the convenient JSON.mapping(key_name: Type) functionality, which provides:
Class.from_json: Creates an instance of the class from a JSON string.instance.to_json: Serializes an instance of the class into a JSON string.- Getters and setters for the defined keys.
We need to define JSON.mapping within the CrystalCoin::Block object and remove the property usage:
| |
In Blockchain#valid_chain?, we iterate through each block and:
- Recalculate the block’s hash using
Block#recalculate_hashand verify its correctness:
| |
- Ensure each block is correctly linked to its predecessor via the
previous_hash. - Check if the block’s hash meets the difficulty criteria (two leading zeros in our case).
Finally, we implement the /nodes/resolve endpoint:
| |
Congratulations! We’ve built a basic decentralized blockchain. The complete code is available on GitHub: final code.
The project structure should now look like this:
| |
Testing Our Decentralized Blockchain
- Set up two nodes on your network, either on different machines or using different ports on the same machine. I’ll use
http://localhost:3000andhttp://localhost:3001as my two nodes. - Register the second node’s address with the first node:
| |
- Add a transaction to the second node:
| |
- Mine this transaction into a block on the second node:
| |
- At this point, the first node has only the genesis block, while the second node has the genesis block and the newly mined block:
| |
| |
- Let’s resolve the first node to update its chain:
| |
Verifying the first node’s updated chain:
| |
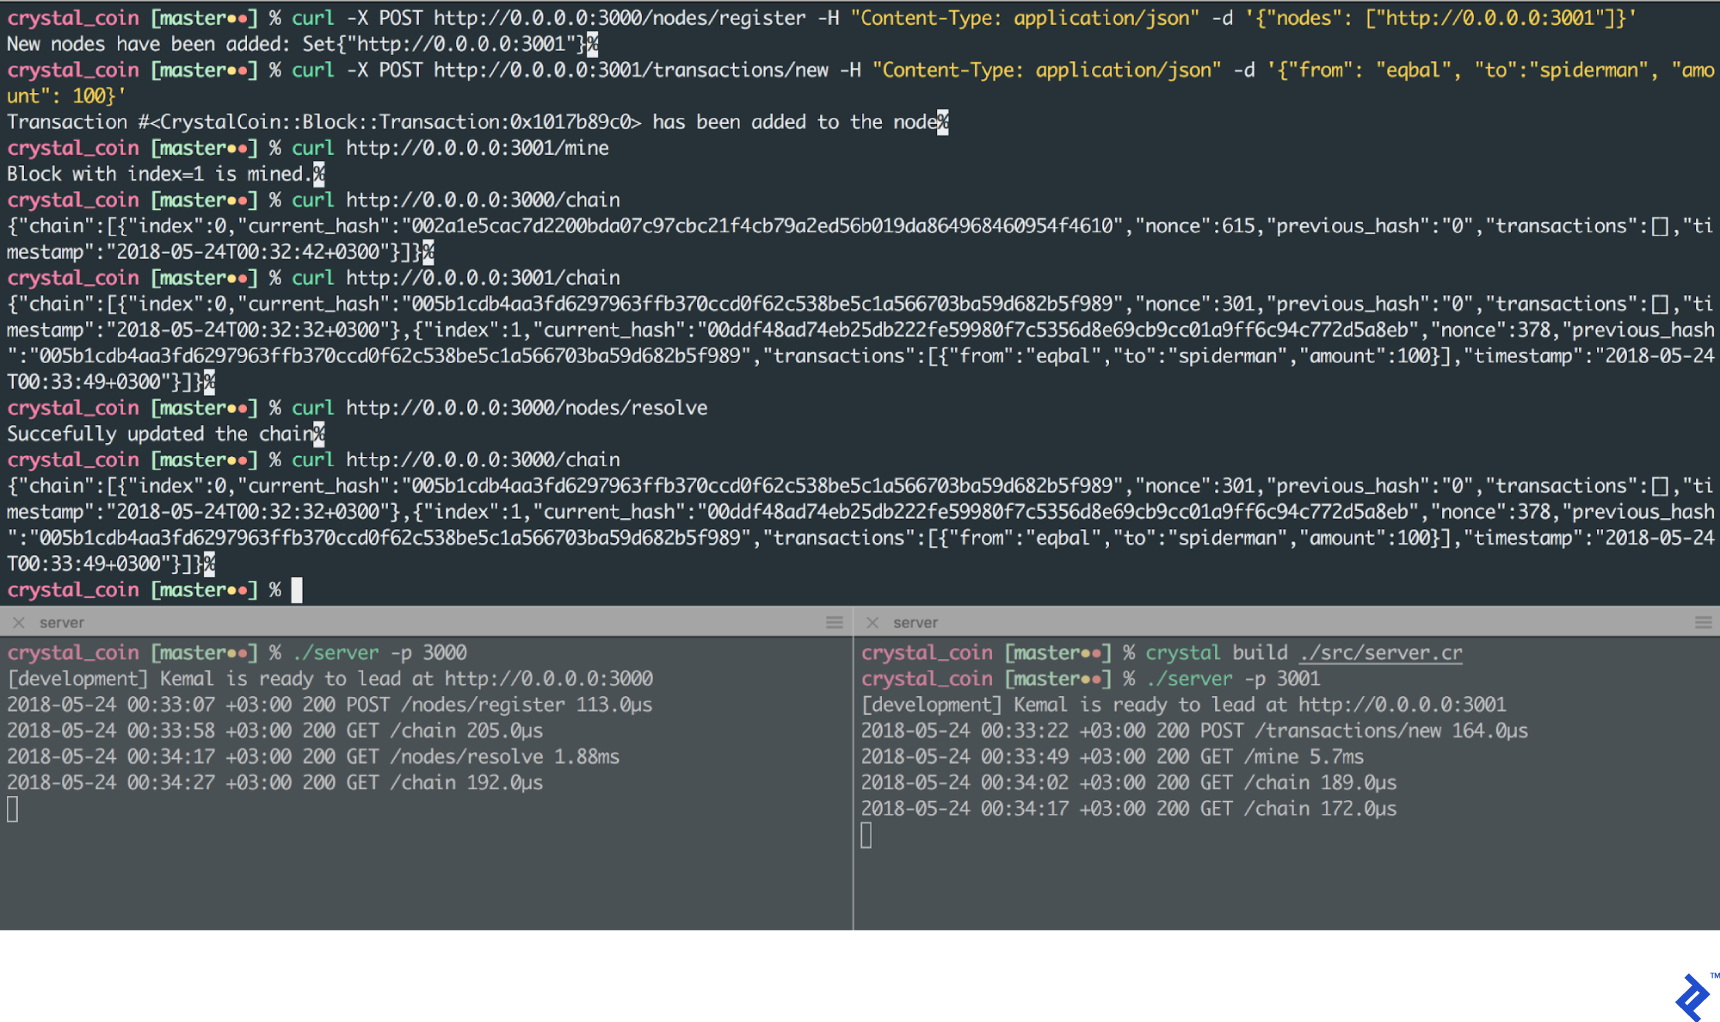
Our Crystal blockchain is working flawlessly!
Conclusion
This tutorial covered the fundamentals of building a public blockchain using Crystal. You’ve learned to implement a blockchain from scratch and create a simple application for sharing information on the network.
We’ve built a functional blockchain that can be deployed on multiple machines to form a decentralized network. While our CrystalCoin is a simplified example, it lays the groundwork for exploring more complex blockchain concepts.
Remember, the code provided here is a starting point and is not production-ready. Use it as a guide for further exploration and experimentation.