Most web traffic now originates from mobile devices](https://www.oberlo.com/statistics/mobile-internet-traffic#:~:text=Mobile%20Browsing%20Stats%20in%20the%20United%20States&text=As%20of%20August%202022%2C%2053.74,46.26%20percent%20coming%20from%20desktops), not desktops. Therefore, contemporary web applications need to effortlessly adjust to different resolutions, aspect ratios, and devices. The React-Bootstrap library combines the strengths of two prominent frameworks ([React and Bootstrap) to simplify the development of high-quality, performant, and responsive web applications.
This piece explores the fundamental components and advantages of utilizing a React-Bootstrap layout. It delves into illustrative instances within a sample application, aiming to enhance the development process for your upcoming web endeavors.
Understanding React-Bootstrap: Its Purpose and Significance
Bootstrap, a framework based on CSS and JavaScript, facilitates responsive web design by employing a grid system composed of rows and columns. Let’s analyze React-Bootstrap within the context of CSS frameworks and traditional Bootstrap to pinpoint the projects it suits best.
Bootstrap and the Realm of CSS Frameworks
When crafting a website, CSS dictates the visual elements presented on a page, and modifying a site’s CSS can provide a much-needed visual refresh. However, in the contemporary landscape of web styling, relying solely on CSS is insufficient. Responsive web design is no longer optional, and frameworks have emerged to alleviate the workload of CSS developers.
Responsive web design empowers applications to dynamically modify layouts and elements based on a spectrum of devices and window/screen dimensions. CSS frameworks offer supplementary benefits, including expedited development cycles, reduced code repetition, and enhanced maintainability of the codebase.
Numerous frameworks aim to simplify CSS development; Tailwind CSS and Foundation stand out as two popular contenders. Nevertheless, Bootstrap has become a standard selection for responsive CSS development, owing to advantages such as:
- A robust and active community coupled with extensive documentation.
- A mature ecosystem encompassing a diverse range of styling components, including pre-built blocks, themes, and templates.
- A high degree of customizability and seamless cross-browser compatibility.
Now, let’s weigh the trade-offs involved in choosing between React-Bootstrap and vanilla Bootstrap.
Bootstrap vs. React-Bootstrap: A Comparative Glance
Given the abundance of out-of-the-box advantages, why wouldn’t we opt for plain Bootstrap when building React applications? The rationale lies in the inherent architecture of React itself.
React advises against developers directly manipulating the DOM. Instead, it predominantly leverages a the virtual DOM, often referred to as the VDOM, to meticulously monitor any modifications applied to the DOM. React might overlook changes occurring outside the confines of the VDOM, potentially resulting in bugs, errors, and unforeseen behavior.
Earlier iterations of Bootstrap heavily relied on jQuery, a library known for directly altering the DOM, which could, in turn, lead to the undesired outcomes mentioned previously. This is where React-Bootstrap comes into play. This library provides developers with access to the complete repertoire of Bootstrap components while relying solely on pure JavaScript instead of jQuery. This design choice ensures that only the VDOM is modified.
Apart from mitigating undesirable behavior associated with direct DOM manipulation, React-Bootstrap offers the added benefit of clean, readable syntax. Let’s illustrate this by constructing an identical card component using both Bootstrap and React-Bootstrap:

Observe that our Bootstrap card’s code is inundated with div tags, making it challenging to discern the role of each component:
| |
In stark contrast, the code for our React-Bootstrap example card clearly labels each individual component:
| |
Do these two advantages alone elevate React-Bootstrap to a position of absolute superiority over Bootstrap in every scenario? Not necessarily. Starting with version 5, Bootstrap has shed its dependence on jQuery, making it compatible with React. Conversely, until recently, React-Bootstrap lacked support for Bootstrap 5, implying that developers couldn’t upgrade their React-Bootstrap projects to leverage new Bootstrap releases. React-Bootstrap v2 addresses this limitation.
If you’re contemplating migrating your project from React to an alternative framework, such as Vue, Bootstrap emerges as the more flexible choice. A significant portion of the plain Bootstrap code can be reused. However, developers working with React-Bootstrap would need to undertake code conversion. Both Bootstrap and React-Bootstrap have their own merits and drawbacks. The optimal choice hinges on your specific project requirements. In our case, we prioritize readability over seamless migration capabilities.
Putting It into Practice: Exploring React-Bootstrap Components
To showcase a practical React-Bootstrap implementation, let’s construct a standard website UI featuring a navbar, a footer, and a responsive grid layout.
Initial Setup and Fundamental Concepts
To begin, let’s create a fresh React application using the following command in our terminal:
| |
Next, we install both React-Bootstrap and Bootstrap. Note that installing Bootstrap is essential because it encompasses all the stylesheets associated with React-Bootstrap components:
| |
If you don’t intend to override Bootstrap’s default styling, you’ll need to import Bootstrap’s primary stylesheet, bootstrap/dist/css/bootstrap.min.css, within your src/App.tsx file at this stage. (We’ll be overriding default Bootstrap styles to accommodate custom styling, so this step is omitted in our case.)
Generally, there are two primary methods for importing React-Bootstrap components. The first approach involves importing the React-Bootstrap container separately from the button, as demonstrated here:
| |
However, the preferred method utilizes destructured imports. This approach yields more concise and readable code, especially when dealing with multiple components:
| |
Finally, we can render a React-Bootstrap component using the following syntax:
| |
Tailoring the Look: Custom Styles
Bootstrap’s default styles, such as its predefined colors, can be overridden with custom styling to achieve a more distinct visual identity for your web project. Let’s proceed by overriding Bootstrap’s 13 default text colors](https://getbootstrap.com/docs/5.2/utilities/colors/#colors) with a custom color palette. First, install [Sass:
| |
Next, rename your App.css file to App.scss to indicate that it’s now a Sass file. Afterward, add import './App.scss'; within your App.tsx file. In your App.scss file, we’ll override the primary and secondary colors and then import the Sass Bootstrap stylesheet, as shown below:
| |
Always ensure that style overrides precede the import of Bootstrap stylesheets. Otherwise, your custom styles won’t be applied.
Building Blocks: Containers
Containers serve as the most rudimentary and fundamental React-Bootstrap component. They act as a building block for implementing more intricate components, such as grids. Containers offer the option to center their enclosed content horizontally and apply padding.
Before incorporating the navbar, footer, and grid system into our website, let’s visually demonstrate how containers affect their content. We’ll temporarily place a simple text paragraph (p) inside a generic section (div) within our src/App.tsx file. To enhance visual clarity, we’ll set the section background to blue and the overall background to gray:
| |
Without a dedicated React-Bootstrap container, our content lacks padding and responsiveness:
Let’s modify the code to use a React-Bootstrap Container component instead of a generic div (remembering to import Container before attempting to use it):
| |
Now, our content is rendered with padding:
Feel free to resize your browser window to witness the responsive design in action.
Streamlined Navigation: Navbars
The initial component we’ll add to our example site is the navbar. Creating a separate React component specifically for the navbar (rather than intermingling its code with other components) improves code organization and simplifies future modifications.
Navigate to your src/components folder and create a new file named ResponsiveNavbar.tsx. We’ll import the Navbar component along with any other required components. Next, we add a basic navbar, which we’ll enclose within the responsive Container component. This navbar will display our site’s logo or title using the Navbar.Brand component:
| |
We supply three arguments to the navbar:
bgdictates the background color of the navbar.collapseOnSelectinstructs the navbar to automatically collapse after a user selects an item.expanddetermines the breakpoint at which the navbar will collapse (smsignifies that it will collapse at a width of 768 px).
To create a more feature-rich navbar, we’ll introduce a toggled burger menu (Navbar.Toggle) that reveals “Home,” “Link,” and “Drop-down” sections. The Navbar.Toggle component remains hidden in desktop mode. However, when the website is accessed on devices with smaller screens, it condenses horizontal sections, wrapped by Navbar.Collapse, into a mobile-friendly burger menu.
| |
Navbar.Toggle and Navbar.Collapse prove to be powerful tools, empowering developers to construct responsive navigation bars with minimal code.
Lastly, we import ResponsiveNavbar from './components/ResponsiveNavbar'; and include it within our primary App component:
| |
You can test the application at any point by executing npm start to observe the updates as you add each component.
A Solid Base: Footers
With our navbar finalized, let’s shift our focus to the site’s footer. Similar to our approach with ResponsiveNavbar, we need to declare a Footer component and export it from a new file named Footer.tsx. We construct a basic footer using text, links, and a Container:
| |
The classes p-3 and mt-5 correspond to padding and margin-top, respectively. Their values can range from zero to five (e.g., p-5 and mt-1 are valid options) or be set to auto. It’s crucial to include mt-auto as well. This will push the footer to the bottom of the page once we incorporate the Footer component into our main App in the subsequent step.
Next, to arrange the social links horizontally with proper spacing, we’ll introduce a Row component and nest each link within a Col (column) component (ensuring we’ve added Row and Col to our React-Bootstrap imports):
| |
The final step involves positioning the footer at the bottom of our page within our App component:
| |
Here, we’ve also established a minimum height of 100vh for the webpage. This value represents the full height of the screen (100% of the viewport height) and guarantees that the footer consistently appears at the very bottom of the screen, even when content is shorter than the screen height, preventing it from clinging directly below the content.
Dynamic Layouts: Grid Systems
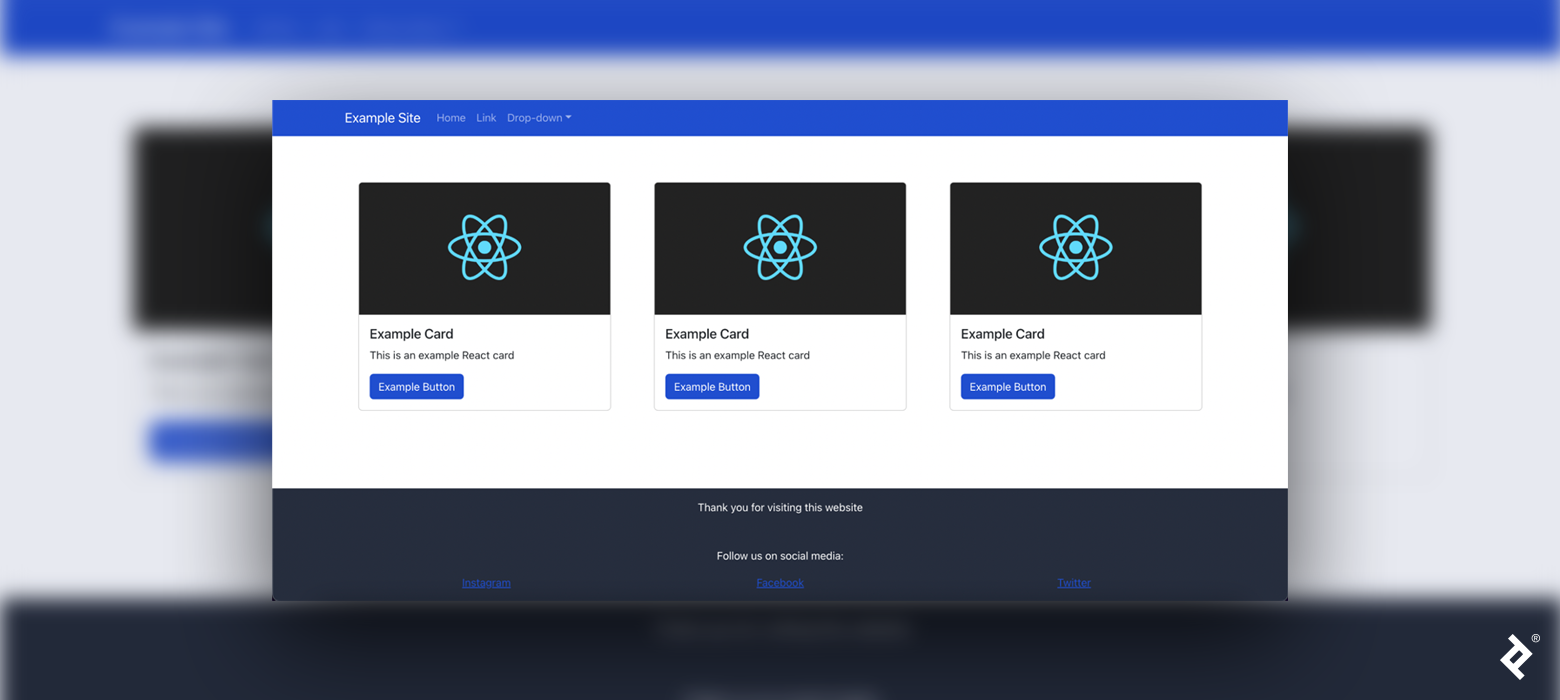
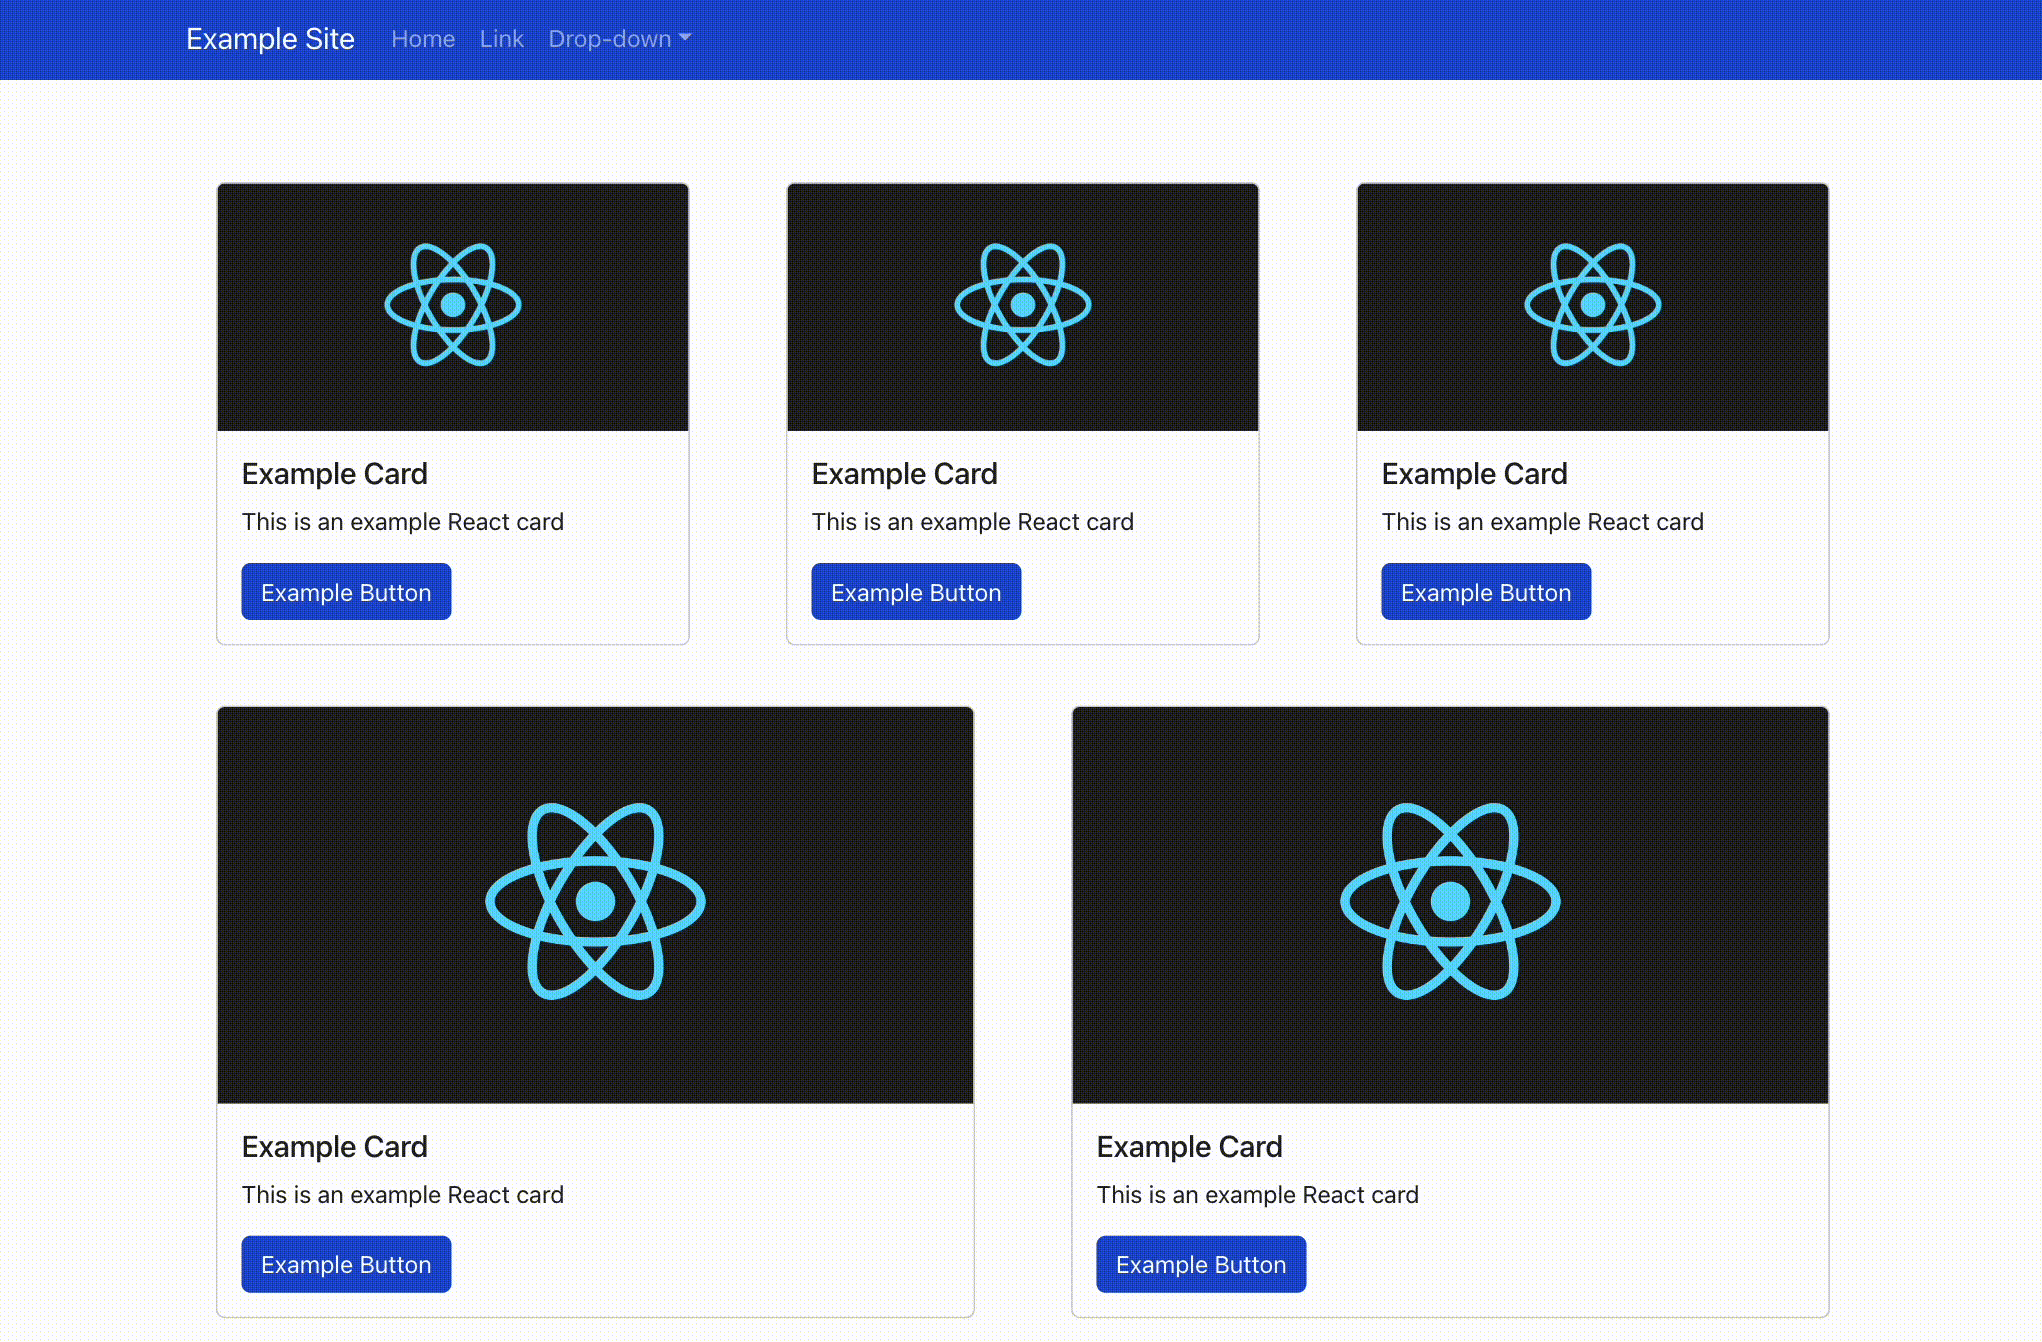
With the navbar and footer in place, let’s complete our website by integrating a dynamic grid system into the page. This grid will house Card components, which we’ll define and export from a new file named Item.tsx:
| |
Now, let’s return to App.tsx and add a dynamic grid comprising rows and columns. We’ll position this grid between the navbar and the footer. It’s important to wrap our grid system within a Container:
| |
We have the flexibility to define a constant value for numberOfItems to govern how many times the Item component is rendered. The columns are automatically sized and exhibit responsiveness across all screen dimensions. Experiment with resizing your browser window to test the the final result in action.
Effortless Responsive Web Development
React-Bootstrap’s clean, readable syntax and intuitive components significantly streamline the implementation of responsive design in any project. The ability to effectively work with both Bootstrap and React-Bootstrap is an invaluable asset for front-end developers. Armed with these tools in your skillset, you’re well-equipped for more efficient web application design and prototyping.
The editorial team at the Toptal Engineering Blog expresses gratitude to Said Kholov for their meticulous review of the code examples and technical content presented in this article.