Selecting the appropriate architecture for your Android project from the outset is crucial for long-term maintainability, particularly as your codebase and team size increase.
This article goes beyond a simple Android MVVM tutorial by integrating MVVM (Model-View-ViewModel) with Clean Architecture. We’ll explore how this architectural pattern facilitates the development of decoupled, testable, and maintainable code.
Why MVVM with Clean Architecture?
MVVM decouples your views (Activitys and Fragments) from business logic. While sufficient for smaller projects, MVVM can lead to bloated ViewModels and convoluted responsibilities as the codebase expands.
This is where MVVM with Clean Architecture shines. By further separating concerns, it enforces a clear structure for the logic governing actions within your application.
Note: While Clean Architecture can be combined with MVP (model-view-presenter), we’ll focus on MVVM due to Android Architecture Components’s native ViewModel class, eliminating the need for an external MVVM framework.
Advantages of Using Clean Architecture
- Enhanced testability compared to standalone MVVM.
- Superior decoupling (a significant advantage).
- Improved package structure navigation.
- Simplified project maintenance.
- Accelerated feature development for your team.
Disadvantages of Clean Architecture
- Steeper learning curve, particularly for developers accustomed to MVVM or MVP, due to the layered structure.
- Increased class count makes it less suitable for projects with low complexity.
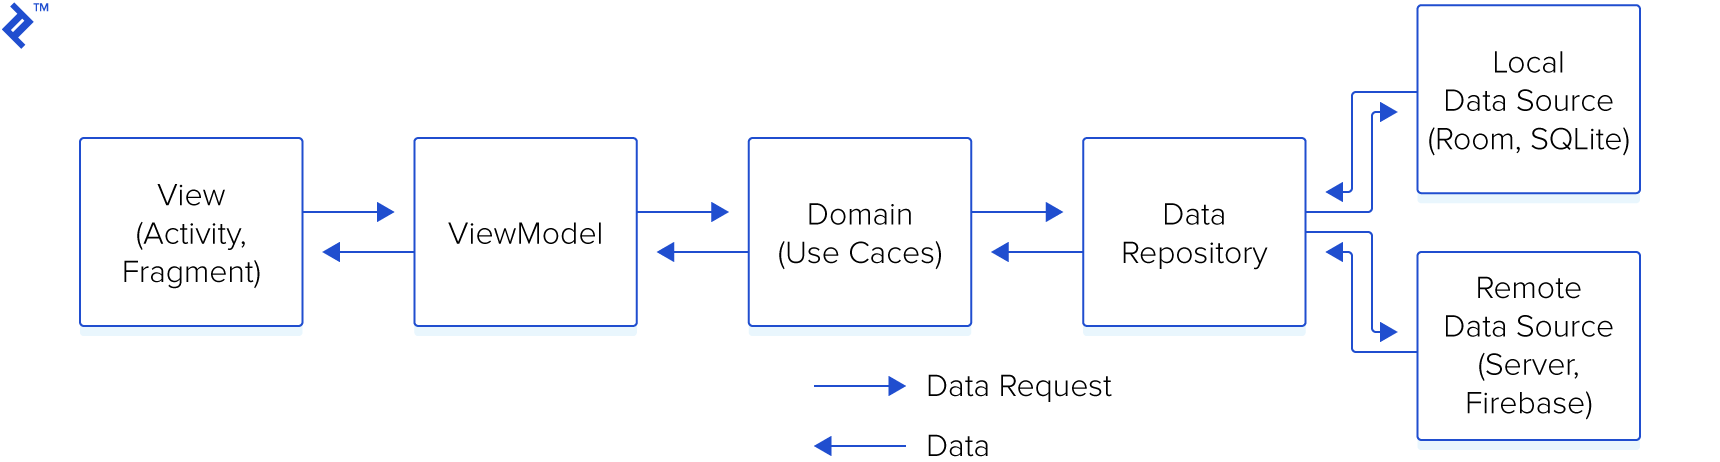
Visual representation of the data flow:
The decoupling of business logic from the UI simplifies maintenance and testing.
Our example, a straightforward application for creating and viewing user-generated posts, will illustrate these concepts without relying on external libraries like Dagger or RxJava to emphasize core principles.
The Layers of MVVM with Clean Architecture
The code is organized into three distinct layers:
- Presentation Layer
- Domain Layer
- Data Layer
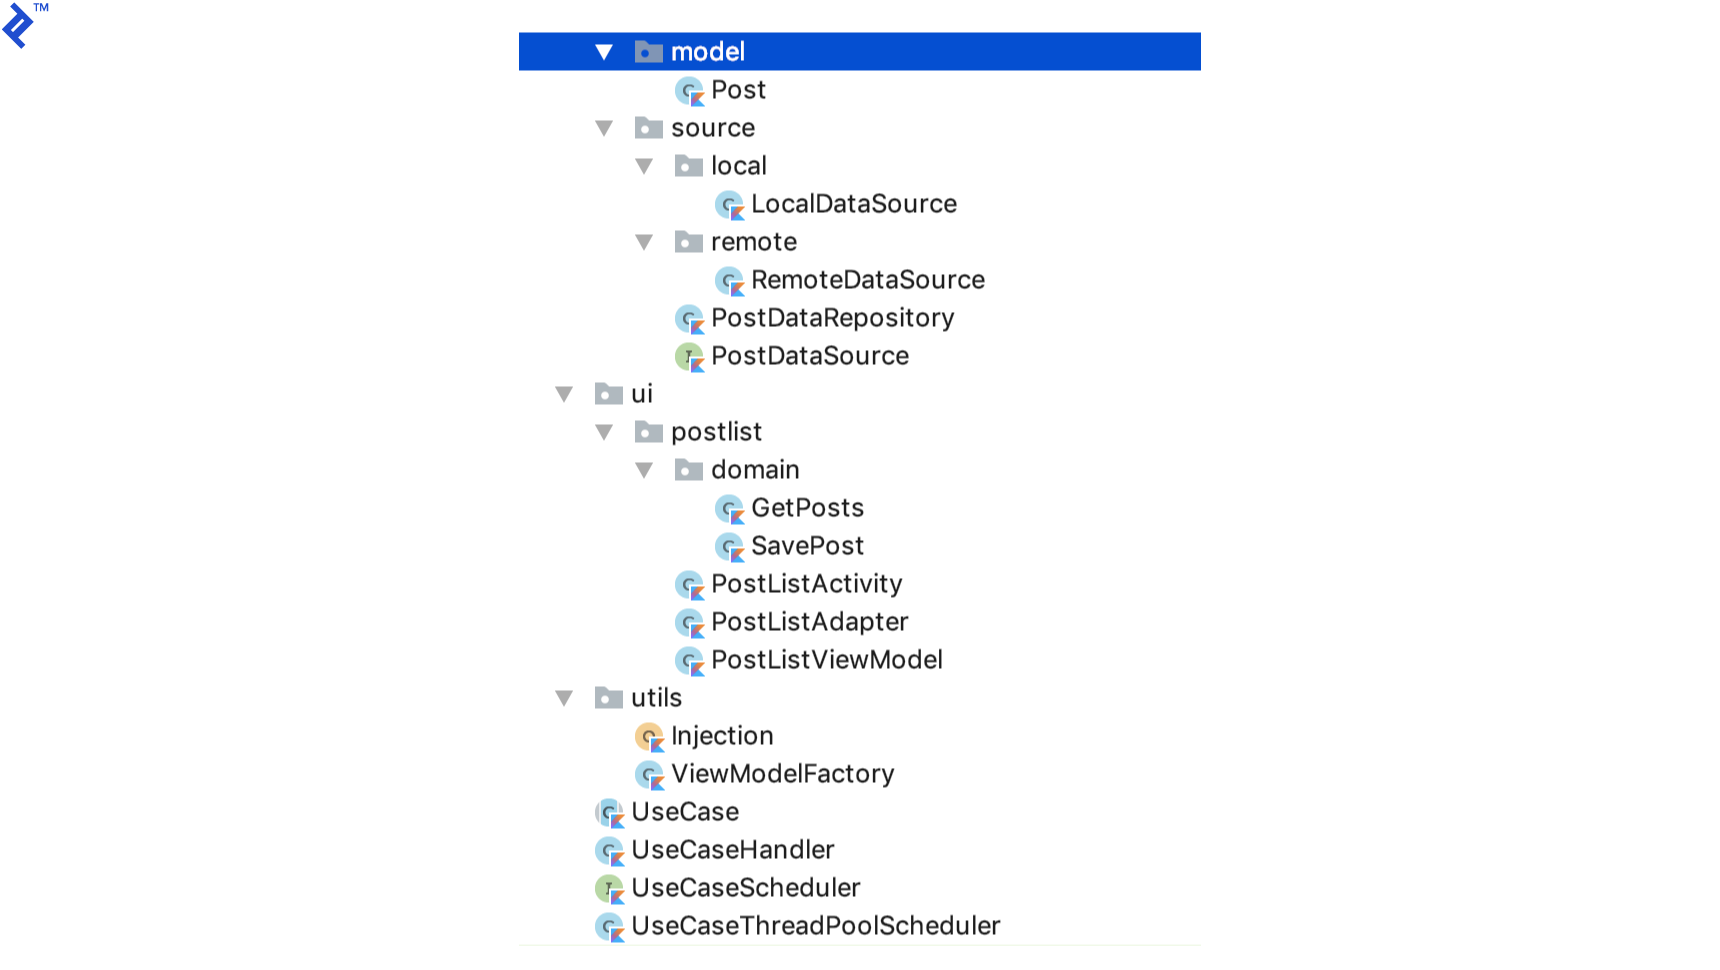
Detailed explanations follow, but the resulting package structure resembles this:
Even within this chosen architecture, numerous file/folder hierarchies are possible. Grouping by features, as shown here, promotes a clean and concise structure, but you are free to adopt a structure that best suits your preferences.
The Presentation Layer
This layer houses Activitys, Fragments, and ViewModels. Activitys should be kept as lean as possible, avoiding any business logic.
Activitys interact with ViewModels, which in turn communicate with the domain layer to execute actions. Importantly, ViewModels never directly interact with the data layer.
Observe how a UseCaseHandler and two UseCases are passed to the ViewModel. We’ll delve into this later, but in essence, a UseCase encapsulates the interaction pattern between a ViewModel and the data layer.
Here’s a snippet of the Kotlin code:
 1
 2
 3
 4
 5
 6
 7
 8
 9
10
11
12
13
14
15
16
17
18
19
20
21
22
23
24
25
26
27
28
29
30
31
32
33
34
| class PostListViewModel(
val useCaseHandler: UseCaseHandler,
val getPosts: GetPosts,
val savePost: SavePost): ViewModel() {
fun getAllPosts(userId: Int, callback: PostDataSource.LoadPostsCallback) {
val requestValue = GetPosts.RequestValues(userId)
useCaseHandler.execute(getPosts, requestValue, object :
UseCase.UseCaseCallback<GetPosts.ResponseValue> {
override fun onSuccess(response: GetPosts.ResponseValue) {
callback.onPostsLoaded(response.posts)
}
override fun onError(t: Throwable) {
callback.onError(t)
}
})
}
fun savePost(post: Post, callback: PostDataSource.SaveTaskCallback) {
val requestValues = SavePost.RequestValues(post)
useCaseHandler.execute(savePost, requestValues, object :
UseCase.UseCaseCallback<SavePost.ResponseValue> {
override fun onSuccess(response: SavePost.ResponseValue) {
callback.onSaveSuccess()
}
override fun onError(t: Throwable) {
callback.onError(t)
}
})
}
}
|
The Domain Layer
This layer encompasses all use cases within your application. In this example, we have UseCase as an abstract class from which all concrete UseCases inherit.
 1
 2
 3
 4
 5
 6
 7
 8
 9
10
11
12
13
14
15
16
17
18
19
20
21
22
23
24
25
26
27
| abstract class UseCase<Q : UseCase.RequestValues, P : UseCase.ResponseValue> {
var requestValues: Q? = null
var useCaseCallback: UseCaseCallback<P>? = null
internal fun run() {
executeUseCase(requestValues)
}
protected abstract fun executeUseCase(requestValues: Q?)
/**
* Data passed to a request.
*/
interface RequestValues
/**
* Data received from a request.
*/
interface ResponseValue
interface UseCaseCallback<R> {
fun onSuccess(response: R)
fun onError(t: Throwable)
}
}
|
The UseCaseHandler is responsible for executing UseCases. To prevent UI blocking during data retrieval (from a database or server), we employ background threads for UseCase execution, receiving responses on the main thread.
 1
 2
 3
 4
 5
 6
 7
 8
 9
10
11
12
13
14
15
16
17
18
19
20
21
22
23
24
25
26
27
28
29
30
31
32
33
34
35
36
37
38
39
40
41
42
43
44
45
46
| class UseCaseHandler(private val mUseCaseScheduler: UseCaseScheduler) {
fun <T : UseCase.RequestValues, R : UseCase.ResponseValue> execute(
useCase: UseCase<T, R>, values: T, callback: UseCase.UseCaseCallback<R>) {
useCase.requestValues = values
useCase.useCaseCallback = UiCallbackWrapper(callback, this)
mUseCaseScheduler.execute(Runnable {
useCase.run()
})
}
private fun <V : UseCase.ResponseValue> notifyResponse(response: V,
useCaseCallback: UseCase.UseCaseCallback<V>) {
mUseCaseScheduler.notifyResponse(response, useCaseCallback)
}
private fun <V : UseCase.ResponseValue> notifyError(
useCaseCallback: UseCase.UseCaseCallback<V>, t: Throwable) {
mUseCaseScheduler.onError(useCaseCallback, t)
}
private class UiCallbackWrapper<V : UseCase.ResponseValue>(
private val mCallback: UseCase.UseCaseCallback<V>,
private val mUseCaseHandler: UseCaseHandler) : UseCase.UseCaseCallback<V> {
override fun onSuccess(response: V) {
mUseCaseHandler.notifyResponse(response, mCallback)
}
override fun onError(t: Throwable) {
mUseCaseHandler.notifyError(mCallback, t)
}
}
companion object {
private var INSTANCE: UseCaseHandler? = null
fun getInstance(): UseCaseHandler {
if (INSTANCE == null) {
INSTANCE = UseCaseHandler(UseCaseThreadPoolScheduler())
}
return INSTANCE!!
}
}
}
|
As its name suggests, the GetPosts UseCase fetches all posts associated with a user.
 1
 2
 3
 4
 5
 6
 7
 8
 9
10
11
12
13
14
15
16
17
18
19
20
21
|
class GetPosts(private val mDataSource: PostDataSource) :
UseCase<GetPosts.RequestValues, GetPosts.ResponseValue>() {

    protected override fun executeUseCase(requestValues: GetPosts.RequestValues?) {
        mDataSource.getPosts(requestValues?.userId ?: -1, object :
        PostDataSource.LoadPostsCallback {
            override fun onPostsLoaded(posts: List<Post>) {
                val responseValue = ResponseValue(posts)
                useCaseCallback?.onSuccess(responseValue)
            }
            override fun onError(t: Throwable) {
                // Never use generic exceptions. Create proper exceptions. Since
                // our use case is different we will go with generic throwable
                useCaseCallback?.onError(Throwable("Data not found"))
            }
        })
    }
    class RequestValues(val userId: Int) : UseCase.RequestValues
    class ResponseValue(val posts: List<Post>) : UseCase.ResponseValue
}
|
UseCases serve as intermediaries between your ViewModels and Repositorys.
Consider adding an “edit post” feature in the future. This would involve creating a new EditPost UseCase, with its logic completely isolated from other UseCases. A common pitfall in software development is the unintended breakage of existing functionality when introducing new features. Separate UseCases greatly mitigate this risk.
While not a foolproof solution, it significantly reduces the likelihood of such issues. This is a key differentiator of Clean Architecture: its decoupled nature allows each layer to function as an independent unit.
The Data Layer
This layer comprises all the repositories accessible to the domain layer. It provides a data source API to external classes:
 1
 2
 3
 4
 5
 6
 7
 8
 9
10
11
12
13
14
15
| interface PostDataSource {
interface LoadPostsCallback {
fun onPostsLoaded(posts: List<Post>)
fun onError(t: Throwable)
}
interface SaveTaskCallback {
fun onSaveSuccess()
fun onError(t: Throwable)
}
fun getPosts(userId: Int, callback: LoadPostsCallback)
fun savePost(post: Post)
}
|
The PostDataRepository implements PostDataSource and determines whether data is fetched from a local database or a remote server.
 1
 2
 3
 4
 5
 6
 7
 8
 9
10
11
12
13
14
15
16
17
18
19
20
21
22
23
24
25
26
27
28
29
30
31
32
33
34
35
36
37
38
39
40
41
42
43
44
45
46
47
48
49
50
51
52
53
54
55
| class PostDataRepository private constructor(
private val localDataSource: PostDataSource,
private val remoteDataSource: PostDataSource): PostDataSource {
companion object {
private var INSTANCE: PostDataRepository? = null
fun getInstance(localDataSource: PostDataSource,
remoteDataSource: PostDataSource): PostDataRepository {
if (INSTANCE == null) {
INSTANCE = PostDataRepository(localDataSource, remoteDataSource)
}
return INSTANCE!!
}
}
var isCacheDirty = false
override fun getPosts(userId: Int, callback: PostDataSource.LoadPostsCallback) {
if (isCacheDirty) {
getPostsFromServer(userId, callback)
} else {
localDataSource.getPosts(userId, object : PostDataSource.LoadPostsCallback {
override fun onPostsLoaded(posts: List<Post>) {
refreshCache()
callback.onPostsLoaded(posts)
}
override fun onError(t: Throwable) {
getPostsFromServer(userId, callback)
}
})
}
}
override fun savePost(post: Post) {
localDataSource.savePost(post)
remoteDataSource.savePost(post)
}
private fun getPostsFromServer(userId: Int, callback: PostDataSource.LoadPostsCallback) {
remoteDataSource.getPosts(userId, object : PostDataSource.LoadPostsCallback {
override fun onPostsLoaded(posts: List<Post>) {
refreshCache()
refreshLocalDataSource(posts)
callback.onPostsLoaded(posts)
}
override fun onError(t: Throwable) {
callback.onError(t)
}
})
}
private fun refreshLocalDataSource(posts: List<Post>) {
posts.forEach {
localDataSource.savePost(it)
}
}
private fun refreshCache() {
isCacheDirty = false
}
}
|
The code is largely self-documenting. The class contains two variables, localDataSource and remoteDataSource, both of type PostDataSource, abstracting away their underlying implementations.
In my own experience, this architecture has proven invaluable. When migrating an app from a Firebase back end (ideal for rapid prototyping) to a custom server, only the RemoteDataSource implementation needed modification. No other classes were affected, highlighting the benefits of decoupled code. Changes to one class should ideally have minimal impact on others.
Here’s a breakdown of some additional classes:
 1
 2
 3
 4
 5
 6
 7
 8
 9
10
11
12
13
14
15
16
17
18
19
20
21
22
23
24
25
26
27
28
29
30
31
32
33
34
35
36
37
38
39
40
41
42
43
44
| interface UseCaseScheduler {
fun execute(runnable: Runnable)
fun <V : UseCase.ResponseValue> notifyResponse(response: V,
useCaseCallback: UseCase.UseCaseCallback<V>)
fun <V : UseCase.ResponseValue> onError(
useCaseCallback: UseCase.UseCaseCallback<V>, t: Throwable)
}
class UseCaseThreadPoolScheduler : UseCaseScheduler {
val POOL_SIZE = 2
val MAX_POOL_SIZE = 4
val TIMEOUT = 30
private val mHandler = Handler()
internal var mThreadPoolExecutor: ThreadPoolExecutor
init {
mThreadPoolExecutor = ThreadPoolExecutor(POOL_SIZE, MAX_POOL_SIZE, TIMEOUT.toLong(),
TimeUnit.SECONDS, ArrayBlockingQueue(POOL_SIZE))
}
override fun execute(runnable: Runnable) {
mThreadPoolExecutor.execute(runnable)
}
override fun <V : UseCase.ResponseValue> notifyResponse(response: V,
useCaseCallback: UseCase.UseCaseCallback<V>) {
mHandler.post { useCaseCallback.onSuccess(response) }
}
override fun <V : UseCase.ResponseValue> onError(
useCaseCallback: UseCase.UseCaseCallback<V>, t: Throwable) {
mHandler.post { useCaseCallback.onError(t) }
}
}
|
UseCaseThreadPoolScheduler facilitates asynchronous task execution using ThreadPoolExecuter.
 1
 2
 3
 4
 5
 6
 7
 8
 9
10
11
12
13
14
15
16
17
18
19
20
21
22
23
|
class ViewModelFactory : ViewModelProvider.Factory {


    override fun <T : ViewModel> create(modelClass: Class<T>): T {
        if (modelClass == PostListViewModel::class.java) {
            return PostListViewModel(
                    Injection.provideUseCaseHandler()
                    , Injection.provideGetPosts(), Injection.provideSavePost()) as T
        }
        throw IllegalArgumentException("unknown model class $modelClass")
    }

    companion object {
        private var INSTANCE: ViewModelFactory? = null
        fun getInstance(): ViewModelFactory {
            if (INSTANCE == null) {
                INSTANCE = ViewModelFactory()
            }
            return INSTANCE!!
        }
    }
}
|
This is our ViewModelFactory, necessary for passing arguments to the ViewModel constructor.
Dependency Injection
Let’s illustrate dependency injection with an example. Our PostDataRepository class depends on LocalDataSource and RemoteDataSource. The Injection class provides these dependencies to PostDataRepository.
Dependency injection offers two major advantages. Firstly, it centralizes object instantiation, improving code organization. Secondly, it simplifies unit testing for PostDataRepository by allowing the injection of mocked LocalDataSource and RemoteDataSource instances during testing.
 1
 2
 3
 4
 5
 6
 7
 8
 9
10
11
12
13
14
15
16
17
18
| object Injection {
fun providePostDataRepository(): PostDataRepository {
return PostDataRepository.getInstance(provideLocalDataSource(), provideRemoteDataSource())
}
fun provideViewModelFactory() = ViewModelFactory.getInstance()
fun provideLocalDataSource(): PostDataSource = LocalDataSource.getInstance()
fun provideRemoteDataSource(): PostDataSource = RemoteDataSource.getInstance()
fun provideGetPosts() = GetPosts(providePostDataRepository())
fun provideSavePost() = SavePost(providePostDataRepository())
fun provideUseCaseHandler() = UseCaseHandler.getInstance()
}
|
Note: For complex projects, Dagger 2 is my preferred dependency injection framework. However, due to its complexity and this article’s scope, we won’t delve into it here. If you’re interested in exploring further, Hari Vignesh Jayapalan’s introduction to Dagger 2 is a highly recommended resource.
MVVM with Clean Architecture: A Solid Combination
While our focus was on understanding the fundamentals of MVVM with Clean Architecture, here are some potential enhancements:
- Incorporate LiveData or RxJava to eliminate callbacks and streamline the code.
- Utilize states for UI representation. (Refer to this amazing talk by Jake Wharton for more details.)
- Employ Dagger 2 for dependency injection.
This architecture is among the most robust and scalable options for Android development. I hope this article has provided valuable insights, and I’m eager to learn about your experiences implementing this approach in your own applications!