Selecting the appropriate tool for the task is crucial, particularly when constructing contemporary web applications. Many of us are acquainted with AngularJS and its ability to simplify the development of robust web application front-ends. While some may oppose the use of this popular web framework, it undeniably offers numerous advantages and can be a suitable choice](/angular-js/a-step-by-step-guide-to-your-first-angularjs-app) for a diverse range of requirements. Conversely, the components employed on the back-end significantly impact the web application’s performance and influence the overall user experience. Play is a high-speed web framework designed for Java and Scala. It is founded on a lightweight, stateless architecture tailored for the web and adheres to [MVC patterns and principles akin to Rails and Django.
This article explores the utilization of AngularJS and Play to create a straightforward blog application incorporating a basic authentication system and functionalities for posting and commenting. AngularJS development, enhanced with Twitter Bootstrap elements, will empower a single-page application experience built upon a Play-based REST API back-end.
Web Applications - Getting Started
AngularJS Application Skeleton
AngularJS and Play apps will reside within the client and server directories, respectively. Our initial step involves creating the “client” directory.
1
mkdir -p blogapp/client
We’ll employ Yeoman, an exceptional scaffolding tool, to construct an AngularJS application skeleton. Installing Yeoman is straightforward. Utilizing it to scaffold a basic AngularJS application skeleton is arguably even simpler:
1
2
cd blogapp/client
yo angular
Upon executing the second command, you’ll encounter several options to choose from. For this project, we can omit “Sass (with Compass).” However, we’ll require Bootstrap along with the following AngularJS plugins:
angular-animate.js
angular-cookies.js
angular-resource.js
angular-route.js
angular-sanitize.js
angular-touch.js
After finalizing your selections, your terminal will display NPM and Bower output as downloads commence and packages are installed. Subsequently, you’ll have a functional AngularJS application skeleton at your disposal.
Play Framework Application Skeleton
The official method for generating a new Play application entails using the Typesafe Activator tool. Prior to its utilization, download and install it on your system. If you’re using Homebrew on Mac OS, a single command suffices:
1
brew install typesafe-activator
Creating a Play application via the command line is remarkably easy:
1
2
3
cd blogapp/
activator new server play-java
cd server/
Importing to an IDE
To integrate the application into an IDE like Eclipse or IntelliJ, it needs to be “eclipsified” or “idealized.” Execute the following command:
1
activator
At the new prompt, enter either “eclipse” or “idea” to configure the application code for Eclipse or IntelliJ, respectively.
For conciseness, we’ll solely cover importing the project into IntelliJ. The Eclipse import process should be equally straightforward. In IntelliJ, choose “File -> New” and opt for “Project from existing sources…” Then, select your build.sbt file and click “OK.” After confirming on the subsequent dialog, IntelliJ will import your Play application as an SBT project.
With our Play application imported into IntelliJ, we’ll import the AngularJS application, either as a distinct project or a module within the Play application’s project.
Here, we’ll import it as a module. Go to “File -> New -> Module From Existing Sources…” In the dialog, choose the “client” directory and click “OK.” On the following screens, click “Next” and “Finish.”
Spawning Local Servers
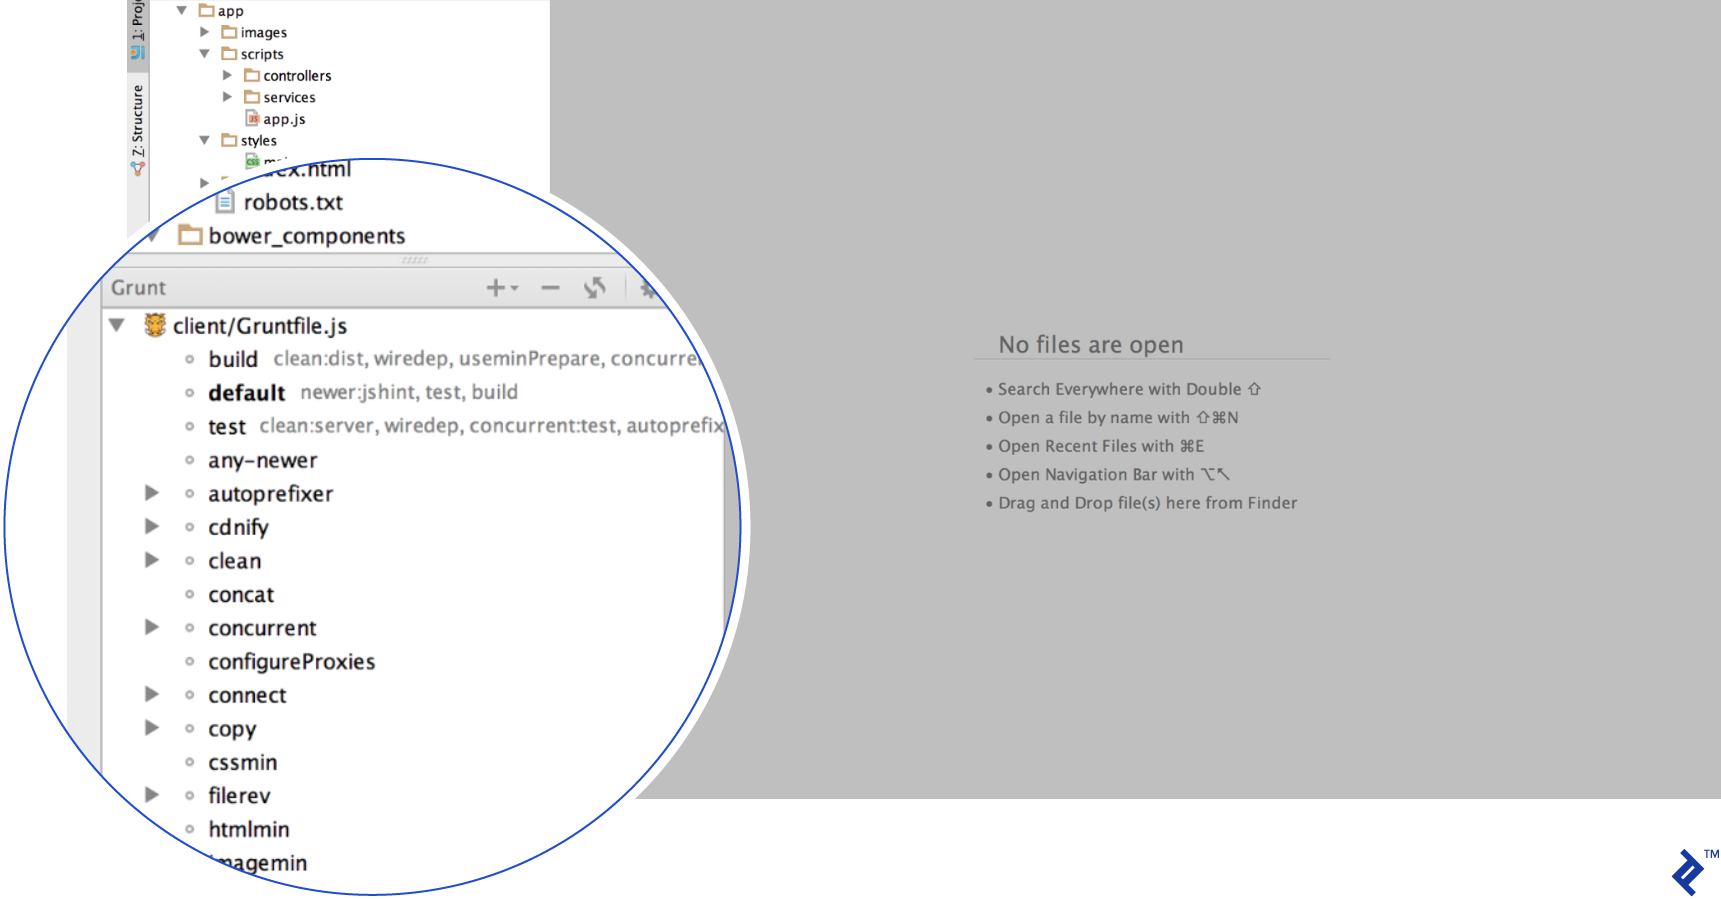
You should be able to launch the AngularJS application as a Grunt task from the IDE. Expand the client folder and right-click “Gruntfile.js.” From the menu, select “Show Grunt Tasks.” A “Grunt” panel will appear, listing various tasks:
Double-click “serve” to initiate the application. Your default web browser will open, directed to a localhost address displaying a rudimentary AngularJS page featuring Yeoman’s logo.
Next, we need to launch our back-end application server. However, two issues require attention:
Both the AngularJS application (bootstrapped by Yeoman) and the Play application default to port 9000.
In production, both applications likely operate under a single domain, with Nginx routing requests. However, in development mode, altering one application’s port leads web browsers to treat them as separate domains.
To circumvent these issues, we’ll employ a Grunt proxy, directing all AJAX requests to the Play application, effectively making both servers accessible on the same apparent port.
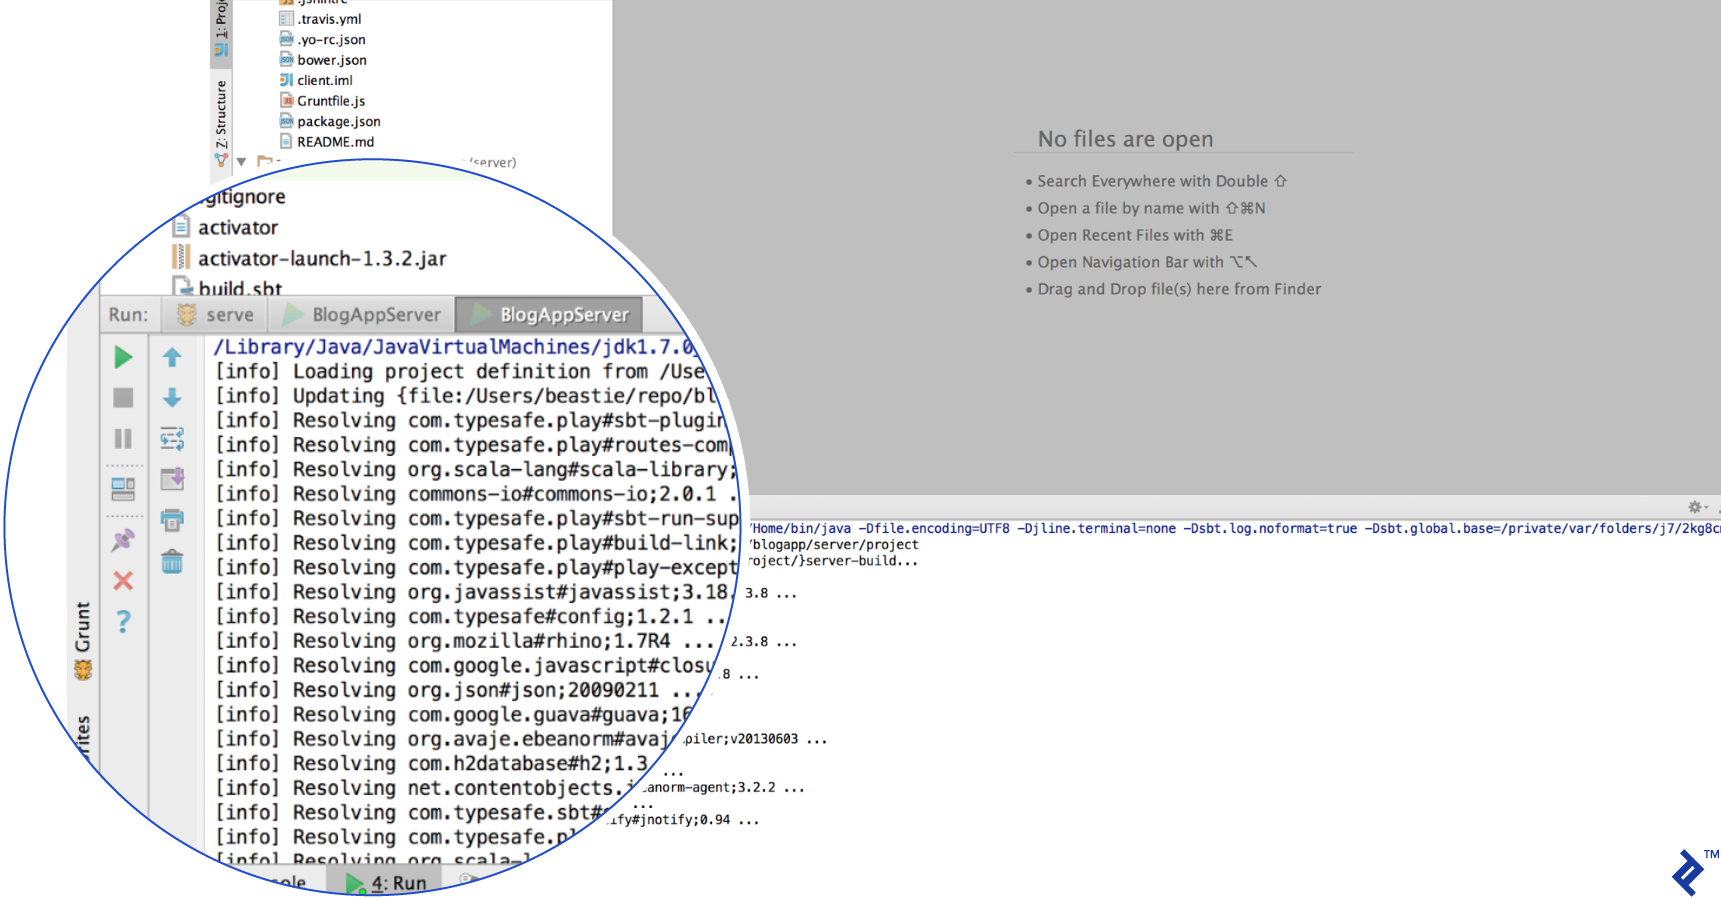
First, let’s change the Play application server’s port to 9090. Access “Run -> Edit Configurations” and locate “Run/Debug Configurations.” Modify the “Url To Open” field’s port number. Click “OK” to confirm and close. Clicking “Run” will initiate dependency resolution, with logs appearing accordingly.
Once complete, navigate to http://localhost:9090 in your browser. Shortly, your Play application should load. To set up the Grunt proxy, install a small Node.js package using NPM:
1
2
cd blogapp/client
npm install grunt-connect-proxy --save-dev
Next, modify your “Gruntfile.js.” Locate the “connect” task and insert the “proxies” key/value pair after it:
1
2
3
4
5
6
7
8
proxies:[{context:'/app',// the context of the data service
host:'localhost',// wherever the data service is running
port:9090,// the port that the data service is running on
changeOrigin:true}],
Grunt will now proxy requests to “/app/*” to the Play back-end, eliminating the need for individual call whitelisting. Additionally, adjust the livereload behavior:
Lastly, incorporate a new dependency, “‘configureProxies:server’,” into the “serve” task:
 1
 2
 3
 4
 5
 6
 7
 8
 9
10
11
12
13
14
15
grunt.registerTask('serve','Compile then start a connect web server',function(target){if(target==='dist'){returngrunt.task.run(['build','connect:dist:keepalive']);}grunt.task.run(['clean:server','wiredep','concurrent:server','autoprefixer:server','configureProxies:server','connect:livereload','watch']);});
Upon restarting Grunt, your logs should display lines indicating the proxy’s operation:
We’ll begin by crafting a signup form for our blog application, verifying that everything functions correctly. We can use Yeoman to generate a Signup controller and view in AngularJS:
1
2
yo angular:controller signup
yo angular:view signup
Update the application routing to reference this new view and remove the auto-generated “about” controller and view. Within “app/scripts/app.js,” eliminate references to “app/scripts/controllers/about.js” and “app/views/about.html,” resulting in:
This form should be processed by the Angular controller. Note that explicitly adding the “ng-controller” attribute in our views is unnecessary, as the routing logic in “app.js” automatically triggers a controller before view loading. To connect this form, define a “signup” function within $scope in “signup.js”:
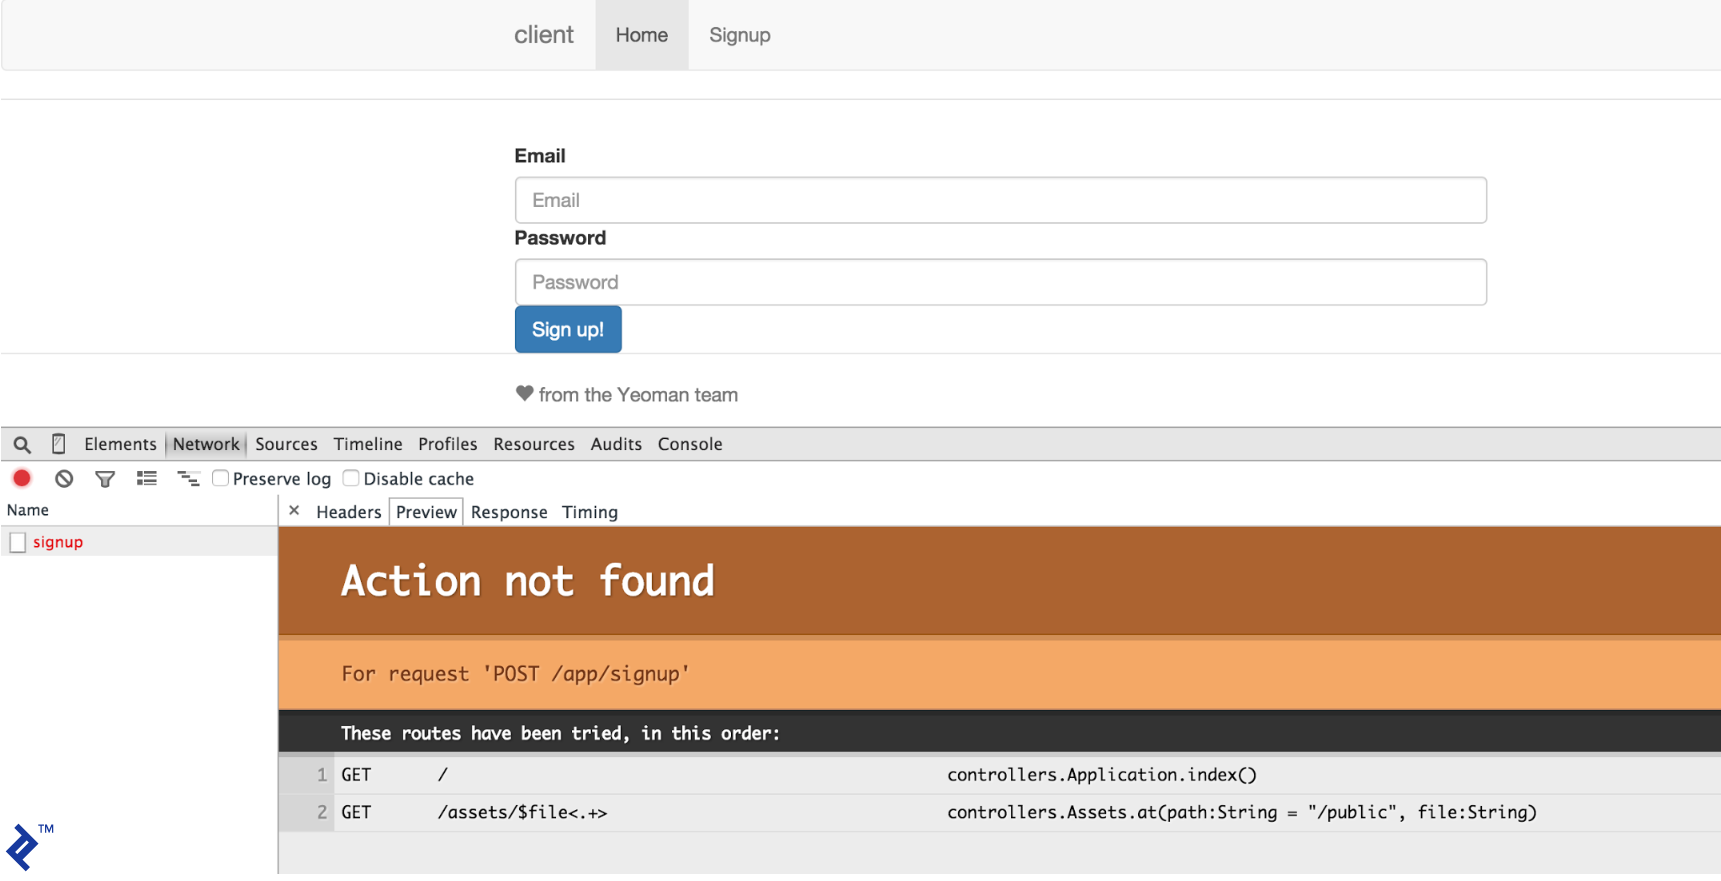
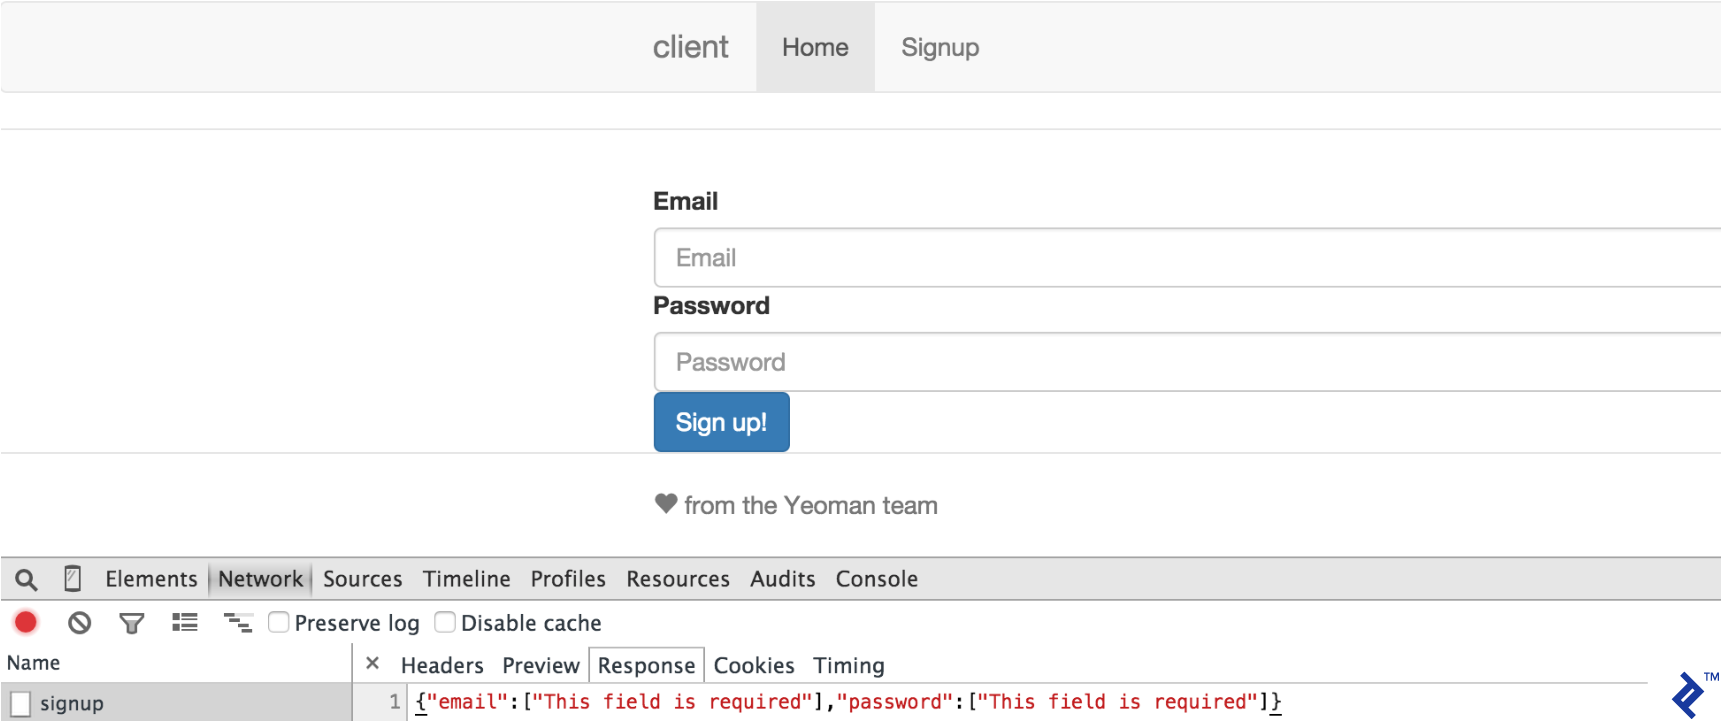
Now, open your Chrome developer console, switch to the “Network” tab, and attempt a signup form submission.
The Play back-end will respond with an “Action not found” error page—expected, as it’s not yet implemented. This confirms our Grunt proxy setup is functioning correctly.
Next, we’ll add an “Action” – a method within the Play application controller. Within the “Application” class in the “app/controllers” package, add a new “signup” method:
1
2
3
publicstaticResultsignup(){returnok("Success!");}
Now, in “conf/routes,” add the following line:
1
POST /app/signup controllers.Application.signup
Finally, return to your browser and http://localhost:9000/#/signup. Clicking “Submit” this time should yield a different result:
You should see the hardcoded value returned from the “signup” method. If so, our development environment is ready, with both Angular and Play applications working correctly.
Defining Ebean Models in Play
Before defining models, let’s select a datastore. This article utilizes the H2 in-memory database. To enable it, uncomment these lines in “application.conf”:
// Application.javapublicstaticResultsignup(){Form<SignUp>signUpForm=Form.form(SignUp.class).bindFromRequest();if(signUpForm.hasErrors()){returnbadRequest(signUpForm.errorsAsJson());}SignUpnewUser=signUpForm.get();UserexistingUser=User.findByEmail(newUser.email);if(existingUser!=null){returnbadRequest(buildJsonResponse("error","User exists"));}else{Useruser=newUser();user.setEmail(newUser.email);user.setPassword(newUser.password);user.save();session().clear();session("username",newUser.email);returnok(buildJsonResponse("success","User created successfully"));}}publicstaticclassUserForm{@Constraints.Required@Constraints.EmailpublicStringemail;}publicstaticclassSignUpextendsUserForm{@Constraints.Required@Constraints.MinLength(6)publicStringpassword;}privatestaticObjectNodebuildJsonResponse(Stringtype,Stringmessage){ObjectNodewrapper=Json.newObject();ObjectNodemsg=Json.newObject();msg.put("message",message);wrapper.put(type,msg);returnwrapper;}
Note: This app’s authentication is rudimentary and unsuitable for production.
We use Play forms for handling signup forms. Constraints set on the “SignUp” form class enable automatic validation without explicit logic.
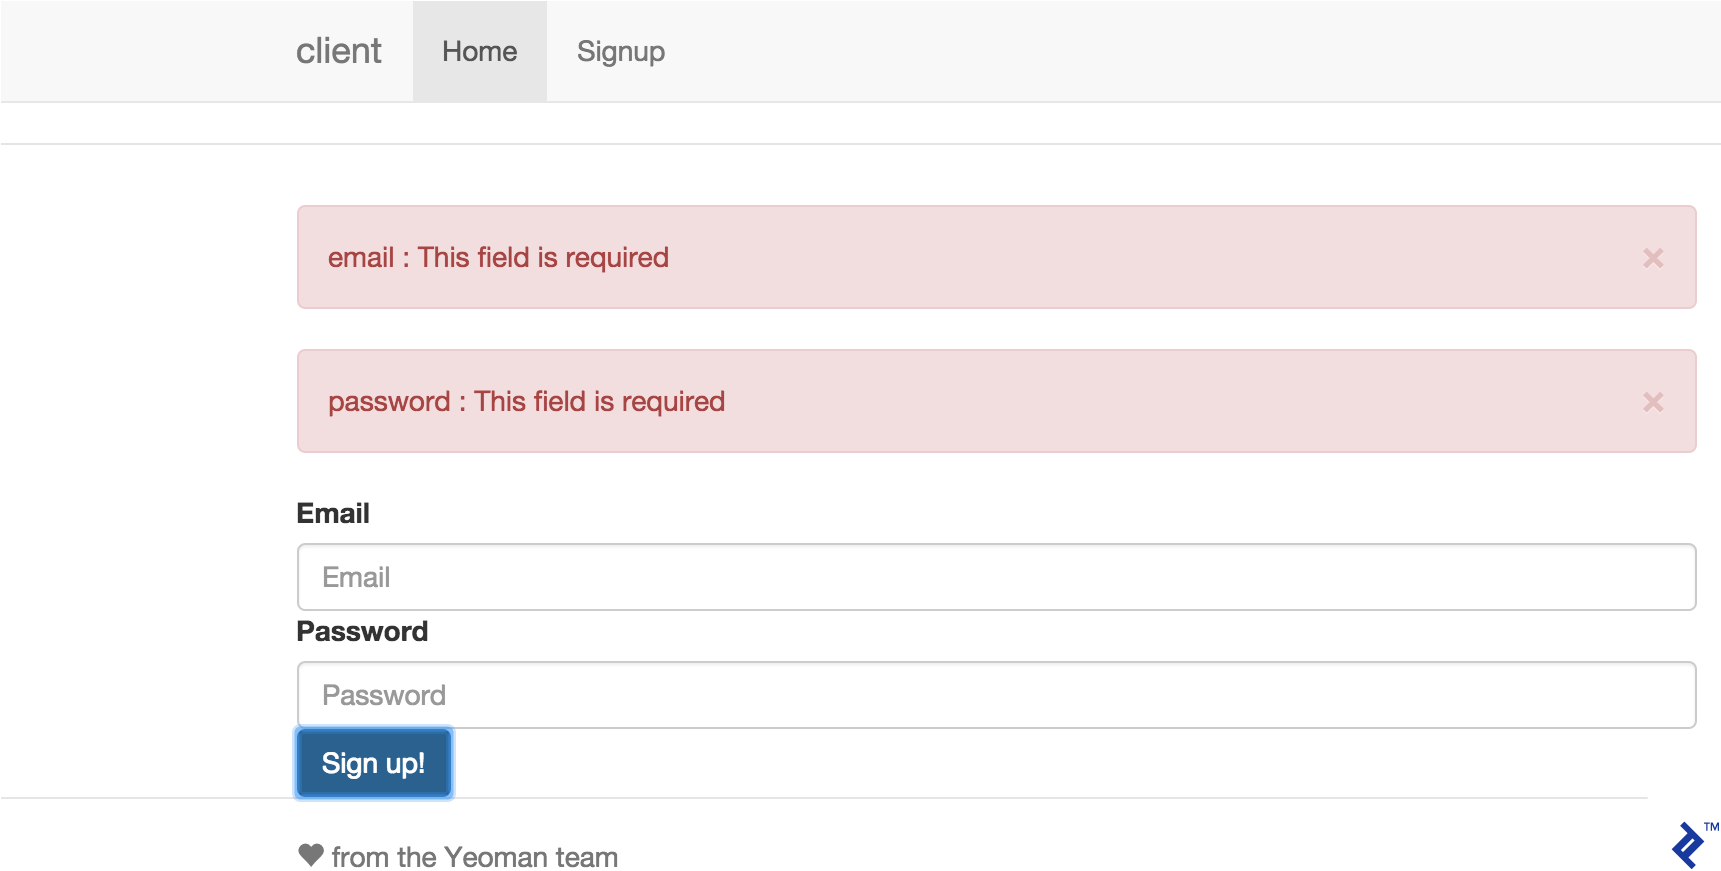
Returning to our AngularJS application, submitting an empty form will now trigger appropriate server-side error messages regarding required fields.
Handling Server Errors in AngularJS
Currently, server errors are invisible to the user. At a minimum, we should display them. Ideally, we’d understand the error type and present a user-friendly message. Let’s create a simple alert service for error display.
<divclass="container"><divng-controller="AlertsCtrl"><alertng-repeat="alert in alerts"type="{{alert.type}}"close="alert.close()">{{ alert.msg }}</alert></div><divng-view=""></div></div>
angular.module('clientApp').controller('SignupCtrl',function($scope,$http,$log,alertService,$location,userService){$scope.signup=function(){varpayload={email:$scope.email,password:$scope.password};$http.post('app/signup',payload).error(function(data,status){if(status===400){angular.forEach(data,function(value,key){if(key==='email'||key==='password'){alertService.add('danger',key+' : '+value);}else{alertService.add('danger',value.message);}});}if(status===500){alertService.add('danger','Internal server error!');}})};});
Now, submitting an empty form will display errors above it:
With error handling in place, let’s redirect users to a dashboard page upon successful signup. First, create the dashboard:
1
2
yo angular:view dashboard
yo angular:controller dashboard
Modify the “signup” method in “signup.js” to redirect upon success:
Before implementing posting functionality, let’s address other essentials: login/logout, displaying user information on the dashboard, and adding authentication support to the back-end.
Basic Authentication
Let’s implement login and logout actions in our Play application. Add these lines to “Application.java”:
publicstaticResultlogin(){Form<Login>loginForm=Form.form(Login.class).bindFromRequest();if(loginForm.hasErrors()){returnbadRequest(loginForm.errorsAsJson());}LoginloggingInUser=loginForm.get();Useruser=User.findByEmailAndPassword(loggingInUser.email,loggingInUser.password);if(user==null){returnbadRequest(buildJsonResponse("error","Incorrect email or password"));}else{session().clear();session("username",loggingInUser.email);ObjectNodewrapper=Json.newObject();ObjectNodemsg=Json.newObject();msg.put("message","Logged in successfully");msg.put("user",loggingInUser.email);wrapper.put("success",msg);returnok(wrapper);}}publicstaticResultlogout(){session().clear();returnok(buildJsonResponse("success","Logged out successfully"));}publicstaticResultisAuthenticated(){if(session().get("username")==null){returnunauthorized();}else{ObjectNodewrapper=Json.newObject();ObjectNodemsg=Json.newObject();msg.put("message","User is logged in already");msg.put("user",session().get("username"));wrapper.put("success",msg);returnok(wrapper);}}publicstaticclassLoginextendsUserForm{@Constraints.RequiredpublicStringpassword;}
Next, restrict specific back-end calls to authenticated users. Create “Secured.java” containing:
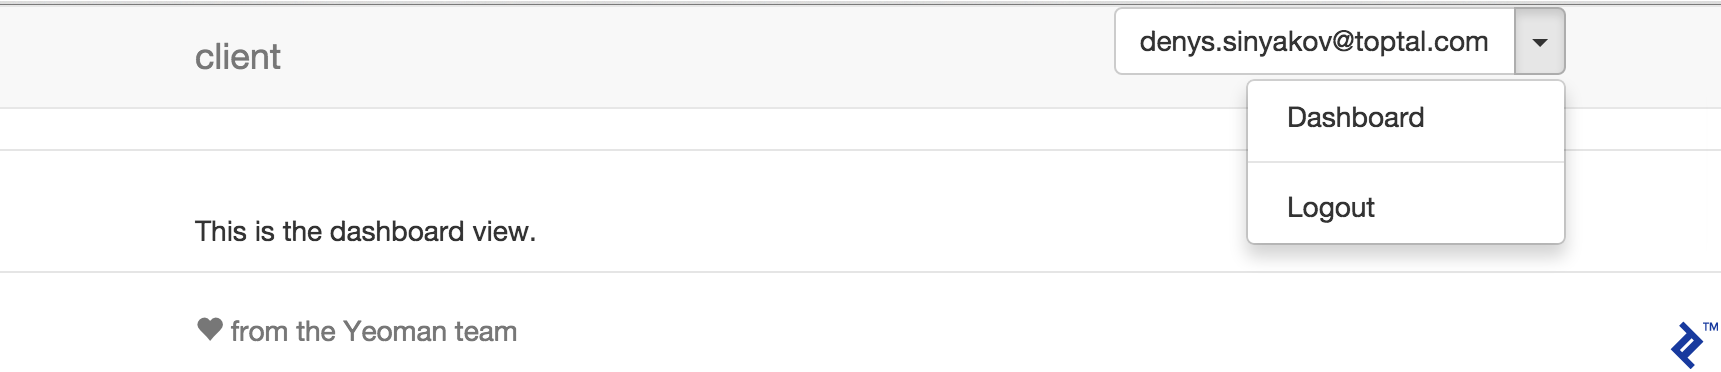
We’ll use this class later to secure new actions. Modify the AngularJS application’s main menu to display username and logout links. First, create a controller:
//login.jsangular.module('clientApp').controller('LoginCtrl',function($scope,userService,$location,$log,$http,alertService){$scope.isAuthenticated=function(){if(userService.username){$log.debug(userService.username);$location.path('/dashboard');}else{$http.get('/app/isauthenticated').error(function(){$location.path('/login');}).success(function(data){if(data.hasOwnProperty('success')){userService.username=data.success.user;$location.path('/dashboard');}});}};$scope.isAuthenticated();$scope.login=function(){varpayload={email:this.email,password:this.password};$http.post('/app/login',payload).error(function(data,status){if(status===400){angular.forEach(data,function(value,key){if(key==='email'||key==='password'){alertService.add('danger',key+' : '+value);}else{alertService.add('danger',value.message);}});}elseif(status===401){alertService.add('danger','Invalid login or password!');}elseif(status===500){alertService.add('danger','Internal server error!');}else{alertService.add('danger',data);}}).success(function(data){$log.debug(data);if(data.hasOwnProperty('success')){userService.username=data.success.user;$location.path('/dashboard');}});};});
//addpost.jsangular.module('clientApp').controller('AddpostCtrl',function($scope,$http,alertService,$location){$scope.post=function(){varpayload={subject:$scope.subject,content:$scope.content};$http.post('/app/post',payload).error(function(data,status){if(status===400){angular.forEach(data,function(value,key){if(key==='subject'||key==='content'){alertService.add('danger',key+' : '+value);}else{alertService.add('danger',value.message);}});}elseif(status===401){$location.path('/login');}elseif(status===500){alertService.add('danger','Internal server error!');}else{alertService.add('danger',data);}}).success(function(data){$scope.subject='';$scope.content='';alertService.add('success',data.success.message);});};});
Add a new method and route to the “Post” controller:
1
2
3
4
5
6
7
8
9
// Post.javapublicstaticResultgetUserPosts(){Useruser=getUser();if(user==null){returnbadRequest(Application.buildJsonResponse("error","No such user"));}returnok(Json.toJson(BlogPost.findBlogPostsByUser(user)));}
1
GET /app/userposts controllers.Post.getUserPosts
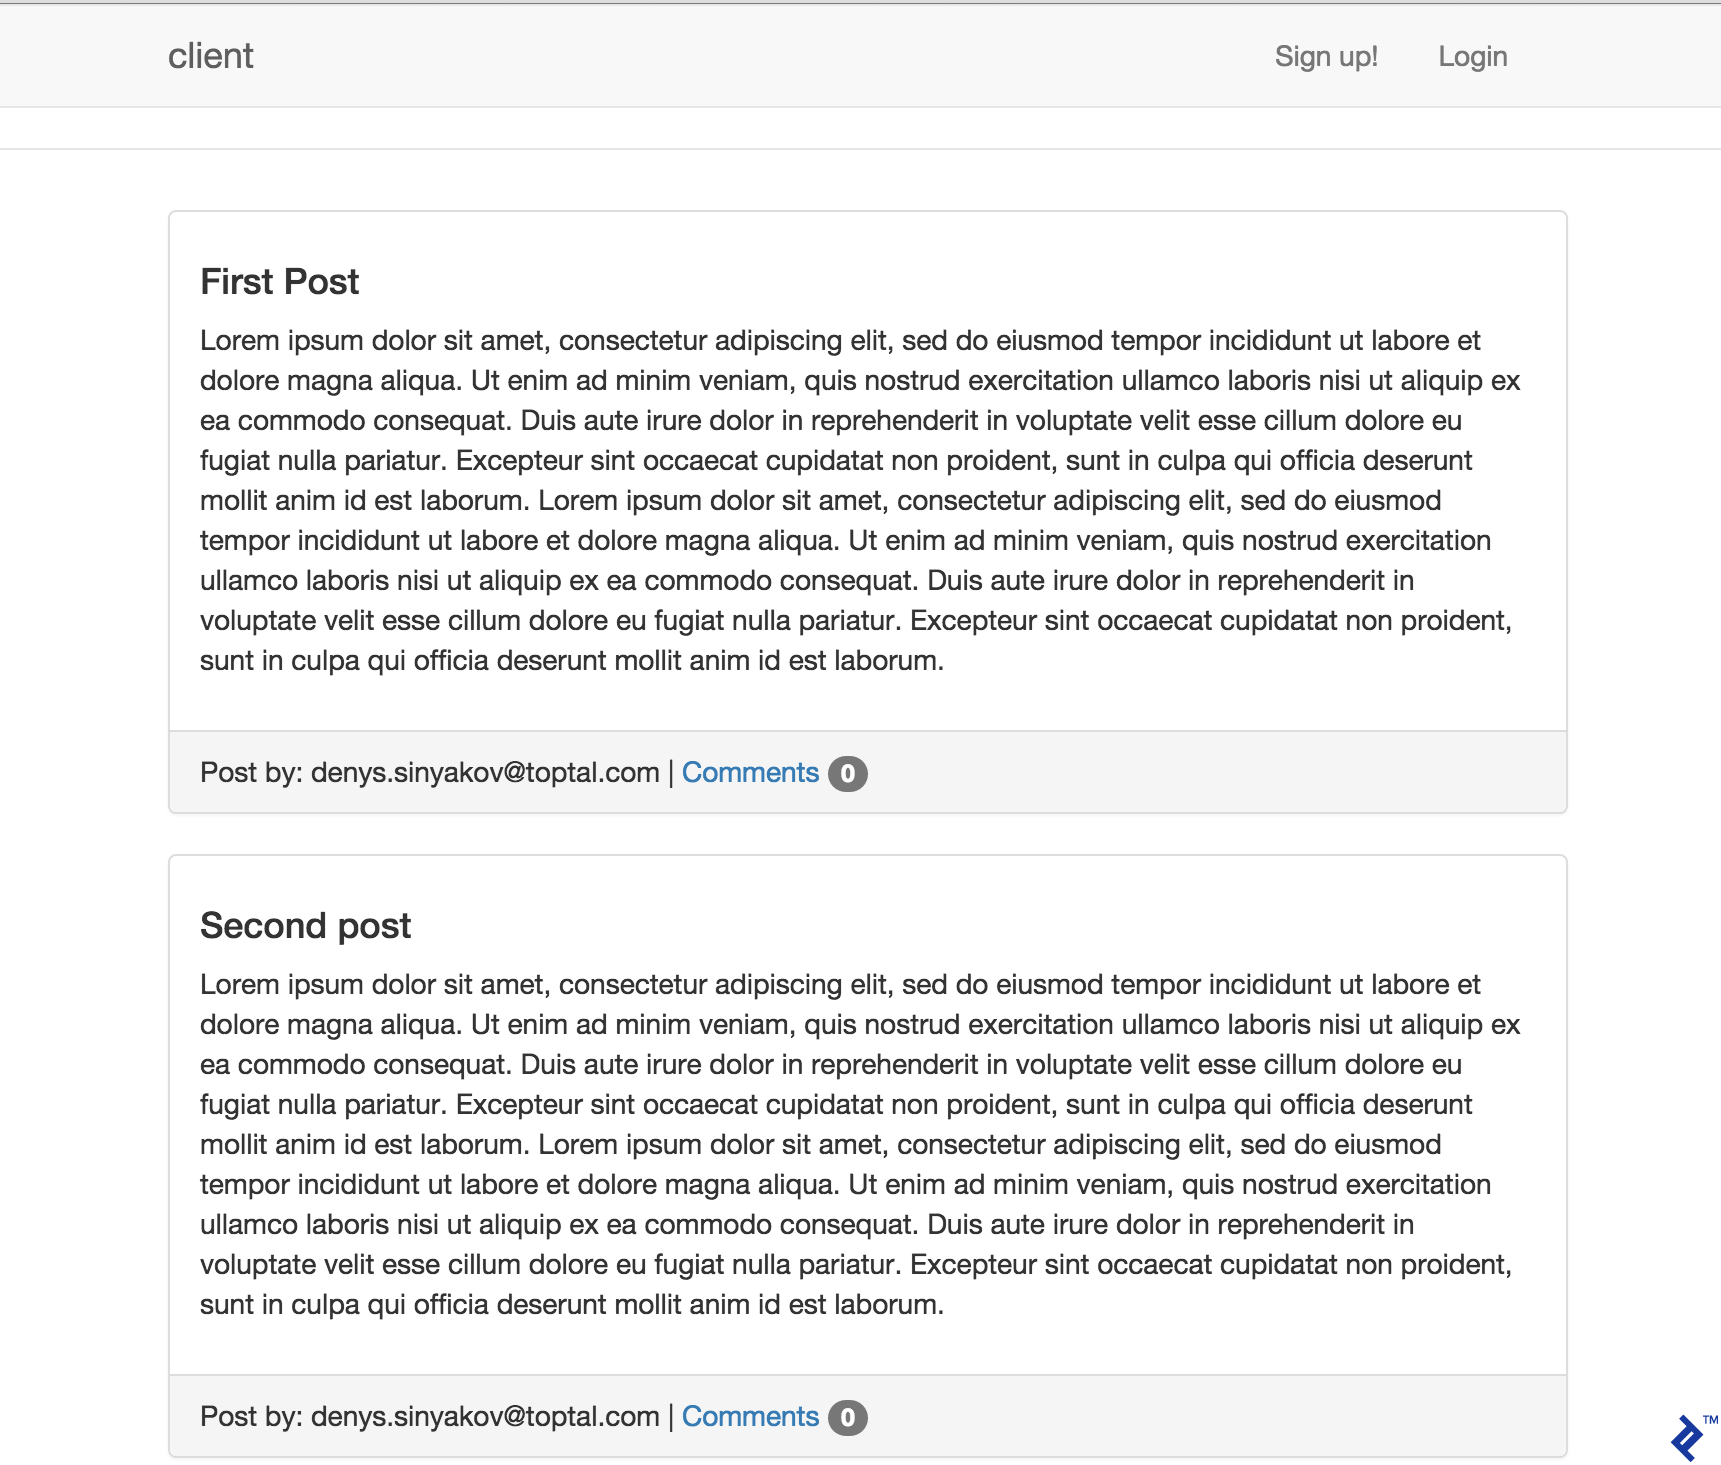
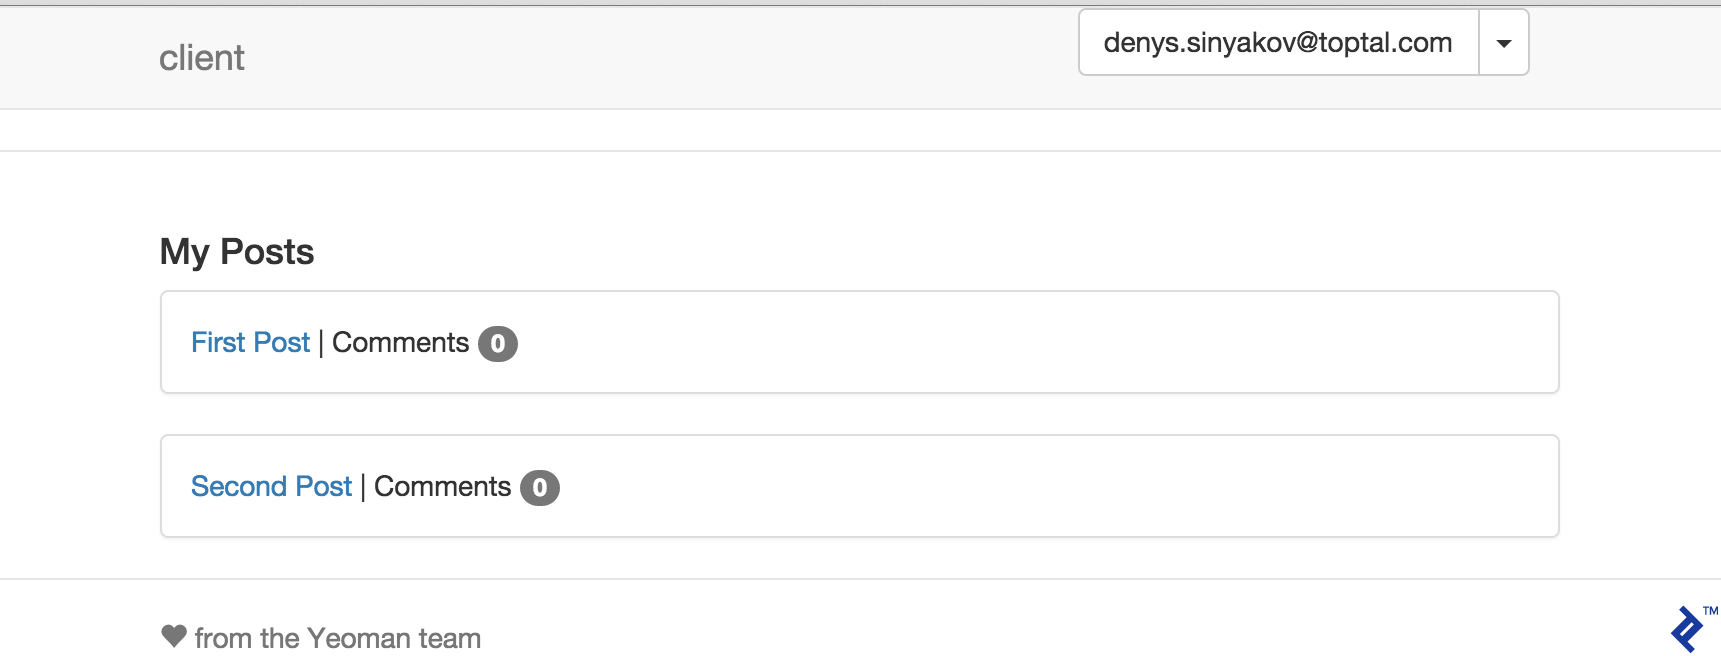
Created posts will now be listed on the dashboard:
Commenting Functionality
To implement commenting, add a new method to the “Post” controller:
$scope.addComment=function(){varpayload={postId:$scope.postId,comment:$scope.comment};$http.post('/app/comment',payload).error(function(data,status){if(status===400){angular.forEach(data,function(value,key){if(key==='comment'){alertService.add('danger',key+' : '+value);}else{alertService.add('danger',value.message);}});}elseif(status===401){$location.path('/login');}elseif(status===500){alertService.add('danger','Internal server error!');}else{alertService.add('danger',data);}}).success(function(data){alertService.add('success',data.success.message);$scope.comment='';$scope.viewPost();});};
Finally, add these lines to “viewpost.html”:
1
2
3
4
5
6
7
8
9
10
11
12
13
14
15
16
17
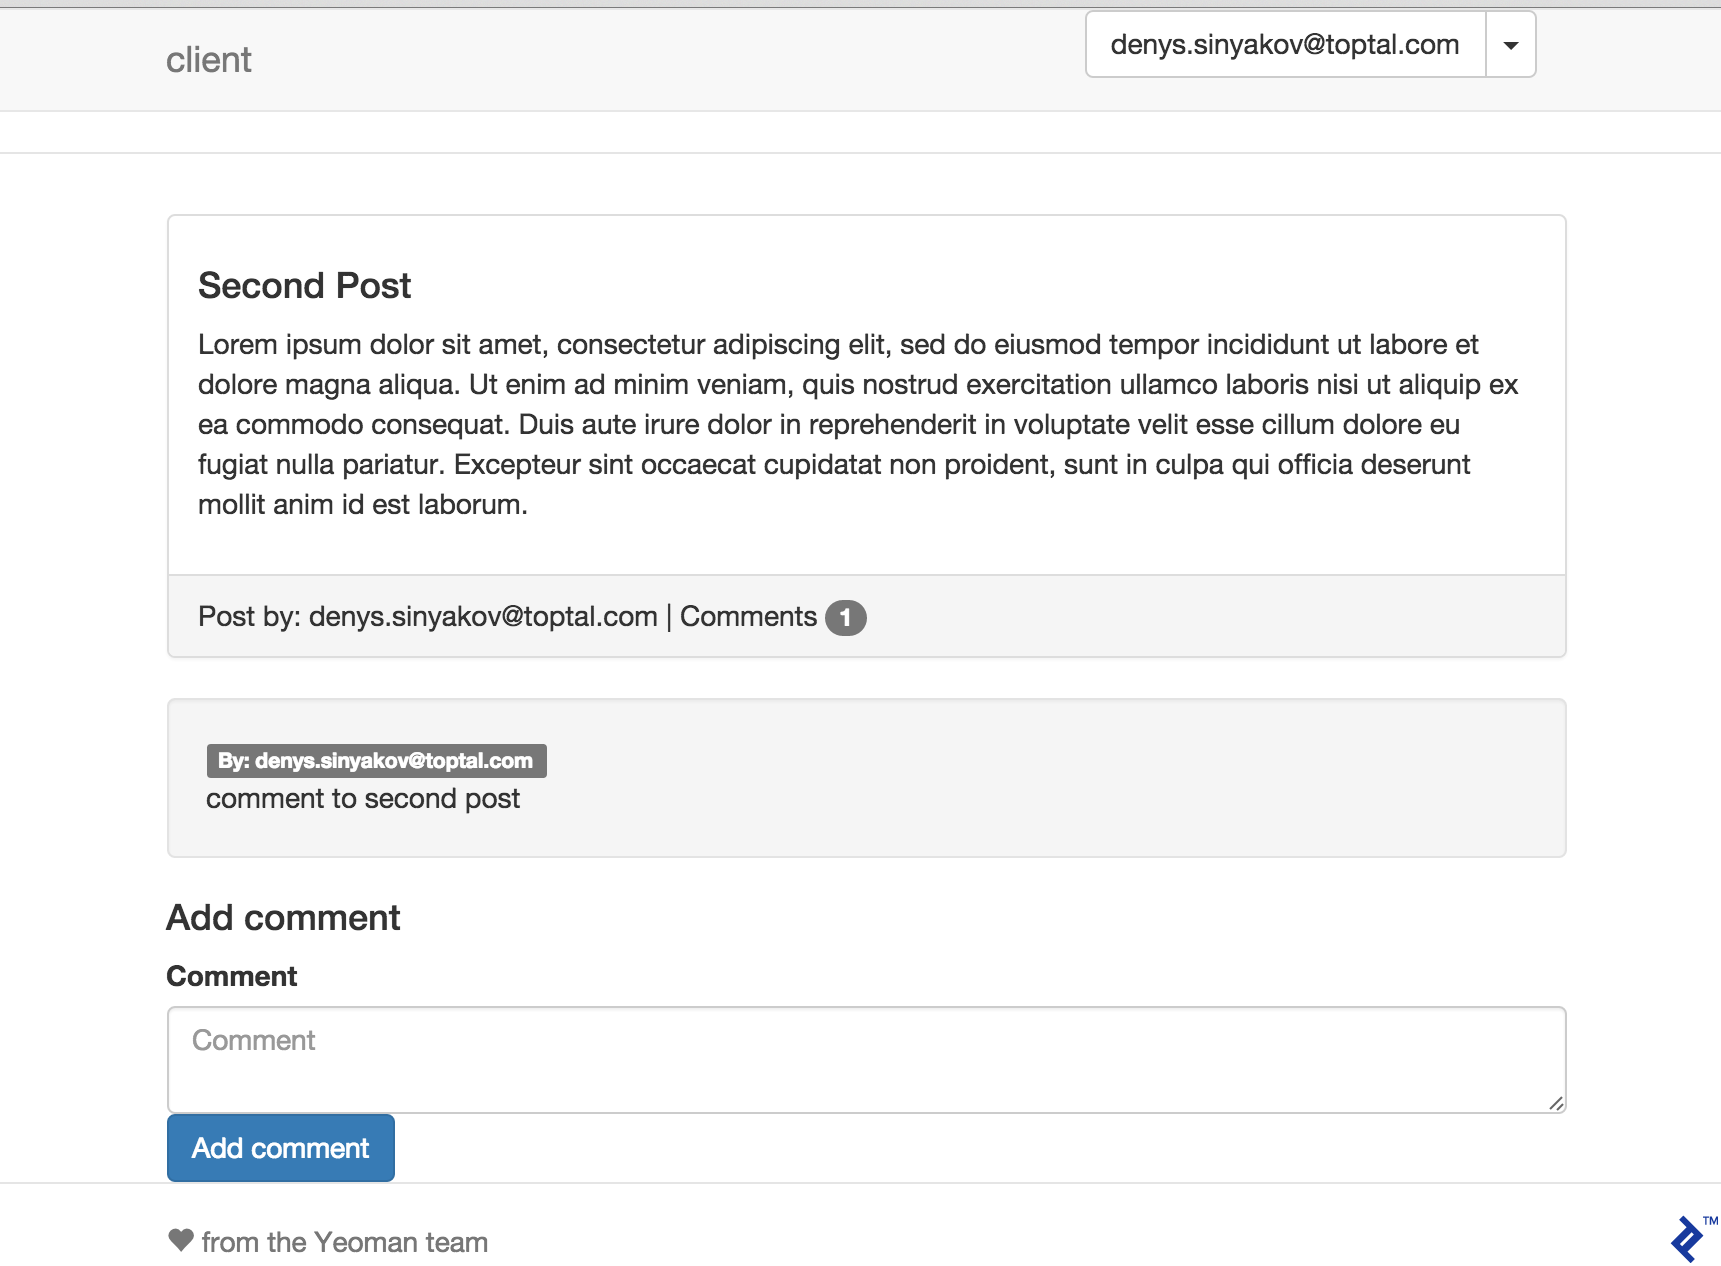
<divclass="well"ng-repeat="comment in post.comments"><spanclass="label label-default">By: {{ comment.user.email }}</span><br/> {{ comment.content }}
</div><divng-hide="user.username || !post"><h4><ang-href="/#/login">Login</a> to comment</h4></div><formname="addCommentForm"ng-submit="addComment()"novalidateng-show="user.username"><div><h4>Add comment</h4></div><div><labelfor="comment">Comment</label><textareaname="comment"class="form-control"id="comment"placeholder="Comment"ng-model="comment"></textarea></div><buttontype="submit"class="btn btn-primary">Add comment</button></form>
You can now add and view comments on any post.
What’s Next?
This tutorial constructed an AngularJS blog with a Play application as its REST API back-end. While lacking robust data validation (particularly client-side) and comprehensive security, this tutorial aimed to showcase one approach to building such an application. The source code is available at a GitHub repository.
For those interested in AngularJS and Play for web development, explore these topics further: