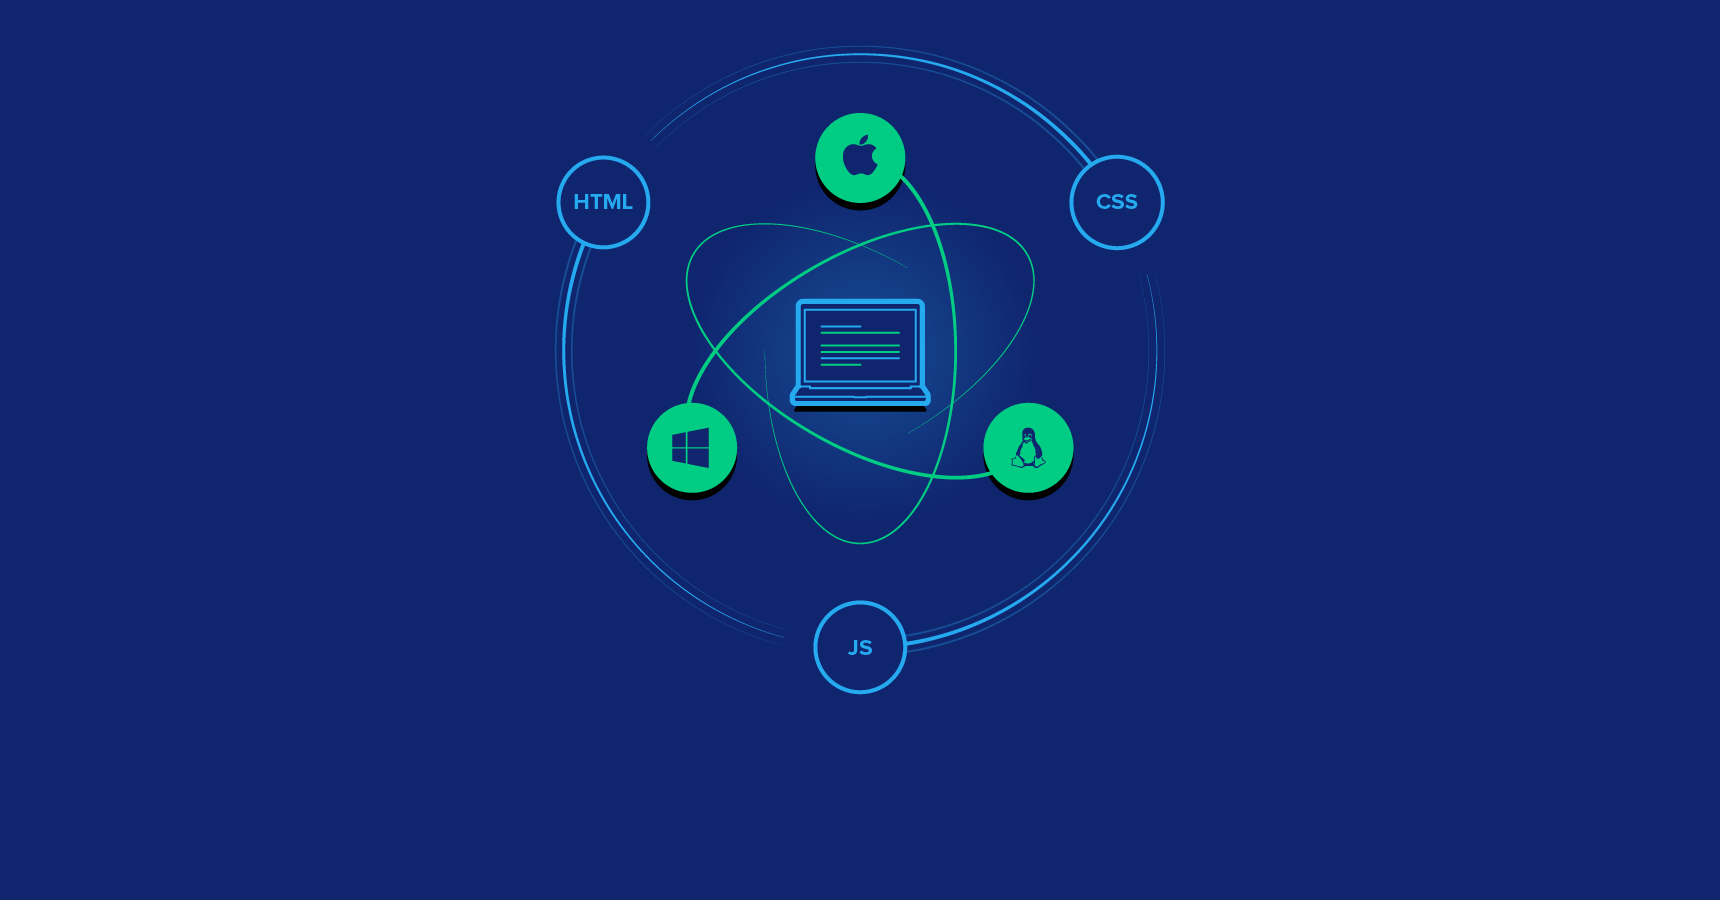
In the early months of this year, Github unveiled Atom-Shell, the heart of its renowned open-source editor Atom. They took the opportunity to rechristen it as Electron.
Unlike its Node.js-based desktop application counterparts, Electron distinguishes itself in this established arena. It merges the robustness of Node.js (io.js in earlier versions) with the Chromium Engine. This potent blend delivers the best of server-side and client-side JavaScript.
Envision a world where we can construct high-performance, data-driven, cross-platform desktop applications. These applications would not only leverage the expanding NPM module repository but also the entire Bower registry for client-side needs.
This is where Electron comes in.
This tutorial guides you through building a straightforward password keychain application. We’ll utilize Electron, Angular.js, and Loki.js](http://lokijs.org/#/), a lightweight, in-memory database with a syntax familiar to [MongoDB developers.
You can access the complete source code for this application here.
This tutorial presumes:
- You have Node.js and Bower installed.
- You are acquainted with Node.js, Angular.js, and MongoDB-like query syntax.
Gathering the Essentials
First and foremost, we need the Electron binaries for local app testing. We can install Electron globally for use as a CLI or locally within our application’s directory. I suggest a global installation to avoid repetitive setups for each app.
Later, we’ll explore packaging our application for distribution using Gulp. This process involves copying Electron binaries, making manual installation in the application path redundant.
To install the Electron CLI, run this command:
| |
Verify the installation by typing electron -h. It should show the Electron CLI version.
During this article’s writing, the Electron version was 0.31.2.
Project Setup
Let’s use this basic folder structure:
| |
… where: - cache/ will store downloaded Electron binaries during the build. - dist/ will hold the generated distribution files. - src/ will contain our source code. - src/app.js will be our application’s entry point.
Navigate to the src/ folder in your terminal and create package.json and bower.json:
| |
We’ll install the required packages later.
Grasping Electron Processes
Electron works with two process types:
- The Main Process: This is the application’s starting point, the file executed on app launch. It typically declares the app’s windows and can define global event listeners using Electron’s IPC module.
- The Renderer Process: This acts as the controller for a specific application window. Each window spawns its own Renderer Process.
For code readability, use a separate file for each Renderer Process. Let’s define our Main Process in
src/app.js. We’ll include theappmodule for starting the app and thebrowser-windowmodule to create application windows (both are part of Electron’s core):
| |
Upon starting, the app triggers a ready event, which we can bind to. This is where we can instantiate the main window:
| |
Key points:
- Creating a new
BrowserWindowobject instance creates a new window. - It accepts an object argument to define various settings, including the default width and height of the window.
- The window instance has a
loadUrl()method to load an HTML file, either local or remote. - The
openDevTools()method (optional) opens Chrome Dev Tools for debugging.
Let’s organize our code. In the src/ folder, create a windows/ folder. Within it, create a subfolder for each window:
| |
… where main.controller.js handles the “server-side” logic, and main.view.js manages the “client-side” logic.
main.html is a simple HTML5 webpage:
| |
Our app should now be runnable. From the src folder, run:
| |
Automate this using the
startscript inpackage.son.

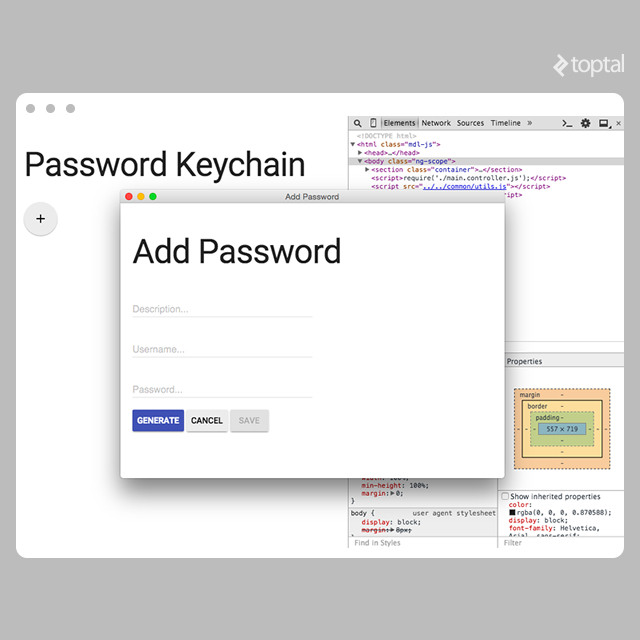
Building a Password Keychain App
Our password keychain application needs: - Functionality to add, generate, and save passwords. - A user-friendly way to copy and remove passwords.
Generating and Saving Passwords
A straightforward form will be sufficient for entering new passwords. To demonstrate communication between multiple windows in Electron, let’s add a second window for the “insert” form. We’ll wrap this logic in a method for easy reuse:
| |
Key points:
- Set show to false in the
BrowserWindowoptions to prevent the window from opening on app startup. - Destroy the
BrowserWindowinstance when the window emits a closed event.
Opening and Closing the “Insert” Window
We want to trigger the “insert” window when the user clicks a button in the “main” window. This requires sending a message from the main window to the Main Process to open the insert window. We’ll use Electron’s IPC module. There are two IPC module variants:
- One for the Main Process, allowing subscription to messages from windows.
- One for the Renderer Process, enabling message sending to the main process.
While Electron’s communication is largely uni-directional, you can access the Main Process’ IPC module in a Renderer Process using the remote module. The Main Process can also reply to the originating Renderer Process using the Event.sender.send() method.
Require the IPC module in your Main Process script like any NPM module:
| |
… then, bind to events using the on() method:
| |
Key Points:
- Event names are arbitrary; the example is for illustration.
- Check if the
BrowserWindowinstance exists before instantiation. - Useful
BrowserWindowmethods:- isClosed(): Returns a boolean indicating if the window is closed.
- isVisible(): Returns a boolean indicating window visibility.
- show() / hide(): Convenience methods for showing and hiding the window.
Let’s create a new main.view.js file and include it in our HTML:
| |
Loading the script via the HTML
scripttag puts it in a client-side context. Global variables are accessible aswindow.<varname>. For server-side loading, userequire('./main.controller.js');directly in the HTML.
Even in a client-side context, we can access the Renderer Process’ IPC module and send our event:
| |
A
sendSync()method is available for synchronous event sending.
To open the “insert” window, create an HTML button with the corresponding Angular directive:
| |
Add the directive as a dependency in the main window’s Angular controller:
| |
Generating Passwords
For simplicity, we’ll use the NPM uuid module to generate unique IDs as passwords. Install it like other NPM modules, require it in our ‘Utils’ script, and create a factory returning a unique ID:
| |
Now, add a button to the insert view and attach a directive to handle clicks and call the create() method:
| |
| |
Saving Passwords
Let’s store our passwords. The data structure is simple:
| |
We need an in-memory database with optional file syncing for backup. Loki.js fits perfectly, offering the needed functionality and Dynamic Views akin to MongoDB’s Aggregation.
Dynamic Views don’t have all of MongodDB’s Aggregation features. Refer to the documentation for details.
Create a basic HTML form:
| |
Add the JavaScript logic for handling form submission and saving:
| |
Key Points:
- Initialize the database by creating a new Loki object. Provide the database file path, check for its existence, create it if needed (including the ‘Keychain’ collection), and load its contents into memory.
- Retrieve a collection using
getCollection(). - Collection objects have methods like
insert()to add new documents. - Use the Loki object’s
saveDatabase()to persist data. - Reset the form data and send an IPC event to close the window after saving.
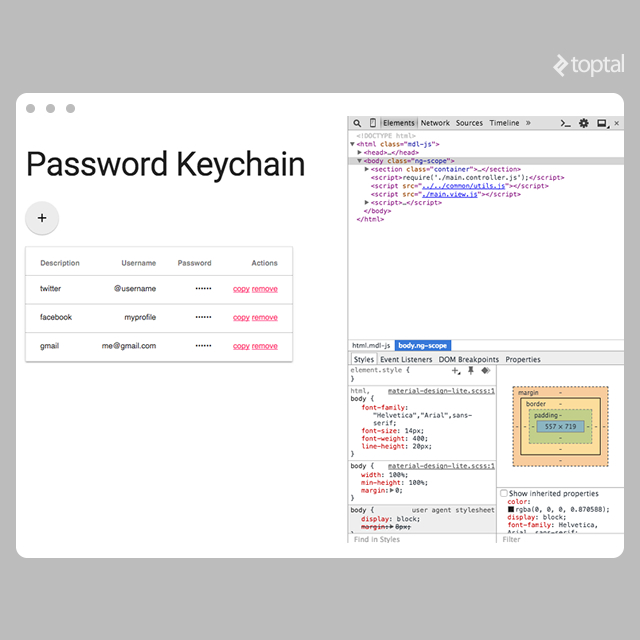
We now have a form for generating and saving passwords. Let’s display these entries in the main view.
Listing Passwords
We need to:
- Retrieve all documents from our collection.
- Update the main view when a new password is saved.
Retrieve documents using the Loki object’s getCollection(). The returned object’s data property holds an array of all documents:
| |
Call getDocs() in our Angular controller to retrieve all passwords after database initialization:
| |
With some Angular templating, we have our password list:
| |
Refreshing the password list after adding a new entry is a good feature. Use Electron’s IPC module for this. As mentioned, the remote module lets us turn a Renderer Process into a listener by accessing the Main Process’ IPC module. Here’s how to implement it in main.view.js:
| |
Key Points:
- Use the
remotemodule’srequire()to access the remote IPC module. - Set up event listeners in the Renderer Process using the
on()method.
The insert view will dispatch this event after saving a new document:
| |
Copying Passwords
Displaying plain text passwords is generally inadvisable. Instead, we’ll hide passwords and provide a button for easy copying.
Electron offers a clipboard module with convenient methods for copying and pasting text, images, and HTML:
| |
Since our passwords are simple strings, we’ll use writeText() to copy them to the clipboard. Update the main view HTML with the copy button and the copy-password directive, passing the password array index:
| |
Removing Passwords
Allow users to delete obsolete passwords. To do this, call the remove() method on the keychain collection, providing the entire document:
| |
Loki.js documentation suggests removing by ID, but this doesn’t seem to work as expected.
Implementing a Desktop Menu
Electron seamlessly integrates with desktop environments, providing a native look and feel. It includes a Menu module for creating sophisticated desktop menus.
Menus are a broad topic deserving their own tutorial. Explore Electron’s Desktop Environment Integration tutorial for a comprehensive understanding of this module.
Here, we’ll cover creating a custom menu, adding a custom command, and implementing the standard quit command.
Creating & Assigning a Custom Menu
While menu logic typically resides in the main script file (Main Process), we can abstract it to a separate file and access the Menu module using the remote module:
| |
Use the buildFromTemplate() method to define a simple menu:
| |
The first array item is always the “default” menu item.
The
labelvalue for the default menu item doesn’t significantly matter. In dev mode, it’s alwaysElectron. We’ll customize this during the build process.
Assign the custom menu as the default using setApplicationMenu():
| |
Mapping Keyboard Shortcuts
Electron provides “accelerators”, predefined strings mapping to keyboard combinations like Command+A or Ctrl+Shift+Z.
The
Commandaccelerator doesn’t work on Windows or Linux. For our password keychain, let’s add aFilemenu with these commands:
- Create Password: Opens the insert view with Cmd (or Ctrl) + N
- Quit: Quits the app with Cmd (or Ctrl) + Q
| |
Key Points:
- Add a visual separator using an item with
typeset toseparator. CmdOrCtrlworks on both Mac and PC keyboards.- The
selectorproperty is OSX-specific.
Styling Our App
You’ve probably noticed mdl- prefixed class names. This tutorial uses the Material Design Lite UI framework, but feel free to choose your preferred one.
Electron supports any HTML5 capabilities. However, be mindful of app size and potential performance impacts from excessive third-party libraries.
Packaging Electron Apps
Your Electron app is ready for distribution after thorough testing, perhaps using Selenium and WebDriver for e2e tests.
Let’s personalize it with a custom name instead of the default “Electron” and add custom icons for Mac and PC.
Building with Gulp
Gulp plugins exist for almost everything. Searching for “gulp electron” leads us to the gulp-electron plugin.
With the folder structure from the beginning, this plugin is straightforward to use. Install it like any Gulp plugin:
| |
Define the Gulp task as follows:
| |
Key Points:
- The
src/folder should be different from the Gulpfile.js and distribution folders. - Specify target platforms in the
platformsarray. - Define a
cachefolder for downloaded Electron binaries. - Pass the
package.jsoncontent via thepackageJsonproperty. - Optionally create zip archives using the
packagingproperty. - Each platform has specific “platform resources” as outlined in can be defined.
Adding App Icons
The icon property within platformResources lets us set custom icons:
| |
OS X requires
.icnsicons. Numerous online tools can convert.pngto.icoand.icns.
Conclusion
This tutorial provides a glimpse into Electron’s capabilities. Draw inspiration from remarkable apps like Atom or Slack.
Feel free to share your comments and experiences with Electron!