There once was a company at the pinnacle of the tech world. Their tools were unmatched, and crafting software for their platform was a developer’s dream. However, over time, they grew complacent, their passion waning. System crashes, once met with urgency, became mere inconveniences, accepted as intrinsic to their reality. They held an unshakeable belief in the flawlessness of their programs—serene, elegant, their very purpose self-evident.
Oh, how mistaken they were…
The day of reckoning finally arrived. Their empire, built on a foundation of arrogance, began to crumble. It was only then that their CEO, in a moment of desperation, cried out to bring back all the developers, who had long since abandoned their sinking ship. The company was Microsoft, and I, along with many others, believed their fate was sealed. We watched, convinced that they were destined to fade into obscurity, another casualty of the relentless march of technological progress.
To my delight, I was proven wrong!
In a remarkable turn of events, Microsoft underwent a metamorphosis. They shed their old skin, emerging as a force to be reckoned with. They did stumble, of course. Skype, under their watch, lost its luster. Their foray into the smartphone market ended in disappointment. Even their tablet venture, though promising, ultimately fell short.
However, amidst these missteps, they achieved something truly extraordinary. They dismantled the walls of their once-closed ecosystem, embracing open source with open arms. .NET was set free, they joined forces with the Linux Foundation, released SQL Server for Linux, and unveiled a groundbreaking tool called Visual Studio for Mac.
Yes, you read that right—a true Microsoft IDE, not shackled to Windows, but designed specifically for Mac. Astonishing!

Building Your First Cross-Platform Android and iOS App Using C# on a Mac
Visual Studio for Mac empowers you to breathe life into almost any application idea you have. This means harnessing the power of C# to develop apps for iOS, tvOS, Android, Mac, .NET Core, and even ASP.NET. Since mobile app development is all the rage these days, let’s dive into using Visual Studio for Mac to craft a C# mobile app that runs seamlessly on both Android and iOS.
Our starting point? Selecting the right application template. Let’s keep things simple and go with the “Single View App” option.

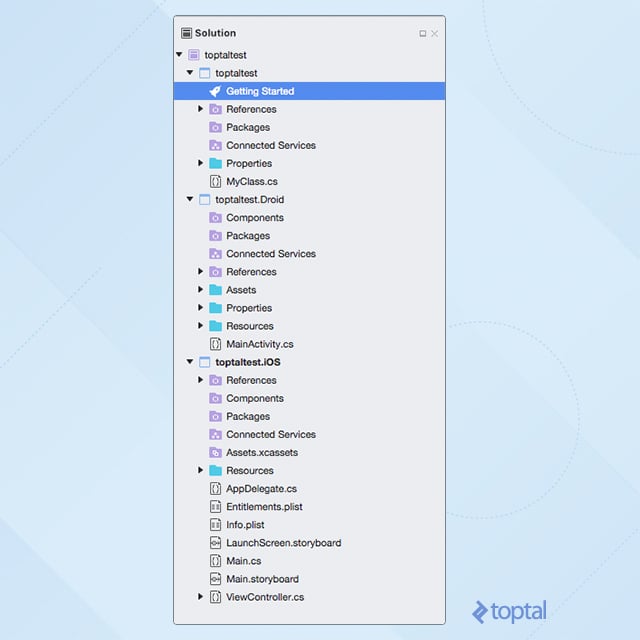
Once you’ve provided a package name and laid the groundwork for your app, Visual Studio gets to work, generating a solution with three projects. The first will be a shared library, the designated space for your platform-agnostic code. The remaining two will be your Android and iOS apps.
To launch your app, simply navigate to the “Run” menu or use the commands conveniently located in the application bar.
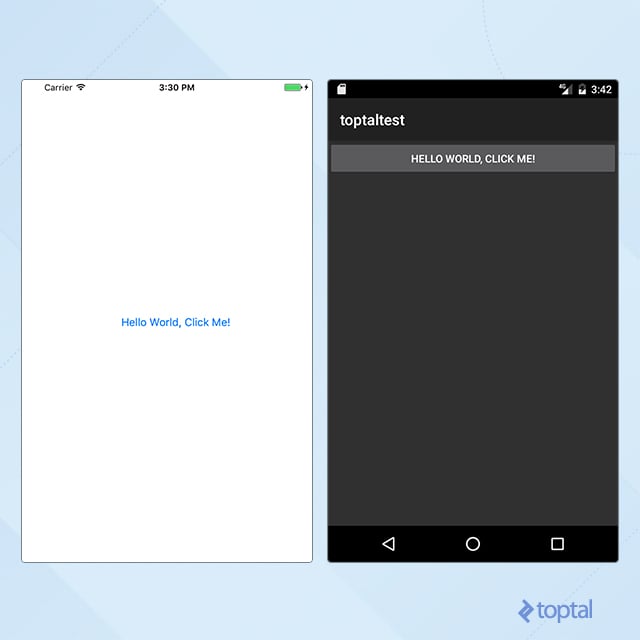
Congratulations are in order! You’ve officially earned your stripes as an iOS and Android developer, all without writing a single line of Objective-C, Swift, or Java.
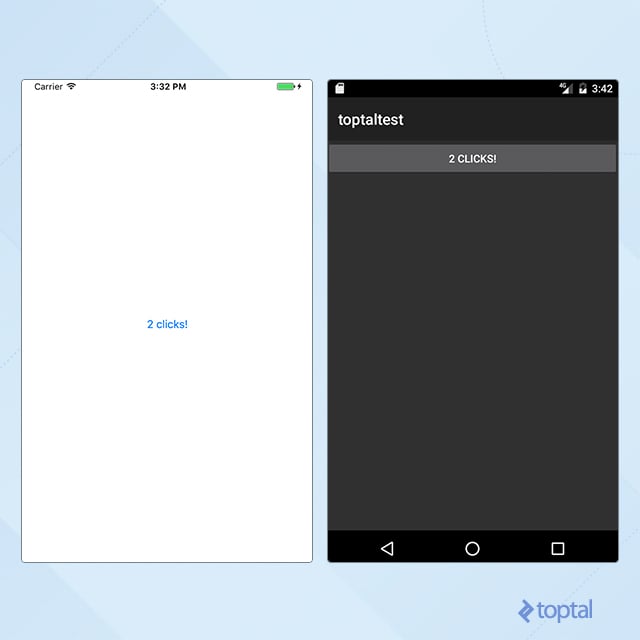
However, our C# iPhone app, as it stands, is rather rudimentary. Let’s spice things up by integrating maps and location services.
Integrating Maps and Location Services
It’s worth noting that VS for Mac is still in its “Preview” phase. Consequently, the abundance of help and documentation you might expect is somewhat limited. Your best bet for guidance is to consult the official Xamarin documentation.
Keep in mind that Visual Studio for Mac doesn’t adhere to the same solution and application structure as the Xamarin tools you may have encountered on PC. In many cases, some experimentation and creative problem-solving might be needed to adapt their examples to this environment. Let’s hope that Microsoft, with the release of the final VS for Mac version, steps up to provide a comprehensive suite of MSDN resources.
Pinpointing the User’s Location on iOS
To access device resources like location data, you’ll need the user’s explicit permission. On iOS, the info.plist file serves as the repository for these settings. Thankfully, VS for Mac offers a visual editor for this file. Our first task is to introduce a value for the setting aptly named NSLocationWhenInUseUsageDescription.
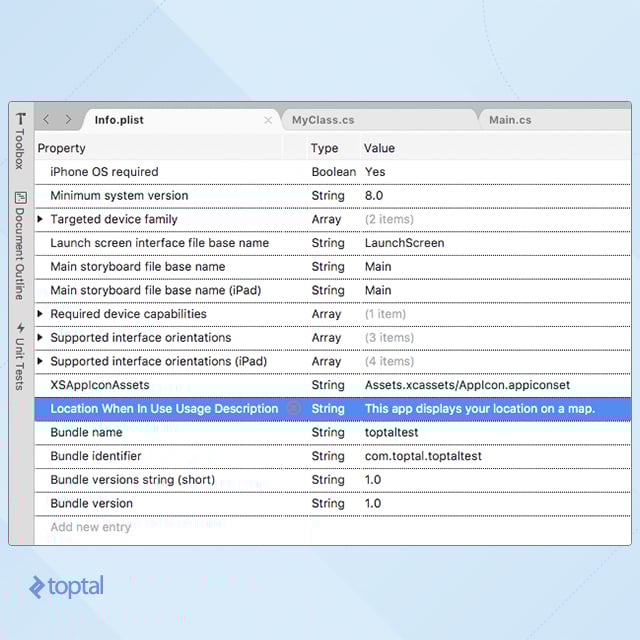
A heads-up: When you define the property name, VS might display a rather lengthy version of “NSLocationWhenInUseUsageDescription.” Don’t be alarmed—this is expected behavior.
Remember that button in our initial app that kept track of clicks? Let’s bid it farewell and replace it with a map. Head over to the solution browser, locate Main.storyboard, and double-click it to summon it in the editor.
Storyboards, the brainchild of Apple, have been embraced by Xamarin as well. If you’re curious to learn more, take a peek at Apple Documentation or Xamarin Documentation.
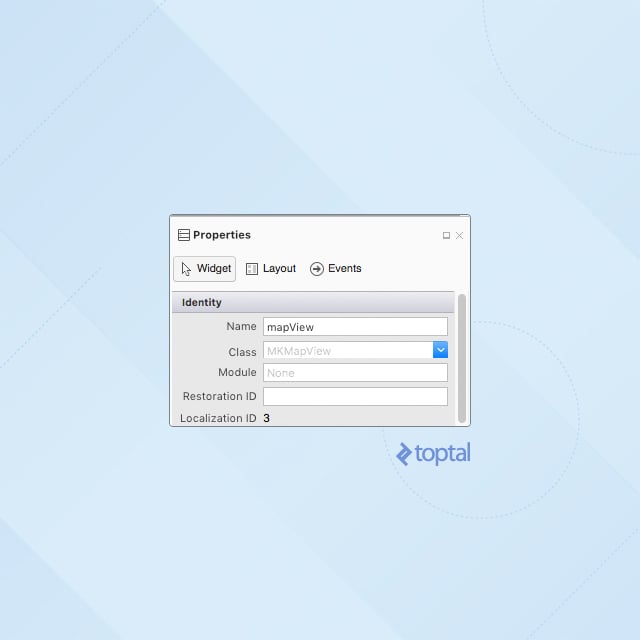
With the button out of the picture, drag and drop a Map View component onto your page.

Ensure your “mapView” component is christened with an appropriate name.
Now, let’s tidy up ViewController.cs. Modify the ViewDidLoad() method to resemble the following:
| |
VS can lend a helping hand here. Use the “Quick fix” feature to automatically add a reference to the CoreLocation library, or add it manually if you prefer.
Upon running your iOS app, you should be greeted with a request to access your location. Grant permission, and your map will spring to life, the familiar blue dot indicating your current whereabouts (or, if you’re using the iOS simulator, your simulated location!).

Displaying the User’s Location on Android
While straightforward on iOS, this task takes a slightly more convoluted turn on Android, thanks to Google and Microsoft’s penchant for complexity. To incorporate maps into your Android app, you’ll need to conjure a Google Maps API key and embed it within your AndroidManifest.xml file.
Fear not, the Xamarin folks have crafted a clear and concise guide for obtaining a Google Maps API key. Before you proceed, I’d recommend following the steps outlined in their guide. Once completed, your AndroidManifest.xml should boast a setting akin to this:
| |
With that out of the way, you’re ready to introduce a map to your Android domain.
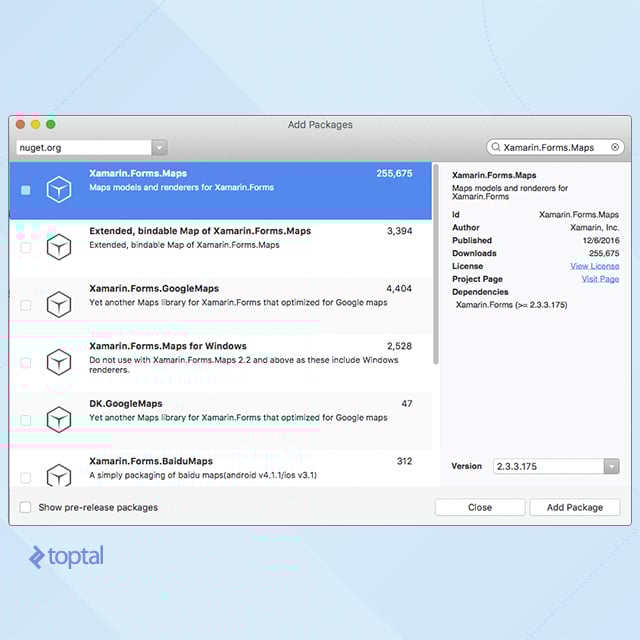
One of the perks of VS for Mac is its seamless integration with NuGet, mirroring its more established Windows counterpart. Since map-handling libraries aren’t part of the standard package, you’ll need to install the Xamarin.Forms.Maps package.
Now, here’s where things get interesting. Unlike iOS, there’s no “Map View” component you can simply drag and drop onto your “Activity”. Instead, you’ll need to don your code-editing hat and make some manual adjustments to your Resources->layout->Main.axml file. While you can use the designer view to eliminate the pre-existing button, adding the map requires switching to “Code View” and inserting the following fragment code within your LinearLayout:
| |
As with C# for iOS, you’ll need to configure your app to politely request the necessary permissions. Open AndroidManifest.xml for editing and click the “Application” button nestled in the editor’s bottom left corner. VS will present you with a user-friendly interface for tweaking these settings. You’ll need to enable a handful of them, as illustrated below.

Now comes the fun part—writing some actual code. Seek out the MainActivity.cs file, open it for editing, and implement the following modifications:
First, add these namespace references:
| |
Next, introduce the following two variables as class-level variables:
| |
Finally, let’s give the OnCreate() method a makeover:
| |
By invoking GetSystemService from within OnCreate(), your MainActivity will be bestowed with the powers of an ILocationListener, allowing it to gracefully handle all the events we discussed earlier.
Run your Android application, and you should be greeted with a map centered on your location, resembling the image below.

Leveraging Shared Libraries for iOS and Android
One of the most compelling features of VS for Mac is the ability to write code once and share it across both iOS and Android apps. Ideally, we’d strive to encapsulate all our app’s business logic within a shared library, relegating iOS- and Android-specific code solely to the UI.
Let’s create a new shared class that will asynchronously execute an HTTP request and display the results in the Debug console.
Head over to your shared library and create a new class file named RestClient.cs, populating it with the following code:
(Remember to use the correct namespace from your project)
| |
Utilizing the Library on iOS
Navigate to your iOS project and modify the ViewController.cs file to match the following code:
(Again, ensure you’re using the correct namespace from your project)
| |
Run your iOS app, click the button, and direct your attention to the “Application Output” tab in Visual Studio. You should be greeted with an output similar to this:

Utilizing the Library on Android
The changes required for your Android app mirror those made on iOS. Open the MainActivity.cs file and make the following adjustments:
(As always, confirm you’re using the correct namespace from your project)
| |
A note of caution: Both Android and iOS are inherently single-threaded when it comes to UI interactions. This means any attempt to modify UI elements must originate from the main thread. That’s where RunOnUiThread and InvokeOnMainThread come into play. Since our HTTP requests were executed in a separate thread and doneCallback() was called outside the main thread, we had to employ these methods to gain access to our buttons and update the label.
C# Developers: The New Force in Android and iOS Development
While Visual Studio for Mac may still have a few rough edges to smooth out, its potential is undeniable. The demand for mobile applications continues to skyrocket, and with Visual Studio for Mac, Microsoft has equipped a legion of skilled C# developers to rise to the challenge. This isn’t to say that VS, Xamarin, and C# will reign supreme in the mobile development arena. However, the influx of new talent, increased competition, and a surge in innovation are always welcome additions to any software development niche.