I get a thrill out of creating things—who doesn’t, especially in the developer world? I find immense satisfaction in brainstorming solutions to intriguing problems, crafting implementations, and producing elegant, well-structured code. However, what I absolutely dread is anything related to operations. For me, operations encompass all the tasks that fall outside the realm of building exceptional software—from the nitty-gritty of server setup to the complexities of getting your code smoothly deployed to production.
Ironically, as a freelance Ruby on Rails developer, I frequently find myself tackling new web application projects, which inevitably means grappling with the intricacies of DevOps. Thankfully, after having gone through this process for dozens of applications, I’ve finally landed on an optimal initial deployment pipeline. Sadly, not everyone has had the same level of experience or success in figuring this out. Recognizing this gap, I decided to take the plunge and meticulously document my process.
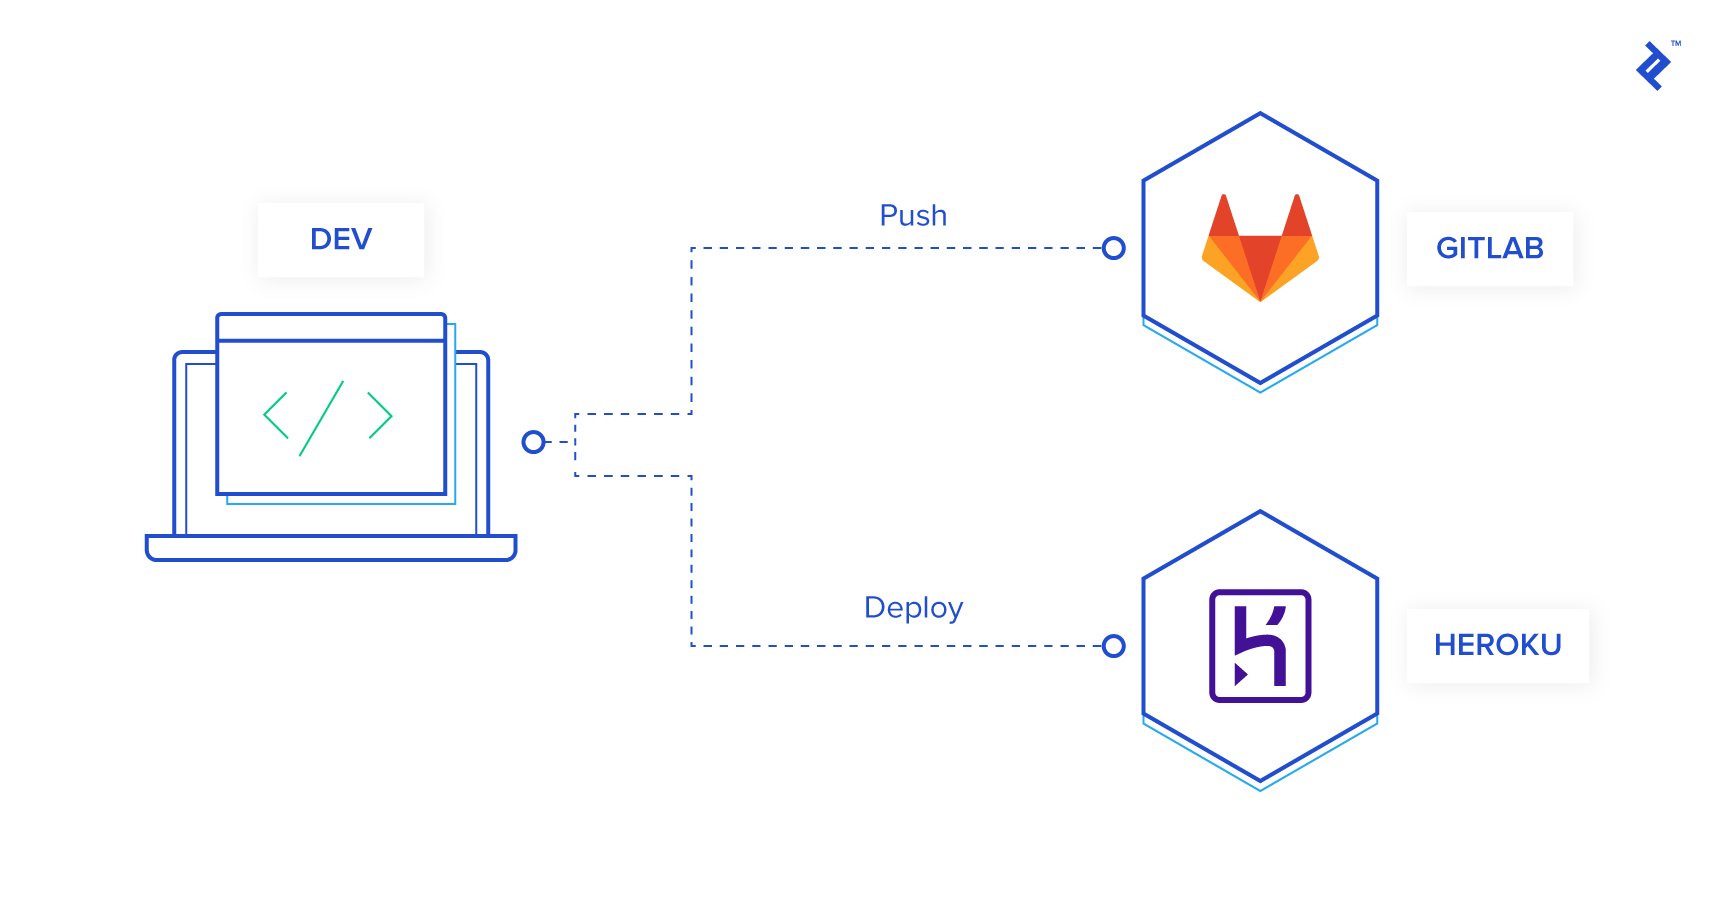
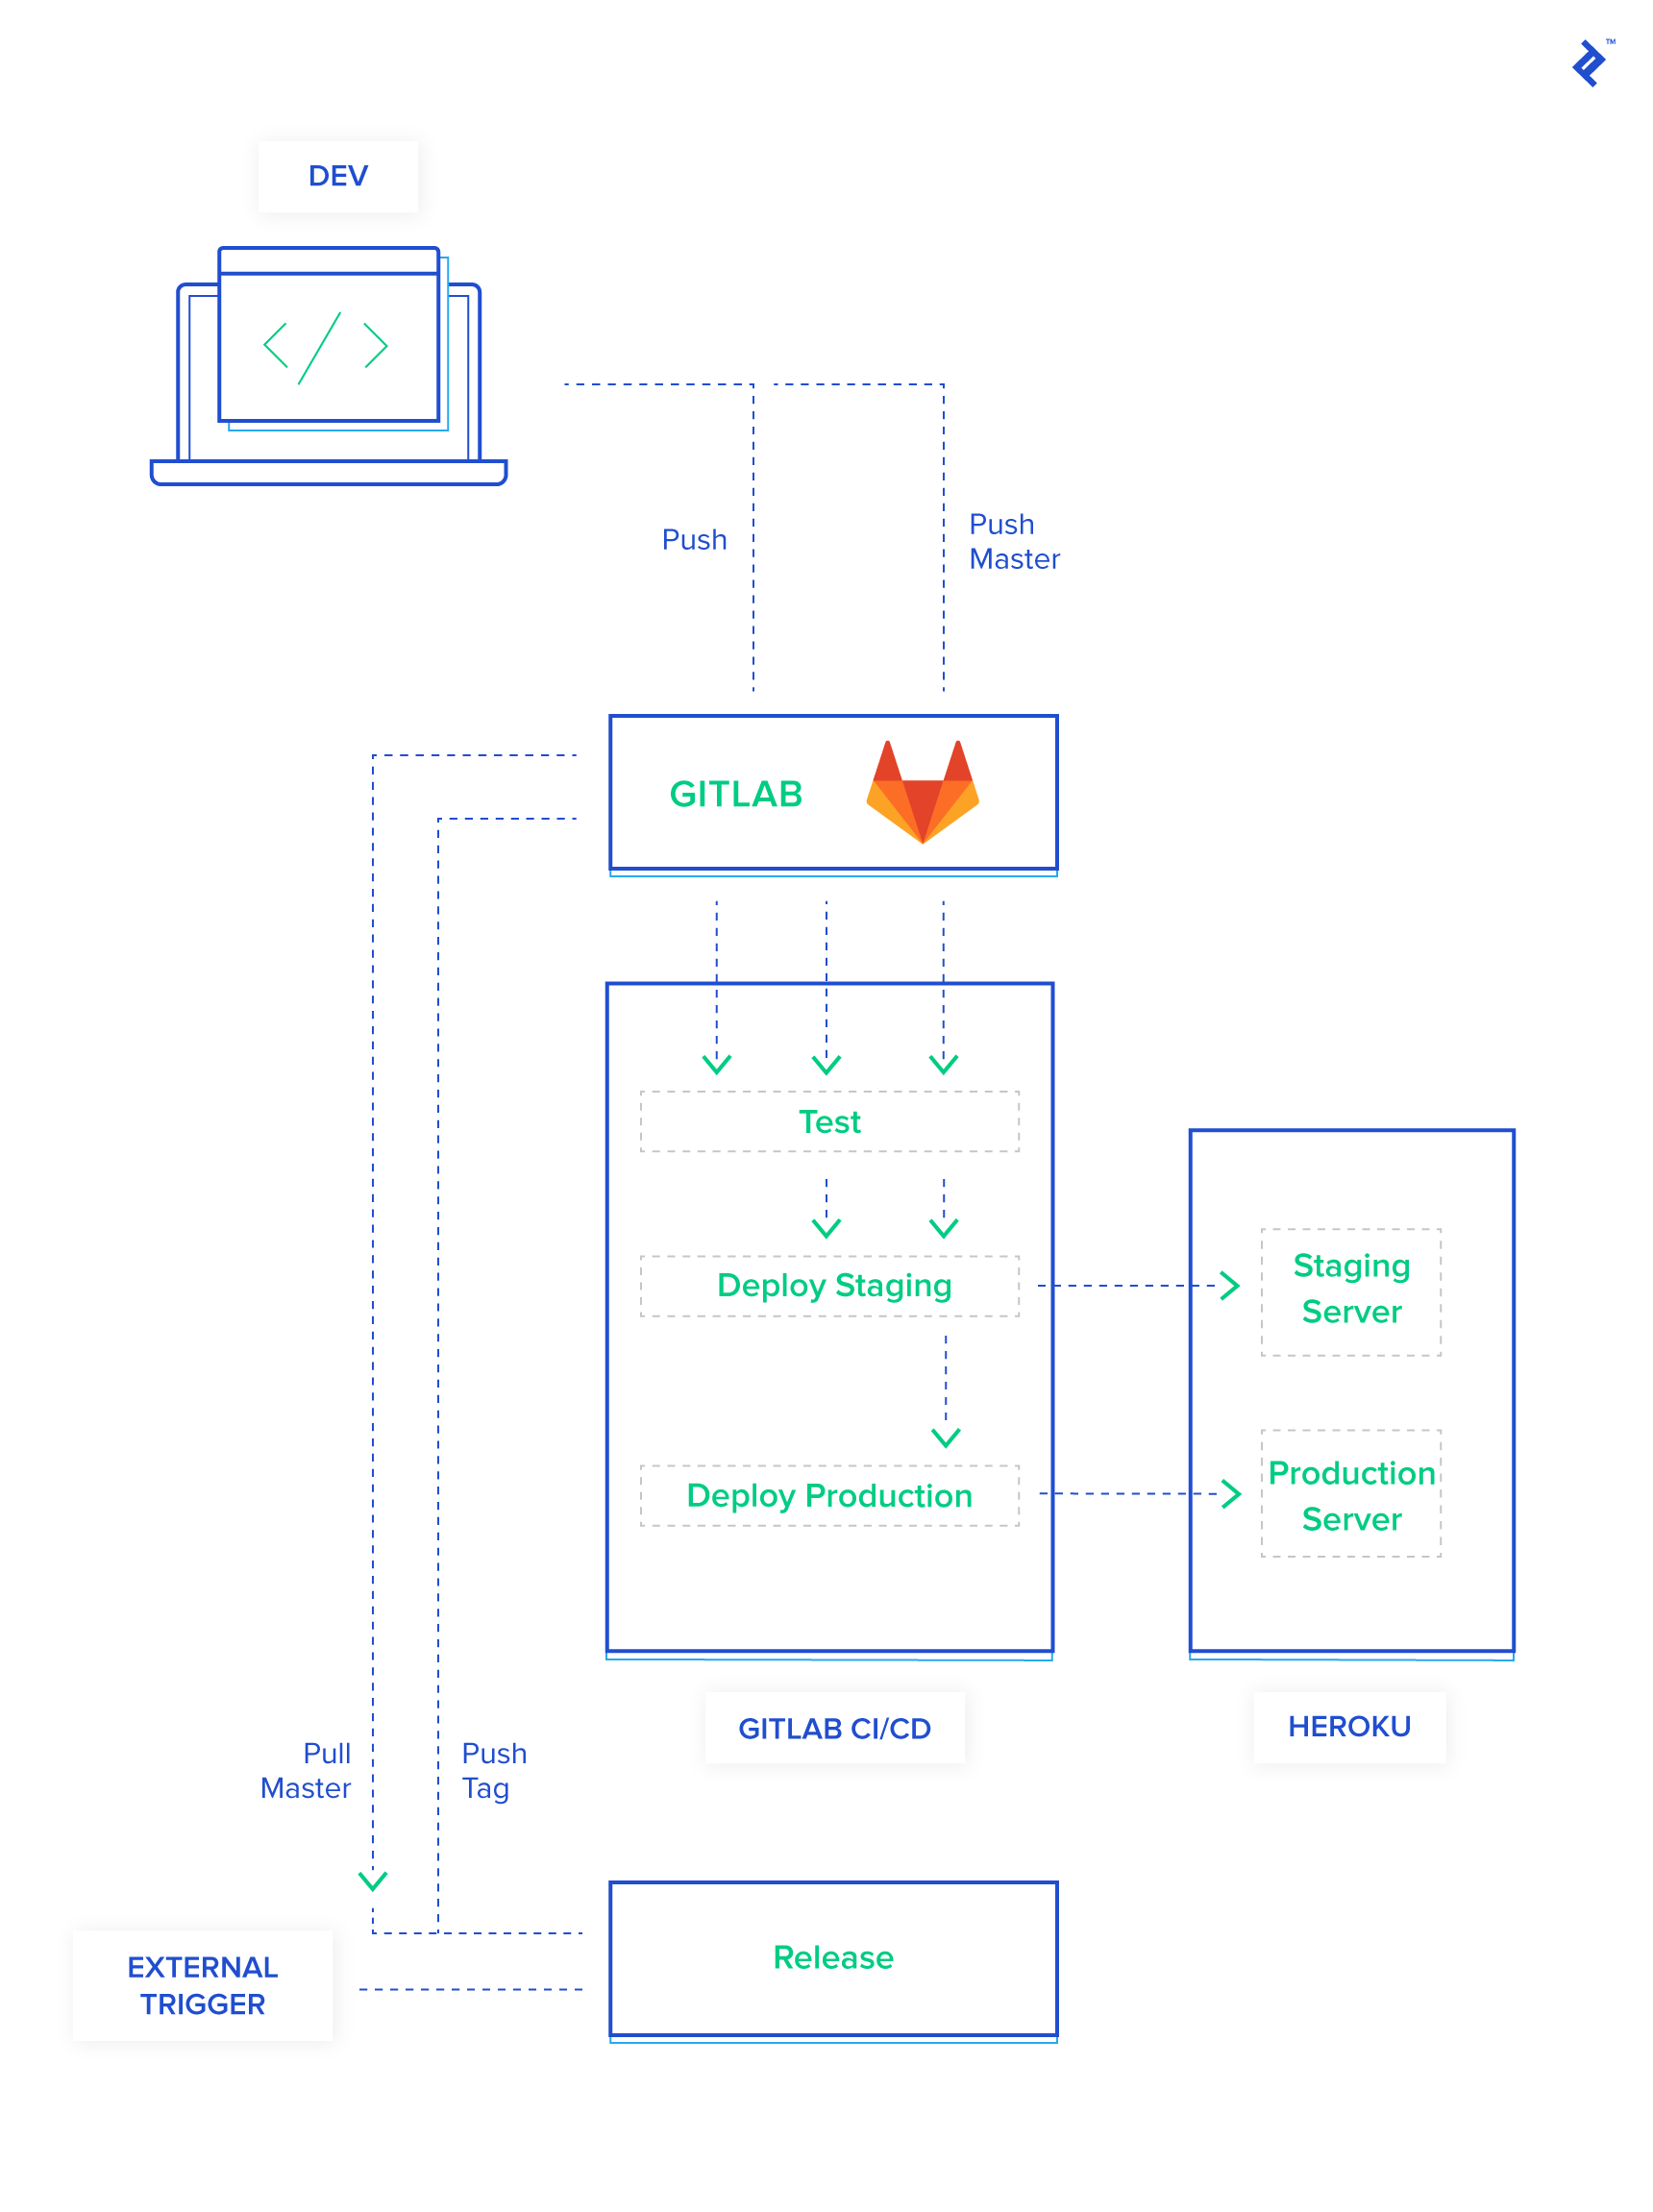
In this comprehensive guide, I’ll walk you through my tried-and-true pipeline, perfectly suited for the initial stages of your project. With my approach, each push you make is rigorously tested, the master branch is seamlessly deployed to a staging environment with a fresh database dump from production, and versioned tags are automatically deployed to production, complete with automated backups and migrations.
Keep in mind that this is my personally crafted pipeline, so it’s naturally tailored to my specific needs and preferences. Feel free to swap out any components that don’t resonate with you and replace them with tools that better suit your fancy. For the purpose of this demonstration, my pipeline incorporates:
- GitLab for hosting the codebase.
- Why: My clients generally prefer to keep their code confidential, and GitLab’s free tier aligns perfectly with this requirement. The integrated free CI capabilities are a major bonus. Kudos to GitLab for that!
- Alternatives: You could opt for other popular choices like GitHub, BitBucket, AWS CodeCommit, among many others.
- GitLab CI for the crucial tasks of building, testing, and deploying our code.
- Why: Seamless integration with GitLab and the fact that it’s free are compelling reasons to choose this option.
- Alternatives: If you prefer other CI/CD solutions, you could consider TravisCI, Codeship, CircleCI, or even go the DIY route with Fabric8.
- Heroku for hosting our application.
- Why: Heroku’s out-of-the-box functionality makes it an ideal starting point for new projects. While you can always explore other options down the line, not every fledgling application requires the sophistication of a dedicated Kubernetes cluster right from the get-go. Even Coinbase started off on Heroku.
- Alternatives: If you prefer other hosting providers or approaches, you could explore AWS, DigitalOcean, Vultr, or even set up your own infrastructure using Kubernetes.
The Old-School Way: Building a Basic App and Deploying It to Heroku
Let’s start by recreating a typical application deployment scenario without the bells and whistles of a fancy CI/CD pipeline—just a straightforward deployment to get the application up and running.
The specific type of application you’re building doesn’t really matter for this illustration, but you will need either Yarn or npm installed. For this example, I’ll be using a Ruby on Rails application. This choice stems from the fact that Rails comes bundled with migrations and a handy CLI, and I already have a pre-configured setup ready to go. You’re more than welcome to use any framework or language that you’re comfortable with, but you’ll need Yarn for the versioning strategy I’ll cover later on. To keep things simple, I’m creating a basic CRUD (Create, Read, Update, Delete) app without any authentication.
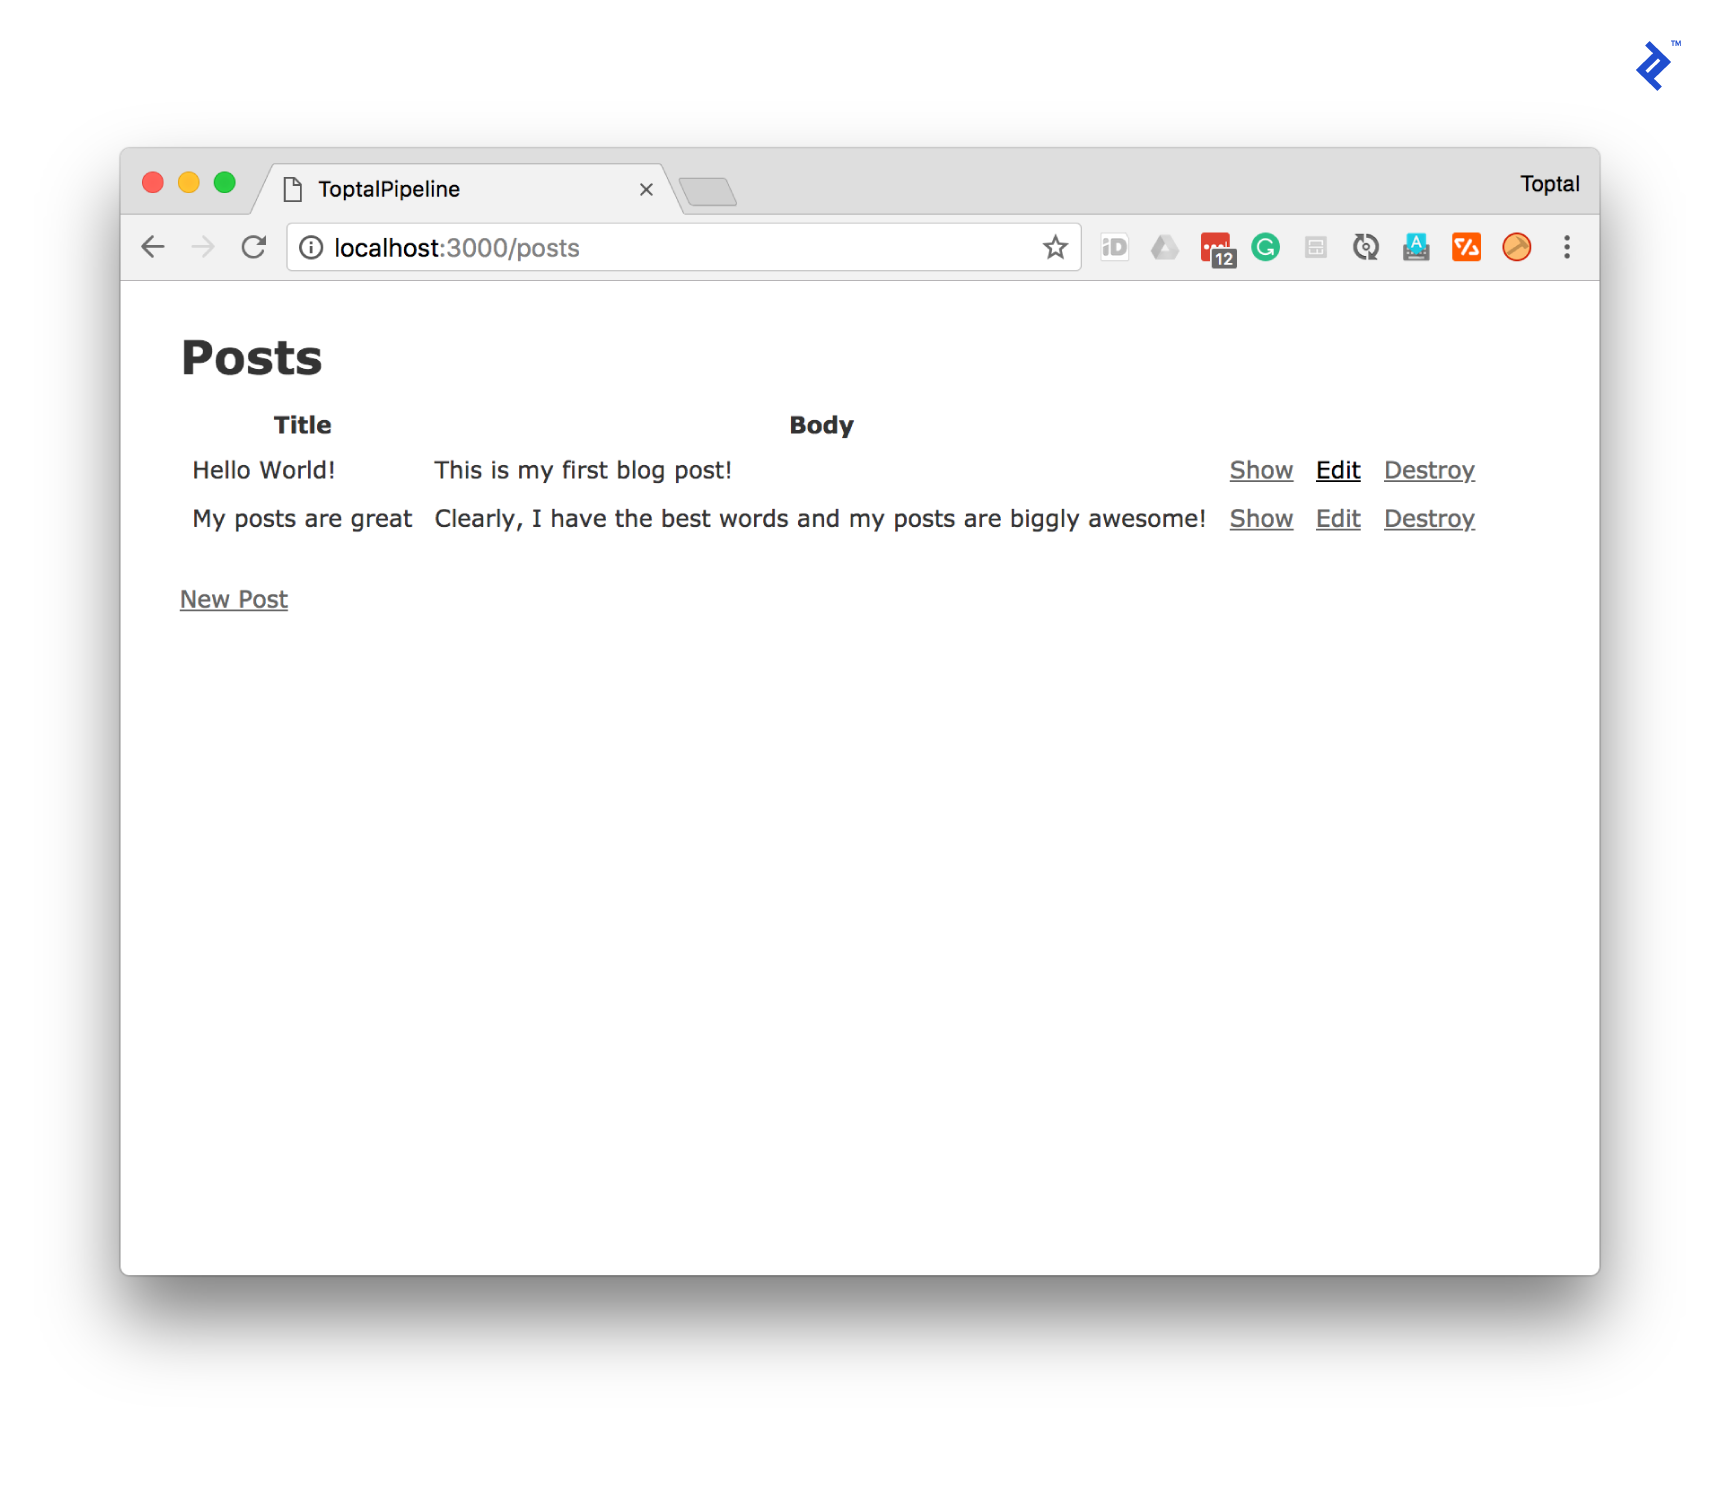
Now, let’s verify that our application is running as expected. I’ve gone ahead and added a few sample posts to ensure everything is functioning correctly.
Next, we’ll deploy our application to Heroku. This involves pushing our code and running the necessary database migrations.
| |
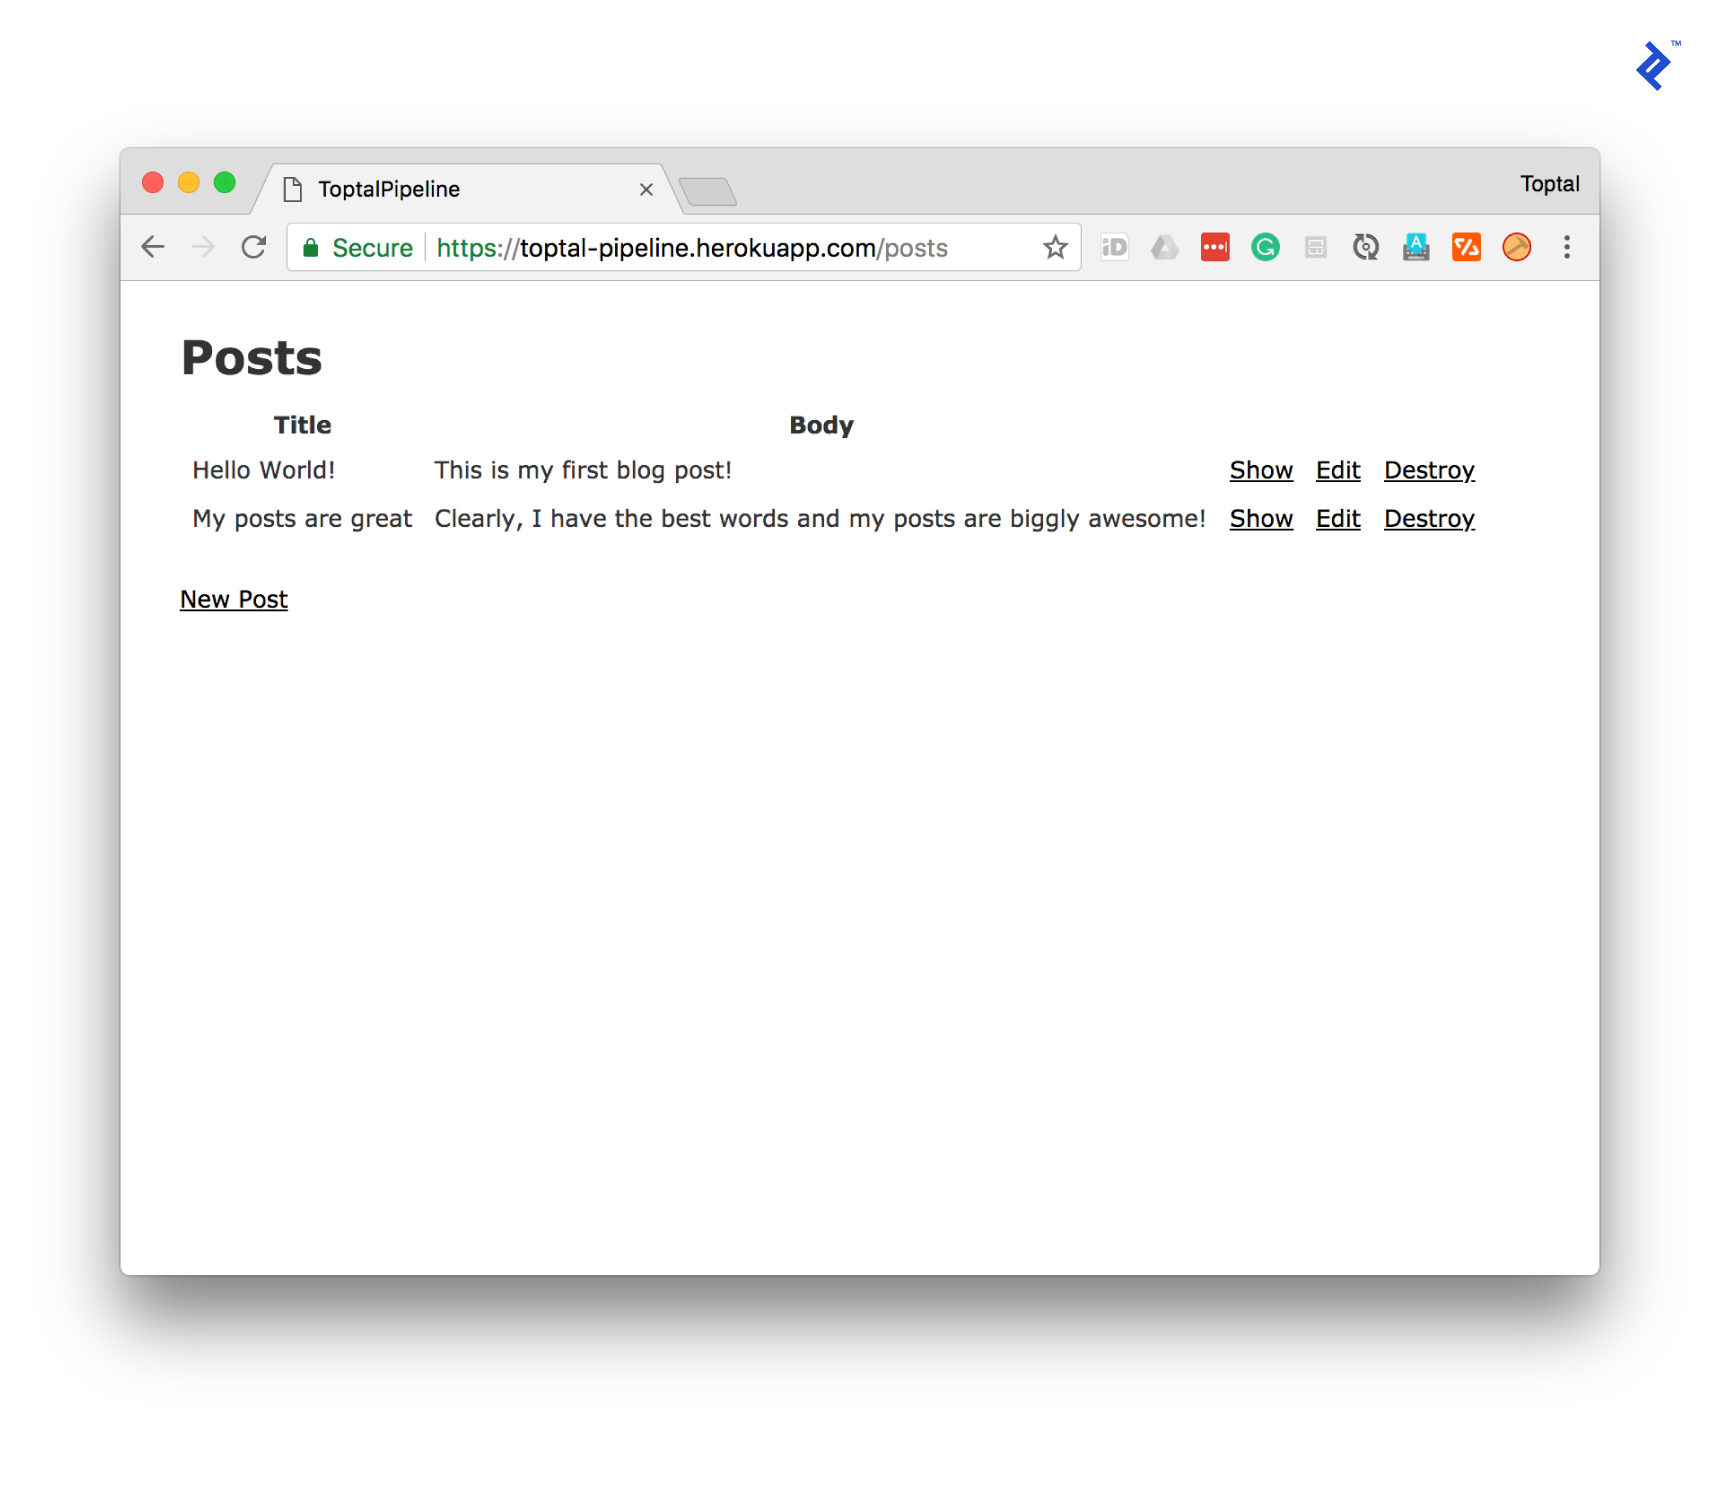
Finally, let’s test it in our production environment.
And there you have it! This is typically where most developers would conclude their operations setup. If you need to make changes in the future, you would essentially repeat the deployment and migration steps outlined above. You might even remember to run your tests if you’re not racing against the clock to grab dinner. While this approach works as a starting point, let’s take a moment to analyze its potential shortcomings.
Pros
- The setup is undeniably quick and straightforward.
- Deployments are, for the most part, a breeze.
Cons
- It lacks the elegance of being DRY (Don’t Repeat Yourself): You end up repeating the same set of steps for every single change.
- Your deployments lack versioning: Rolling back to a specific point in time becomes a game of guesswork. “Let’s revert to yesterday’s deployment from last week” doesn’t exactly inspire confidence three weeks down the line.
- It doesn’t inherently protect you from bad code: Sure, you know you should be running your tests diligently, but without any automated enforcement, the temptation to skip them when you’re pressed for time can be strong.
- It’s vulnerable to malicious actors: Imagine a disgruntled developer deciding to wreak havoc on your application by pushing malicious code. Without proper safeguards in place, this scenario could become a nightmare.
- It doesn’t scale well: Granting every developer on your team the ability to deploy code directly to production essentially gives them unrestricted access to your live application, which is a major security risk and violates the Principle of Least Privilege.
- You’re missing out on a crucial safety net—a staging environment: Errors that are specific to your production environment won’t rear their ugly heads until you’re live, potentially impacting your users.
Crafting the Perfect Initial Deployment Pipeline
Let’s try something a little different. Imagine we’re having a conversation about how to elevate this current workflow. To make it more engaging, I’ll give “you” a voice, and we’ll brainstorm together. Go ahead, say something.
Wait, what? You’re saying I can actually participate in this conversation?
Precisely! That’s the beauty of this hypothetical dialogue. I’m giving you a chance to share your thoughts and insights. So, how are you finding this so far?
I’m doing well, although this whole talking-to-myself-in-an-article thing feels a bit strange.
I understand it might feel a little unconventional, but just go with it. Now, let’s delve into the heart of our pipeline discussion. What aspect of running deployments do you find the most frustrating?
Oh, that’s an easy one. It’s the sheer amount of time I end up wasting on it. Have you ever had the pleasure of pushing code to Heroku?
You bet! Watching your dependencies download and your application being built as part of a git push can feel like an eternity.
Exactly! It’s incredibly inefficient. I wish there was a way to bypass that entire process. And to add insult to injury, I have to run migrations after the deployment finishes, which means I’m stuck babysitting the whole ordeal to ensure everything runs smoothly.
You know, you could actually address the migration issue by chaining the two commands together using &&. For instance, you could use git push heroku master && heroku run rails db:migrate. Alternatively, you could create a simple bash script and include it in your codebase. But you’re absolutely right—the time sink and repetitive nature of this process are major pain points.
It truly is a productivity killer.
What if I told you that you could eliminate that frustration entirely with the magic of a CI/CD pipeline?
A what now? Could you elaborate on that?
CI/CD stands for continuous integration (CI) and continuous delivery/deployment (CD). I’ll admit that when I was first starting out, I struggled to grasp the exact meaning because people often used vague phrases like “amalgamation of development and operations.” However, in its simplest form:
- Continuous Integration: This is all about ensuring that all your code is consistently merged and integrated into a central repository. If your team is already using Git, congratulations, you’re already practicing CI!
- Continuous Delivery: This focuses on ensuring that your code is always in a shippable state—meaning you can quickly generate a production-ready version of your product.
- Continuous Deployment: This takes the concept of continuous delivery a step further and seamlessly deploys your product to your servers automatically.
Ah, I see the light now! So it’s basically a magical system that automatically deploys my app to the world!
If you’re looking for a crystal-clear explanation of CI/CD, I highly recommend Atlassian’s article on the topic here. It will definitely answer any lingering questions you might have. Now, let’s get back to addressing the pain points of our current deployment process.
Yes, please! So, how do I escape the clutches of manual deployments?
Embracing CI/CD to Deploy on Push to master
Imagine this: You push your code to your GitLab remote (origin), and like magic, a dedicated computer spins up, fetches your code, and deploys it directly to Heroku. Does that sound like something you’d be interested in?
You’re kidding, right? That sounds too good to be true!
Believe it or not, it’s entirely possible! Let’s dive back into some code to make this a reality.
Create a .gitlab-ci.yml file in your project root and populate it with the following configuration, making sure to replace toptal-pipeline with the actual name of your Heroku application:
| |
Once you’ve added that file, go ahead and push it to your repository. You’ll notice that the pipeline fails when you check your project’s Pipelines page on GitLab. This is because we haven’t provided the necessary authentication keys to access your Heroku account. Fortunately, rectifying this is quite straightforward.
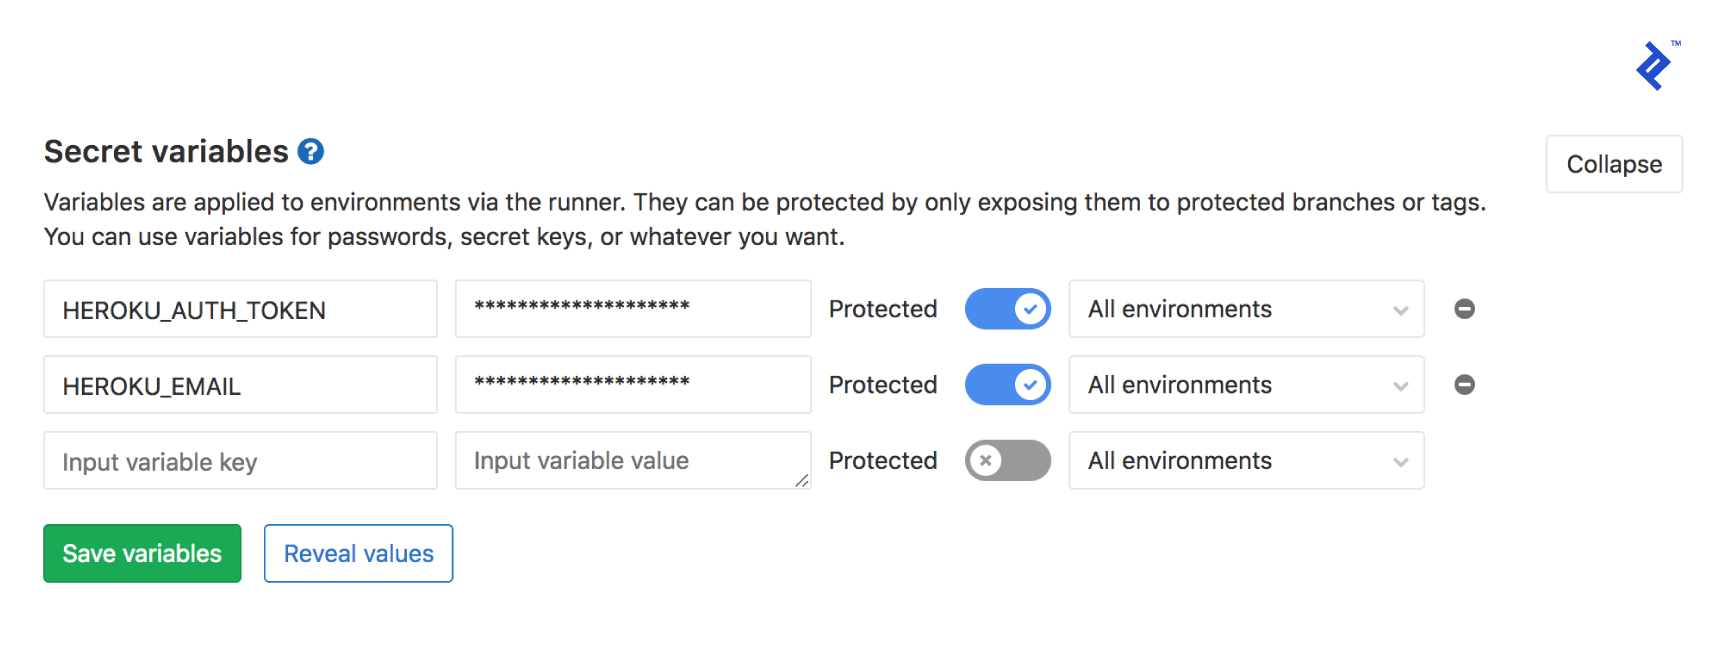
Start by grabbing your Heroku API key from the Manage Account page. Once you have that, head over to your GitLab repository’s CI/CD settings and add the following secret variables:
HEROKU_EMAIL: Enter the email address you use to log in to your Heroku account.HEROKU_AUTH_KEY: Paste the API key you obtained from Heroku earlier.
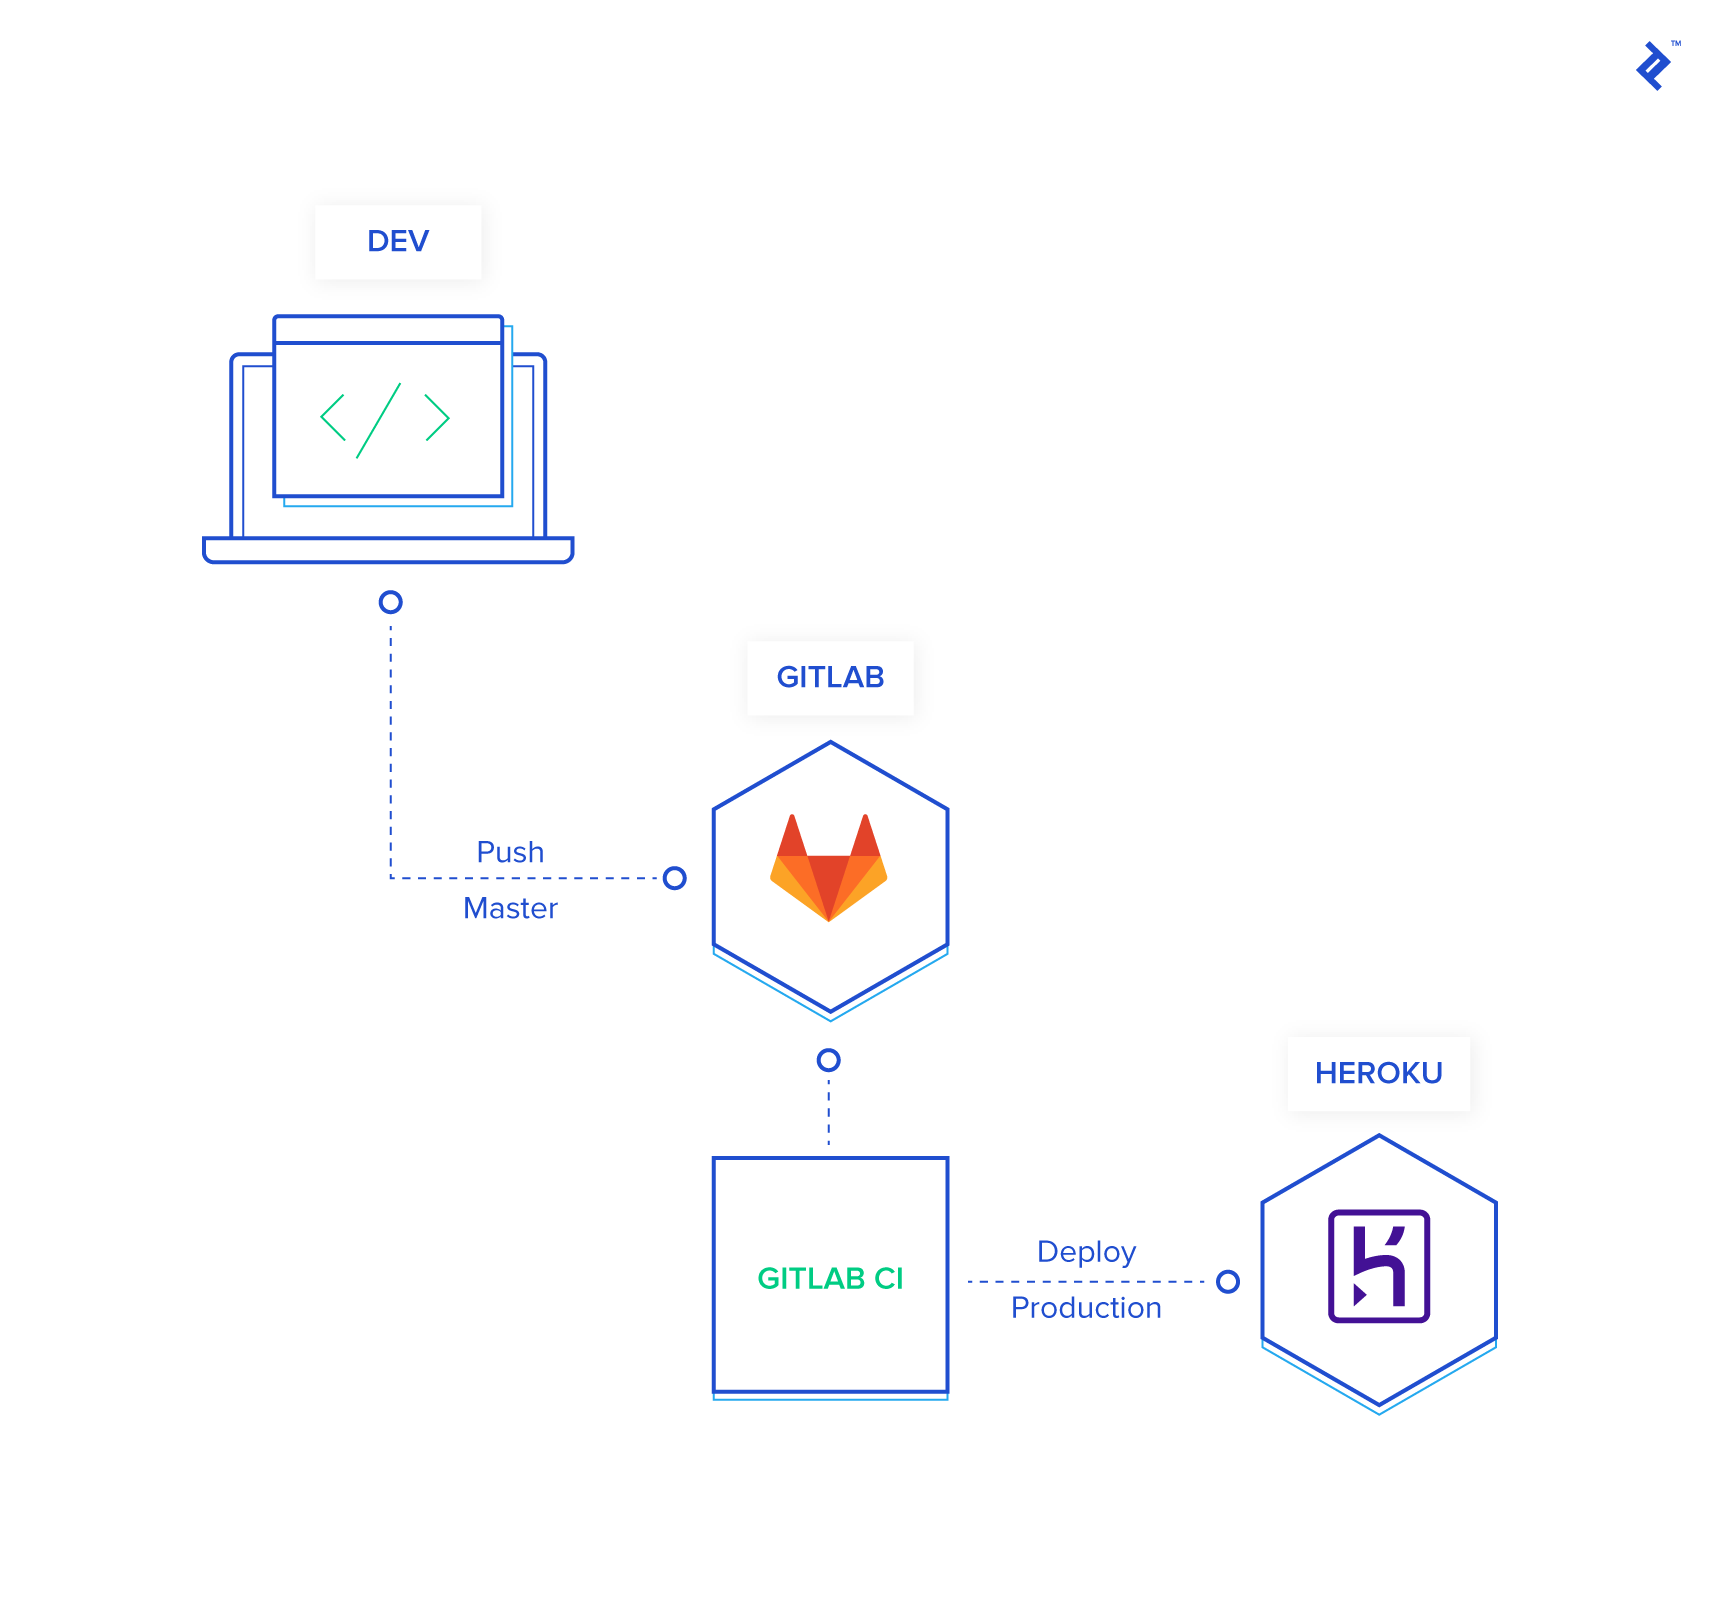
With those variables in place, your GitLab-to-Heroku deployment pipeline should now be up and running, seamlessly deploying your code with every push to the master branch. Let’s break down what’s happening behind the scenes:
- Trigger: You push your code to the
masterbranch. - Environment Setup: GitLab CI spins up a container and installs the Heroku CLI, ensuring it’s authenticated using the secret variables we set up earlier.
- Deployment: Your code is then pushed to Heroku, triggering their deployment process.
- Backup: As a precautionary measure, a backup of your production database is created and stored on Heroku.
- Migrations: Any pending database migrations are executed to keep your schema up-to-date.
You can already see the immense value this approach brings. You’ve not only automated your entire deployment workflow down to a simple git push, but you’ve also incorporated automatic database backups with every deployment. This means if something goes awry, you have a readily available snapshot to revert to.
Introducing a Dedicated Staging Environment
This is already a significant improvement, but let’s not stop there. Think back to our earlier discussion about production-specific issues. What happens when a bug slips through the cracks because your development environment doesn’t perfectly mirror your production setup? I vividly recall encountering baffling inconsistencies between SQLite 3 and PostgreSQL during a migration. The specifics escape me now, but it underscores the importance of having a staging environment.
Hold on a second. I’m extremely meticulous about my development process. I always use PostgreSQL in development to avoid database engine mismatches, and I keep a watchful eye on my technology stack for any potential incompatibilities.
That’s commendable! Your dedication to maintaining consistency is admirable. However, can you guarantee that same level of meticulousness from every single future developer, collaborator, or contributor who might work on this project?
Well, when you put it that way… no, I can’t guarantee it. Other people might not be as careful. I see your point. So, how do we address this potential risk?
This is where the concept of a staging environment comes into play. It acts as a dress rehearsal before you go live, allowing you to catch and resolve errors early on. Think of it as a mirror image of your production environment, but without the real-world consequences. I typically configure my staging environments to closely resemble production and even go the extra mile of dumping a copy of the production database into staging during deployments. This helps ensure that migrations go smoothly and eliminates nasty surprises caused by subtle differences between environments. With a staging environment in place, you can confidently say goodbye to using your users as unwitting beta testers!
That makes a lot of sense! So how do we go about setting up this magical staging environment?
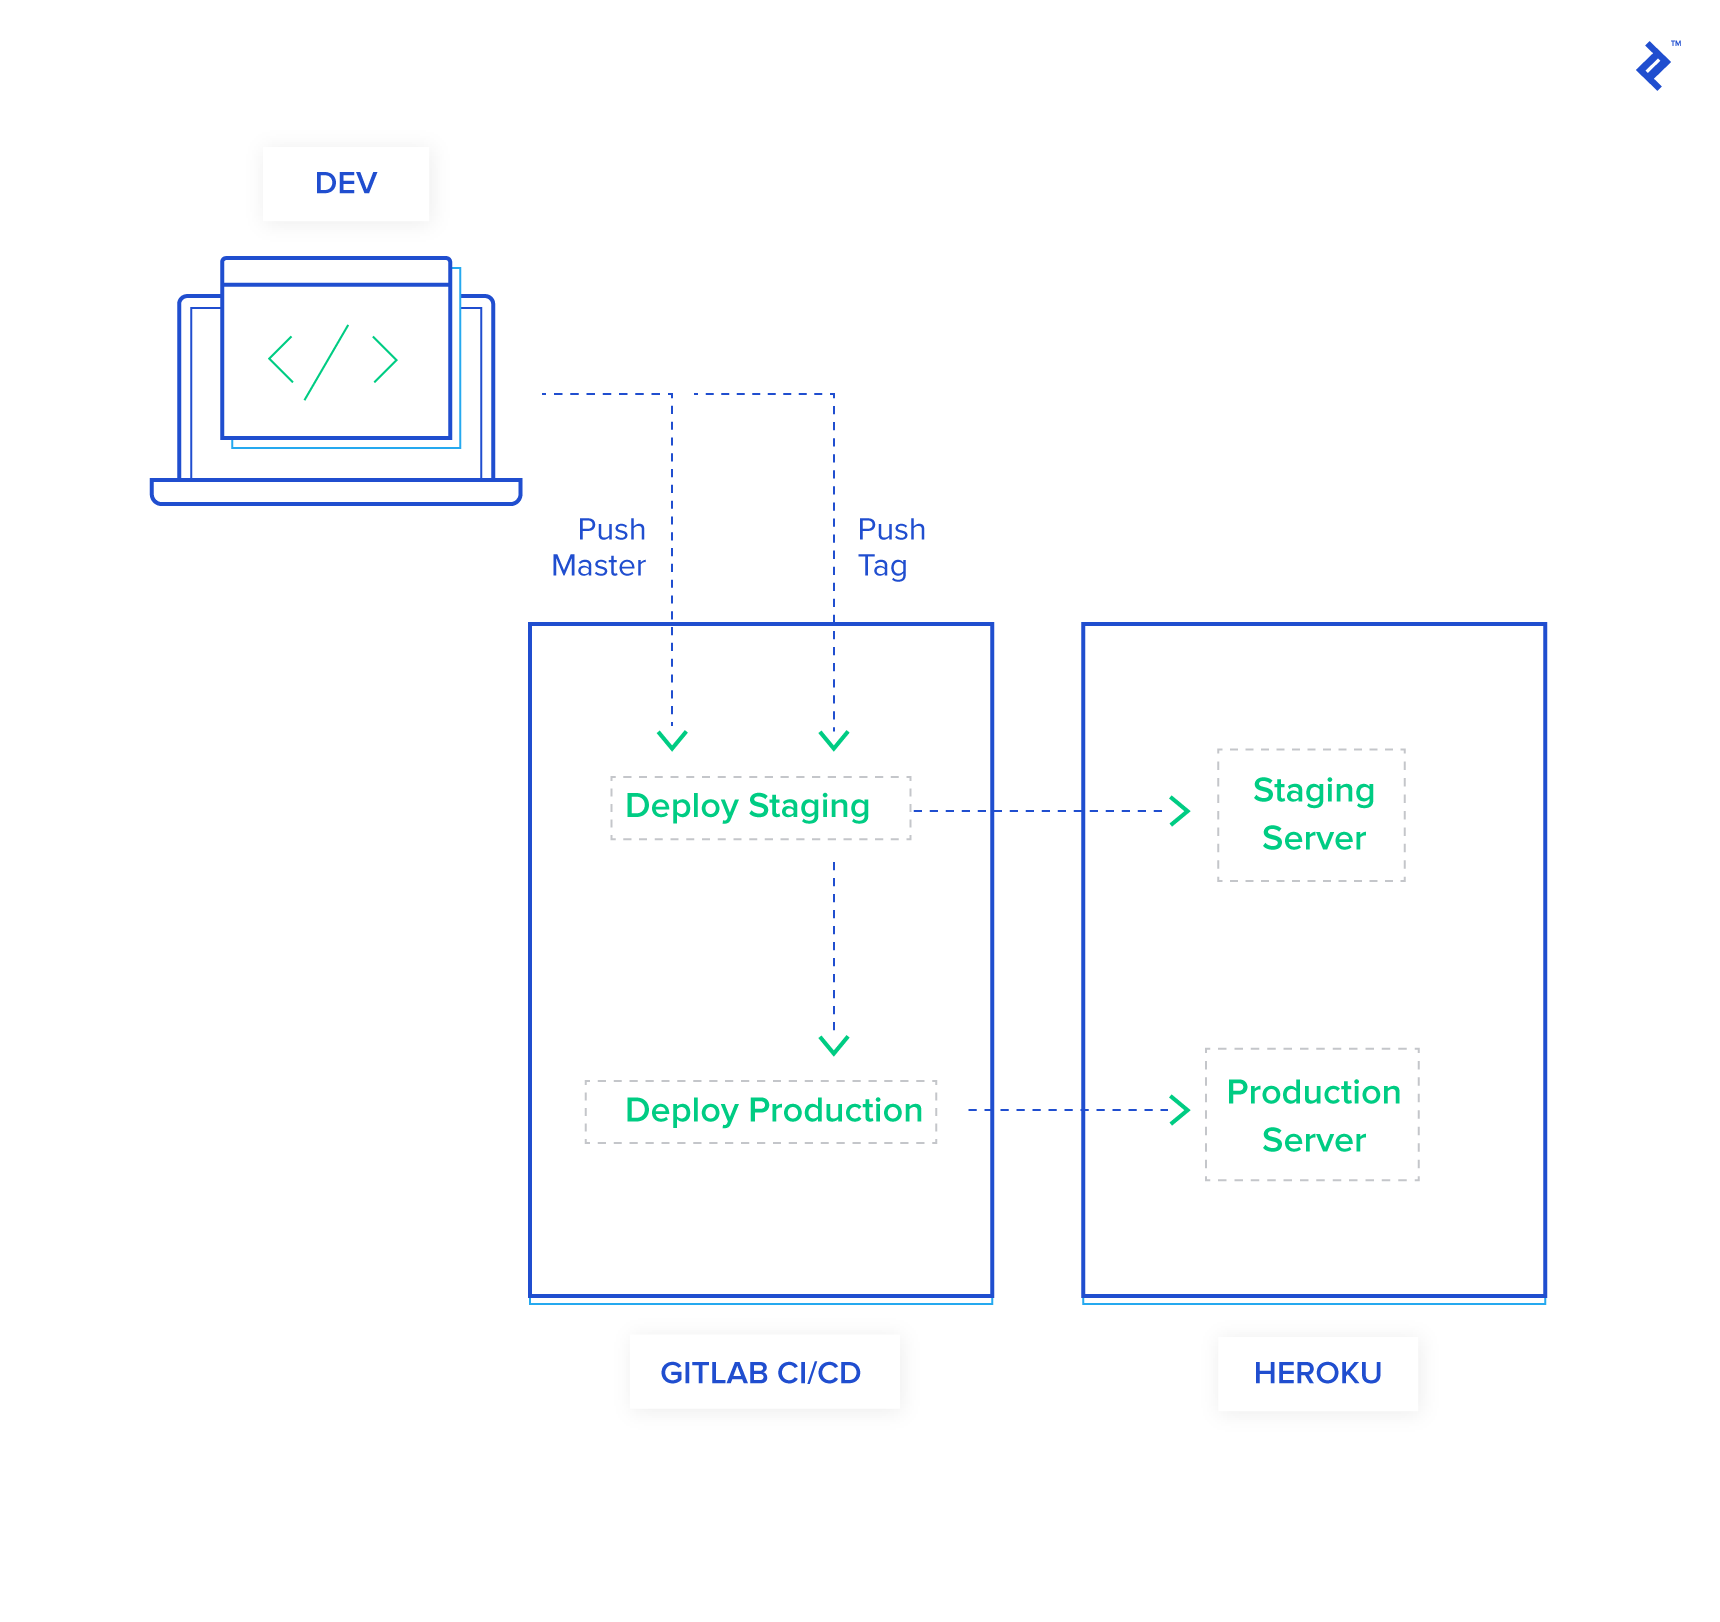
Here’s where things get interesting. My preferred approach is to deploy the master branch directly to our staging environment.
Wait a minute. Isn’t that where we’re deploying our production code right now?
You’re absolutely right! We’ll be making a slight adjustment to our pipeline to accommodate both staging and production deployments.
But if master now deploys to staging, how do we handle deployments to production?
This is where a practice you should have adopted ages ago comes in handy—versioning your code using Git tags.
Git tags? Seriously? Who uses those anymore? This is starting to sound overly complicated.
I understand your hesitation, but trust me, it’s not as daunting as it seems. The good news is that I’ve already done the heavy lifting, so you can simply borrow my approach and reap the benefits.
Let’s start by adding a new section to your .gitlab-ci.yml file to handle staging deployments. For this example, I’ve created a new Heroku application called toptal-pipeline-staging:
| |
Next, modify the last line of your production deployment block to trigger deployments only when you push a semantically versioned Git tag. We’ll leave the master branch dedicated to staging deployments:
| |
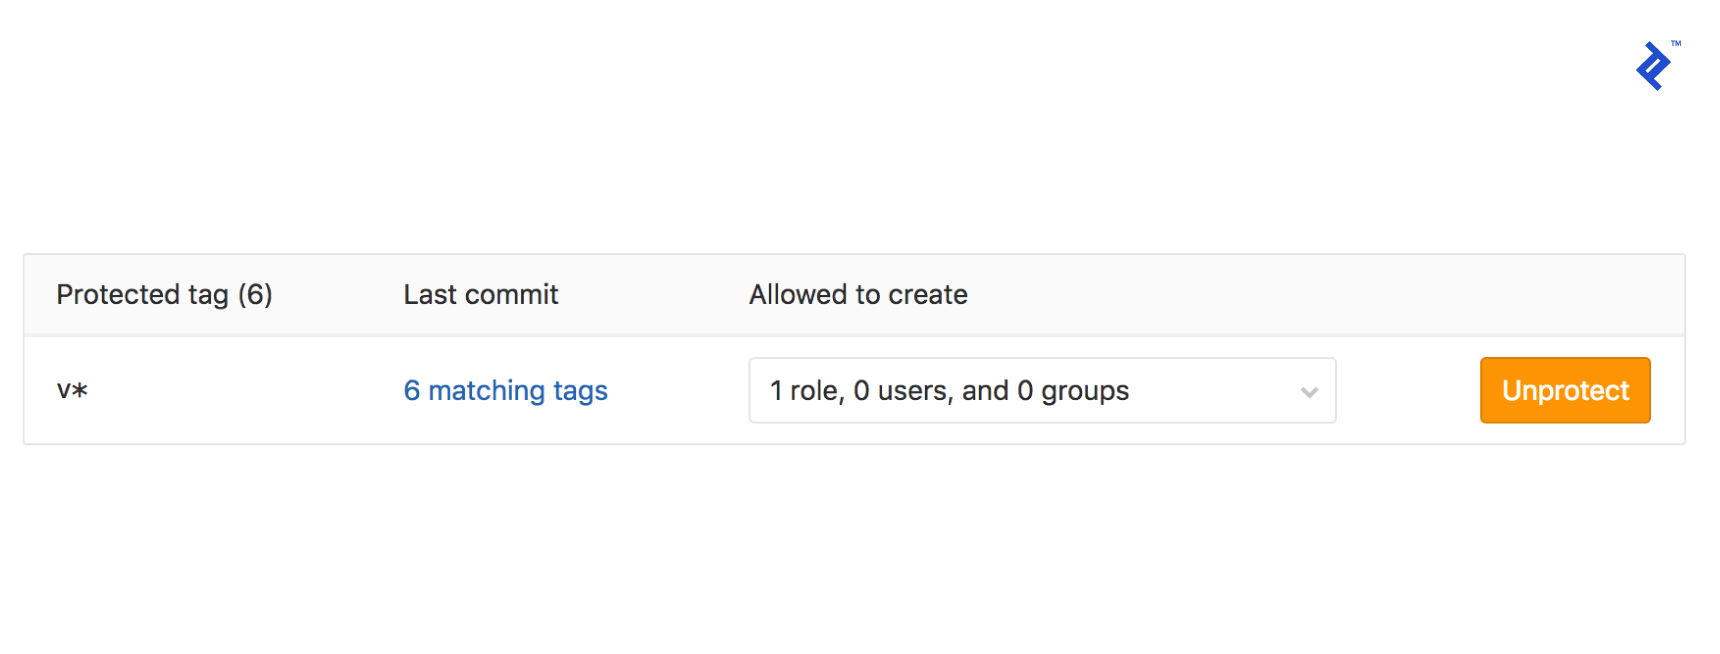
If you attempt to run this pipeline now, it will fail. GitLab, being the security-conscious platform it is, restricts access to our secret variables to only “protected” branches and tags. To grant our version tags the necessary permissions, navigate to your GitLab project’s repository settings and add v* to the “Protected Tags” section.
Let’s take a moment to recap our enhanced pipeline:
- Push to
masteror Tagged Commit:- A new container is spun up, and the Heroku CLI is installed and authenticated using our secret variables.
- Your code is deployed to the staging environment on Heroku.
- A backup of your production database is created and stored securely.
- This backup is then restored to your staging environment to ensure data consistency.
- Finally, database migrations are executed against the staging database.
- Push of a Semantically Versioned Tag:
- A container is prepared, the Heroku CLI is installed and authenticated.
- Your code is deployed to the production environment on Heroku.
- A backup of your production database is taken as a safety measure.
- Database migrations are run on the production database.
How’s that for automation? Feel the power surging through your veins? I distinctly remember the first time I got this entire pipeline up and running. I was so ecstatic that I called my wife (who’s not even in tech) and walked her through every intricate detail. It was a proud moment, and you should feel the same sense of accomplishment!
Elevating Quality with Automated Testing
But wait, there’s more! Since we have a diligent computer at our beck and call, why not put it to work by automating those tedious tasks you’d rather avoid—like testing and linting? You can configure your pipeline to run your test suite, check for code style violations, and pretty much anything else your heart desires. The beauty of this setup is that if any of these automated checks fail, the deployment process comes to a screeching halt, preventing potentially buggy code from reaching your users.
I’ve come to appreciate having automated tests integrated into my pipeline. It makes code reviews a much more enjoyable experience. Knowing that any merge request that makes it past our automated quality gates has already undergone a certain level of scrutiny gives me peace of mind.
Let’s enhance our pipeline further by adding a dedicated test block:
| |
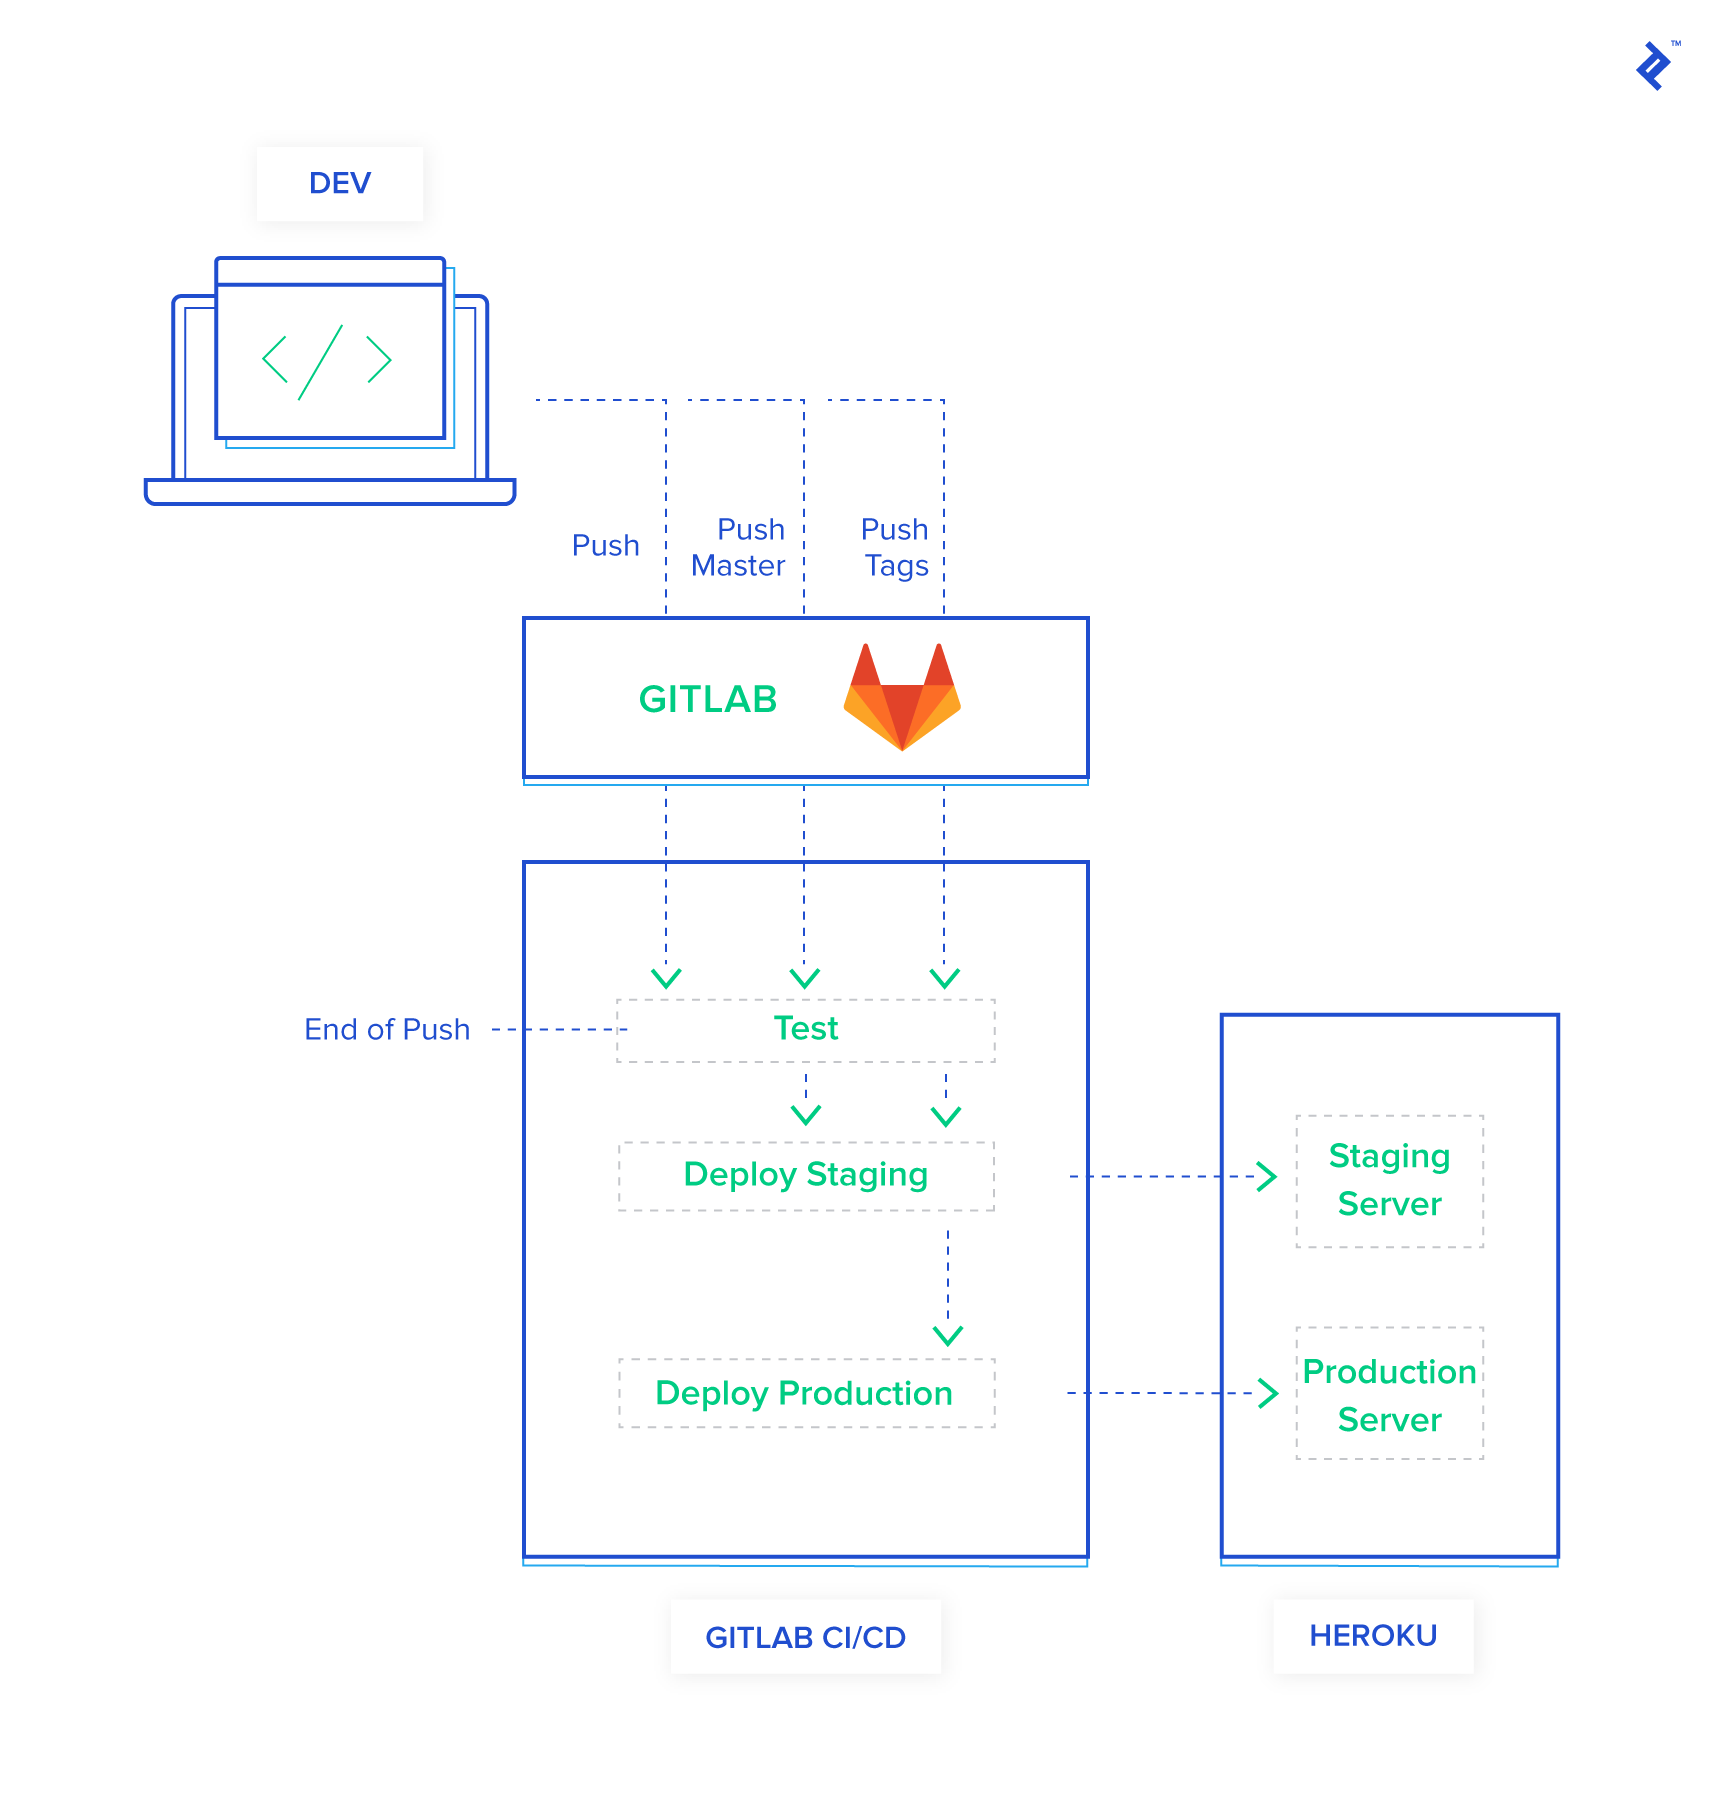
With this addition, our pipeline now looks like this:
- Every Push or Merge Request:
- A fresh container is created, and Ruby and Node.js are set up.
- Your project dependencies are installed.
- Your test suite is executed.
- Push to
masteror Tagged Commit (Only if Tests Pass):- The familiar deployment process for staging is initiated (container setup, Heroku CLI, deployment, backup, restore, migrations).
- Push of a Semantically Versioned Tag (Only if Tests Pass):
- The production deployment process is triggered (container setup, Heroku CLI, deployment, backup, migrations).
Take a step back and marvel at the level of automation you’ve achieved! From this point forward, your role is simplified to writing exceptional code and pushing it to your repository. You can manually test your application in the staging environment if you wish, and when you’re feeling confident, simply tag your code with a semantic version to trigger a production release.
The Pursuit of Automation Nirvana: Automatic Semantic Versioning
This is fantastic, you might say, but there’s still one minor annoyance. Personally, I’m not a fan of having to manually look up the last version of my application and explicitly create a new tag for every release. It’s a multi-step process that briefly disrupts my flow.
Okay, hold on a minute! I think we’ve reached the point of diminishing returns. Your pipeline is already incredibly efficient. Don’t over-engineer a solution that’s already working beautifully.
I understand your concern, but hear me out. There’s a method to my madness.
Alright, indulge me. Convince me why this extra step is necessary.
I used to share your sentiment. I was perfectly content with my setup until I made a rather embarrassing mistake. You see, git tag has the peculiar habit of listing tags in alphabetical order, which means v0.0.11 appears before v0.0.2. In a moment of haste, I accidentally tagged a release incorrectly and continued doing so for several subsequent releases before realizing my error. It was then that I decided to automate this aspect of my workflow as well.
Here we go again…
Fortunately, we have the power of npm at our disposal. I stumbled upon a handy package called standard-version. To add it to your project, simply run yarn add --dev standard-version. Once installed, include the following configuration in your package.json file:
| |
We’re almost there! There’s one final configuration tweak to make our lives even easier. By default, Git requires you to explicitly push tags using git push --tags. Let’s streamline this by configuring Git to push tags automatically with every regular git push. You can accomplish this by running the following command: git config --global push.followTags true.
With these final touches in place, you now have a fully automated release pipeline. To create a new release, simply run one of the following commands:
yarn patchfor patch releases (e.g., v1.0.1 to v1.0.2)yarn minorfor minor releases (e.g., v1.0.0 to v1.1.0)yarn majorfor major releases (e.g., v1.0.0 to v2.0.0)
If you’re unsure about the nuances of semantic versioning and the distinctions between “major,” “minor,” and “patch” releases, I encourage you to read more about it in the semantic versioning site.
Let’s take a moment to admire our handiwork and summarize how to use this streamlined pipeline:
- Write Code: Focus on what you love most—crafting elegant solutions.
- Commit and Push: Commit your changes and push them to your repository. This will trigger tests and automatically deploy your code to the staging environment.
- Tag Your Release: When you’re ready for a new release, use
yarn patch,yarn minor, oryarn majorto automatically bump the version and create a tagged commit. - Push to Production: A simple
git pushis all it takes to deploy your tagged release to production.
Taking Your Pipeline to the Next Level
We’ve covered a lot of ground in this article, but keep in mind that we’ve only scratched the surface of what’s possible with CI/CD pipelines. The example we’ve walked through is intentionally simplistic to illustrate the fundamental concepts. As your application matures and your requirements evolve, you might find yourself wanting to explore more sophisticated setups, such as replacing Heroku with a more customizable platform like Kubernetes.
If you choose to stick with GitLab CI, I highly recommend delving deeper into their documentation, specifically the section on yaml docs. You’ll discover a wealth of information on advanced techniques like caching files between deployments to speed up your pipeline or saving build artifacts for later use.
Another powerful enhancement to consider is integrating external triggers to initiate your semantic versioning and release process. Currently, ChatOps is a feature offered as part of their paid plans. However, I’m hopeful that they’ll consider releasing it to free tier users as well. Imagine the convenience of triggering your next deployment with a single Slack command!
As your application grows in complexity and begins to rely on system-level dependencies, you might want to explore the world of containers. When that time comes, be sure to check out our comprehensive guide on Getting Started with Docker: Simplifying Devops.
The example application we’ve discussed throughout this article is not just a figment of our imagination—it’s a living, breathing project! You can find the complete source code available here. Feel free to explore it, experiment with it, and adapt it to your heart’s content.