Creating a Role-based API using Firebase Authentication

This tutorial guides you through building a Node.js application that utilizes the Firebase Auth REST API for managing users and their roles. Moreover, it demonstrates the API’s usage in authorizing user access to specific resources.

Introduction

Nearly all applications necessitate a certain degree of authorization. While a simple username/password check against a Users table might suffice in some scenarios, many others demand a more granular permissions model. This model would allow certain users access to specific resources while restricting others. Implementing such a system can be complex and time-consuming. This tutorial explores building a role-based authentication API using Firebase to expedite this process.

Role-based Auth

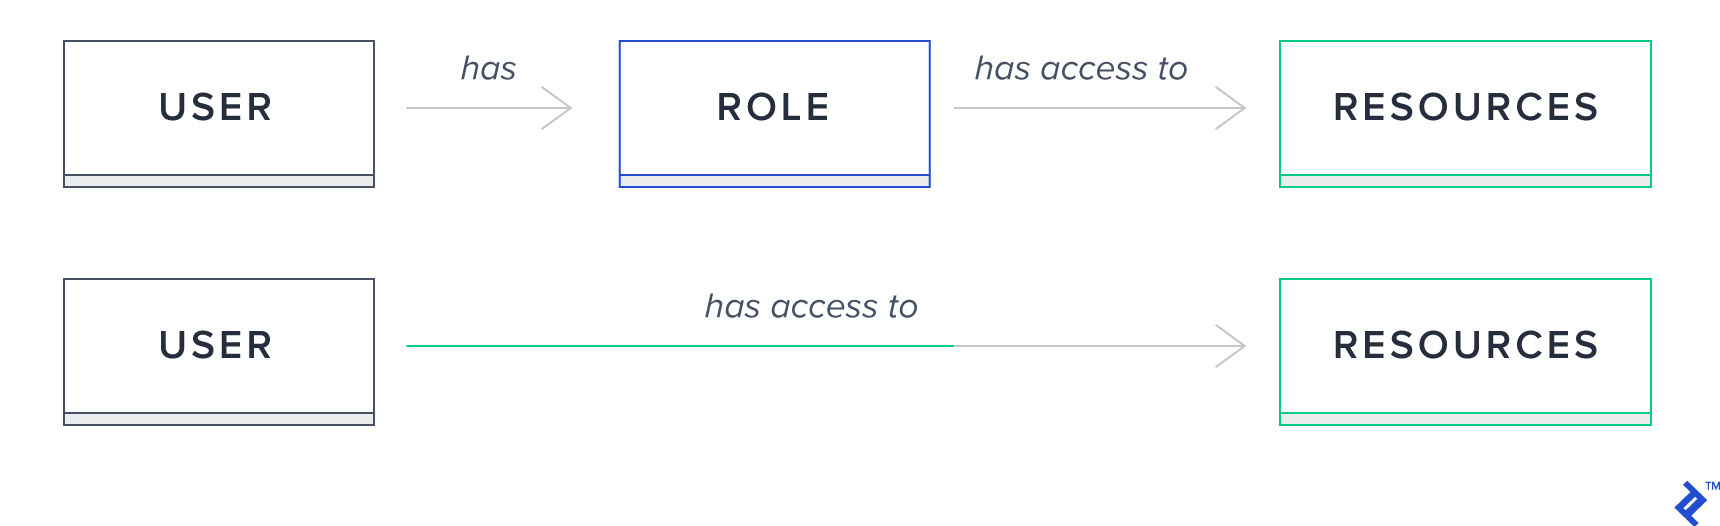
In this authorization model, access is granted to roles rather than individual users. Each user can possess one or more roles, shaping your permission structure. Resources, on the other hand, are associated with specific roles, dictating user access.

Role-based Auth with illustrated

Firebase

Firebase Authentication

In essence, Firebase Authentication is a versatile token-based authentication system offering seamless integration with popular providers like Google, Facebook, and Twitter.

It enables us to employ custom claims, which we’ll leverage to build a flexible role-based API. These claims can be viewed as user roles within Firebase, mapping directly to the roles defined in our application.

We can embed any JSON value within these claims, for instance, { role: 'admin' } or { role: 'manager' }.

Once set, these custom claims are incorporated into the generated Firebase token, which we can then decode to control access.

Firebase Authentication comes with a generous free quota, often sufficient for most applications.

Firebase Functions

Functions provide a fully managed serverless platform. You only need to write your Node.js code and deploy it, leaving infrastructure scaling, server configuration, and other tasks to Firebase. We’ll utilize this service to build our API and expose it over HTTP for web access.

Firebase allows configuring express.js applications as handlers for various paths. For instance, you can create an Express app and associate it with /mypath, routing all requests to that path to your configured app.

Within a function’s context, you gain access to the entire Firebase Authentication API via the Admin SDK.

This is how we’ll build our user API.

What We’ll Build

Before diving in, let’s outline our objective. We aim to create a REST API with the following endpoints:

Http VerbPathDescriptionAuthorization
GET/usersLists all usersOnly admins and managers have access
POST/usersCreates new userOnly admins and managers have access
GET/users/:idGets the :id userAdmins, managers, and the same user as :id have access
PATCH/users/:idUpdates the :id userAdmins, managers, and the same user as :id have access
DELETE/users/:idDeletes the :id userAdmins, managers, and the same user as :id have access

Each endpoint will handle authentication, validate authorization, execute the corresponding operation, and return an appropriate HTTP status code.

We’ll develop authentication and authorization functions to validate the token and verify if the claims contain the necessary role for the requested operation.

Building the API

Building the API necessitates:

  • A Firebase project
  • firebase-tools installed

Start by logging into Firebase:

1
firebase login

Next, initialize a Functions project:

 1
 2
 3
 4
 5
 6
 7
 8
 9
10
11
12
firebase init

? Which Firebase CLI features do you want to set up for this folder? ...
(O) Functions: Configure and deploy Cloud Functions

? Select a default Firebase project for this directory: {your-project}

? What language would you like to use to write Cloud Functions? TypeScript

? Do you want to use TSLint to catch probable bugs and enforce style? Yes

? Do you want to install dependencies with npm now? Yes

This creates a Functions folder with the basic setup for Firebase Functions.

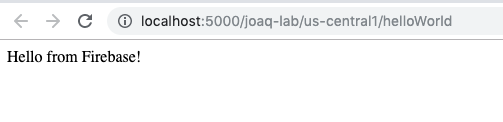
Inside src/index.ts, you’ll find a helloWorld example. Uncomment and test this function to ensure your Functions setup is working correctly. Then, navigate to cd functions and execute npm run serve. This transpiles the code and starts a local server.

Access the results at http://localhost:5000/{your-project}/us-central1/helloWorld

A fresh Firebase app

Observe that the function is accessible via the path defined by its name in 'index.ts: 'helloWorld'.

Creating a Firebase HTTP Function

Let’s proceed with coding our API. We’ll create an HTTP Firebase function and associate it with the /api path.

Begin by installing npm install express.

Within src/index.ts:

  • Initialize the firebase-admin SDK module using admin.initializeApp();
  • Designate an Express app as the handler for our api HTTPS endpoint
1
2
3
4
5
6
7
8
9
import * as functions from 'firebase-functions';
import * as admin from 'firebase-admin';
import * as express from 'express';

admin.initializeApp();

const app = express();

export const api = functions.https.onRequest(app);

Now, any request directed to /api will be handled by our app instance.

Next, we’ll configure the app instance to handle CORS and incorporate JSON body-parsing middleware. This enables requests from any URL and facilitates the processing of JSON-formatted requests.

First, install the necessary dependencies:

1
npm install --save cors body-parser
1
npm install --save-dev @types/cors

Then:

 1
 2
 3
 4
 5
 6
 7
 8
 9
10
//...
import * as cors from 'cors';
import * as bodyParser from 'body-parser';

//...
const app = express();
app.use(bodyParser.json());
app.use(cors({ origin: true }));

export const api = functions.https.onRequest(app);

Finally, we’ll define the routes for our app to manage.

1
2
3
4
5
6
7
8
//...
import { routesConfig } from './users/routes-config';
 
//…
app.use(cors({ origin: true }));
routesConfig(app)

export const api = functions.https.onRequest(app);

Firebase Functions allows us to employ an Express app as a handler. Any path following the one defined in functions.https.onRequest(app); (in this case, api) will also be handled by our app. This enables us to define specific endpoints like api/users and assign handlers for each HTTP verb, which we’ll do next.

Let’s create the file src/users/routes-config.ts.

Here, we’ll define a create handler for POST '/users'.

1
2
3
4
5
6
7
8
import { Application } from "express";
import { create} from "./controller";

export function routesConfig(app: Application) {
   app.post('/users',
       create
   );
}

Next, create the src/users/controller.ts file.

Within this function, we’ll first verify the presence of all required fields in the request body. Subsequently, we’ll create the user and set the custom claims.

We’re only passing { role } to setCustomUserClaims as Firebase automatically manages other fields.

If no errors occur, we return a 201 status code along with the uid of the newly created user.

 1
 2
 3
 4
 5
 6
 7
 8
 9
10
11
12
13
14
15
16
17
18
19
20
21
22
23
24
25
26
27
import { Request, Response } from "express";
import * as admin from 'firebase-admin'

export async function create(req: Request, res: Response) {
   try {
       const { displayName, password, email, role } = req.body

       if (!displayName || !password || !email || !role) {
           return res.status(400).send({ message: 'Missing fields' })
       }

       const { uid } = await admin.auth().createUser({
           displayName,
           password,
           email
       })
       await admin.auth().setCustomUserClaims(uid, { role })

       return res.status(201).send({ uid })
   } catch (err) {
       return handleError(res, err)
   }
}

function handleError(res: Response, err: any) {
   return res.status(500).send({ message: `${err.code} - ${err.message}` });
}

Now, let’s secure this handler by implementing authorization. We’ll add a couple of handlers to our create endpoint. In express.js, you can chain handlers, executed sequentially. Within a handler, you can execute code and pass control to the next handler using next() or directly return a response. Our approach involves first authenticating the user and then validating their authorization.

Modify src/users/routes-config.ts as follows:

 1
 2
 3
 4
 5
 6
 7
 8
 9
10
11
//...
import { isAuthenticated } from "../auth/authenticated";
import { isAuthorized } from "../auth/authorized";

export function routesConfig(app: Application) {
   app.post('/users',
       isAuthenticated,
       isAuthorized({ hasRole: ['admin', 'manager'] }),
       create
   );
}

Create the file src/auth/authenticated.ts.

This function will check for the presence of the authorization bearer token in the request header. It then decodes the token using admin.auth().verifyidToken() and stores the user’s uid, role, and email in the res.locals variable. We’ll use this information later for authorization.

If the token is invalid, a 401 response is returned to the client:

 1
 2
 3
 4
 5
 6
 7
 8
 9
10
11
12
13
14
15
16
17
18
19
20
21
22
23
24
25
26
27
28
29
import { Request, Response } from "express";
import * as admin from 'firebase-admin'

export async function isAuthenticated(req: Request, res: Response, next: Function) {
   const { authorization } = req.headers

   if (!authorization)
       return res.status(401).send({ message: 'Unauthorized' });

   if (!authorization.startsWith('Bearer'))
       return res.status(401).send({ message: 'Unauthorized' });

   const split = authorization.split('Bearer ')
   if (split.length !== 2)
       return res.status(401).send({ message: 'Unauthorized' });

   const token = split[1]

   try {
       const decodedToken: admin.auth.DecodedIdToken = await admin.auth().verifyIdToken(token);
       console.log("decodedToken", JSON.stringify(decodedToken))
       res.locals = { ...res.locals, uid: decodedToken.uid, role: decodedToken.role, email: decodedToken.email }
       return next();
   }
   catch (err) {
       console.error(`${err.code} -  ${err.message}`)
       return res.status(401).send({ message: 'Unauthorized' });
   }
}

Now, let’s create src/auth/authorized.ts.

This handler retrieves the user’s information from res.locals, which we populated earlier. It then verifies if the user possesses the required role to execute the operation. If the operation permits execution by the same user, we check if the ID in the request parameters matches the ID from the authentication token. If the user lacks the necessary role, a 403 response is returned.

 1
 2
 3
 4
 5
 6
 7
 8
 9
10
11
12
13
14
15
16
17
18
19
import { Request, Response } from "express";

export function isAuthorized(opts: { hasRole: Array<'admin' | 'manager' | 'user'>, allowSameUser?: boolean }) {
   return (req: Request, res: Response, next: Function) => {
       const { role, email, uid } = res.locals
       const { id } = req.params

       if (opts.allowSameUser && id && uid === id)
           return next();

       if (!role)
           return res.status(403).send();

       if (opts.hasRole.includes(role))
           return next();

       return res.status(403).send();
   }
}

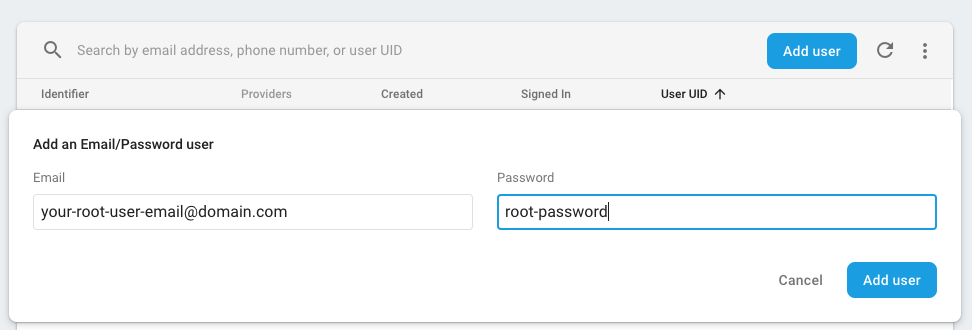
These two methods enable us to authenticate requests and authorize them based on the role present in the incoming token. However, Firebase prevents us from setting custom claims directly from the project console. As a workaround, we can create a root user through the Firebase Authentication Console.

Creating a user from the Firebase Authentication Console

We’ll then implement an email comparison in our code. This allows requests from this specific user to bypass restrictions and execute all operations.

1
2
3
4
5
6
7
//...
  const { role, email, uid } = res.locals
  const { id } = req.params

  if (email === 'your-root-user-email@domain.com')
    return next();
//...

Now, let’s add the remaining CRUD operations to src/users/routes-config.ts.

For operations like retrieving or updating a single user, where an :id parameter is present, we’ll also allow the same user to execute the operation.

 1
 2
 3
 4
 5
 6
 7
 8
 9
10
11
12
13
14
15
16
17
18
19
20
21
22
23
24
25
26
27
export function routesConfig(app: Application) {
   //..
   // lists all users
   app.get('/users', [
       isAuthenticated,
       isAuthorized({ hasRole: ['admin', 'manager'] }),
       all
   ]);
   // get :id user
   app.get('/users/:id', [
       isAuthenticated,
       isAuthorized({ hasRole: ['admin', 'manager'], allowSameUser: true }),
       get
   ]);
   // updates :id user
   app.patch('/users/:id', [
       isAuthenticated,
       isAuthorized({ hasRole: ['admin', 'manager'], allowSameUser: true }),
       patch
   ]);
   // deletes :id user
   app.delete('/users/:id', [
       isAuthenticated,
       isAuthorized({ hasRole: ['admin', 'manager'] }),
       remove
   ]);
}

In src/users/controller.ts, we’ll utilize the Admin SDK to interact with Firebase Authentication and perform the respective operations. As with the create operation, we return meaningful HTTP status codes for each operation.

For the update operation, we verify the presence of all fields and overwrite the customClaims with those provided in the request:

 1
 2
 3
 4
 5
 6
 7
 8
 9
10
11
12
13
14
15
16
17
18
19
20
21
22
23
24
25
26
27
28
29
30
31
32
33
34
35
36
37
38
39
40
41
42
43
44
45
46
47
48
49
50
51
52
53
54
55
56
57
58
59
60
61
62
63
64
65
//..

export async function all(req: Request, res: Response) {
    try {
        const listUsers = await admin.auth().listUsers()
        const users = listUsers.users.map(mapUser)
        return res.status(200).send({ users })
    } catch (err) {
        return handleError(res, err)
    }
}

function mapUser(user: admin.auth.UserRecord) {
    const customClaims = (user.customClaims || { role: '' }) as { role?: string }
    const role = customClaims.role ? customClaims.role : ''
    return {
        uid: user.uid,
        email: user.email || '',
        displayName: user.displayName || '',
        role,
        lastSignInTime: user.metadata.lastSignInTime,
        creationTime: user.metadata.creationTime
    }
}

export async function get(req: Request, res: Response) {
   try {
       const { id } = req.params
       const user = await admin.auth().getUser(id)
       return res.status(200).send({ user: mapUser(user) })
   } catch (err) {
       return handleError(res, err)
   }
}

export async function patch(req: Request, res: Response) {
   try {
       const { id } = req.params
       const { displayName, password, email, role } = req.body

       if (!id || !displayName || !password || !email || !role) {
           return res.status(400).send({ message: 'Missing fields' })
       }

       await admin.auth().updateUser(id, { displayName, password, email })
       await admin.auth().setCustomUserClaims(id, { role })
       const user = await admin.auth().getUser(id)

       return res.status(204).send({ user: mapUser(user) })
   } catch (err) {
       return handleError(res, err)
   }
}

export async function remove(req: Request, res: Response) {
   try {
       const { id } = req.params
       await admin.auth().deleteUser(id)
       return res.status(204).send({})
   } catch (err) {
       return handleError(res, err)
   }
}

//...

You can now run the function locally. Before doing so, ensure you’ve set up the account key to enable local connections to the authentication API. Then, execute:

1
npm run serve

Deploy the API

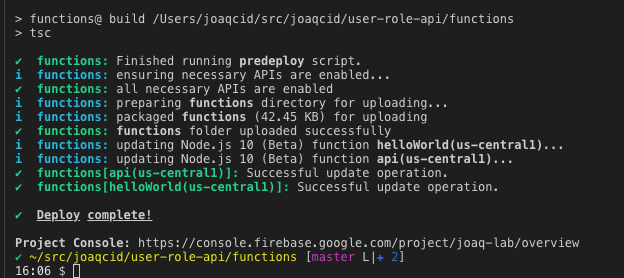
With our application utilizing Firebase’s role-based authentication API ready, we can deploy it and make it accessible. Firebase simplifies deployment to a single command: firebase deploy. Once deployed, our API will be accessible at the provided URL.

Running the firebase deploy command

You can find your API’s URL at https://console.firebase.google.com/u/0/project/{your-project}/functions/list.

The API URL at the Firebase Console

In this instance, the URL is [https://us-central1-joaq-lab.cloudfunctions.net/api].

Consuming the API

Once deployed, our API can be accessed in various ways. This tutorial covers accessing it through Postman and an Angular application.

Attempting to access the List All Users URL (/api/users) directly through a browser results in:

Firebase Authentication API

This occurs because browser requests are sent as GET requests without authentication headers. This behavior confirms our API is functioning securely.

Our API relies on token-based authentication. To generate a token, we invoke Firebase’s Client SDK and authenticate with valid user credentials. Upon successful authentication, Firebase returns a token in the response, which we then include in the headers of subsequent requests to our API.

From an Angular App

This section outlines the key aspects of consuming the API from an Angular app. The complete repository is available here. For a detailed guide on creating an Angular app and configuring @angular/fire, refer to this [post].

Let’s focus on the sign-in process. We’ll create a SignInComponent with a <form> for user credentials.

 1
 2
 3
 4
 5
 6
 7
 8
 9
10
11
12
13
14
15
16
17
18
19
20
//...
 
<form [formGroup]="form">
   <div class="form-group">
     <label>Email address</label>
     <input type="email"
            formControlName="email"
            class="form-control"
            placeholder="Enter email">
   </div>
   <div class="form-group">
     <label>Password</label>
     <input type="password"
            formControlName="password"
            class="form-control"
            placeholder="Password">
   </div>
 </form>

//...

Within the component’s class, we use signInWithEmailAndPassword provided by the AngularFireAuth service.

 1
 2
 3
 4
 5
 6
 7
 8
 9
10
11
12
13
14
15
16
17
18
19
20
21
 //... 

 form: FormGroup = new FormGroup({
   email: new FormControl(''),
   password: new FormControl('')
 })

 constructor(
   private afAuth: AngularFireAuth
 ) { }

 async signIn() {
   try {
     const { email, password } = this.form.value
     await this.afAuth.auth.signInWithEmailAndPassword(email, password)
   } catch (err) {
     console.log(err)
   }
 }

 //..

We can now sign in to our Firebase project.

Signing in through the Angular app
The API response when signing in from the Angular app

Inspecting the network requests in your browser’s DevTools, you’ll notice Firebase returns a token after successful user authentication.

This token is what we’ll include in our API requests’ headers. An HttpInterceptor offers a convenient way to add the token to all requests automatically.

This file demonstrates retrieving the token from AngularFireAuth and adding it to request headers. We then register the interceptor in our AppModule.

http-interceptors/auth-token.interceptor.ts

 1
 2
 3
 4
 5
 6
 7
 8
 9
10
11
12
13
14
15
16
17
18
19
20
21
22
23
24
25
26
27
28
29
@Injectable({ providedIn: 'root' })
export class AuthTokenHttpInterceptor implements HttpInterceptor {

   constructor(
       private auth: AngularFireAuth
   ) {

   }

   intercept(req: HttpRequest<any>, next: HttpHandler): Observable<HttpEvent<any>> {
       return this.auth.idToken.pipe(
           take(1),
           switchMap(idToken => {
               let clone = req.clone()
               if (idToken) {
                   clone = clone.clone({ headers: req.headers.set('Authorization', 'Bearer ' + idToken) });
               }
               return next.handle(clone)
           })
       )

   }
}

export const AuthTokenHttpInterceptorProvider = {
   provide: HTTP_INTERCEPTORS,
   useClass: AuthTokenHttpInterceptor,
   multi: true
}

app.module.ts

1
2
3
4
5
6
7
8
@NgModule({
 //..
 providers: [
   AuthTokenHttpInterceptorProvider
 ]
 //...
})
export class AppModule { }

With the interceptor configured, we can now make API requests using httpClient. As an example, here’s a UsersService demonstrating how to list all users, retrieve a user by ID, create a new user, and update a user.

 1
 2
 3
 4
 5
 6
 7
 8
 9
10
11
12
13
14
15
16
17
18
19
20
21
22
23
24
25
26
27
28
29
30
31
32
33
34
35
36
37
38
39
40
//…

export type CreateUserRequest = { displayName: string, password: string, email: string, role: string }
export type UpdateUserRequest = { uid: string } & CreateUserRequest

@Injectable({
 providedIn: 'root'
})
export class UserService {

 private baseUrl = '{your-functions-url}/api/users'

 constructor(
   private http: HttpClient
 ) { }
  get users$(): Observable<User[]> {
   return this.http.get<{ users: User[] }>(`${this.baseUrl}`).pipe(
     map(result => {
       return result.users
     })
   )
 }

 user$(id: string): Observable<User> {
   return this.http.get<{ user: User }>(`${this.baseUrl}/${id}`).pipe(
     map(result => {
       return result.user
     })
   )
 }

 create(user: CreateUserRequest) {
   return this.http.post(`${this.baseUrl}`, user)
 }

 edit(user: UpdateUserRequest) {
   return this.http.patch(`${this.baseUrl}/${user.uid}`, user)
 }

}

We can now call the API to fetch the logged-in user by their ID and list all users from a component like this:

 1
 2
 3
 4
 5
 6
 7
 8
 9
10
11
12
13
14
15
16
17
18
19
20
21
22
23
24
25
26
27
28
29
30
31
32
33
34
35
36
37
38
//...

  <div *ngIf="user$ | async; let user"
       class="col-12">
    <div class="d-flex justify-content-between my-3">
      <h4> Me </h4>
    </div>

    <ul class="list-group">
      <li class="list-group-item d-flex justify-content-between align-items-center">
        <div>
          <h5 class="mb-1">{{user.displayName}}</h5>
          <small>{{user.email}}</small>
        </div>
        <span class="badge badge-primary badge-pill">{{user.role?.toUpperCase()}}</span>
      </li>
    </ul>
  </div>

  <div class="col-12">
    <div class="d-flex justify-content-between my-3">
      <h4> All Users </h4>
    </div>

    <ul *ngIf="users$ | async; let users"
        class="list-group">
      <li *ngFor="let user of users"
          class="list-group-item d-flex justify-content-between align-items-center">
        <div>
          <h5 class="mb-1">{{user.displayName}}</h5>
          <small class="d-block">{{user.email}}</small>
          <small class="d-block">{{user.uid}}</small>
        </div>
        <span class="badge badge-primary badge-pill">{{user.role?.toUpperCase()}}</span>
      </li>
    </ul>

//...
 1
 2
 3
 4
 5
 6
 7
 8
 9
10
11
12
13
14
15
16
17
18
19
20
21
22
//...

 users$: Observable<User[]>
 user$: Observable<User>

 constructor(
   private userService: UserService,
   private userForm: UserFormService,
   private modal: NgbModal,
   private afAuth: AngularFireAuth
 ) { }

 ngOnInit() {
   this.users$ = this.userService.users$

   this.user$ = this.afAuth.user.pipe(
     filter(user => !!user),
     switchMap(user => this.userService.user$(user.uid))
   )
 }

//...

Here’s the resulting output.

All the users in our Angular app

If we sign in with a user having the role role=user, only the “Me” section will be displayed.

The view of the user resource that the user with the role user has access to

The network inspector will show a 403 error. This is due to the restriction we implemented earlier, allowing only “Admins” to list all users.

A 403 error in the network inspector

Let’s add functionality for creating and editing users. We’ll start by creating a UserFormComponent and a UserFormService.

 1
 2
 3
 4
 5
 6
 7
 8
 9
10
11
12
13
14
15
16
17
18
19
20
21
22
23
24
25
26
27
28
29
30
31
32
33
34
35
36
37
38
39
40
41
42
43
44
45
46
47
48
49
50
51
52
53
54
<ng-container *ngIf="user$ | async"></ng-container>
<div class="modal-header">
  <h4 class="modal-title"
      id="modal-title">{{ title$ | async}}</h4>
  <button type="button"
          class="close"
          aria-describedby="modal-title"
          (click)="dismiss()">
    <span aria-hidden="true">&times;</span>
  </button>
</div>
<div class="modal-body">
  <form [formGroup]="form"
        (ngSubmit)="save()">
    <div class="form-group">
      <label>Email address</label>
      <input type="email"
             formControlName="email"
             class="form-control"
             placeholder="Enter email">
    </div>
    <div class="form-group">
      <label>Password</label>
      <input type="password"
             formControlName="password"
             class="form-control"
             placeholder="Password">
    </div>
    <div class="form-group">
      <label>Display Name</label>
      <input type="string"
             formControlName="displayName"
             class="form-control"
             placeholder="Enter display name">
    </div>
    <div class="form-group">
      <label>Role</label>
      <select class="custom-select"
              formControlName="role">
        <option value="admin">Admin</option>
        <option value="manager">Manager</option>
        <option value="user">User</option>
      </select>
    </div>
  </form>
</div>
<div class="modal-footer">
  <button type="button"
          class="btn btn-outline-danger"
          (click)="dismiss()">Cancel</button>
  <button type="button"
          class="btn btn-primary"
          (click)="save()">Save</button>
</div>
 1
 2
 3
 4
 5
 6
 7
 8
 9
10
11
12
13
14
15
16
17
18
19
20
21
22
23
24
25
26
27
28
29
30
31
32
33
34
35
36
37
38
39
40
41
42
43
44
45
46
@Component({
  selector: 'app-user-form',
  templateUrl: './user-form.component.html',
  styleUrls: ['./user-form.component.scss']
})
export class UserFormComponent implements OnInit {

  form = new FormGroup({
    uid: new FormControl(''),
    email: new FormControl(''),
    displayName: new FormControl(''),
    password: new FormControl(''),
    role: new FormControl(''),
  });
  title$: Observable<string>;
  user$: Observable<{}>;

  constructor(
    public modal: NgbActiveModal,
    private userService: UserService,
    private userForm: UserFormService
  ) { }

  ngOnInit() {
    this.title$ = this.userForm.title$;
    this.user$ = this.userForm.user$.pipe(
      tap(user => {
        if (user) {
          this.form.patchValue(user);
        } else {
          this.form.reset({});
        }
      })
    );
  }

  dismiss() {
    this.modal.dismiss('modal dismissed');
  }

  save() {
    const { displayName, email, role, password, uid } = this.form.value;
    this.modal.close({ displayName, email, role, password, uid });
  }

}
 1
 2
 3
 4
 5
 6
 7
 8
 9
10
11
12
13
14
15
16
17
18
19
20
21
22
23
24
25
26
27
28
29
30
31
32
33
import { Injectable } from '@angular/core';
import { BehaviorSubject } from 'rxjs';
import { map } from 'rxjs/operators';

@Injectable({
  providedIn: 'root'
})
export class UserFormService {

  _BS = new BehaviorSubject({ title: '', user: {} });

  constructor() { }

  edit(user) {
    this._BS.next({ title: 'Edit User', user });
  }

  create() {
    this._BS.next({ title: 'Create User', user: null });
  }

  get title$() {
    return this._BS.asObservable().pipe(
      map(uf => uf.title)
    );
  }

  get user$() {
    return this._BS.asObservable().pipe(
      map(uf => uf.user)
    );
  }
}

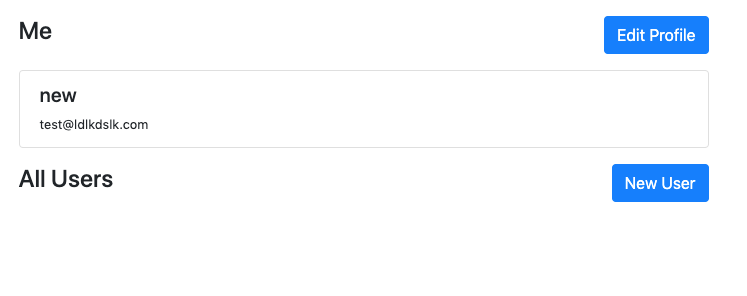
Back in our main component, let’s add buttons to trigger these actions. The “Edit User” button will be accessible only to the logged-in user. You can expand this functionality to allow editing other users if required.

 1
 2
 3
 4
 5
 6
 7
 8
 9
10
11
12
13
14
15
16
17
18
19
20
//...

    <div class="d-flex justify-content-between my-3">
      <h4> Me </h4>
      <button class="btn btn-primary"
              (click)="edit(user)">
        Edit Profile
      </button>
    </div>

//...
    <div class="d-flex justify-content-between my-3">
      <h4> All Users </h4>

      <button class="btn btn-primary"
              (click)="create()">
        New User
      </button>
    </div>
//...
 1
 2
 3
 4
 5
 6
 7
 8
 9
10
11
12
13
14
15
16
17
18
19
20
21
22
23
24
25
26
//...
  create() {
    this.userForm.create();
    const modalRef = this.modal.open(UserFormComponent);
    modalRef.result.then(user => {
      this.userService.create(user).subscribe(_ => {
        console.log('user created');
      });
    }).catch(err => {

    });
  }

  edit(userToEdit) {
    this.userForm.edit(userToEdit);
    const modalRef = this.modal.open(UserFormComponent);

    modalRef.result.then(user => {
      this.userService.edit(user).subscribe(_ => {
        console.log('user edited');
      });
    }).catch(err => {

    });

  }

From Postman

Postman is a tool for constructing and sending API requests. We can use it to simulate calls to our API from any client application or another service.

Let’s demonstrate sending a request to list all users.

Open Postman and enter the following URL: https://us-central1-{your-project}.cloudfunctions.net/api/users

The API URL loaded in the Postman field ready to fire as a GET request

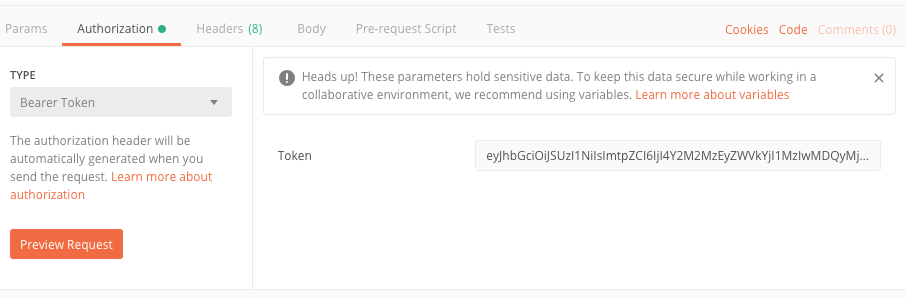
Navigate to the “Authorization” tab, select “Bearer Token”, and paste the token we obtained from the browser’s DevTools earlier.

Setting the bearer token in Postman
The body of the response we receive

Conclusion

Congratulations! You’ve successfully completed this tutorial and learned how to build a user role-based API on Firebase.

We covered consuming this API from both an Angular application and Postman.

Here’s a summary of the key takeaways:

  1. Firebase enables you to quickly build and deploy a production-ready authentication API, which you can later extend based on your requirements.
  2. Most projects require authorization. Firebase Authentication provides a rapid solution for implementing a role-based access control model.
  3. The role-based model centers around controlling access to resources based on user roles instead of individual users.
  4. By utilizing an Express.js application within Firebase Functions, we can create REST APIs and implement handlers for authentication and authorization.
  5. Firebase’s built-in custom claims provide a straightforward mechanism for building a secure, role-based authentication API for your application.

You can find more information about Firebase Authentication here. To further leverage the roles we’ve defined, consider exploring @angular/fire helpers.

Licensed under CC BY-NC-SA 4.0