Constructing a REST API presents a considerable challenge, particularly when dealing with legacy PHP projects. While numerous contemporary libraries promise simplified REST API implementation, integrating them into established codebases can prove quite intimidating. Moreover, the luxury of utilizing modern frameworks like Laravel or Symfony isn’t always available. Legacy PHP projects often find themselves entangled in outdated, proprietary frameworks operating on antiquated PHP versions.

This article aims to explore common obstacles encountered when implementing REST APIs from the ground up, propose potential solutions, and outline a comprehensive approach for building bespoke PHP-based API servers for legacy projects.
While rooted in PHP 5.3 and later, the fundamental principles discussed here hold relevance for all PHP versions beyond 5.0 and can even be extrapolated to non-PHP endeavors. It’s important to note that this article won’t delve into the general concept of REST APIs. If you’re unfamiliar with them, refer to about it before proceeding.
To ensure clarity, here’s a glossary of terms used throughout the article:
- API Server: The core REST application serving the API, in this context, written in PHP.
- API Endpoint: A backend function the client interacts with to perform actions and generate results.
- API Endpoint URL: The URL through which the backend system is globally accessible.
- API Token: A unique identifier transmitted via HTTP headers or cookies to authenticate the user.
- App: The client application communicating with the REST application through API endpoints. This article assumes it’s web-based (desktop or mobile) and written in JavaScript.
Getting Started
Path Patterns
A crucial initial decision is determining the URL path for API endpoint availability. Two popular methods exist:
- Employing a subdomain like api.example.com.
- Utilizing a path such as example.com/api.
While the first option might appear more prevalent and appealing, the second often proves more fitting for project-specific APIs.
A primary rationale for choosing the second approach is that it facilitates cookie-based credential transfer. Browser-based clients automatically include relevant cookies in XHR requests, eliminating the need for an additional authorization header.
Furthermore, this method bypasses the complexities of subdomain configuration and management issues, like custom headers being stripped by certain proxy servers—a potentially arduous task in legacy projects.
While using cookies for authentication might be deemed “unRESTful” due to REST’s statelessness principle, a compromise can be struck by transmitting the token value within a cookie instead of a custom header. This essentially employs cookies solely for token value transfer rather than direct session_id handling. While arguably stateless, this approach ultimately boils down to personal preference.
API endpoint URLs can also be versioned and include the anticipated response format as a path name extension. Though not mission-critical, particularly during early API development, these details can prove invaluable in the long run, especially when implementing new features. Version checks and format provisions for backward compatibility cater to client expectations.
The API endpoint URL structure could resemble this:
| |
For instance:
| |
Routing
Once a base URL for API endpoints is established, the next step is devising a routing system. While integration into an existing framework is ideal, a viable workaround, if that proves too cumbersome, involves creating an “api” folder within the document root, allowing the API to maintain entirely separate logic. This approach can be expanded by placing API logic within dedicated files, as illustrated below:

Here, “www/api/Apis/Users.php” acts as a separate “controller” for a specific API endpoint. Ideally, existing codebase implementations, like models already interacting with the database, should be reused.
Finally, ensure all incoming requests from “/api/*” are directed to “/api/index.php” by modifying your web server configuration.
API Class
Version and Format
Clearly defining the versions and formats accepted by your API endpoints, along with the default ones, is crucial. This enables future feature development while preserving existing functionalities. While API versions can be represented as strings, numeric values offer better clarity and comparability. Spare digits for minor versions effectively convey minimal changes:
- v1.0 signifies the initial version.
- v1.1 denotes the first version with minor modifications.
- v2.0 represents a completely revamped version.
Format flexibility is key, accommodating client needs, including but not limited to JSON, XML, and even CSV. Specifying the format as a file extension within the API endpoint URL enhances readability and instantly informs the consumer about the expected format:
- “/api/v1.0/records.json” returns a JSON array of records.
- “/api/v1.0/records.xml” returns an XML file of records.
Remember to send the appropriate Content-Type header in the response for each format.
Upon receiving an incoming request, prioritize checking if the API server supports the requested version and format. Within your main request handling method, parse $_SERVER[‘PATH_INFO’] or $_SERVER[‘REQUEST_URI’] to determine compatibility. Proceed or return a 4xx response (e.g., 406 “Not Acceptable”) accordingly. Always strive to return client-expected content. Alternatively, you could inspect the “Accept” request header instead of the URL path extension.
Allowed Routes
While transparently forwarding everything to API controllers is possible, employing a whitelist of allowed routes is often more prudent. This approach, though slightly less flexible, provides crystal-clear insight into API endpoint URL structures for future reference.
| |
Moving these to separate files enhances code organization. The above configuration enables requests to these URLs:
| |
Handling PUT Data
PHP automatically processes incoming POST data, storing it under the $_POST superglobal. However, PUT requests behave differently, burying data within php://input. Parse this data into a separate structure or array before invoking the actual API method. While a simple parse_str might suffice, additional parsing might be needed to handle form boundaries in multipart requests, typically used for file uploads. Detecting and managing multipart requests can be done as follows:
| |
Here, parse_raw_request could be implemented as:
| |
This approach stores the necessary request payload in Api::$input as raw input and Api::$input_data as an associative array.
Simulating PUT/DELETE
Situations might arise where the server only supports standard GET/POST HTTP methods. A common workaround involves “faking” PUT/DELETE or other custom request methods using a “magic” parameter like “_method”. If this parameter is present in your $_REQUEST array, treat the request as belonging to the specified type. Modern frameworks like Laravel have built-in functionality for this, offering excellent compatibility when server or client limitations exist (e.g., a user on a restricted corporate Wi-Fi network).
Forwarding to Specific API
If reusing existing project autoloaders isn’t feasible, create your own using the spl_autoload_register function. Define this function in your “api/index.php” page and call your API class located in “api/Api.php”. This API class functions as middleware, calling the actual method. For instance, a request to “/api/v1.0/records/7.json” should invoke the “Apis/Records.php” GET method with parameter 7. This enforces separation of concerns and promotes cleaner logic. However, if deeper integration with your framework and reuse of its specific controllers or routes is possible, prioritize that option.
Below is an example of “api/index.php” with a basic autoloader:
| |
This code snippet loads and initiates our Api class independently from the main project.
OPTIONS Requests
When a client uses custom headers to transmit its unique token, the browser needs to verify server support for that header beforehand. This is where OPTIONS requests come into play. They ensure a secure and seamless experience for both client and API server. Consequently, OPTIONS requests might fire every time a client attempts an action. However, when cookies handle credentials, the browser is spared from sending this extra OPTIONS request.
For a client requesting POST /users/8.json using cookies, the process is fairly standard:
- The app sends a POST request to /users/8.json.
- The browser executes the request and receives a response.
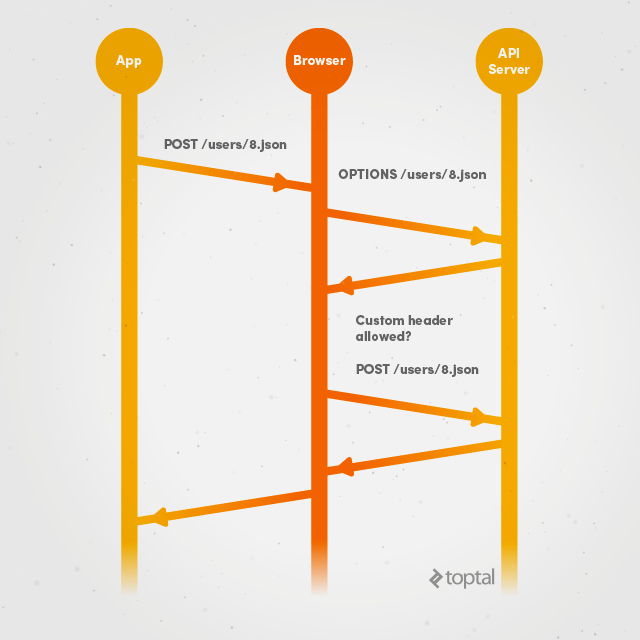
However, with custom authorization or token headers, the process differs:
- The app sends a POST request to /users/8.json.
- The browser pauses processing and initiates an OPTIONS request instead.
- The OPTIONS request is sent to /users/8.json.
- The browser receives a response containing a list of supported methods and headers as defined by the API.
- The browser only proceeds with the original POST request if the custom header is present in the allowed headers list.
Remember that even when using cookies, you might still encounter that additional OPTIONS request for PUT/DELETE methods. Therefore, be prepared to handle it.
Records API
Basic Structure
Let’s consider a straightforward Records API encompassing all request methods and returning output to the main API class. For example:
| |
Defining each HTTP method facilitates building the API in a RESTful manner.
Formatting Output
Blindly relaying everything received from the database back to the client can have disastrous consequences. To prevent inadvertent data exposure, create a dedicated format method that returns only whitelisted keys.
An added benefit of whitelisted keys is their role in documentation and type-checking. For instance, they ensure user_id is always an integer, is_banned flag is always a boolean (true or false), and date times adhere to a standard response format.
Delivering Results
Headers
Implementing separate methods for header output ensures the correctness of information sent to the browser. This method can leverage the benefits of same-domain API accessibility while retaining the ability to receive custom authorization headers. The decision to use the same or a third-party domain can be based on the HTTP_ORIGIN and HTTP_REFERER server headers. If the app detects client usage of x-authorization (or any other custom header), it should permit access from all origins and allow the custom header, as shown below:
| |
However, for cookie-based client credentials, headers might differ slightly, allowing only the requested host and cookie-related headers for authentication:
| |
Note that OPTIONS requests don’t support cookies, so the app won’t send them along. Finally, this setup enables all desired HTTP methods to have controlled access expiration:
| |
Body
The response body should contain the data in the client’s requested format, accompanied by a 2xx HTTP status upon success, a 4xx status for client-side failures, and a 5xx status for server-side errors. While the response structure can vary, including “status” and “response” fields proves beneficial. For instance, if a new user registration attempt encounters a duplicate username, you could send a response with HTTP status 200 but include a JSON body similar to this:
| |
… instead of a direct HTTP 4xx error.
Conclusion
Given the uniqueness of every project, the strategy outlined here might not be universally applicable. However, the fundamental principles should resonate regardless. It’s crucial to acknowledge that not every page benefits from the latest frameworks. Sometimes, the frustration stemming from a malfunctioning REST Symfony bundle can be channeled into building a functional, albeit custom, solution. While the end result might lack the sheen of widely adopted frameworks, its effectiveness is paramount for any API developer.
For your convenience, example implementations of the discussed concepts have been uploaded to a GitHub repository. While these samples might not be production-ready, they serve as a solid foundation for your next legacy PHP API integration project.
Have you recently tackled REST API server implementation for a legacy project? We’d love to hear about your experience in the comments below.