In the realm of computing, Virtual Network Computing, or VNC, stands out as a graphical desktop sharing system that leverages the Remote Framebuffer (RFB) protocol to enable remote control of a separate computer. Its functionality involves transmitting keyboard and mouse events from the originating computer to the target machine while simultaneously relaying graphical screen updates back in the opposite direction across a network connection.
RFB, in essence, is a straightforward protocol designed for remote access to graphical user interfaces. Operating at the frame buffer level, it demonstrates versatility across various windowing systems and applications, including prominent ones like Microsoft Windows, Mac OS X, and the X Window System.
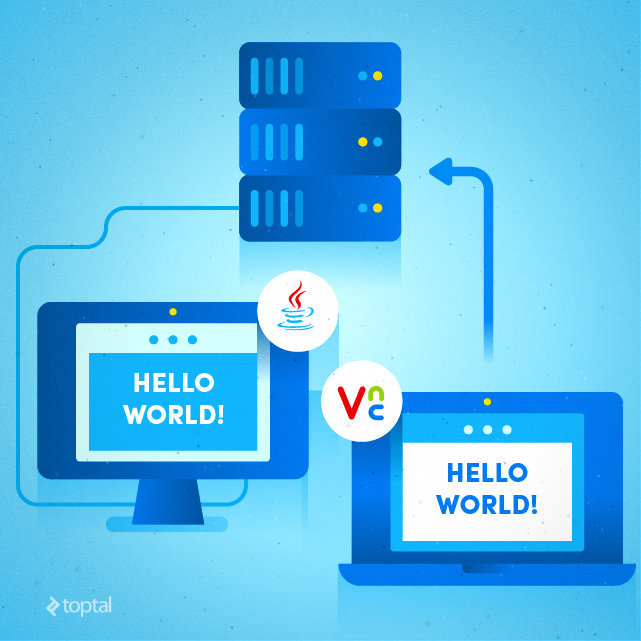
This article aims to guide you through implementing the RFB server-side protocol. We’ll illustrate this with a compact Java Swing application that showcases the transmission of the main window over a TCP connection to VNC viewers. The objective here is to demonstrate the fundamental features of the protocol and a potential implementation using Java.
A prerequisite for this article is a foundational understanding of the Java programming language and familiarity with basic concepts related to TCP/IP networking, the client-server model, and similar principles. Ideally, the reader would be a Java developer with some prior experience in well-known VNC implementations such as RealVNC, UltraVNC, or TightVNC.
Decoding the Remote Framebuffer Protocol Specification
The RFB protocol specification is relatively well defined. As per Wikipedia, the RFB protocol has gone through several iterations. However, our primary focus in this article will be on common messages that most VNC implementations should be able to interpret correctly, irrespective of the protocol version.
When a VNC viewer (acting as the client) establishes a TCP connection with a VNC server (running the RFB service), the initial phase involves exchanging protocol versions:
| |
This exchange takes the form of a simple stream of bytes, which can be decoded into ASCII characters, typically resembling “RFB 003.008\n”.
Following the version exchange, the next stage is authentication. The VNC server transmits an array of bytes to signal the types of authentication it supports. For instance:
| |
In this scenario, the VNC server presents only one possible authentication type (0x02). The leading byte, 0x01, signifies the number of available authentication types. The VNC viewer is obligated to respond with the value 0x02, as it represents the sole authentication type supported by the server in this example.
Subsequently, the server issues an authentication challenge (the specifics of which vary based on the algorithm in use), and the client must respond with an appropriate challenge response message. Following this, the client awaits confirmation from the server. Once the client is successfully authenticated, it can proceed with establishing the session.
For simplicity, one can opt for no authentication whatsoever. It’s important to note that the RFB protocol, by its nature, is inherently insecure, regardless of the authentication mechanism employed. Should security be a primary concern, the recommended approach would be to tunnel RFB sessions through secure channels like VPN or SSH connections.
At this juncture, the VNC viewer sends a “shared desktop” message, indicating whether the client intends to share the session and permit other VNC viewers to connect to the same desktop. The RFB service implementation then processes this message, potentially restricting multiple VNC viewers from sharing a single screen. This message is concise, comprising only a single byte, and the valid values are either 0x00 or 0x01.
Finally, the RFB server dispatches a “server init” message containing crucial information about the screen: its dimensions, bits per pixel, depth, endianness (big endian flag), true color flags, maximum values for red, green, and blue colors, bit positions for these colors within a pixel, and a desktop string or title. The initial two bytes represent the screen width in pixels, followed by two bytes for screen height. After the screen height bytes, a single byte represents the bits per pixel. This value is typically 8, 16, or 32. On most modern systems boasting a full color range, this byte holds the value 32 (0x20), signaling to the client that it can request the full color palette for each pixel from the server. The “big endian” byte is non-zero only if the pixels are arranged in big-endian order. If the “true color” byte is non-zero (true), the subsequent six bytes detail how to extract red, green, and blue color intensities from the pixel value. The following six bytes represent the maximum allowed values for the red, green, and blue components of a pixel. This is particularly relevant in 8-bit color mode, where only a limited number of bits are available for each color component. The red, green, and blue shifts determine the bit positions for each respective color. The final three bytes are padding and should be disregarded by the client. Following the pixel format, a single byte specifies the length of the desktop title string. The desktop title itself is an ASCII-encoded string represented as a byte array of variable length.
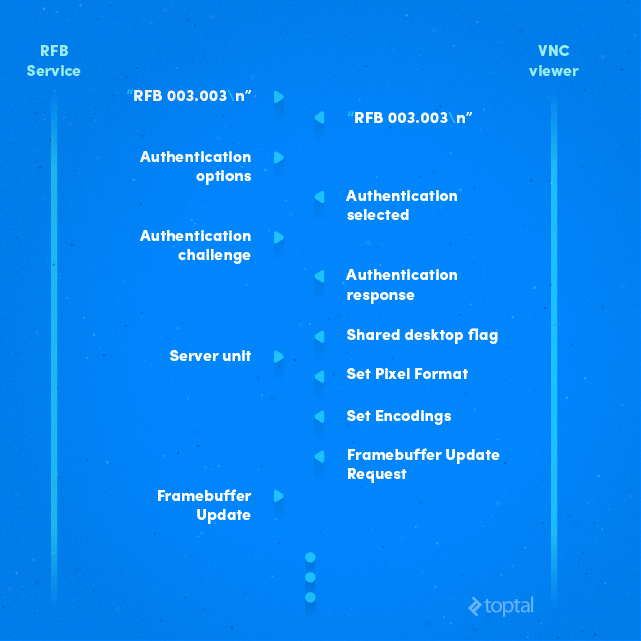
Once the “server init” message is sent, the RFB service should be ready to receive and decode client messages from the socket. There are six primary types of messages:
- SetPixelFormat
- SetEncodings
- FramebufferUpdateRequest
- KeyEvent
- PointerEvent
- ClientCutText
The protocol documentation provides precise explanations for each message type, detailing the purpose of every byte. For example, let’s consider the “server init” message:
| No of bytes | Type | Description |
|---|---|---|
| 2 | U16 | framebuffer-width |
| 2 | U16 | framebuffer-height |
| 16 | PIXEL_FORMAT | server-pixel-format |
| 4 | U32 | name-length |
| name-length | U8 array | name-string |
Here, PIXEL_FORMAT is defined as:
| No of bytes | Type | Description |
|---|---|---|
| 1 | U8 | bits-per-pixel |
| 1 | U8 | depth |
| 1 | U8 | big-endian-flag |
| 1 | U8 | true-colour-flag |
| 2 | U16 | red-max |
| 2 | U16 | green-max |
| 2 | U16 | blue-max |
| 1 | U8 | red-shift |
| 1 | U8 | green-shift |
| 1 | U8 | blue-shift |
| 3 | padding |
In this context, U16 represents an unsigned 16-bit integer (two bytes), U32 denotes an unsigned 32-bit integer, and U8 array refers to an array of bytes, and so forth.
Bringing the Protocol to Life: Implementation in Java
A typical Java server application consists of a thread dedicated to listening for incoming client connections and multiple threads responsible for managing individual client connections.
| |
In this code snippet, TCP port 5902 (corresponding to display :2) is chosen. The while loop patiently waits for a client to establish a connection. The ServerSocket.accept() method operates in a blocking manner, causing the thread to halt execution until a new client connection is established. Upon a successful client connection, a new thread, RFBService, is created to handle the RFB protocol messages received from that particular client.
The RFBService class implements the Runnable interface and is equipped with methods for reading bytes from the socket. The run() method plays a crucial role, as it is executed immediately when the thread is started at the end of the loop:
| |
Here, the sendProtocolVersion() method transmits the RFB version string to the client (VNC viewer) and then waits to read the protocol version string sent back from the client. The client is expected to reply with a string similar to “RFB 003.008\n”. The readProtocolVersion() method, like other methods prefixed with “read,” operates in a blocking manner.
| |
The readProtocolVersion() method is straightforward: it reads 12 bytes from the socket and returns the data as a string. The readU8Array(int) function is responsible for reading the specified number of bytes, which in this case is 12 bytes. If there aren’t enough bytes available to read from the socket, it patiently waits:
| |
Similar to readU8Array(int), we have methods like readU16int() and readU32int() that read bytes from the socket and return an integer value.
After the exchange of protocol versions, the RFB service proceeds to send the security message:
| |
In this implementation, we’ve opted for the simplest approach: no password is required from the VNC client.
| |
Here, SECURITY_TYPE is a byte array defined as follows:
| |
This specific sequence of bytes, as per the RFB protocol version 3.3, signifies to the VNC viewer that it doesn’t need to provide any password.
The next piece of information the RFB service expects from the client is the “shared desktop” flag, which is a single byte transmitted over the socket.
| |
While we read the “shared desktop” flag from the socket, our current implementation chooses to ignore it.
Next, the RFB service is responsible for sending the “server init” message:
| |
In our demo, JFrameMainWindow is a JFrame serving as the source of graphics. The “server init” message mandates the inclusion of the screen width and height in pixels, along with the desktop title. In this example, we’re using the JFrame’s title, obtained using the getTitle() method.
Following the “server init” message, the RFB service thread enters a loop where it continuously reads six types of messages from the socket:
| |
Each method—readSetPixelFormat(), readSetEncoding(), readFrameBufferUpdateRequest(), and so on, up to readClientCutText()—operates in a blocking fashion and triggers specific actions based on the message received.
For instance, the readClientCutText() method is responsible for reading the text sent by the VNC viewer when a user performs a “cut” operation on the client side. The text is encoded within the message and transmitted to the server via the RFB protocol. Upon receipt, the server places this text into the system clipboard.
Deconstructing Client Messages
The RFB service must support all six types of client messages, at least at the byte level. This means that whenever the client transmits a message, the server is obligated to read the entire message, byte by byte. This is because the RFB protocol is byte-oriented, and there are no delimiters between consecutive messages.
The most crucial message type is the “frame buffer update request,” where the client can request either a full or incremental update of the screen content.
| |
The first byte of the “frame buffer update request” message indicates the message type, which is always 0x03. The next byte is the “incremental” flag, signaling to the server whether to send the entire frame or just the differences since the last update. In the case of a full update request, the RFB service will capture a screenshot of the main window using the RobotScreen class and transmit it to the client.
Conversely, if the request is for an incremental update, a flag named incrementalFrameBufferUpdate is set to true. Swing components will then consult this flag to determine if they need to send only the portions of the screen that have changed. Typically, components like JMenu, JMenuItem, JTextArea, and others might need to perform incremental screen updates when the user moves the mouse pointer, clicks, types, or interacts in similar ways.
The sendFrameBufferUpdate(int, int, int, int, int[]) method is responsible for sending the image buffer data to the socket.
| |
This method first ensures that the (x, y) coordinates, along with the width and height of the image buffer, don’t exceed the screen boundaries. The message type value for a “frame buffer update” is 0x00. The “padding” value is typically set to 0x00 and should be ignored by the VNC viewer. The “number of rectangles” is a two-byte value indicating the number of rectangles that follow within the message.
Each rectangle is defined by its upper-left coordinate, width, height, encoding type, and pixel data. The RFB protocol supports several efficient encoding formats, such as ZRLE, Hextile, and Tight. However, for the sake of simplicity and clarity, our implementation utilizes the “raw” encoding format.
Raw encoding transmits pixel color information as RGB components. If the client has set the pixel format to 32-bit, then 4 bytes are transmitted for each pixel. Conversely, if the client is using 8-bit color mode, each pixel is transmitted as a single byte. The provided code snippet demonstrates this within the for loop. Note that in 8-bit mode, a color map is employed to find the best match for each pixel from the screenshot or image buffer. In 32-bit pixel mode, the image buffer holds an array of integers, with each value containing multiplexed RGB components.
A Swinging Demo: Building the Application
Our Swing demo application includes an action listener responsible for triggering the sendFrameBufferUpdate(int, int, int, int, int[]) method. In a typical scenario, application elements like Swing components would have listeners that send screen change notifications to the client. For instance, if a user enters text into a JTextArea, this change should be reflected on the VNC viewer.
| |
The code for this action listener is quite straightforward. It captures a screenshot of the main window (JFrameMain) using the RobotScreen class and then determines if a partial screen update is necessary. The variable diffUpdateOfScreen acts as a flag for partial updates. Finally, either the complete image buffer or only the rows that have changed are transmitted to the client. Additionally, the code accommodates multiple connected clients; hence the use of an iterator to loop through the client list maintained in the RFBDemo.rfbClientList
The “frame buffer update” action listener can be used in conjunction with a Timer, which can be started whenever a JComponent undergoes a change:
| |
This particular code snippet resides within the constructor of the JFrameMainWindow class. The timer is started by the doIncrementalFrameBufferUpdate() method:
| |
Other action listeners typically invoke the doIncrementalFrameBufferUpdate() method:
| |
This approach is designed for simplicity and ease of understanding. It only requires a reference to the JFrameMainWindow instance and a single call to the doIncrementalFrameBufferUpdate() method. This method checks for active client connections and, if any exist, starts the timerUpdateFrameBuffer timer. Once the timer starts ticking, the action listener will capture a screenshot and execute the sendFrameBufferUpdate() method.
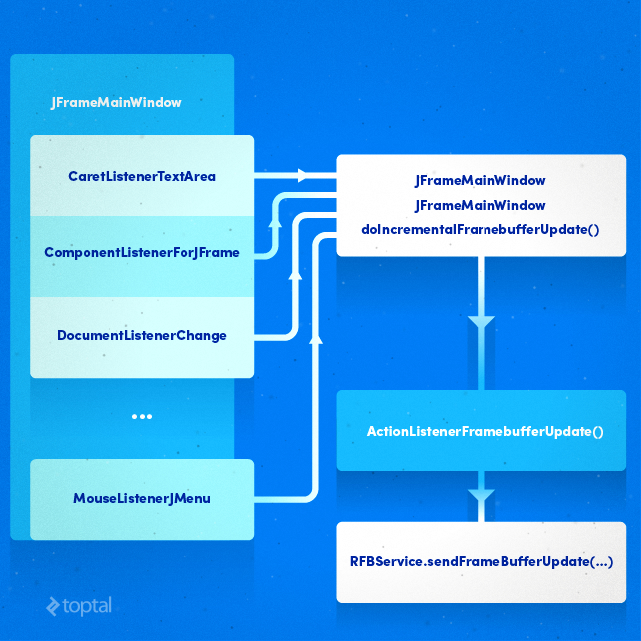
The figure above illustrates the relationship between various listeners and the frame buffer update process. Most listeners are triggered when the user interacts with the application, such as clicking, selecting text, typing in a text area, or performing similar actions. These actions, in turn, invoke the doIncrementalFramebufferUpdate() member function, which subsequently starts the timerUpdateFrameBuffer. This timer is responsible for eventually calling the sendFrameBufferUpdate() method within the RFBService class, ultimately leading to a screen update on the client side (VNC viewer).
Capturing the Screen, Simulating Keystrokes, and Controlling the Mouse Pointer
Java provides a built-in Robot class that empowers developers to create applications capable of capturing screenshots, sending keystrokes, manipulating the mouse pointer, simulating clicks, and more.
To capture the specific area of the screen where the JFrame window is displayed, we utilize the RobotScreen class. The core method here is getScreenshot(int, int, int, int), which captures a rectangular region of the screen. RGB values for each pixel within the captured region are stored in an int[] array:
| |
This method stores pixel data in the colorImageBuffer array. To retrieve this pixel data, we can use the getColorImageBuffer() method.
Furthermore, the method retains a copy of the previous image buffer, enabling us to extract only the pixels that have changed between captures. To obtain just the differences within the captured image area, we can utilize the getDeltaImageBuffer() method.
The Robot class simplifies the process of sending simulated keystrokes to the system. However, it’s important to handle special key codes received from VNC viewers and translate them correctly. The RobotKeyboard class offers the sendKey(int, int) method, which adeptly handles both special keys and alphanumeric keys:
| |
The “state” argument determines whether the key is being pressed or released. After appropriately translating the key code into a VT constant, the doType(int, int) method passes the key value to the Robot instance, effectively replicating the action of a local user pressing the corresponding key on the keyboard:
| |
Similar to RobotKeyboard, we have the RobotMouse class, which handles pointer events and can move the mouse pointer and simulate clicks.
| |
All three classes, RobotScreen, RobotMouse, and RobotKeyboard, create a new Robot instance within their constructors:
| |
In our application, we only need a single instance of each class, as there’s no need for multiple instances of RobotScreen, RobotMouse, or RobotKeyboard.
| |
In this particular demo application, these instances are created within the main() function.
The culmination of our efforts is a Swing-based Java application functioning as an RFB service provider, allowing standard VNC viewers to establish connections:

In Conclusion: The Power and Potential of RFB
The RFB protocol enjoys widespread use and acceptance, with client implementations in the form of VNC viewers readily available for virtually every platform and device. While its primary purpose is to remotely display desktops, its applications extend far beyond this. Developers can leverage RFB to create innovative graphical tools and access them remotely, enhancing existing remote workflows.
This article has provided a comprehensive overview of the RFB protocol, covering its message formats, screen transmission techniques, and methods for handling keyboard and mouse interactions. For those eager to delve deeper, the full source code of the Swing demo application is available on GitHub.