Editor’s note: This article was revised on August 22, 2022. Our editorial team updated it with recent information and ensured it aligns with our current editorial style.
Discord, a real-time messaging platform, promotes itself as a comprehensive voice and text chat solution for gamers. Its user-friendly interface, intuitive design, and extensive features have led to remarkable growth, making it popular even among those less interested in gaming. From 2018 to 2022, its user base saw explosive growth, surging from 56 million to over 150 million users.
One of Discord’s most appealing aspects is its support for bots. These programmable bots enhance Discord’s functionality by integrating it with external services and providing a richer user experience. Discord bots are widespread and offer diverse services such as moderation support, games, music streaming, internet searches, payment processing, and more.
This tutorial explores Discord bot development. We’ll start by examining Discord’s user interface, REST API, and WebSocket API for bots. We will then create a simple Discord bot using JavaScript. Lastly, the developer of a prominent Discord bot will provide insights into building and managing its extensive infrastructure and codebase.
Understanding the Discord User Interface
Before delving into the technicalities, it’s crucial to grasp how users interact with Discord and how the platform presents itself. While bots don’t perceive the interface visually, the underlying principles remain similar. The official Discord applications utilize the same APIs as bots. Technically, a bot could operate within a regular user account with minor modifications; however, Discord’s terms of service strictly prohibit this. Bots must run under bot accounts.
Let’s examine the browser version of Discord running in Chrome:
Note: The Discord UI is nearly identical across the web and desktop applications, thanks to Electron. React Native powers the iOS app, while the Android app is built with native Android Java code.
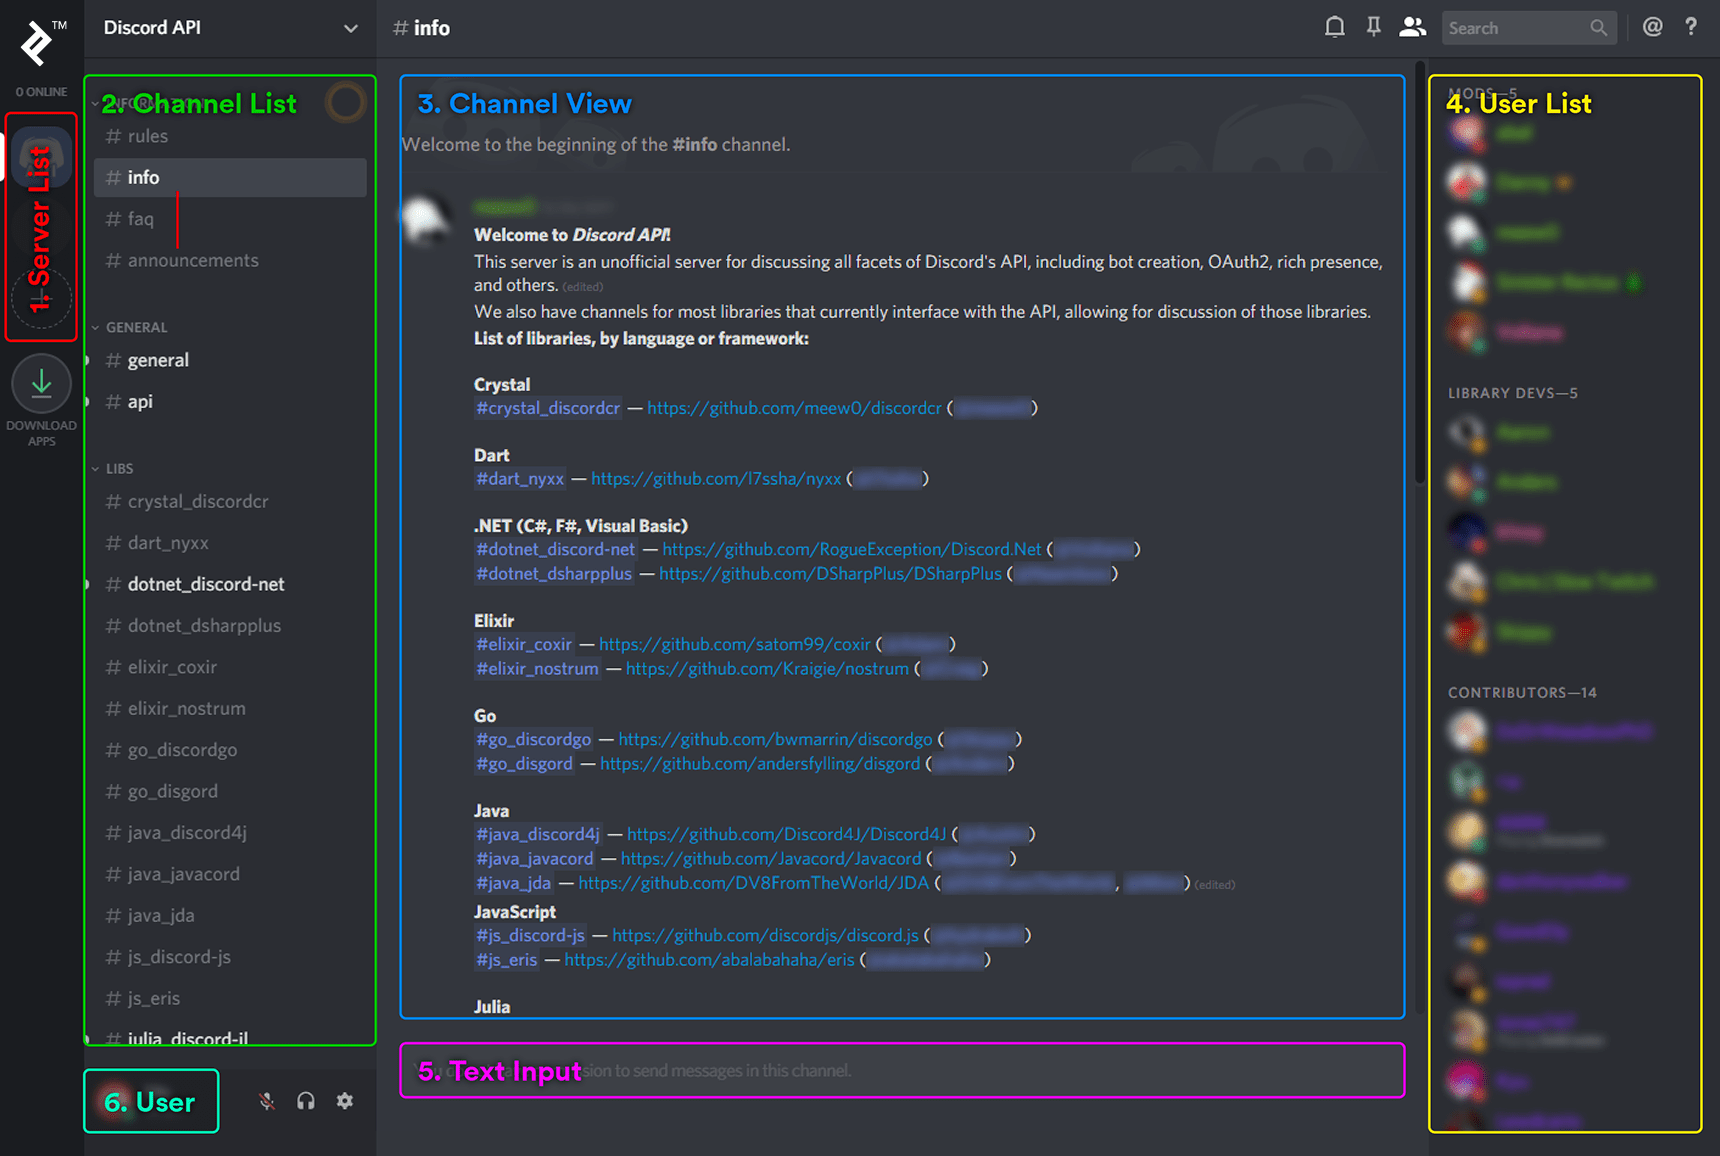
Let’s break down the interface:
1. Server List
On the left, you’ll find the server list, displaying servers you’ve joined. Similar to Slack workspaces, servers represent user groups that can communicate within channels. Server creators and staff manage the server, including its rules, channel structure, and user management.
In this example, the “Discord API” server is at the top, offering a valuable resource for assistance and discussions with fellow developers. Below is the “Test” server, created for testing our bot later. A button for creating new servers is available below that, allowing anyone to start a server effortlessly.
It’s worth noting that while the user interface uses the term “Server,” the developer documentation and API refer to it as a “Guild.” These terms are interchangeable.
2. Channel List
Next to the server list is the channel list, displaying channels within the currently active server, in this case, the “Discord API” server. Channels are organized into categories. This server has categories like INFORMATION, GENERAL, and LIBS. Each channel serves as a chatroom for topic-specific discussions. The currently active channel, “info,” has a lighter background. New messages highlight channel names in white.
3. Channel View
The channel view displays ongoing discussions. We can see a message preview—a list of support server links for different Discord bot libraries. This server restricts message posting to administrators, allowing them to share essential information without cluttering the chat.
4. User List
The right side displays the list of online users in the current server, categorized and color-coded based on their roles. Roles define user categories, name colors, and server permissions. Users can hold multiple roles, and a hierarchy determines which role’s attributes take precedence. At a minimum, every user has the “@everyone” role. Server staff create and assign other roles.
5. Text Input
The text input area allows for typing and sending messages, provided you have the necessary permissions. In this case, I’m restricted from sending messages in this channel, so I can’t type here.
6. User
This section displays the current user. I’ve set my username to “Me” for clarity and my inability to choose good names. Below my username is my discriminator (#9484), ensuring uniqueness among other users named “Me.” I can also set server-specific nicknames to appear differently in different servers.
While these are the fundamental elements of Discord’s user interface, there’s much more to explore. Discord is accessible even without an account. Feel free to explore by visiting the Discord homepage, clicking “open Discord in a browser,” and choosing a username.
Discord API: A Closer Look
The Discord API comprises two main components: the WebSocket API and the REST API. The WebSocket API handles real-time event reception from Discord, while the REST API facilitates actions within Discord.
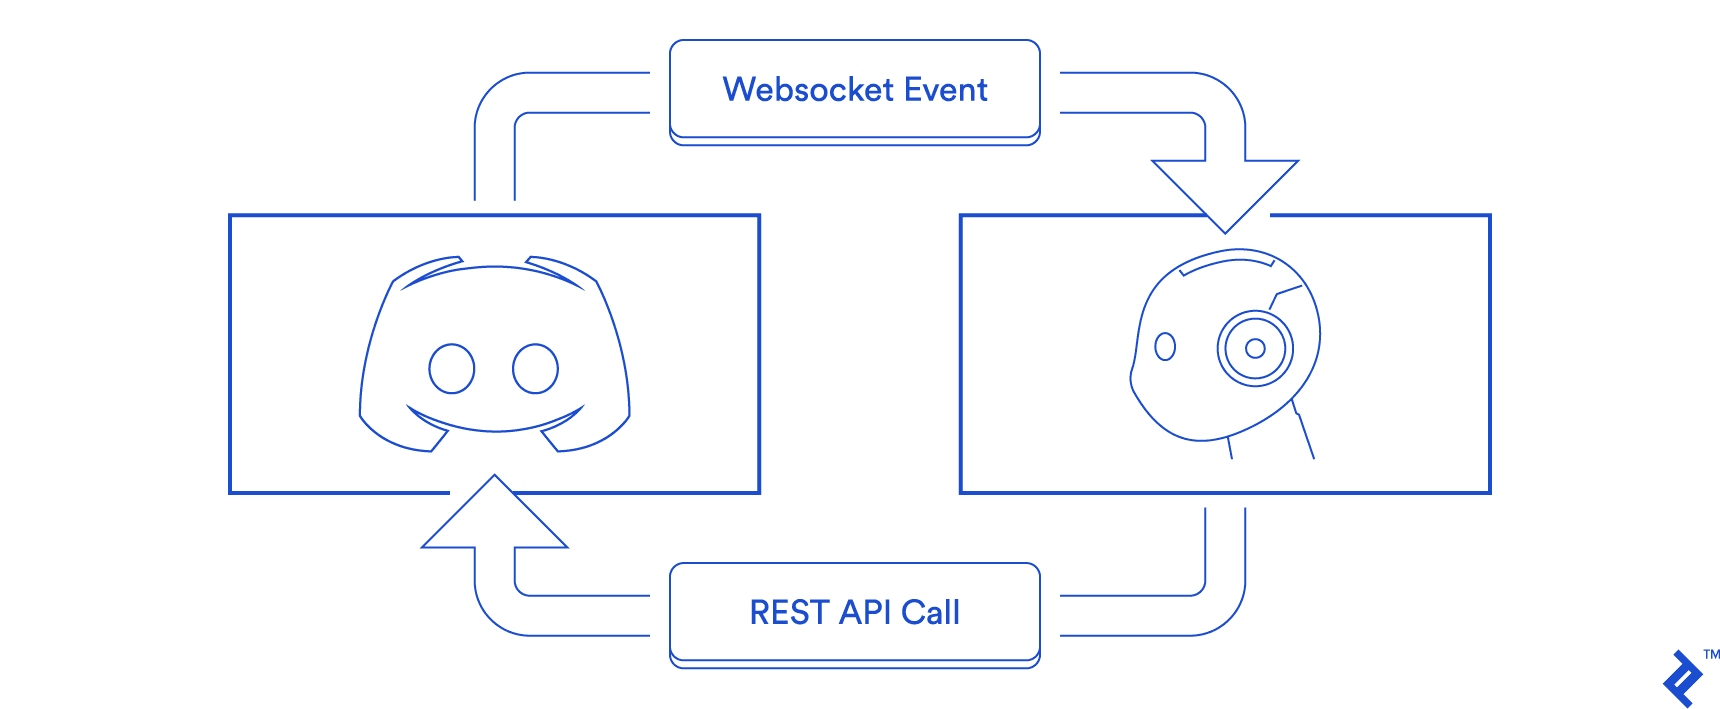
WebSocket API in Detail
The WebSocket API centers around receiving Discord events, such as message creation, deletion, user kicks/bans, permission updates, and more. Conversely, communication from the bot to the WebSocket API is limited to essential tasks like requesting connections, identification, heartbeat maintenance, voice connection management, and a few others. Refer to Discord’s gateway documentation for detailed information. (A single WebSocket API connection is called a gateway). More complex actions are handled by the REST API.
Events from the WebSocket API carry payloads containing information specific to the event type. For example, all “Message Create” events include a user object representing the message author. However, the user object might not contain all available information about the user, like permissions. While you can query the REST API for more details, it’s generally recommended to utilize the cache built from payloads received in previous events due to reasons explained in the next section. Several events deliver payloads relevant to user permissions, including but not limited to “Guild Create,” “Guild Role Update,” and “Channel Update.”
A bot can only be present in a maximum of 2,500 guilds per WebSocket connection. To expand a bot’s reach to more guilds, sharding is necessary. Sharding involves establishing multiple WebSocket connections to Discord. While this might seem excessive for bots running on a single process and node, Discord’s sharding support simplifies back-end distribution across multiple nodes for popular bots requiring such scaling.
Exploring the REST API
The Discord REST API enables bots to perform actions like sending messages, kicking/banning users, and updating permissions, mirroring the events received from the WebSocket API. Although it can query information, bots predominantly rely on WebSocket API events and cache the received data.
This approach is favored for two primary reasons. Firstly, constantly querying the REST API for information, such as user details on every “Message Create” event, leads to scalability issues due to the REST API’s rate limits. Secondly, it introduces redundancy, as the WebSocket API usually delivers the required information, which should already be cached.
However, exceptions exist where information might not be available in the cache, requiring REST API requests. For instance, when a bot connects to a WebSocket gateway, it receives initial “Ready” and “Guild Create” events for each guild to populate its cache with the current state. Heavily populated guilds might only include data about online users in their “Guild Create” events. If your bot requires information about an offline user, querying the REST API becomes necessary. Alternatively, if you frequently need data about offline users, you can send a “Request Guild Members” opcode to the WebSocket API to request offline guild member information.
Another exception arises when your application doesn’t connect to the WebSocket API, such as a bot with a web dashboard allowing users to modify bot settings for their server. This dashboard, running as a separate process without WebSocket API connections or a data cache, might only require occasional REST API requests. In such cases, relying on the REST API for information retrieval makes sense.
API Wrappers: Simplifying Development
While understanding each layer of your technology stack is beneficial, directly interacting with the Discord WebSocket and REST APIs can be cumbersome, error-prone, unnecessary, and even risky.
Discord provides an curated list of officially vetted libraries and cautions against:
Using custom implementations or non-compliant libraries that abuse the API or cause excessive rate limits, which may result in a permanent ban.
Officially vetted libraries by Discord tend to be mature, well-documented, and offer comprehensive Discord API coverage. Most bot developers won’t need to create custom implementations unless driven by curiosity.
Currently, officially vetted libraries exist for various languages, including Crystal, C#, D, Go, Java, JavaScript, Lua, Nim, PHP, Python, Ruby, Rust, and Swift. Multiple libraries might be available for your preferred language. Choosing one requires careful consideration. Besides reviewing the documentation, explore the unofficial Discord API server to understand the community behind each library.
Creating Your First Discord Bot
Let’s dive into building a Discord bot that resides in your server and listens for webhooks from Ko-fi. Ko-fi is a service that simplifies accepting donations via your PayPal account. Setting up webhooks on Ko-fi is easier than PayPal, which requires a business account, making it suitable for demonstrations or small-scale donation processing.
Our bot will assign a “Premium Member” role to users who donate $10 or more. This role changes their name color and elevates their position in the online users’ list. For this project, we’ll utilize Node.js and a Discord API library called Eris. While other JavaScript libraries like discord.js exist, the code will be similar regardless of your choice.
It’s worth noting that Patreon, another donation platform, offers a official Discord bot and supports configuring Discord roles as perks for contributors. We’ll implement a basic version of this functionality.
The code for each step of the tutorial is available on GitHub (https://github.com/mistval/premium_bot). Some steps might omit unchanged code for brevity. Refer to the provided GitHub links if you encounter any issues.
Setting Up a Discord Bot Account
Before writing code, we need a bot account. To create a bot account, you need a user account. Follow the instructions here to create one.
Next, to create a bot account:
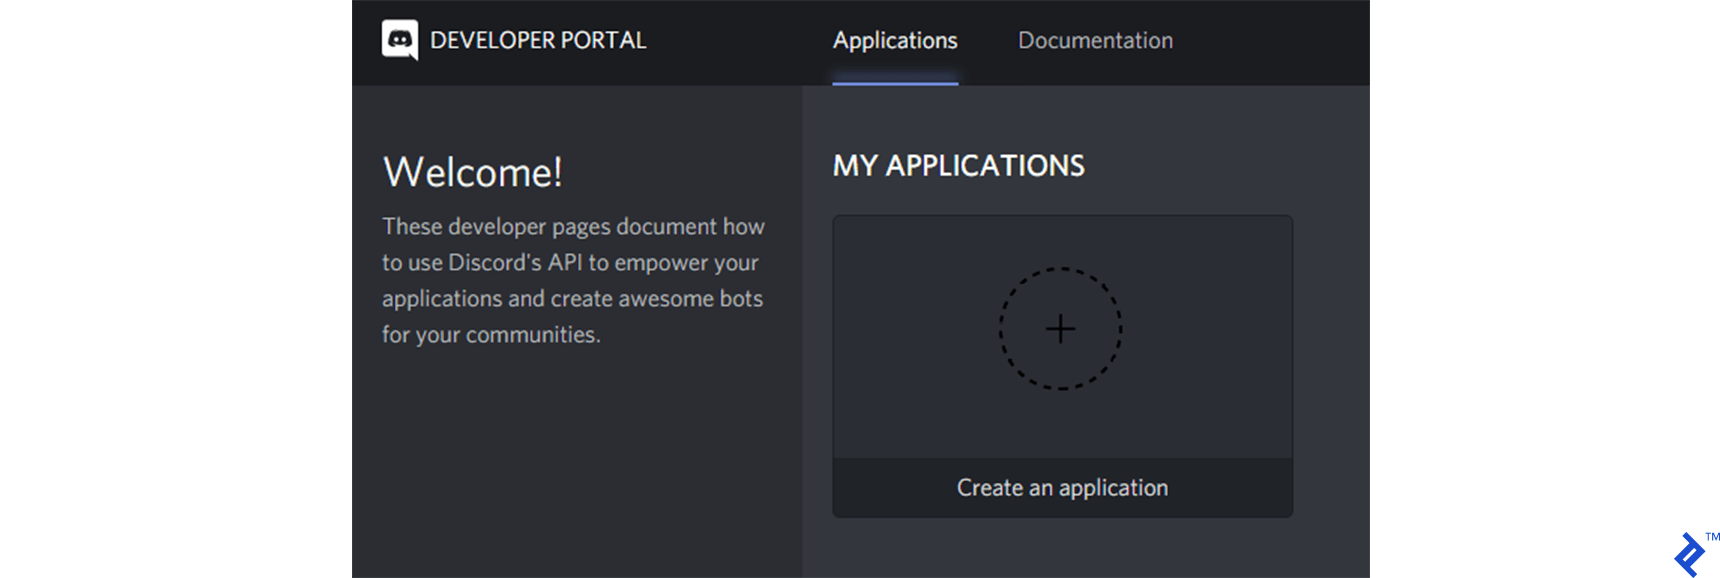
- Navigate to the developer portal and create a new application.
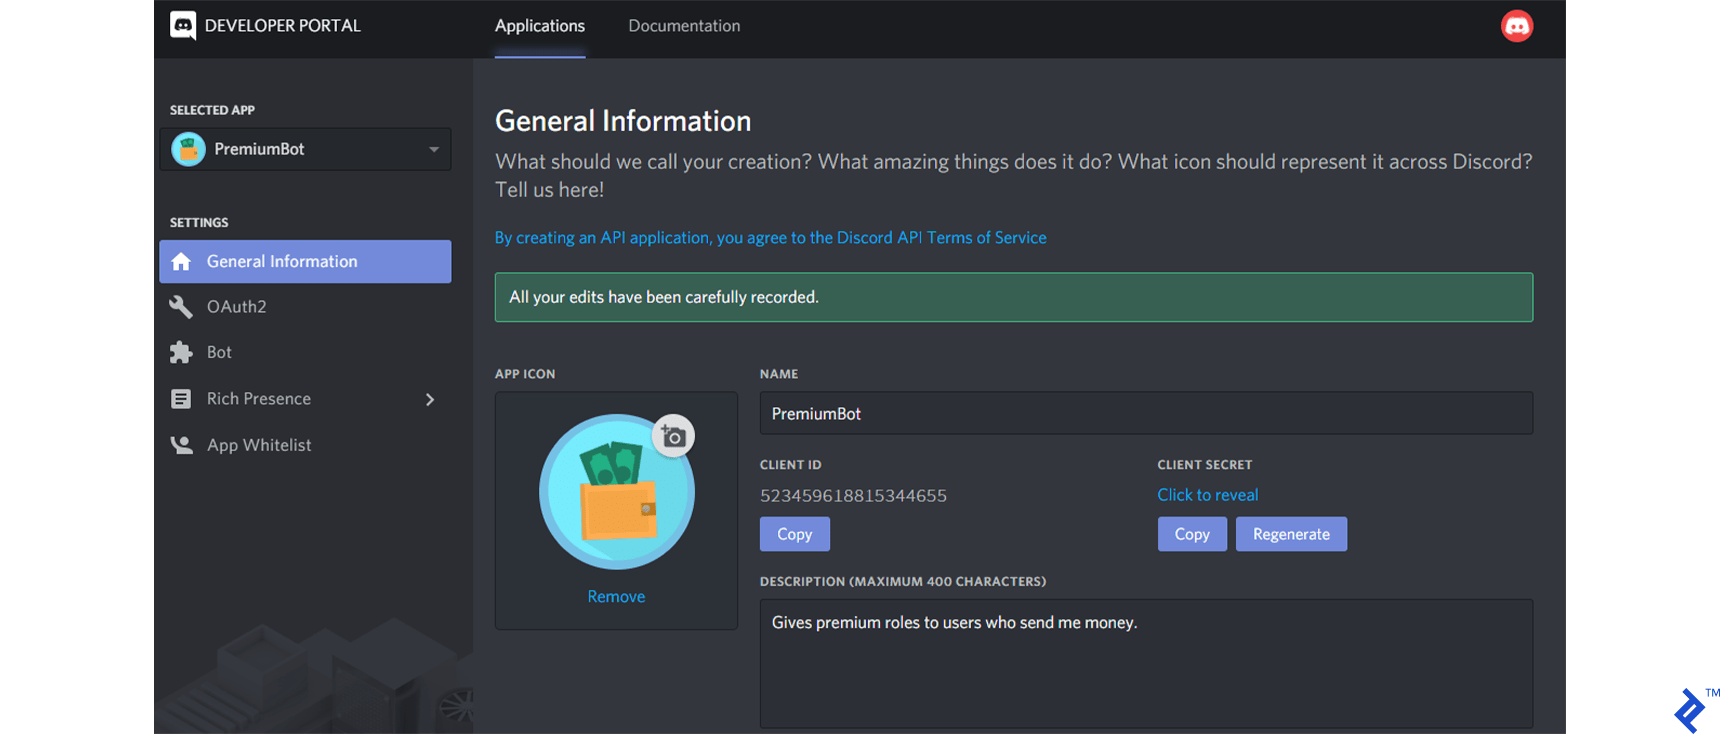
- Provide basic information about the application. Take note of the CLIENT ID; we’ll need it later.
- Add a bot user to the application.
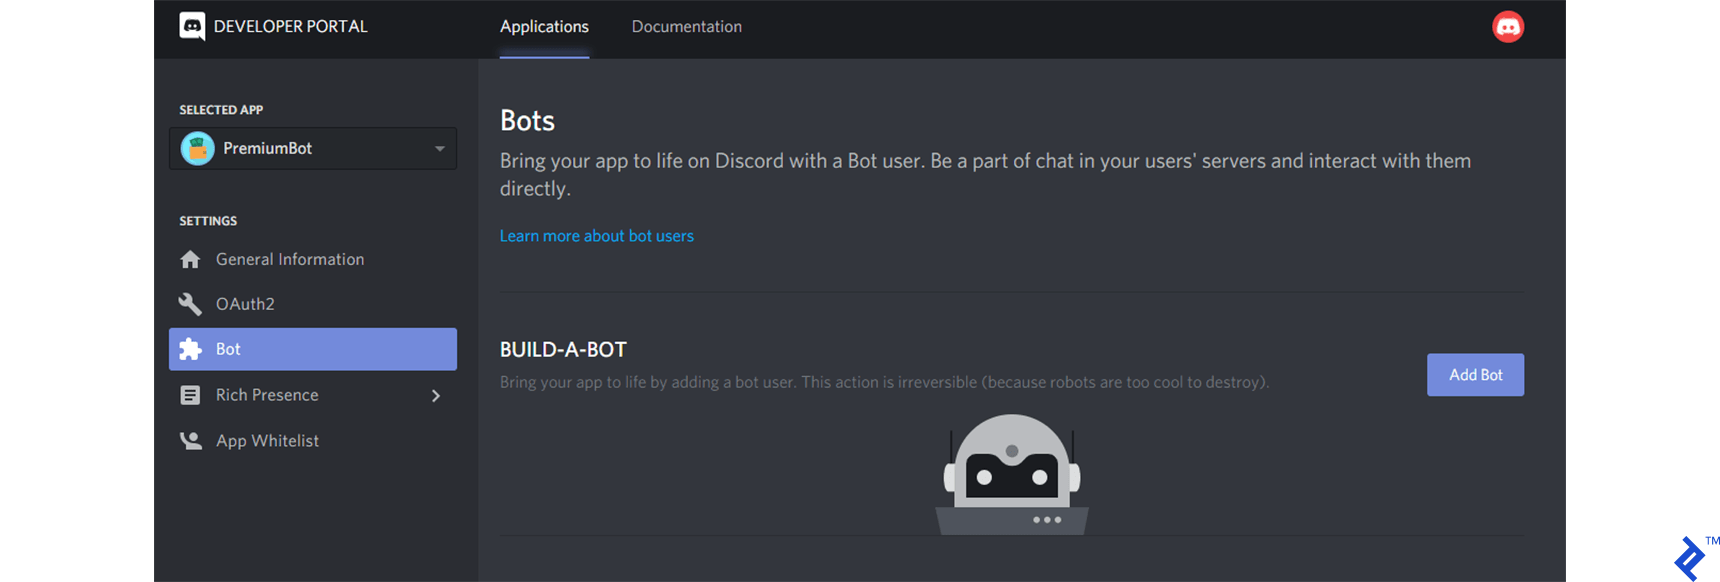
- Disable the “PUBLIC BOT” option and copy the displayed bot token. We’ll need this later. It’s crucial to regenerate your bot token immediately if it’s ever compromised, such as being exposed in an image uploaded to a blog post. Anyone with your bot token can control your bot, potentially causing severe and irreversible damage.

- Add the bot to your test guild. Replace “YOUR_CLIENT_ID” with your bot’s client ID (obtained earlier) in the following URI and open it in a browser.
https://discordapp.com/api/oauth2/authorize?scope=bot&client_id=XXX
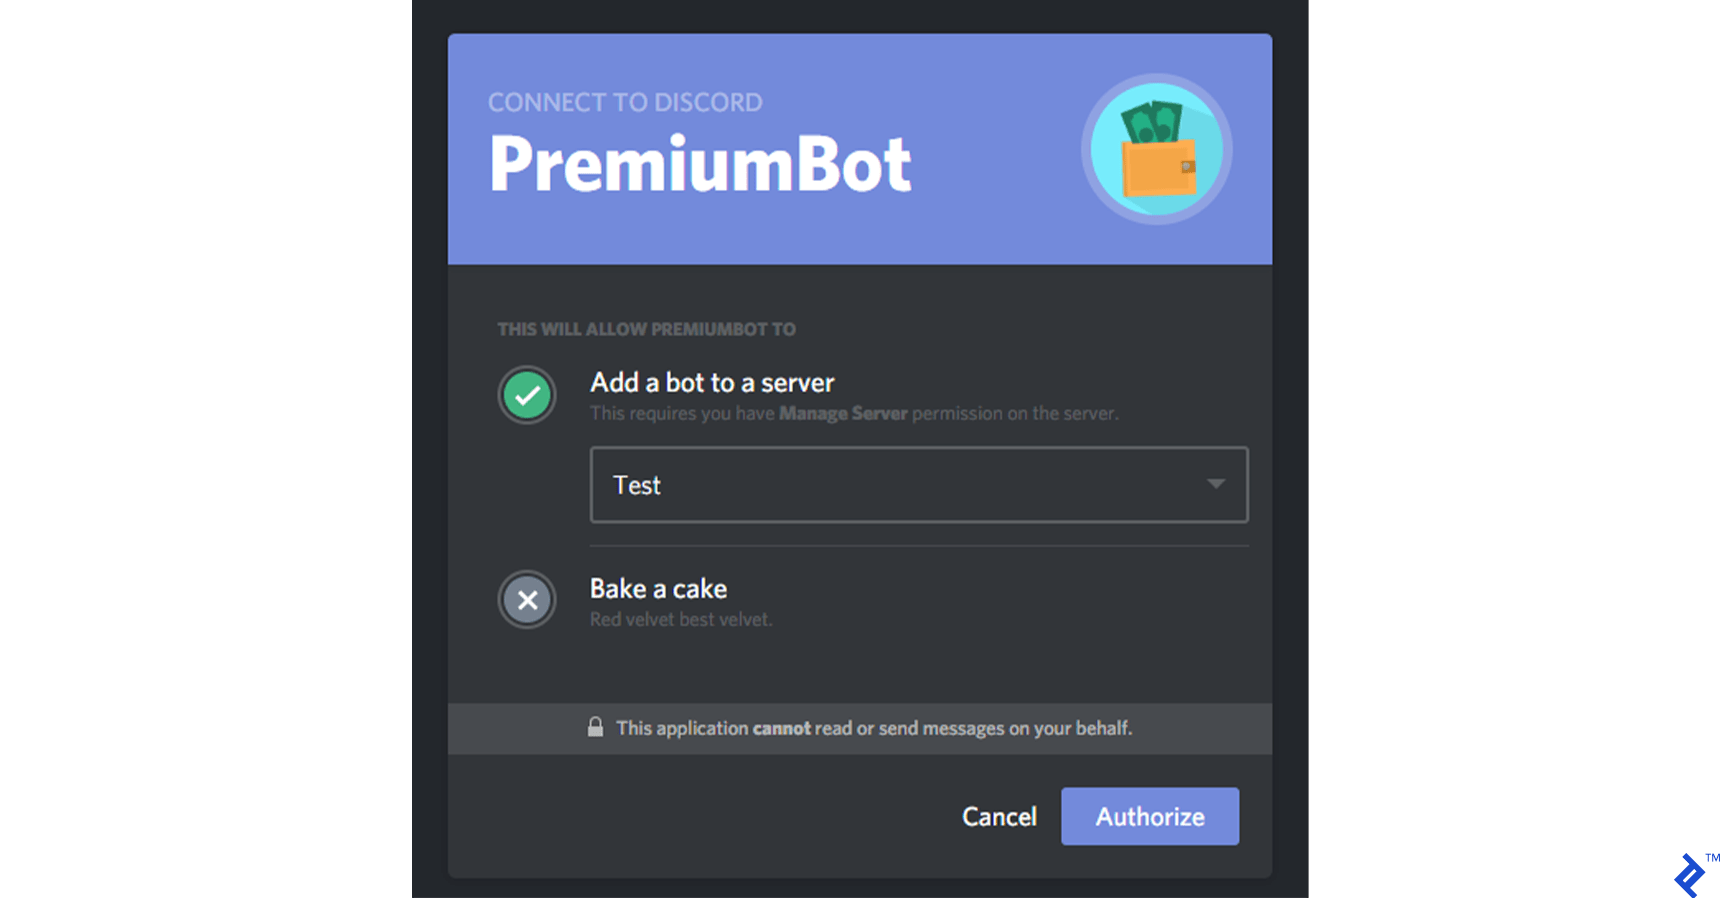
Click “Authorize” to add the bot to your test guild. You’ll see it in the user list, offline for now. We’ll address that shortly.
Creating the Project
Make sure you have Node.js installed. Create a new project and install the necessary packages:
| |
Bringing the Bot Online
Let’s begin with bringing the bot online and making it responsive. We can achieve this with a few lines of code. In a new file named bot.js, create an instance of the Eris Client, passing your bot token (obtained during bot application creation). Subscribe to events on the Client instance and instruct it to connect to Discord. For simplicity, we’ll hardcode the bot token in the bot.js file. However, it’s best practice to store sensitive information like API keys in a separate configuration file and exclude it from source control.
(GitHub code link: https://github.com/mistval/premium_bot/blob/master/src/bot_step1.js)
| |
If everything is set up correctly, running this code with your bot token will print “Connected and ready.” to the console, and your bot will appear online in your test server. You can mention2 your bot by right-clicking its name and selecting “Mention” or typing its name prefixed with “@”. The bot should respond with “Present.”

2_Mentioning is a way to get a user’s attention, even if they’re not actively present. Mentioned users receive notifications via desktop notifications, mobile push notifications, or a red badge on the Discord icon in the system tray, depending on their settings and online status. However, bots don’t receive special notifications when mentioned. They receive a regular “Message Create” event and can determine if they were mentioned by checking the event’s attached mentions._
Implementing the Payment Recording Command
Now that our bot is online, let’s create a command to inform the bot about received payments.
We’ll use a command structured like this:
| |
For instance, typing pb!addpayment @Me 10.00 would record a $10.00 payment made by the user “Me.”
The pb! prefix is a convention for bot commands, providing a namespace and preventing conflicts with commands from other bots. While most bots include a help command, imagine the chaos if multiple bots in your guild responded to the same help command! However, using pb! as a prefix isn’t foolproof, as other bots might use the same prefix. Popular bots often allow prefix customization on a per-guild basis to avoid clashes. Another option is using the bot’s own mention as a prefix, although this makes commands more verbose.
(GitHub code link: https://github.com/mistval/premium_bot/blob/master/src/bot_step2.js)
| |
Let’s test it out:

We’ve successfully made the bot respond to the pb!addpayment command and established a pattern for handling commands. Adding more commands is as simple as adding more handlers to the commandHandlerForCommandName dictionary. This forms the basis of a simple command framework. Since command handling is crucial for bots, numerous open-source command frameworks are available for use. These frameworks often provide features like cooldowns, required user permissions, command aliases, command descriptions, usage examples (for automatically generated help commands), and more. Eris even comes with a built-in command framework.
Speaking of permissions, our bot has a security flaw: anyone can execute the addpayment command. Let’s restrict it to the bot owner. We’ll refactor the commandHandlerForCommandName dictionary to store JavaScript objects as values. These objects will contain an execute property with the command handler function and a botOwnerOnly property with a boolean value. We’ll also hardcode your user ID in the constants section of the bot code to define its owner. You can find your user ID by enabling Developer Mode in Discord settings, then right-clicking your username and selecting “Copy ID.”
(GitHub code link: https://github.com/mistval/premium_bot/blob/master/src/bot_step3.js)
| |
Now, only the bot owner can execute the addpayment command.
Next, let’s configure the bot to assign the “Premium Member” role to users who donate $10 or more. Add the following code to the top of the bot.js file:
(GitHub code link: https://github.com/mistval/premium_bot/blob/master/src/bot_step4.js)
| |
Now, typing pb!addpayment @Me 10.00 should assign the “Premium Member” role to me.
However, a “Missing Permissions” error appears in the console.
| |
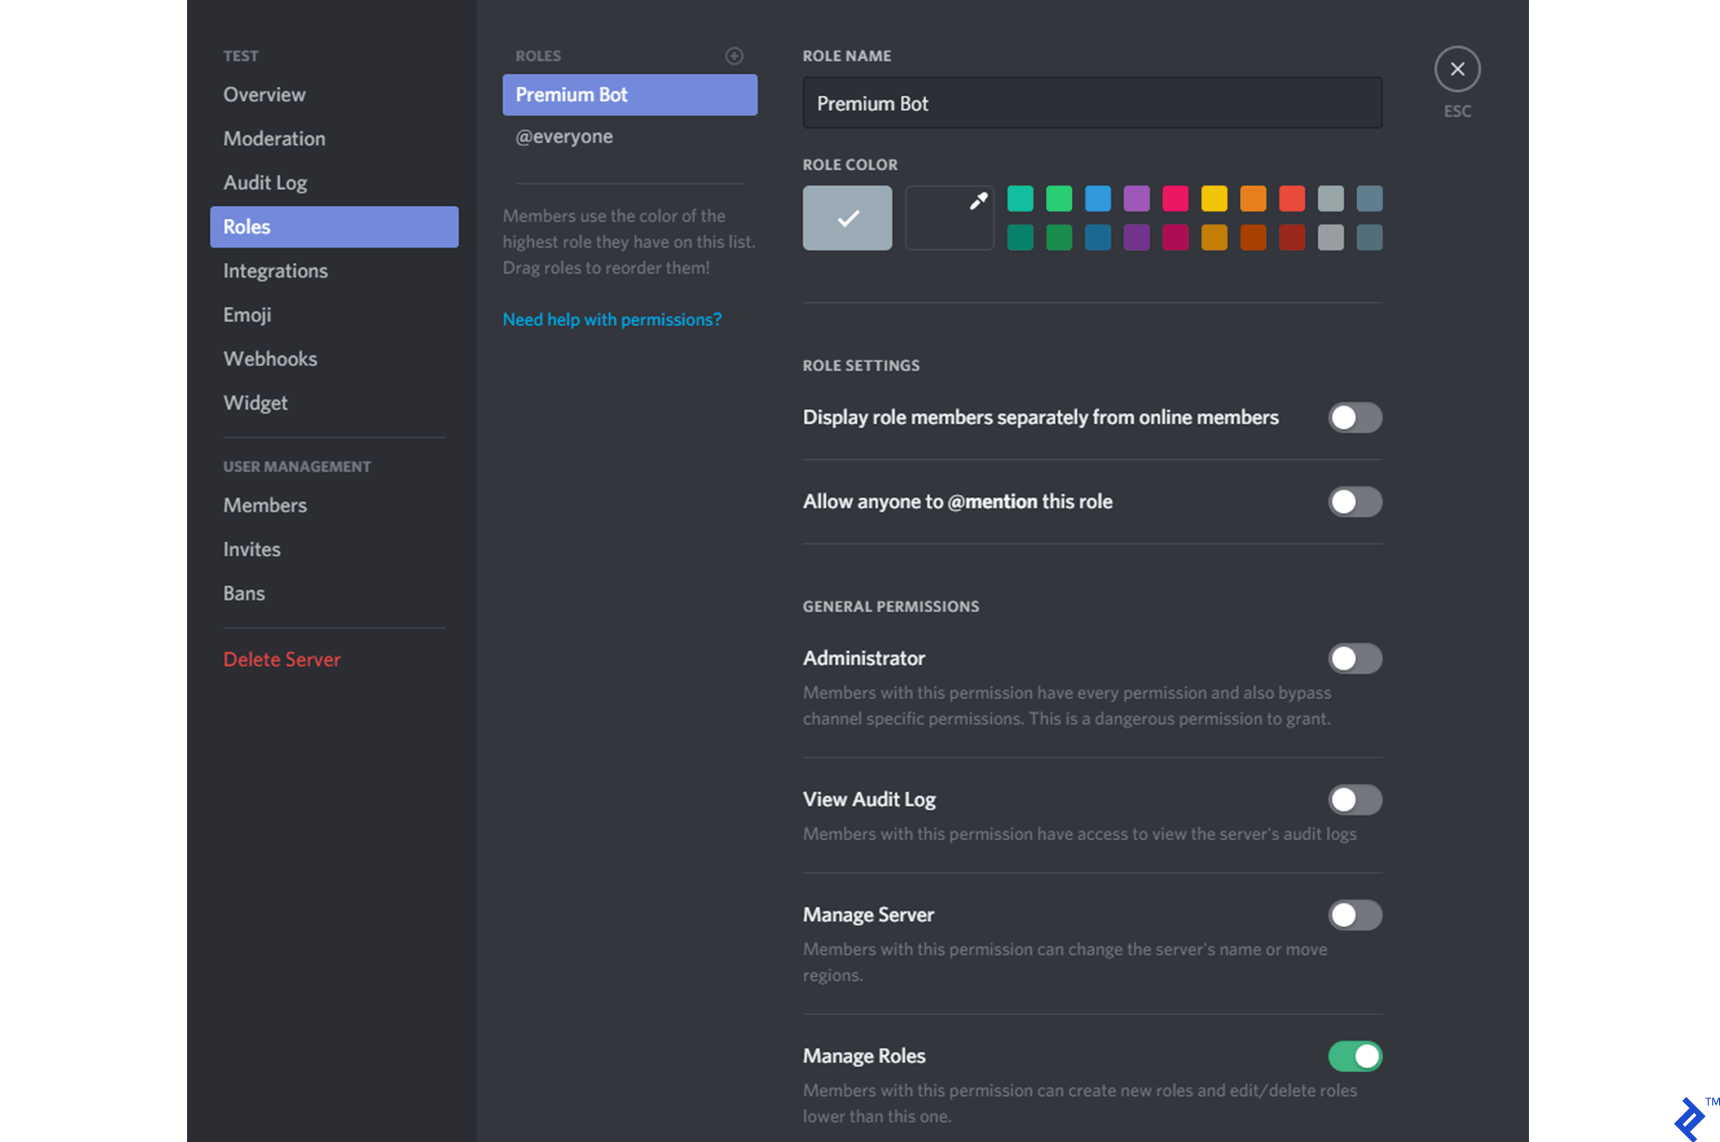
The bot lacks the “Manage Roles” permission in the test guild, preventing it from creating or assigning roles. Granting the bot administrator privileges would solve this but, as with any system, it’s best to grant only the necessary permissions.
We can give the bot the “Manage Roles” permission by creating a new role in the server settings, enabling the “Manage Roles” permission for that role, and assigning the role to the bot.
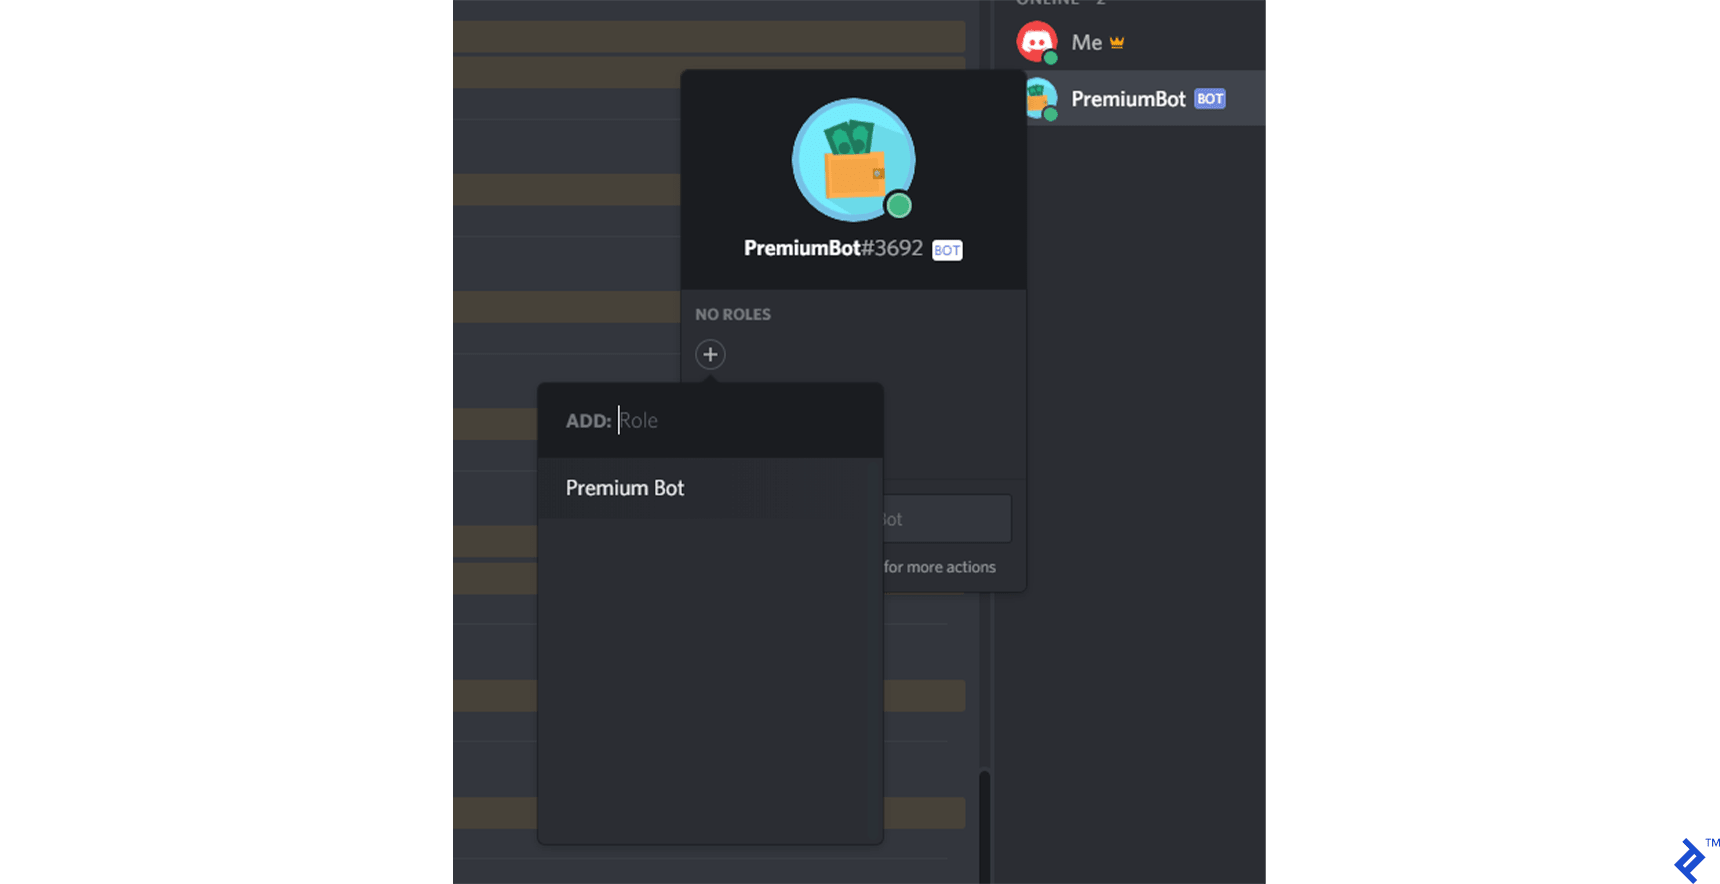
Now, executing the command again successfully creates and assigns the role, granting me a distinct name color and a higher position in the member list.

We have a TODO comment in the command handler, reminding us to handle invalid arguments. Let’s address that now:
(GitHub code link: https://github.com/mistval/premium_bot/blob/master/src/bot_step5.js)
| |
Here’s the complete code so far:
(GitHub code link: https://github.com/mistval/premium_bot/blob/master/src/bot_step5.js)
| |
This provides a solid foundation for creating a Discord bot. Now, let’s integrate our bot with Ko-fi. You can optionally create a webhook in your dashboard on Ko-fi, ensure your router forwards port 80, and send live test webhooks to yourself. However, we’ll use Postman to simulate these requests.
Ko-fi webhooks deliver payloads similar to this:
| |
Create a new file named webhook_listener.js and use Express to listen for incoming webhooks. For simplicity, we’ll handle all web server logic in this single file.
(GitHub code link: https://github.com/mistval/premium_bot/blob/master/src/webhook_listener_step6.js)
| |
Next, require this new file at the top of bot.js to start the listener when running the bot.
(GitHub code link: https://github.com/mistval/premium_bot/blob/master/src/bot_step6.js)
| |
After starting the bot, navigating to http://localhost/kofi in your browser should display “Hello.”
Now, let’s modify the WebhookListener to process data from the webhook and emit an event. Since Ko-fi sends POST requests, we’ll update our route accordingly.
(GitHub code link: https://github.com/mistval/premium_bot/blob/master/src/bot_step7.js)
| |
Next, we need to make the bot listen for this event, identify the donating user, and assign the role. We’ll attempt to find a user whose username is a substring of the message received from Ko-fi. Donors will need to include their username (with the discriminator) in their donation message.
Add the following code to the bottom of bot.js:
(GitHub code link: https://github.com/mistval/premium_bot/blob/master/src/bot_step7.js)
| |
In the onDonation function, we encounter two representations of a user: User and Member. Both represent the same individual, but the Member object includes guild-specific information like roles and nicknames. Since we’re assigning a role, we’ll use the Member representation. Each Discord user has a unique Member representation for each guild they’ve joined.
Let’s test this using Postman:
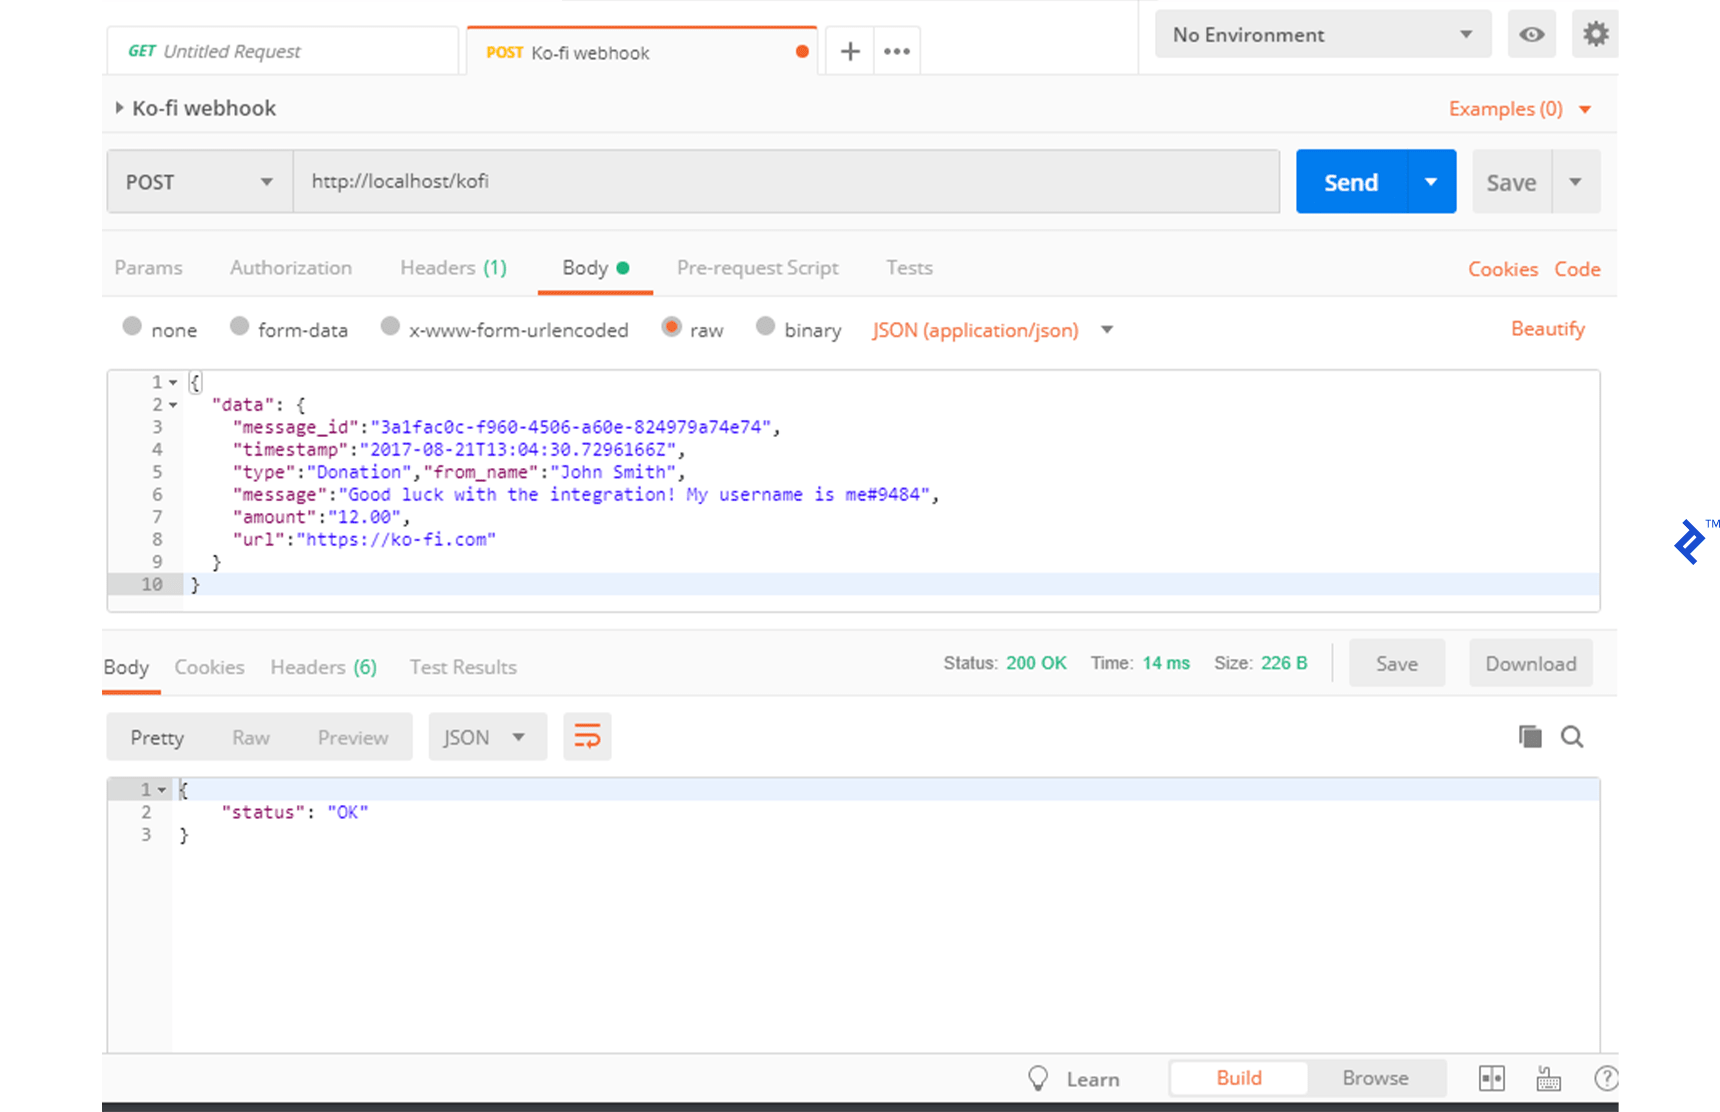
We receive a 200 status code, and the role is successfully assigned to the user in the server.
However, if the message from Ko-fi lacks a valid username, nothing happens. The donation isn’t attributed to a guild member, and no role is assigned. Let’s add logging for all donations, including those without a valid username.
First, create a dedicated log channel in Discord and note its channel ID. You can find the channel ID using Discord’s developer tools, enabled in settings. Right-click the channel and select “Copy ID.”
Add the log channel ID to the constants section of bot.js:
(GitHub code link: https://github.com/mistval/premium_bot/blob/master/src/bot_step8.js)
| |
Next, create a logDonation function:
(GitHub code link: https://github.com/mistval/premium_bot/blob/master/src/bot_step8.js)
| |
Update the onDonation function to utilize the new log function:
| |
Now, invoking the webhook, first with a valid username and then without, produces two log messages in the log channel:
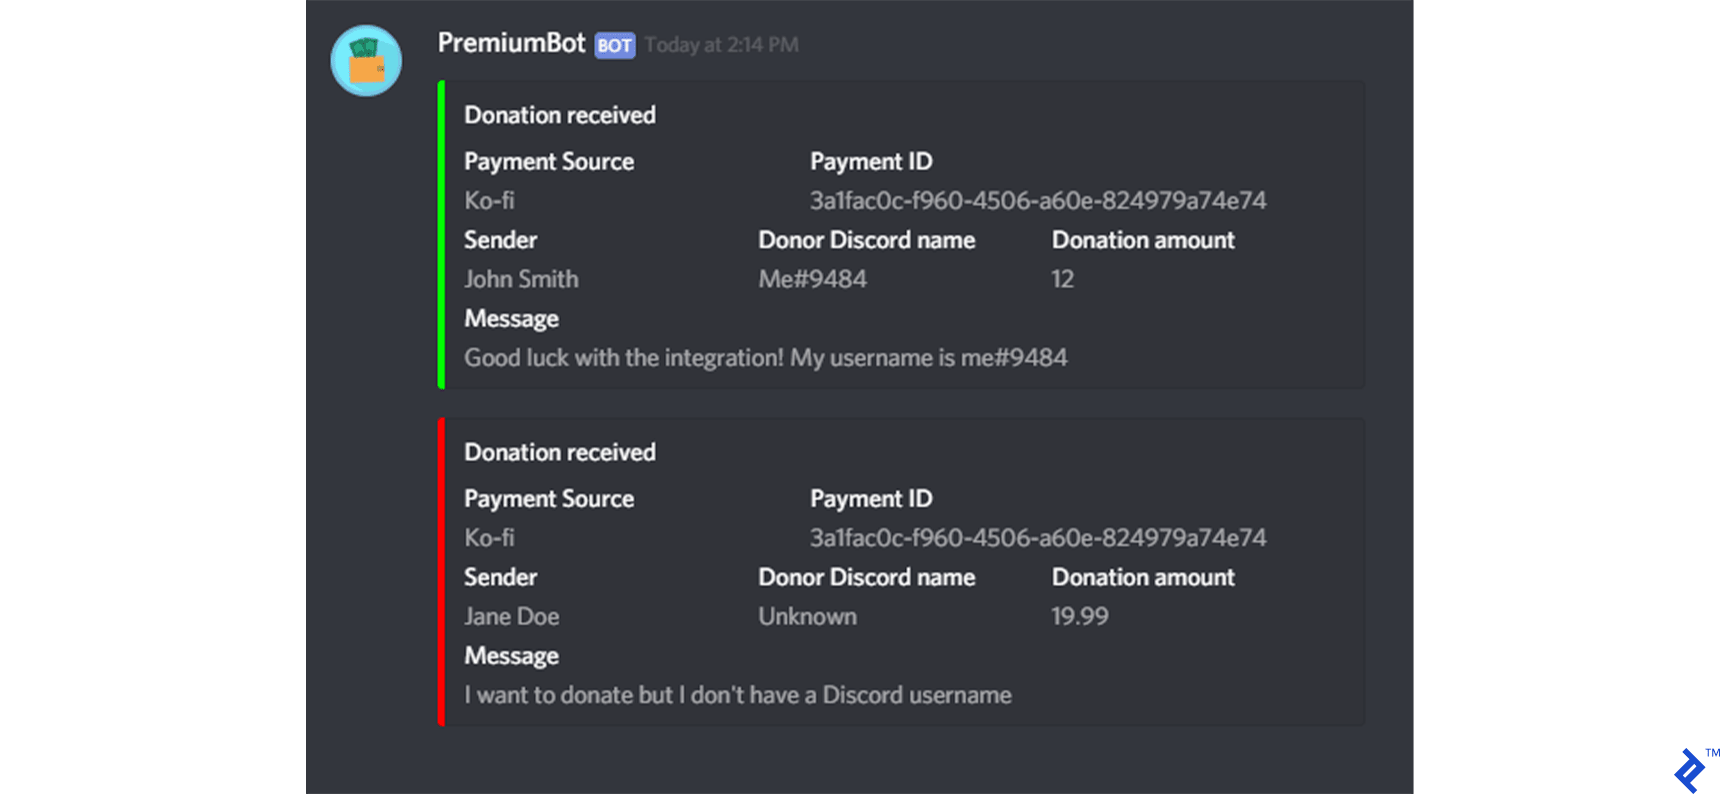
Previously, we sent strings to Discord as messages. The more complex JavaScript object sent in the logDonation function is a special message type called an rich embed. Embeds provide structure for creating visually appealing messages. Only bots can create embeds.
Our bot now receives, logs, and rewards donations. We can also manually add donations using the addpayment command in case a user forgets to include their username.
The complete code for this tutorial is available on GitHub: here.
Next Steps and Considerations
We’ve built a functional bot for tracking donations. While it covers the basics, there’s always room for improvement. Here are some potential enhancements:
- Persistent Storage: Currently, users lose their “Premium Member” role if they leave the guild. Implementing a database to store payments by user ID would allow for role restoration and personalized welcome messages upon rejoining.
- Installment Payments: The bot doesn’t handle installment payments. Storing payments in a database would enable tracking total donations and automatically granting the “Premium Member” role once a user reaches the $10 threshold.
- Duplicate Webhook Handling: Ko-fi might resend webhooks if it doesn’t receive a 200 response. Keeping track of payments in a database and ignoring duplicate webhooks based on their IDs can prevent double-counting donations.
- Webhook Security: Currently, anyone knowing your webhook address could forge requests. While Ko-fi doesn’t sign webhooks, consider implementing IP whitelisting to enhance security.
- Multi-Guild Support: The bot is designed for a single guild. Expanding its functionality to support multiple guilds would require architectural changes and potentially sharding.
Insights from a Large-Scale Discord Bot Developer
Numerous websites, including DiscordBots.org and Discord.Bots.gg, list and showcase Discord bots. While most are passion projects, some gain immense popularity, demanding significant effort for maintenance.
Rythm, a music bot that connects to voice channels and plays user-requested music, currently holds the title of the most popular Discord bot by guild count. It boasts a presence in over 2.85 million guilds, reaching approximately 90 million users. At its peak, Rythm simultaneously played audio for around 100,000 users across 20,000 guilds. ImBursting, Rythm’s creator and lead developer, shared insights into the challenges and rewards of building and maintaining a large-scale Discord bot.
Interviewer: Tell us about Rythm’s architecture and hosting.
ImBursting: Rythm is distributed across nine physical servers, each equipped with 32 cores, 96GB of RAM, and a 10Gbps connection. We colocate these servers at a data center with support from GalaxyGate, a hosting provider.
Did you anticipate Rythm’s growth when you started? How has it evolved technically?
Rythm’s initial version, written in Python, faced performance bottlenecks as it reached 10,000 servers. Recognizing this limitation, I rewrote the bot in Java for its optimized audio libraries and scalability. This rewrite brought a tenfold performance improvement. However, further scaling became necessary as we hit 300,000 servers. We implemented optimizations like garbage collector tuning and split voice connections into microservices using Lavalink. The final infrastructure overhaul involved dividing the bot into nine clusters running on separate physical servers, along with custom gateway and stats microservices for seamless operation.
Rythm has a canary version and benefits from contributions from other developers. What’s your update process like?
Rythm Canary serves as our alpha testing ground for new features and performance improvements before deploying them to Rythm 2 for wider testing and finally to the production version. Discord’s rate limits pose a significant challenge, resulting in long reboot times. We strive to ensure updates are thoroughly prepared before deployment.
We receive invaluable help from volunteer developers and community members. Ensuring a smooth experience for everyone involves answering questions, providing support, and constantly exploring new opportunities.
Discord Bot Development: A Rewarding Journey
Discord has transitioned from a newcomer to a dominant force in real-time communication. While most bot development remains a hobbyist pursuit, the platform’s growing user base presents increasing commercial opportunities, as evidenced by companies like Patreon.
Building chatbots is enjoyable, except when their responses to complex queries lack depth. For a great user experience, refer to “The Chat Crash - When a Chatbot Fails” by the Toptal Design Blog, which outlines five design pitfalls to avoid.