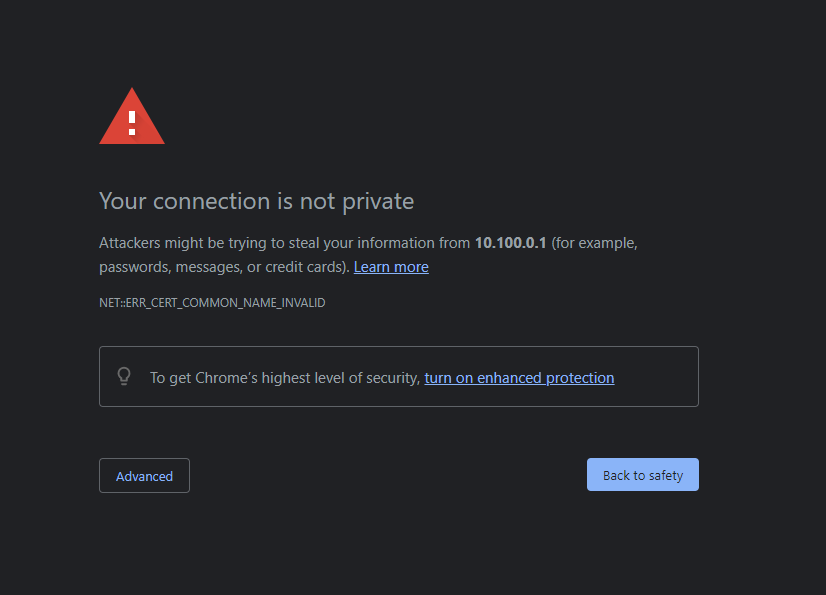
If you own a Unifi device, such as a Dream Machine, Dream Machine Pro, UNVR, CloudKey, or a similar model, you’ve likely encountered the infamous red triangle accompanied by the frustrating message “Your connection is not private.”
As of now, there isn’t an official or integrated method for generating a security certificate for your device. However, some intriguing GitHub projects suggest potential solutions if you’re willing to experiment. While my approach might not be as elegant as directly generating certificates using LetsEncrypt on the server-side like the linked GitHub project, it offers a reliable solution.
My solution involves using an NGINX reverse proxy. This setup forwards traffic from a subdomain linked to my primary domain (e.g., unifi.whitematter.tech, protect.whitematter.tech) to my Dream Machine Pro or UNVR, depending on my needs. For guidance on creating a reverse proxy with Docker, you can refer to my previous post here.
After configuring your reverse proxy and adding a subdomain to your DNS records (e.g., unifi.whitematter.tech) to point to your public IP address, you’re ready for the next step.
This configuration assumes you’ve directed your subdomain (e.g., unifi.whitematter.tech) to your public IP. If your public IP address isn’t static, consider using a free dynamic DNS service like DuckDNS. This service automatically updates your DNS records to reflect your IP address if your ISP changes it. My private domain is linked to a DuckDNS hostname for this reason.
Disclosure: As an Amazon Associate, I earn from qualifying purchases. Your support through these links helps maintain this blog, and the product pricing remains the same for you regardless.
Setting Up the Reverse Proxy for Unifi Devices
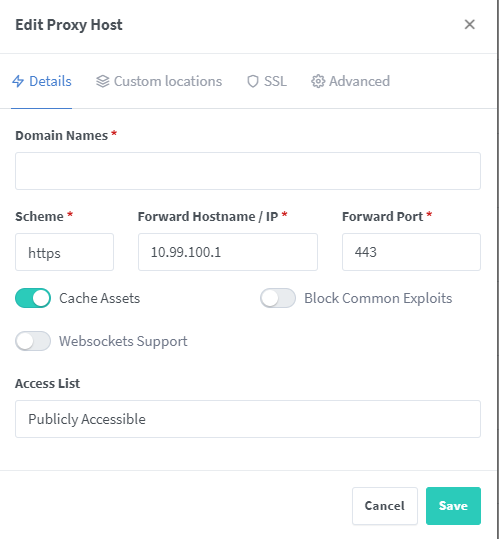
Configuring the reverse proxy is fairly straightforward. The image below demonstrates the correct setup. In the “Domain Names” field, enter your domain (e.g., unifi.whitematter.tech). Choose “https” for the “Scheme” and specify your Unifi Dream Machine’s local IP or other Unifi device’s IP address (e.g., 192.168.1.1, 10.0.0.1) in the “Forward Hostname / IP” field. Set the “Forward Port” to 443. I generally enable “Cache Assets.” Given that Unifi devices are secured with a Unifi account, I leave the “Access List” as public. While you can add username/password protection, I suggest using a strong Unifi password for enhanced security.
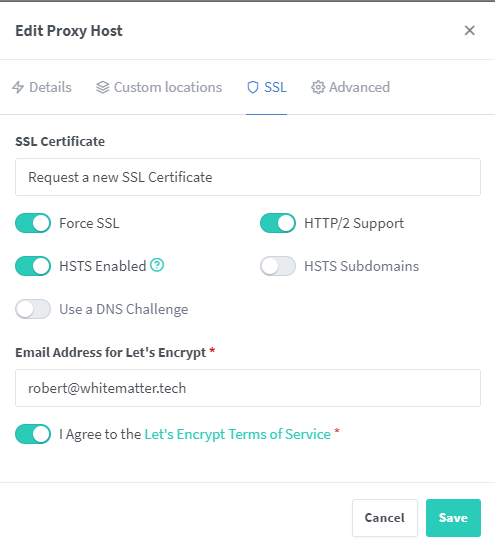
Next, navigate to “SSL” in the top menu, as illustrated in the subsequent image. Select “Request a new SSL Certificate” and enable the options for “Force SSL,” “HTTP/2 Support,” and “HSTS Enabled.” Input your email address, which will be used for Let’s Encrypt certificate generation, and after reviewing, agree to the Let’s Encrypt terms. Save your settings by clicking “Save,” and you’re all set!
Conclusion
If you’ve followed these instructions carefully and your DNS records are accurate, you should be able to access your Unifi device using the Let’s Encrypt-generated certificate by going to unifi.yourdomain.com. The bothersome error message should no longer appear when connecting. Additionally, when you examine the certificate details linked to your Unifi domain, you’ll be redirected to https://letsencrypt.org/documents/isrg-cps-v4.1/.
I appreciate this solution because it simplifies access by requiring only your subdomain instead of an IP address. It also allows you to connect to your device without relying on Unifi’s cloud-based connection when you’re outside your local network.
Remember that whenever you make services publicly accessible, it’s crucial to prioritize security with strong passwords. Password managers, such as 1Password, and hardware security keys like Yubikey, can significantly enhance your security practices.