A crucial step in enhancing your website’s search engine visibility is connecting it to Google Search Console (GSC). This guide provides a simple, step-by-step approach to link your site with Google.
Our plugin allows you to integrate Google Search Console with Yoast SEO. This verification process for your Google Search Console account helps you identify and address crawl errors, which can be overwhelming, especially for large websites. This article will delve deeper into understanding and resolving these errors using the Yoast SEO WordPress plugin.
Google utilizes automated programs called Google bots to explore and index your web pages. Crawling can be understood as the process where Googlebot systematically examines your pages by following links, sitemaps, and other navigational elements. This process aims to discover every important page on your site. On the other hand, Indexing is how Googlebot absorbs the content on your pages to include it in its search results.
Connecting Your Website to GSC: A Step-by-Step Guide
Note: This guide focuses on verifying your site using Google Analytics or HTML tags. Other verification methods are not covered in this post.
If you’d rather not directly modify your website template for Search Console setup, it’s best to consult a professional. We offer free consultations with our SEO experts who can guide you through GSC issues and more – just schedule one!
You can access Google Search Console here.
Site verification with Google requires one of the following:
- Administrative privileges for your website’s Google Analytics (GA) account. GA needs to be pre-configured for this method.
- Editing rights to your website’s header, usually located in Appearance > Editor – Theme Header or header.php in WordPress.
- You might need to temporarily activate a different theme to view header options.
- Select “Add property.”
- Choose the relevant box and paste your website’s URL, copied from your homepage.
URL prefix options should start with HTTP or HTTPS. Domain options don’t need HTTP or HTTPS, and NONE should have anything after .com/, .org/, .net/, or similar extensions.
- Correct: https://www.nexus-security.github.io/
- Incorrect: https://www.nexus-security.github.io/blog
After selecting the appropriate option, click “Next.”
Subsequent Steps to Connect WordPress to GSC
You should receive a success notification. Congratulations! If you encounter any issues, double-check the prerequisites. If the error persists, try the alternative HTML markup validation method outlined below.
HTML markup: Choose the “HTML markup” option. Copy the complete code snippet into the designated white box. Access your website’s header (refer to step one for instructions). For HubSpot or Squarespace websites, directly paste the code within the header area.
For WordPress, insert the code between the tags, ideally just below the first tag. This step is crucial and necessitates saving your changes; otherwise, verification will fail. Return to the Search Console window and click “Confirm.” A confirmation message indicating success should appear for most website owners.
Selecting Your Verification Method
You’ll be presented with several review options. Choosing between alternatives like Google Analytics or HTML markup is often simpler.
Google Analytics: For website verification through Google Analytics, ensure:
- The Google Analytics code is already present in your website’s header.
- You have administrator access to your Analytics account.
If both conditions are met, click “Confirm” to establish the WordPress-GSC connection.
Establishing the Google Search Console WordPress Connection

There are two types of crawl errors:
- Site errors impact your entire site, like web server connection problems or issues fetching the robots.txt file.
- URL errors affect specific web pages. These occur when Googlebot encounters issues crawling a particular URL despite successfully resolving the DNS, connecting to the server, fetching the robots.txt file, and requesting the URL.
Identifying Crawl Errors in Yoast SEO
Our Yoast SEO plugin, both free and paid versions, provides insights into crawl errors encountered by Google on your website. Simply connect Google Search Console to Yoast SEO. Our plugin streamlines this process, and here’s a breakdown of the steps.
Linking Google Search Console with Yoast SEO
Navigate to SEO › Search Console within WordPress to connect Google Search Console to the Yoast SEO plugin.
Click the “Get Google Authorization Code” button:
You’ll be redirected to Google Search Console, where you’ll need to confirm the connection between Google Search Console and Yoast SEO, granting our plugin access to view and manage your site data. Click “Allow”:
You’ll receive a key to paste into the plugin, connecting WordPress to GSC:
After copying and pasting the code into the provided box within the plugin, click “Authenticate.”
Select the desired profile for connection and save your selection. You’re all set! Now, focus on the first tab within the same section (Desktop) to examine and address specific crawl errors.
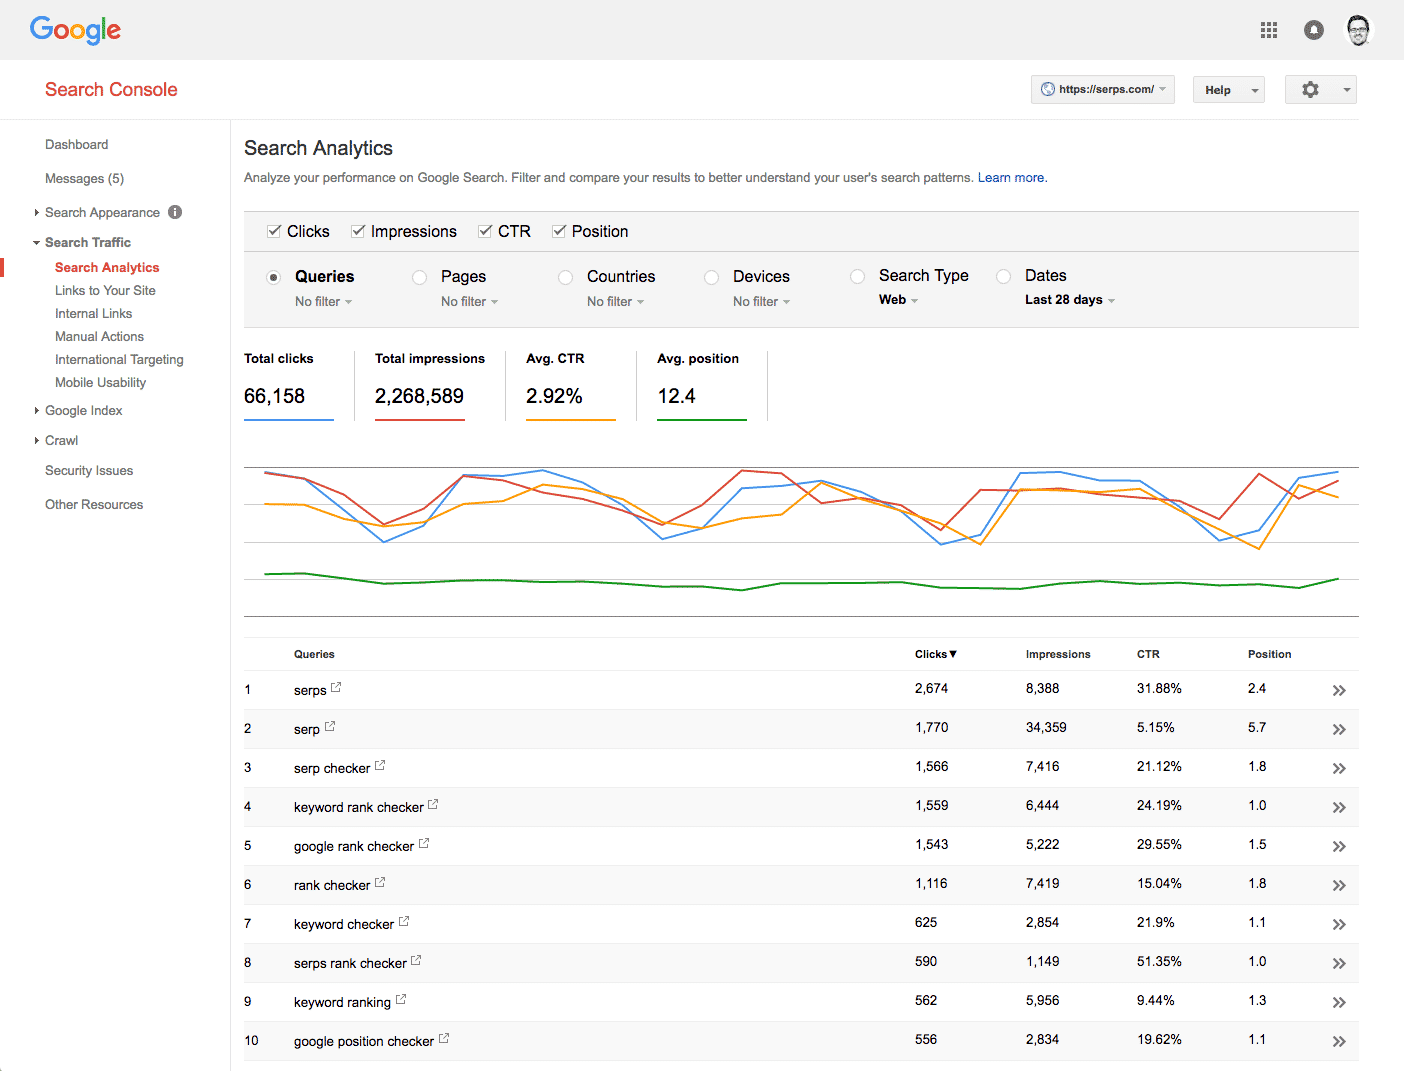
This section presents the data gathered from your Google Search Console. The table displays the error-generating URL, the initial Google crawled it last of detection by Google, and the corresponding response code. For instance, the screenshot shows all response codes as 404 Not Found.
Connecting Google Search Console to Yoast SEO provides a comprehensive overview of crawl errors identified by Google on your site. You can then create redirects for these 404 errors or implement 410 status codes for irrelevant pages. For more information on status codes, refer to this article. Once an error is addressed, hover over the URL in Yoast SEO and select “Mark as fixed.”
Simplifying Redirect Creation
Yes! Yoast SEO Premium offers a streamlined approach. Beyond its numerous features, the plugin simplifies the process of create your redirect directly within the plugin:
Click “Create redirect.” Unlike the free plugin, which only indicates this feature’s availability in the premium version, you’ll see this screen:
You can create redirects or apply different status codes (301, 302, 307, 410, and 451). For 301 redirects, as shown in the example, enter the desired destination URL for the “old” URL. Check the “Mark as fixed” box to update Google Search Console about the fix, and then click “Create redirect.” It’s that easy. We’ll explore the redirects manager in tomorrow’s article.
Connect Google Search Console to WordPress Now!
Hopefully, this highlights the importance of integrating Google Search Console with Yoast SEO. Monitor crawl errors efficiently with our free plugin, and for a minimal annual fee, our premium plugin can even help you resolve them!
If you’ve already benefited from this feature in our premium plugin, we encourage you to share your experiences and feedback in the comments!