
Let’s explore the concept of a cloud server.
A cloud server is essentially a virtualized computer server. This virtualization allows users to access its resources from anywhere with a network connection. These servers are designed to function similarly to traditional physical or virtual servers located in a data center. They support the same operating systems, applications, and offer comparable performance levels. Cloud servers are often referred to as virtual servers, virtual private servers (VPS), or virtual platforms.
Numerous cloud server providers offer various cloud computing services, including IaaS (Infrastructure as a Service), PaaS (Platform as a Service), and SaaS (Software as a Service). Some of the most popular providers include:
- Amazon Web Services (AWS)
- Microsoft Azure
- Google Cloud Platform
- IBM Cloud
- Oracle Cloud
- Alibaba Cloud
- Rackspace
- DigitalOcean
- Vultr
- Linode
- Upcloud
These companies offer a range of services, including virtual machines, storage solutions, networking, analytics, machine learning, and more. They also have different pricing models like pay-as-you-go, on-demand, and reserved pricing. Carefully compare these options to find the best fit for your needs and budget.
Once you’ve chosen a provider, you can register with a credit card, access your dashboard, and create your virtual machine. Some platforms let you set a custom root password, while others assign a random password you can change later.
For this example, a demonstration server was created with the following specs: 2 CPUs, 2 GB RAM, and 50 GB storage.
After setting up your cloud server, take these steps to prepare your new Linux system:
- Update your system software for security and functionality.
- Set the appropriate time zone for your location.
- Configure a custom hostname for easy identification.
- Add a user account with limited privileges for security.
- Strengthen SSH access to prevent unauthorized logins.
- Set up a firewall to control network traffic and enhance security.
These steps ensure your server is current, secure, and ready for use.
You can connect to your server using SSH from your local machine using the server’s IP address. For example, using a Debian desktop terminal:

The first step is to perform system updates:
Regular system updates are crucial for any operating system. These updates include critical security patches and minor bug fixes, addressing vulnerabilities before they become widely exploited. Updating also ensures you have the latest software versions.
For Debian and Ubuntu, use the following command:
apt update && apt upgrade
Next, set the time zone:
Newly created servers usually default to UTC time. It’s recommended to set the time zone to your location for accurate log file timestamps.
Both Ubuntu and Debian utilize the user-friendly ’tzdata’ tool:
Open the tzdata tool using:
dpkg-reconfigure tzdata


Choose your continent and region using the arrow keys and confirm with Enter.
Verify the time:
The date command displays the current date and time according to your server settings.
Next, configure a custom hostname:
A hostname makes it easier to identify your cloud server with a memorable name.
View the current hostname using:
hostnamectl
Change the current hostname to your preferred name:
hostnamectl set-hostname koha.shcollege.ac.in

Update the system’s hosts file:
The hosts file maps IP addresses to hostnames or domains, taking precedence over DNS for name resolution.
Edit the hosts file using a text editor:
nano /etc/hosts
Add a line containing your server’s public IP address:

Now, create a limited user account:
Logging in as the root user grants full access, potentially leading to accidental damage. Create a user with restricted permissions for everyday use. Use ‘sudo’ to temporarily elevate privileges for administrative tasks.
Note
While Debian and Ubuntu come with ‘sudo’ pre-installed, other distributions might require you to install it.
apt install sudo
For Ubuntu and Debian:
Create a user, replacing ‘mahesh’ with your desired username, and set a password:
adduser mahesh
Grant administrative privileges by adding the user to the ‘sudo’ group:
adduser mahesh sudo
To log in as the new user:
Disconnect from your cloud server:
exit
Log back in using your new username and server IP:
Now, you can manage your server from this account using ‘sudo’ for administrative commands.
Next, let’s enhance SSH access security:
By default, SSH uses password authentication. For improved security, use cryptographic key-pairs where a private key replaces the password, making brute-force attacks much harder. Let’s generate a key-pair and configure SSH to disable password logins.
This process takes place on your local computer, not the cloud server. We’ll create a 4096-bit RSA key-pair. You can add a passphrase for extra security, requiring it to use the private key.
On Linux:
Caution
If you have an existing RSA key-pair, this command overwrites it, potentially locking you out of other systems. If you have one, skip this step. To check, run ’ls ~/.ssh/id_rsa*’.
ssh-keygen
Press Enter to accept the default names ‘id_rsa’ and ‘id_rsa.pub’ before setting your passphrase. On Linux, these files are saved in the ‘/home/your_username/.ssh’ directory.

To verify:
ls -l ~/.ssh
Upload your public key to your cloud server, replacing ’example_user’ and the IP address accordingly:
On Linux:
From your local computer:
ssh-copy-id -i ~/.ssh/id_rsa.pub mahesh@172.16.26.165
These commands add security by restricting access to the public key directory and the file itself.
Log out and back into your server. Enter your passphrase if you set one.
Caution
Always keep a backup copy of both your private and public SSH keys.
SSH Daemon Options:
On your server, open the SSH configuration file with a text editor:
sudo vim /etc/ssh/sshd_config
Find and modify these settings:
Disallow root logins over SSH: Force all SSH connections to be established by non-root users. Administrative tasks can be done after logging in as a limited user, either by using ‘sudo’ or switching to a root shell with ‘su’.

Disable SSH password authentication: Require all SSH connections to use key authentication. You may need to add the line ‘PasswordAuthentication’ or uncomment it by removing the ‘#’ symbol.
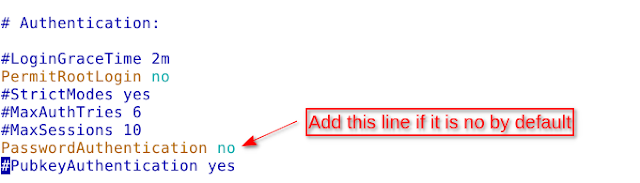
Note
Leaving password authentication enabled might be necessary if connecting from multiple computers to avoid generating and uploading a key-pair for every device.
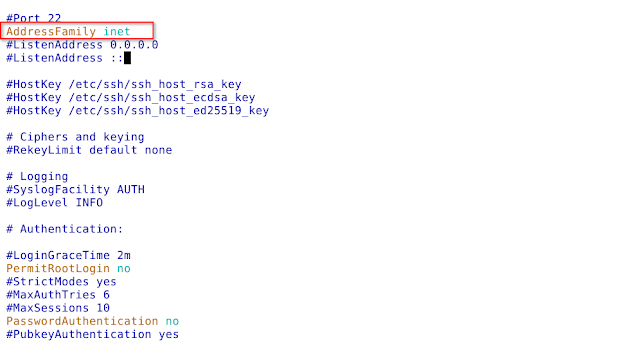
Listen to only one internet protocol: The SSH daemon, by default, listens for connections over both IPv4 and IPv6. If you only need one, disable the other to enhance security. This change only affects the SSH daemon, not the entire system. Depending on the distribution, you might need to add or uncomment the ‘AddressFamily’ line.
Use the following options:
AddressFamily inet: Listen only on IPv4.
AddressFamily inet6: Listen only on IPv6.


Restart the SSH service to apply the changes:
sudo systemctl restart sshd
Setting up a Firewall with UFW:
Both Debian and Ubuntu include UFW (Uncomplicated Firewall), a user-friendly tool for managing ‘iptables’ firewall rules, simplifying firewall configuration.
Install UFW:
sudo apt install ufw
Check UFW Status:
After installation, check UFW’s status using:
sudo ufw status verbose
or
sudo systemctl status ufw
Allow SSH Connections:
Before enabling UFW, create a rule to allow incoming SSH connections. Otherwise, you’ll lose access to your server, especially if connecting remotely.
Allow incoming SSH connections with:
sudo ufw allow ssh
or
sudo ufw allow 22/tcp
Enable UFW:
Once configured for SSH, enable UFW:
sudo ufw enable
sudo systemctl start ufw
(Ignore the warning about potential SSH disruption; type ‘y’ and press Enter).
Allowing Connections on Other Ports:
Allow incoming connections on other ports based on the applications running on your server.
Some common examples:
Open port 80 (HTTP):
sudo ufw allow http
or
sudo ufw allow 80/tcp
Open port 443 (HTTPS):
sudo ufw allow https
or
sudo ufw allow 443/tcp
Open port 8080:
sudo ufw allow 8080/tcp
Open port 8002:
sudo ufw allow 8002/tcp
Deleting UFW Rules:
You can delete rules by rule number or by specifying the rule itself.
Deleting by rule number:
List rules with numbers:
sudo ufw status numbered

Delete rule number 3 (port 8080):
sudo ufw delete 3
Deleting by rule:
To delete the rule for port 8080:
sudo ufw delete allow 8080

Disabling and Enabling UFW:
To stop UFW and deactivate all rules:
sudo ufw disable
To re-enable UFW and activate all rules:
sudo ufw enable
Resetting UFW:
Resetting UFW disables it and deletes all active rules, allowing you to start fresh:
sudo ufw reset
Using Fail2Ban for SSH Login Protection:
Fail2Ban enhances security by blocking IP addresses that make too many failed login attempts, preventing brute-force attacks.
Update your system:
sudo apt update && sudo apt upgrade -y
Install Fail2ban:
sudo apt install fail2ban
(The service starts automatically.)
(Optional) For email notifications, install Sendmail:
sudo apt install sendmail-bin sendmail
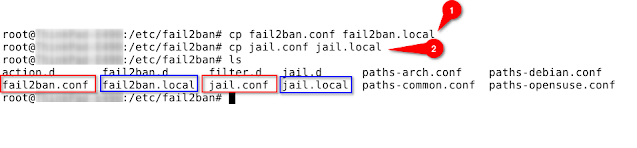
Navigate to the Fail2ban directory:
cd /etc/fail2ban
Copy the configuration files (to avoid overwriting during updates):
sudo cp fail2ban.conf fail2ban.local
sudo cp jail.conf jail.local
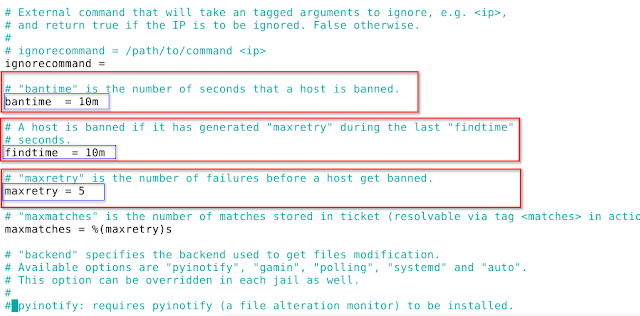
Configure Fail2ban Settings:
Open ‘jail.local’ with a text editor and adjust the settings, including ban times:
sudo vim jail.local
Restart Fail2ban:
sudo systemctl restart fail2ban
Check Fail2ban Status:
sudo fail2ban-client status


Create a Swap file:
Refer to the following resource for creating a swap file:
https://www.digitalocean.com/community/tutorials/how-to-add-swap-space-on-ubuntu-20-04
References:
https://linuxize.com/post/how-to-setup-a-firewall-with-ufw-on-ubuntu-18-04/
https://www.linode.com/docs/guides/using-fail2ban-to-secure-your-server-a-tutorial/