I’ve been contemplating a blog post ever since the initial release of Angular significantly impacted Microsoft’s presence in client-side development. Technologies like ASP.NET, Web Forms, and MVC Razor have become less prevalent, supplanted by a JavaScript framework not directly from Microsoft. However, since Angular’s second version, Microsoft and Google collaborated to create Angular 2, merging my two preferred technologies and enabling Angular’s use with .NET Core.
This blog aims to guide you in crafting an optimal architecture by combining ASP.NET Core and Angular. Ready? Let’s begin!
Exploring the Angular 5/ASP.NET Core Architecture
We will construct an Angular 5 client that interacts with a RESTful Web API Core 2 service.
Client-Side Technologies:
- Angular 5
- Angular CLI
- Angular Material
Server-Side Technologies:
- .NET C# Web API Core 2
- Dependency Injection
- JWT Authentication
- Entity Framework Code First
- SQL Server
Important Note
| In this blog post we are assuming the reader already has basic knowledge of TypeScript, Angular modules, components, and importing/exporting. The goal of this post is to create a good architecture that will allow for the code to grow over time. |
Prerequisites for Your .NET/Angular Project
Let’s begin by selecting an IDE. This is my personal preference, and you are welcome to use whichever you find most comfortable. I will be using Visual Studio Code and Visual Studio 2017.
Why two IDEs? Microsoft designed Visual Studio Code with front-end development in mind, and I find it indispensable for that purpose. Additionally, we’ll explore integrating Angular 5 within the solution, which can be beneficial if you prefer debugging both the back end and front end with a single F5.
For the back end, you can install the latest Visual Studio 2017 version. It offers a comprehensive free edition for developers: Community.
Here’s a list of the software we need to install for this tutorial:
Important Note
Verify that you are running at least Node 6.9.x and npm 3.x.x by running node -v and npm -v in a terminal or console window. Older versions produce errors, but newer versions are fine. |
Front-End Development
Getting Started
Let’s dive in! Our first task is to install Angular CLI globally. Open your node.js command prompt and execute the following command:
1
| npm install -g @angular/cli
|
Now we have our module bundler. Typically, the module is installed in your user folder. An alias shouldn’t be necessary by default, but if you require one, you can run the following line:
1
| alias ng="<UserFolder>/.npm/lib/node_modules/angular-cli/bin/ng"
|
Next, we’ll create a new project named angular5-app. Navigate to the desired directory for your project and run:
Initial Build
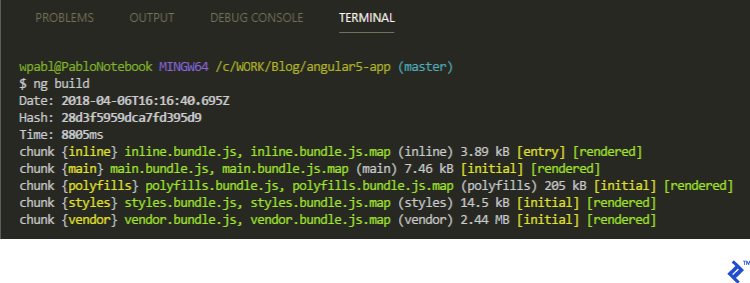
While you can test your website by running ng serve --open, I advise testing it through your preferred web service. Why? Certain issues might only surface in a production environment, and building with ng build closely simulates this. Let’s open the angular5-app folder in Visual Studio Code and execute ng build in the terminal:
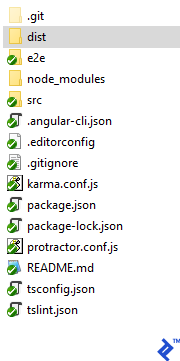
A new folder named dist will be generated, ready to be served using IIS or your chosen web server. Enter the URL in your browser, and voila!
Important Note
| It is not the purpose of this tutorial to show how to set up a web server, so I assume you already have that knowledge. |
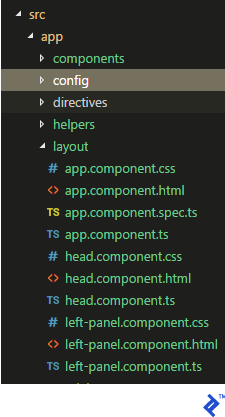
Understanding the src Folder
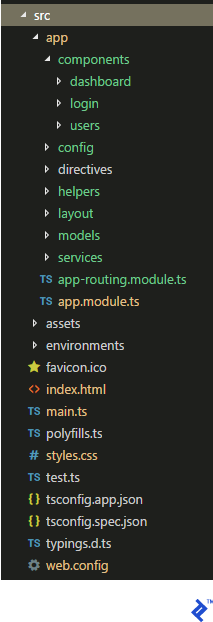
Here’s how my src folder is structured: Inside the app folder, we have components, where each Angular component’s files (css, ts, spec, and html) are organized. The config folder stores site configurations, directives houses custom directives, helpers contains common code like the authentication manager, layout holds main components (body, head, side panels), models aligns with back-end view models, and services handles calls to the back end.
Outside the app folder, we retain default folders like assets and environments along with root files.
Setting Up the Configuration File
Within the config folder, create a config.ts file containing a class named AppConfig. This is where we’ll define values used throughout our code, such as the API URL. Notice that the class implements a get property, accepting a key/value pair and a method for retrieving the value. This allows easy value access using this.config.setting['PathAPI'] in classes that inherit from it.
 1
 2
 3
 4
 5
 6
 7
 8
 9
10
11
12
13
14
15
16
| import { Injectable } from '@angular/core';
@Injectable()
export class AppConfig {
private _config: { [key: string]: string };
constructor() {
this._config = {
PathAPI: 'http://localhost:50498/api/'
};
}
get setting():{ [key: string]: string } {
return this._config;
}
get(key: any) {
return this._config[key];
}
};
|
Integrating Angular Material
Before designing the layout, let’s set up the UI component framework. While options like Bootstrap are available, I recommend Angular Material for its Material Design aesthetics and Google support.
Installation requires running three commands in the Visual Studio Code terminal:
1
2
3
| npm install --save @angular/material @angular/cdk
npm install --save @angular/animations
npm install --save hammerjs
|
The second command includes Angular Animations, a dependency for some Material components. I suggest reading the official page to learn about supported browsers and polyfills.
The third command incorporates HammerJS, which provides gesture support for certain Material components.
Now, import the desired component modules into app.module.ts:
 1
 2
 3
 4
 5
 6
 7
 8
 9
10
11
12
13
14
15
16
17
| import {MatButtonModule, MatCheckboxModule} from '@angular/material';
import {MatInputModule} from '@angular/material/input';
import {MatFormFieldModule} from '@angular/material/form-field';
import {MatSidenavModule} from '@angular/material/sidenav';
// ...
@NgModule({
imports: [
BrowserModule,
BrowserAnimationsModule,
MatButtonModule,
MatCheckboxModule,
MatInputModule,
MatFormFieldModule,
MatSidenavModule,
AppRoutingModule,
HttpClientModule
],
|
Next, modify style.css to apply your chosen theme:
1
| @import "~@angular/material/prebuilt-themes/deeppurple-amber.css";
|
Import HammerJS by adding this line to main.ts:
Finally, include Material icons in the head section of index.html:
1
| <link href="https://fonts.googleapis.com/icon?family=Material+Icons" rel="stylesheet">
|
Building the Layout
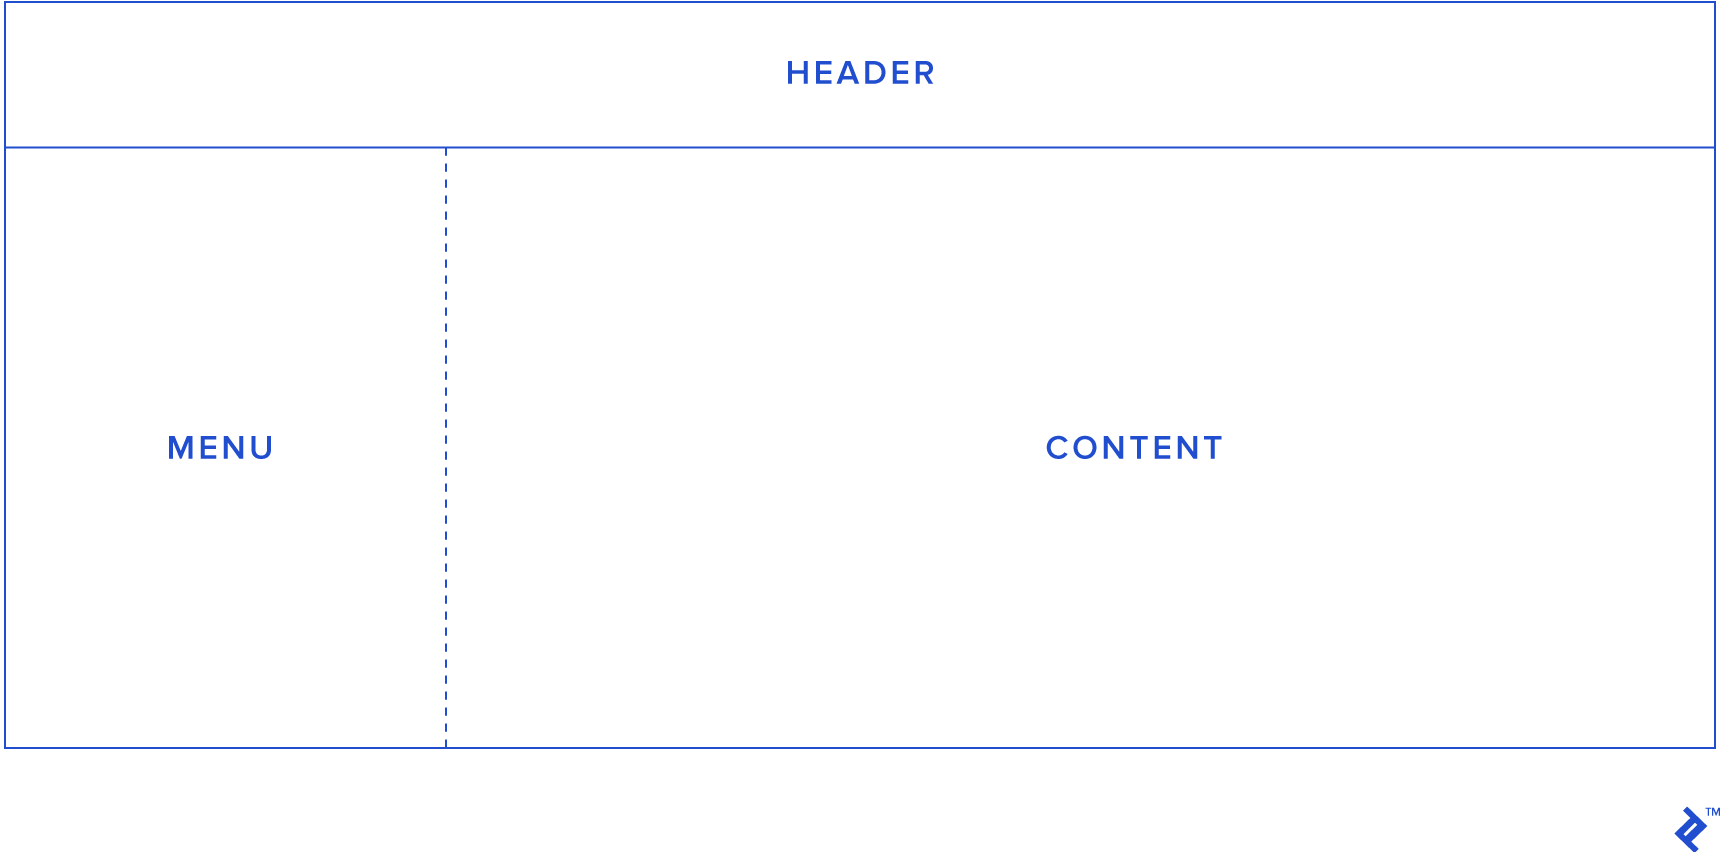
Our example will feature a simple layout as follows:
The concept is to toggle the menu’s visibility by interacting with a header button, with Angular Responsive handling the responsiveness. We’ll create a layout folder to house the default app.component files and separate files for each layout section, as depicted below. Thus, app.component represents the body, head.component the header, and left-panel.component the menu.
Let’s modify app.component.html:
 1
 2
 3
 4
 5
 6
 7
 8
 9
10
11
12
13
14
15
| <div *ngIf="authentication">
<app-head></app-head>
<button type="button" mat-button (click)="drawer.toggle()">
Menu
</button>
<mat-drawer-container class="example-container" autosize>
<mat-drawer #drawer class="example-sidenav" mode="side">
<app-left-panel></app-left-panel>
</mat-drawer>
<div>
<router-outlet></router-outlet>
</div>
</mat-drawer-container>
</div>
<div *ngIf="!authentication"><app-login></app-login></div>
|
We introduce an authentication property to control the display of the header and menu. If the user isn’t logged in, a login page replaces them.
Here’s the code for head.component.html:
1
2
| <h1>{{title}}</h1>
<button mat-button [routerLink]=" ['./logout'] ">Logout!</button>
|
Just a logout button—we’ll revisit this shortly. For now, change the HTML of left-panel.component.html to:
1
2
3
4
| <nav>
<a routerLink="/dashboard">Dashboard</a>
<a routerLink="/users">Users</a>
</nav>
|
Simple enough: two links for navigation between pages (more on this later).
The TypeScript code for the head and left-side components is as follows:
1
2
3
4
5
6
7
8
9
| import { Component } from '@angular/core';
@Component({
selector: 'app-head',
templateUrl: './head.component.html',
styleUrls: ['./head.component.css']
})
export class HeadComponent {
title = 'Angular 5 Seed';
}
|
1
2
3
4
5
6
7
8
9
| import { Component } from '@angular/core';
@Component({
selector: 'app-left-panel',
templateUrl: './left-panel.component.html',
styleUrls: ['./left-panel.component.css']
})
export class LeftPanelComponent {
title = 'Angular 5 Seed';
}
|
We’ll hold off on the app.component TypeScript code for now and return to it after implementing authentication.
Implementing Routing
With Angular Material assisting our UI and a basic layout in place, let’s enable page navigation.
For this example, we’ll create two pages: “User” for listing users from the database, and “Dashboard” for displaying statistics.
Inside the app folder, create app-routing.modules.ts with the following code:
 1
 2
 3
 4
 5
 6
 7
 8
 9
10
11
12
13
14
15
16
17
18
19
| import { NgModule } from '@angular/core';
import { RouterModule, Routes } from '@angular/router';
import { AuthGuard } from './helpers/canActivateAuthGuard';
import { LoginComponent } from './components/login/login.component';
import { LogoutComponent } from './components/login/logout.component';
import { DashboardComponent } from './components/dashboard/dashboard.component';
import { UsersComponent } from './components/users/users.component';
const routes: Routes = [
{ path: '', redirectTo: '/dashboard', pathMatch: 'full', canActivate: [AuthGuard] },
{ path: 'login', component: LoginComponent},
{ path: 'logout', component: LogoutComponent},
{ path: 'dashboard', component: DashboardComponent, canActivate: [AuthGuard] },
{ path: 'users', component: UsersComponent,canActivate: [AuthGuard] }
];
@NgModule({
imports: [ RouterModule.forRoot(routes) ],
exports: [ RouterModule ]
})
export class AppRoutingModule {}
|
It’s straightforward: import RouterModule and Routes from @angular/router to map desired paths. We define four paths:
/dashboard: Our homepage/login: The authentication page/logout: For logging out/users: Our page for listing users
Notice that dashboard acts as the default, redirecting users who type /. The canActivate parameter references the AuthGuard class, responsible for verifying user login and redirecting to the login page if needed. We’ll create this class in the next section.
Now, let’s build the menu. Recall the left-panel.component.html file from the layout section:
1
2
3
4
| <nav>
<a routerLink="/dashboard">Dashboard</a>
<a routerLink="/users">Users</a>
</nav>
|
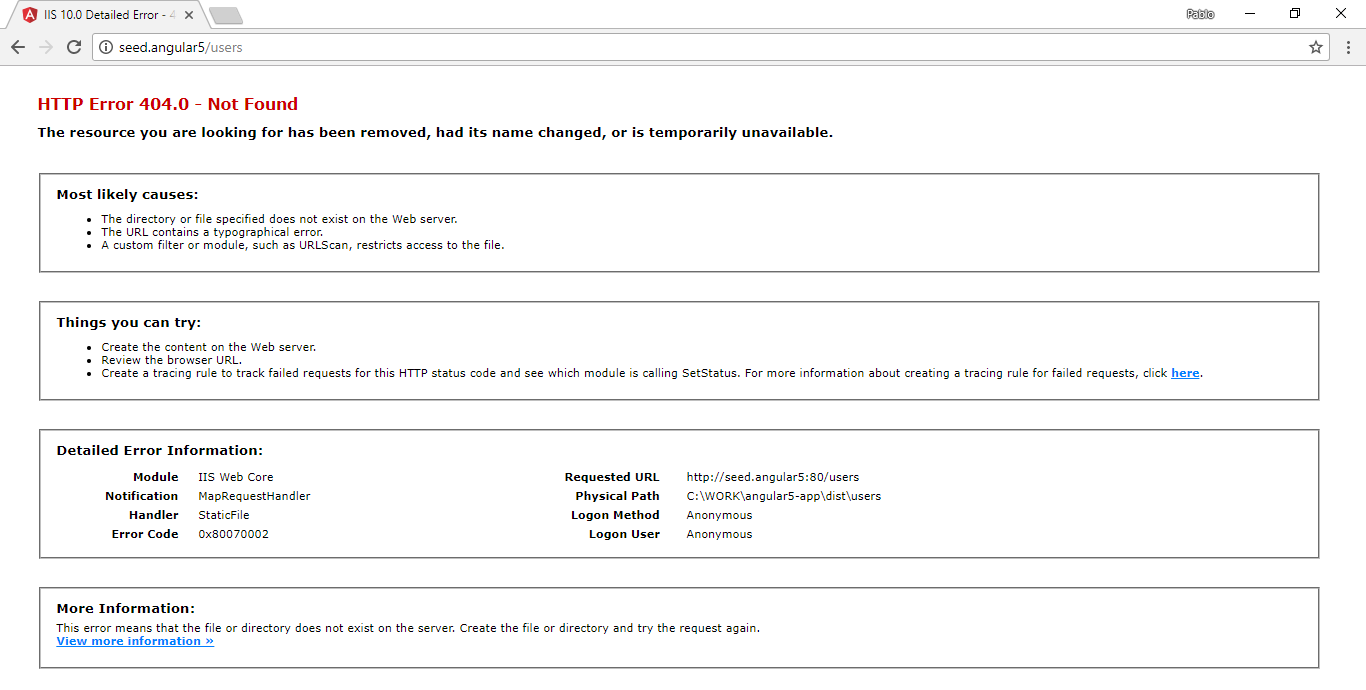
This is where our code comes to life. After building, you can test navigation between the Dashboard and Users pages. However, what happens if you directly access our.site.url/users in the browser?
It’s worth noting that this error might also occur if you refresh the browser after successfully navigating to the URL through the app’s side panel. To understand this behavior, let’s refer to the official docs, which offers a clear explanation:
Routed applications should support deep links, which are URLs specifying paths to components within the app. For instance, http://www.mysite.com/users/42 is a deep link to the hero detail page, displaying the hero with ID 42.
Navigating to this URL within a running client poses no problem. The Angular router interprets the URL and routes accordingly.
However, clicking a link in an email, entering the URL directly, or refreshing the hero detail page are handled by the browser outside the app. This results in a direct request to the server, bypassing the router.
A static server typically returns index.html for requests to http://www.mysite.com/. However, it rejects http://www.mysite.com/users/42, returning a 404 error unless configured to return index.html instead.
Resolving this is simple. We need to create a service provider configuration file. Since I’m using IIS, I’ll demonstrate the process for this environment, but the concept remains similar for Apache or other web servers.
Create a file named web.config inside the src folder with the following content:
 1
 2
 3
 4
 5
 6
 7
 8
 9
10
11
12
13
14
15
16
17
18
19
20
| <?xml version="1.0"?>
<configuration>
<system.webServer>
<rewrite>
<rules>
<rule name="Angular Routes" stopProcessing="true">
<match url=".*" />
<conditions logicalGrouping="MatchAll">
<add input="{REQUEST_FILENAME}" matchType="IsFile" negate="true" />
<add input="{REQUEST_FILENAME}" matchType="IsDirectory" negate="true" />
</conditions>
<action type="Rewrite" url="/index.html" />
</rule>
</rules>
</rewrite>
</system.webServer>
<system.web>
<compilation debug="true"/>
</system.web>
</configuration>
|
Ensure that this asset is copied to the deployment folder. This involves modifying the angular-cli.json file:
 1
 2
 3
 4
 5
 6
 7
 8
 9
10
11
12
13
14
15
16
17
18
19
20
21
22
23
24
25
26
27
28
29
30
31
32
33
34
35
36
37
38
39
40
41
42
43
44
45
46
47
48
49
50
51
52
53
54
55
56
57
58
59
60
61
| {
"$schema": "./node_modules/@angular/cli/lib/config/schema.json",
"project": {
"name": "angular5-app"
},
"apps": [
{
"root": "src",
"outDir": "dist",
"assets": [
"assets",
"favicon.ico",
"web.config" // or whatever equivalent is required by your web server
],
"index": "index.html",
"main": "main.ts",
"polyfills": "polyfills.ts",
"test": "test.ts",
"tsconfig": "tsconfig.app.json",
"testTsconfig": "tsconfig.spec.json",
"prefix": "app",
"styles": [
"styles.css"
],
"scripts": [],
"environmentSource": "environments/environment.ts",
"environments": {
"dev": "environments/environment.ts",
"prod": "environments/environment.prod.ts"
}
}
],
"e2e": {
"protractor": {
"config": "./protractor.conf.js"
}
},
"lint": [
{
"project": "src/tsconfig.app.json",
"exclude": "**/node_modules/**"
},
{
"project": "src/tsconfig.spec.json",
"exclude": "**/node_modules/**"
},
{
"project": "e2e/tsconfig.e2e.json",
"exclude": "**/node_modules/**"
}
],
"test": {
"karma": {
"config": "./karma.conf.js"
}
},
"defaults": {
"styleExt": "css",
"component": {}
}
}
|
Implementing Authentication
Remember the AuthGuard class used in routing configuration? Each navigation event triggers this class to verify user authentication via a token, redirecting to the login page if necessary. Create canActivateAuthGuard.ts inside the helpers folder:
 1
 2
 3
 4
 5
 6
 7
 8
 9
10
11
12
13
14
15
16
| import { CanActivate, Router } from '@angular/router';
import { Injectable } from '@angular/core';
import { Observable } from 'rxjs/Observable';
import { Helpers } from './helpers';
import { ActivatedRouteSnapshot, RouterStateSnapshot } from '@angular/router';
@Injectable()
export class AuthGuard implements CanActivate {
constructor(private router: Router, private helper: Helpers) {}
canActivate(route: ActivatedRouteSnapshot, state: RouterStateSnapshot): Observable<boolean> | boolean {
if (!this.helper.isAuthenticated()) {
this.router.navigate(['/login']);
return false;
}
return true;
}
}
|
Every page change invokes the canActivate method, which checks authentication status and redirects to the login page using the Router instance if needed. But what’s this new Helper class method?
Create helpers.ts within the helpers folder to manage localStorage, where our token from the back end will be stored.
Important Note
Regarding localStorage, you can also use cookies or sessionStorage, and the decision will depend on the behavior we want to implement. As the name suggests, sessionStorage is only available for the duration of the browser session, and is deleted when the tab or window is closed; it does, however, survive page reloads. If the data you are storing needs to be available on an ongoing basis, then localStorage is preferable to sessionStorage. Cookies are primarily for reading server-side, whereas localStorage can only be read client-side. So the question is, in your app, who needs this data---the client or the server? |
 1
 2
 3
 4
 5
 6
 7
 8
 9
10
11
12
13
14
15
16
17
18
19
20
21
22
23
24
25
26
27
28
29
30
31
32
33
34
35
36
37
38
39
40
41
42
43
| import { Injectable } from '@angular/core';
import { Observable } from 'rxjs';
import { Subject } from 'rxjs/Subject';
@Injectable()
export class Helpers {
private authenticationChanged = new Subject<boolean>();
constructor() {
}
public isAuthenticated():boolean {
return (!(window.localStorage['token'] === undefined ||
window.localStorage['token'] === null ||
window.localStorage['token'] === 'null' ||
window.localStorage['token'] === 'undefined' ||
window.localStorage['token'] === ''));
}
public isAuthenticationChanged():any {
return this.authenticationChanged.asObservable();
}
public getToken():any {
if( window.localStorage['token'] === undefined ||
window.localStorage['token'] === null ||
window.localStorage['token'] === 'null' ||
window.localStorage['token'] === 'undefined' ||
window.localStorage['token'] === '') {
return '';
}
let obj = JSON.parse(window.localStorage['token']);
return obj.token;
}
public setToken(data:any):void {
this.setStorageToken(JSON.stringify(data));
}
public failToken():void {
this.setStorageToken(undefined);
}
public logout():void {
this.setStorageToken(undefined);
}
private setStorageToken(value: any):void {
window.localStorage['token'] = value;
this.authenticationChanged.next(this.isAuthenticated());
}
}
|
Our authentication code should be making more sense now. We’ll delve into the Subject class later. For now, let’s revisit routing configuration and examine this line:
1
| { path: 'logout', component: LogoutComponent},
|
This is our logout component, a simple class for clearing localStorage. Create it under components/login as logout.component.ts:
 1
 2
 3
 4
 5
 6
 7
 8
 9
10
11
12
13
14
| import { Component, OnInit } from '@angular/core';
import { Router } from '@angular/router';
import { Helpers } from '../../helpers/helpers';
@Component({
selector: 'app-logout',
template:'<ng-content></ng-content>'
})
export class LogoutComponent implements OnInit {
constructor(private router: Router, private helpers: Helpers) { }
ngOnInit() {
this.helpers.logout();
this.router.navigate(['/login']);
}
}
|
Accessing /logout clears localStorage and redirects to the login page. Finally, let’s create login.component.ts:
 1
 2
 3
 4
 5
 6
 7
 8
 9
10
11
12
13
14
15
16
17
18
19
20
21
| import { Component, OnInit } from '@angular/core';
import { Router } from '@angular/router';
import { TokenService } from '../../services/token.service';
import { Helpers } from '../../helpers/helpers';
@Component({
selector: 'app-login',
templateUrl: './login.component.html',
styleUrls: [ './login.component.css' ]
})
export class LoginComponent implements OnInit {
constructor(private helpers: Helpers, private router: Router, private tokenService: TokenService) { }
ngOnInit() {
}
login(): void {
let authValues = {"Username":"pablo", "Password":"secret"};
this.tokenService.auth(authValues).subscribe(token => {
this.helpers.setToken(token);
this.router.navigate(['/dashboard']);
});
}
}
|
Currently, we’ve hard-coded credentials. Note the call to a service class; we’ll create these to interact with our back end in the next section.
Lastly, let’s return to app.component.ts, the site’s layout component. If the user is authenticated, the menu and header are displayed; otherwise, the login page is shown.
 1
 2
 3
 4
 5
 6
 7
 8
 9
10
11
12
13
14
15
16
17
| export class AppComponent implements AfterViewInit {
subscription: Subscription;
authentication: boolean;
constructor(private helpers: Helpers) {
}
ngAfterViewInit() {
this.subscription = this.helpers.isAuthenticationChanged().pipe(
startWith(this.helpers.isAuthenticated()),
delay(0)).subscribe((value) =>
this.authentication = value
);
}
title = 'Angular 5 Seed';
ngOnDestroy() {
this.subscription.unsubscribe();
}
}
|
Remember the Subject class in our helper class? It’s an Observable. Observables enable message passing between publishers and subscribers within your application. Any change to the authentication token updates the authentication property. This should make more sense when reviewing app.component.html:
 1
 2
 3
 4
 5
 6
 7
 8
 9
10
11
12
13
14
15
| <div *ngIf="authentication">
<app-head></app-head>
<button type="button" mat-button (click)="drawer.toggle()">
Menu
</button>
<mat-drawer-container class="example-container" autosize>
<mat-drawer #drawer class="example-sidenav" mode="side">
<app-left-panel></app-left-panel>
</mat-drawer>
<div>
<router-outlet></router-outlet>
</div>
</mat-drawer-container>
</div>
<div *ngIf="!authentication"><app-login></app-login></div>
|
Working with Services
We can now navigate pages, handle client-side authentication, and render a basic layout. Let’s explore retrieving data from the back end. It’s highly recommended to perform all back-end access through dedicated service classes.
Our first service will reside in the services folder as token.service.ts:
 1
 2
 3
 4
 5
 6
 7
 8
 9
10
11
12
13
14
15
16
17
18
19
20
21
22
23
24
| import { Injectable } from '@angular/core';
import { HttpClient, HttpHeaders } from '@angular/common/http';
import { Observable } from 'rxjs/Observable';
import { of } from 'rxjs/observable/of';
import { catchError, map, tap } from 'rxjs/operators';
import { AppConfig } from '../config/config';
import { BaseService } from './base.service';
import { Token } from '../models/token';
import { Helpers } from '../helpers/helpers';
@Injectable()
export class TokenService extends BaseService {
private pathAPI = this.config.setting['PathAPI'];
public errorMessage: string;
constructor(private http: HttpClient, private config: AppConfig, helper: Helpers) { super(helper); }
auth(data: any): any {
let body = JSON.stringify(data);
return this.getToken(body);
}
private getToken (body: any): Observable<any> {
return this.http.post<any>(this.pathAPI + 'token', body, super.header()).pipe(
catchError(super.handleError)
);
}
}
|
The initial call is a POST request to the token API, which doesn’t require a token string in the header. However, what about other endpoints? Notice that TokenService (and service classes in general) inherit from BaseService:
 1
 2
 3
 4
 5
 6
 7
 8
 9
10
11
12
13
14
15
16
17
18
19
20
21
22
23
24
25
26
27
28
29
30
31
32
33
34
35
36
37
38
39
40
41
| import { Injectable } from '@angular/core';
import { HttpClient, HttpHeaders } from '@angular/common/http';
import { Observable } from 'rxjs/Observable';
import { of } from 'rxjs/observable/of';
import { catchError, map, tap } from 'rxjs/operators';
import { Helpers } from '../helpers/helpers';
@Injectable()
export class BaseService {
constructor(private helper: Helpers) { }
public extractData(res: Response) {
let body = res.json();
return body || {};
}
public handleError(error: Response | any) {
// In a real-world app, we might use a remote logging infrastructure
let errMsg: string;
if (error instanceof Response) {
const body = error.json() || '';
const err = body || JSON.stringify(body);
errMsg = `${error.status} - ${error.statusText || ''} ${err}`;
} else {
errMsg = error.message ? error.message : error.toString();
}
console.error(errMsg);
return Observable.throw(errMsg);
}
public header() {
let header = new HttpHeaders({ 'Content-Type': 'application/json' });
if(this.helper.isAuthenticated()) {
header = header.append('Authorization', 'Bearer ' + this.helper.getToken());
}
return { headers: header };
}
public setToken(data:any) {
this.helper.setToken(data);
}
public failToken(error: Response | any) {
this.helper.failToken();
return this.handleError(Response);
}
}
|
This ensures that every HTTP call we make implements the request header using super.header. If a token exists in localStorage, it’s added to the header; otherwise, only the JSON format is set. We also handle authentication failures here.
The login component calls the service class, which in turn communicates with the back end. Once we obtain the token, the helper class manages it, allowing us to retrieve the user list from the database.
Before fetching data, ensure that our model classes align with the back-end view models used in responses.
In user.ts:
1
2
3
4
| export class User {
id: number;
name: string;
}
|
Now, create user.service.ts:
 1
 2
 3
 4
 5
 6
 7
 8
 9
10
11
12
13
14
15
16
17
18
| import { Injectable } from '@angular/core';
import { HttpClient, HttpHeaders } from '@angular/common/http';
import { Observable } from 'rxjs/Observable';
import { of } from 'rxjs/observable/of';
import { catchError, map, tap } from 'rxjs/operators';
import { BaseService } from './base.service';
import { User } from '../models/user';
import { AppConfig } from '../config/config';
import { Helpers } from '../helpers/helpers';
@Injectable()
export class UserService extends BaseService {
private pathAPI = this.config.setting['PathAPI'];
constructor(private http: HttpClient, private config: AppConfig, helper: Helpers) { super(helper); }
/** GET heroes from the server */
getUsers (): Observable<User[]> {
return this.http.get(this.pathAPI + 'user', super.header()).pipe(
catchError(super.handleError));
}
|
Back-End Development
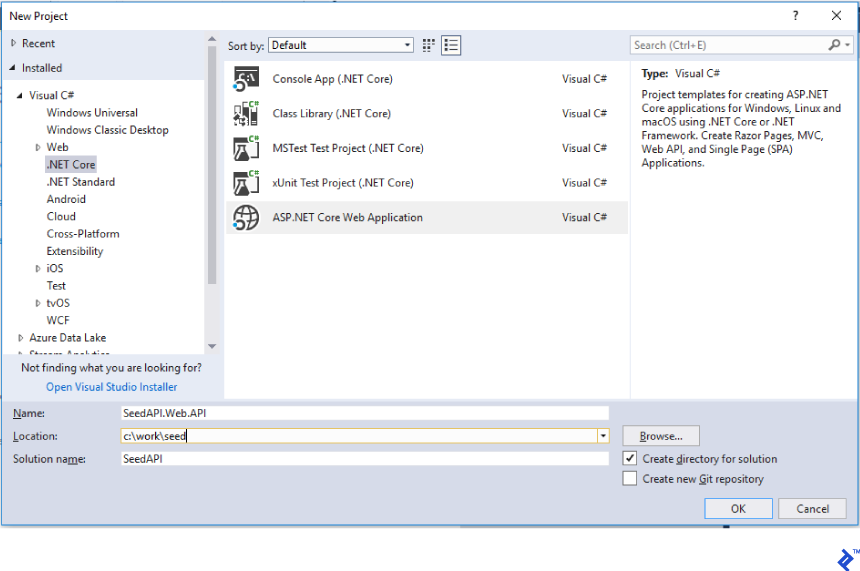
Getting Started
Welcome to the first step of creating our Web API Core 2 application. We’ll begin by creating an ASP.NET Core Web Application project named SeedAPI.Web.API.
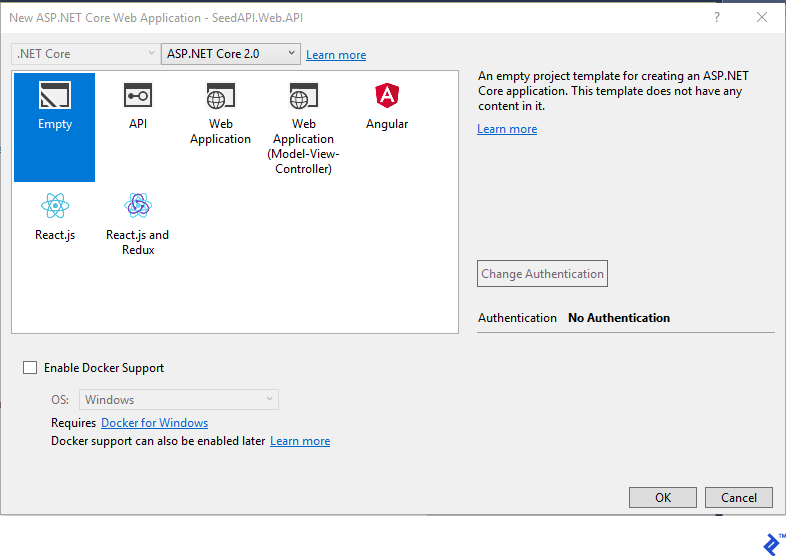
Choose the Empty template for a clean slate, as shown below:
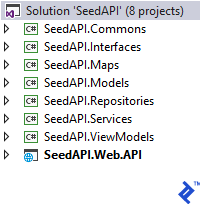
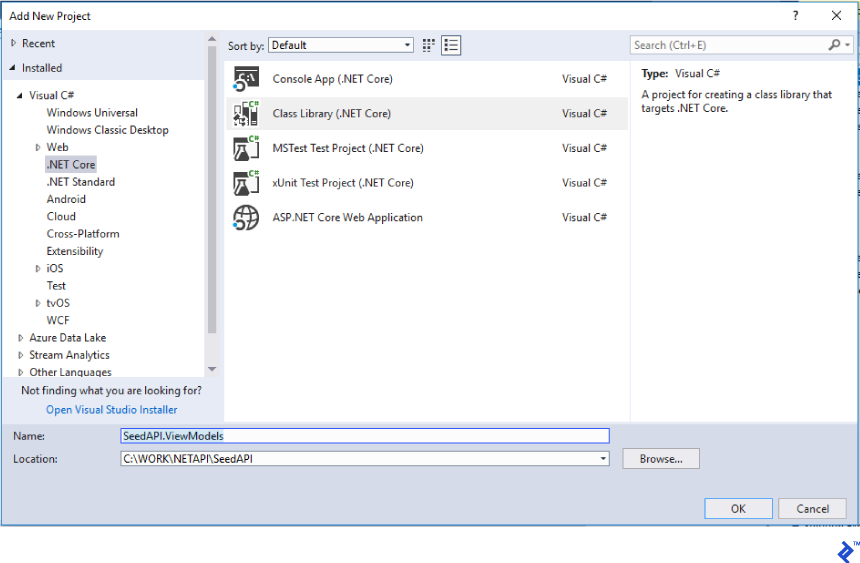
We now have a solution with an empty web application as a starting point. Our architecture will consist of the following projects:
Create these projects by right-clicking the solution and adding a “Class Library (.NET Core)” project for each one.
Understanding the Architecture
We’ve created eight projects. Let’s break down their purposes:
Web.API: The startup project where endpoints are defined. It handles JWT setup, dependency injection, and controllers.ViewModels: Responsible for converting data returned by controllers to a format suitable for the front end. These classes ideally align with front-end models.Interfaces: Facilitates dependency injection by defining contracts for classes. This leverages the type checking capabilities of C#.Commons: Contains shared behaviors, utility code, and helper functions used across the application.Models: Houses entity database classes that are independent of the front end. This separation allows database changes without directly impacting the front end and aids in refactoring.Maps: Handles the mapping between ViewModels and Models, bridging the gap between controllers and services.Services: Encapsulates business logic and operations performed on data.Repositories: The sole point of interaction with the database.
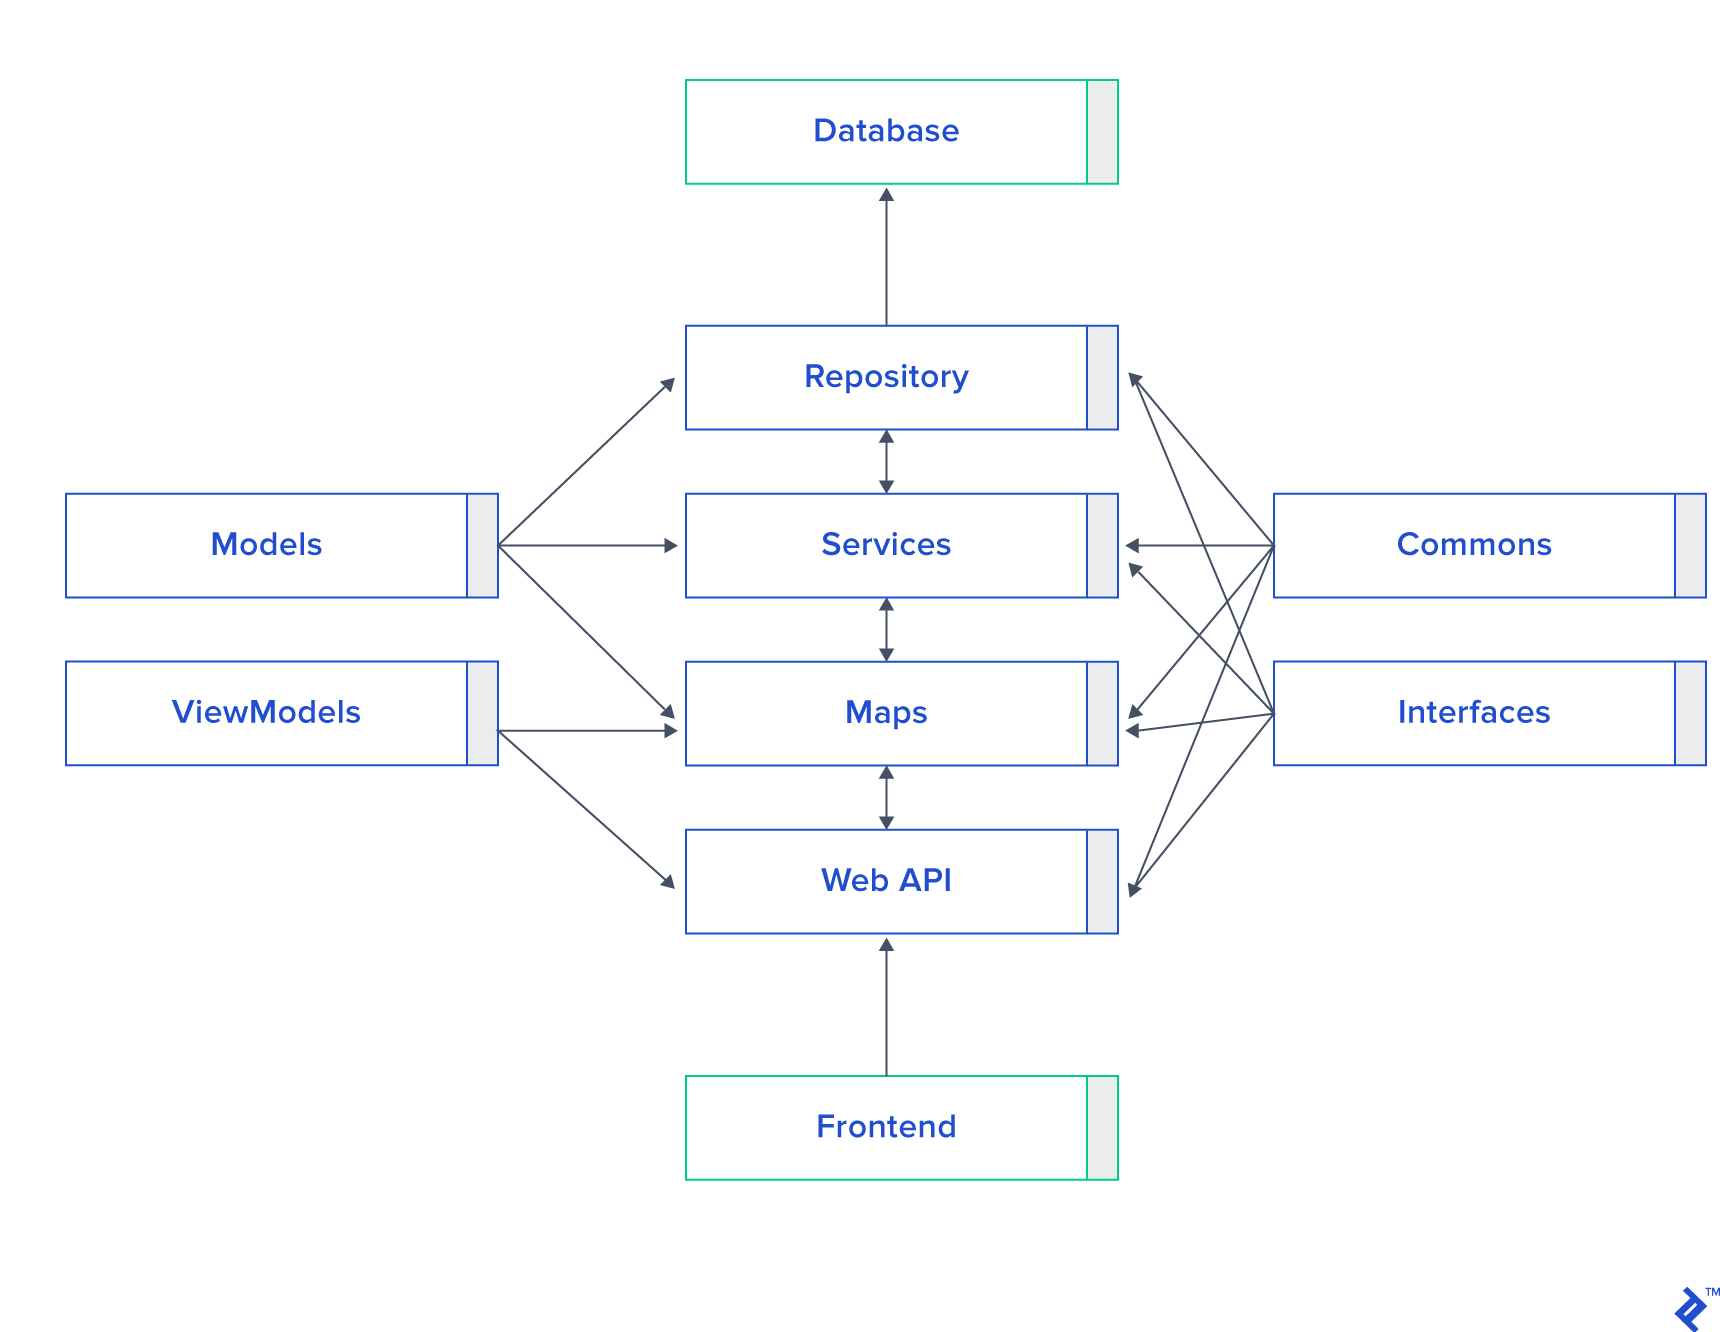
Here’s how the project references should look:
Implementing JWT-Based Authentication
Let’s configure token authentication and delve into security considerations.
Start by creating JwtTokenConfig.cs within the App_Start folder to house our JSON Web Token (JWT) configuration. Here’s the code:
 1
 2
 3
 4
 5
 6
 7
 8
 9
10
11
12
13
14
15
16
17
18
19
20
21
22
23
24
| namespace SeedAPI.Web.API.App_Start
{
public class JwtTokenConfig
{
public static void AddAuthentication(IServiceCollection services, IConfiguration configuration)
{
services.AddAuthentication(JwtBearerDefaults.AuthenticationScheme)
.AddJwtBearer(options =>
{
options.TokenValidationParameters = new TokenValidationParameters
{
ValidateIssuer = true,
ValidateAudience = true,
ValidateLifetime = true,
ValidateIssuerSigningKey = true,
ValidIssuer = configuration["Jwt:Issuer"],
ValidAudience = configuration["Jwt:Issuer"],
IssuerSigningKey = new SymmetricSecurityKey(Encoding.UTF8.GetBytes(configuration["Jwt:Key"]))
};
services.AddCors();
});
}
}
}
|
Validation parameter values depend on your project’s requirements. You can set the valid user and audience in appsettings.json:
1
2
3
4
| "Jwt": {
"Key": "veryVerySecretKey",
"Issuer": "http://localhost:50498/"
}
|
Next, call this configuration from the ConfigureServices method in startup.cs:
1
2
3
4
5
6
7
8
| // This method gets called by the runtime. Use this method to add services to the container.
public void ConfigureServices(IServiceCollection services)
{
DependencyInjectionConfig.AddScope(services);
JwtTokenConfig.AddAuthentication(services, Configuration);
DBContextConfig.Initialize(services, Configuration);
services.AddMvc();
}
|
We can now create our first controller, TokenController.cs. The "veryVerySecretKey" value from appsettings.json should match the one used for token creation. First, define the LoginViewModel within the ViewModels project:
1
2
3
4
5
6
7
8
| namespace SeedAPI.ViewModels
{
public class LoginViewModel : IBaseViewModel
{
public string username { get; set; }
public string password { get; set; }
}
}
|
Finally, the controller:
 1
 2
 3
 4
 5
 6
 7
 8
 9
10
11
12
13
14
15
16
17
18
19
20
21
22
23
24
25
26
27
28
29
30
31
32
33
34
35
36
37
38
39
40
41
42
43
44
| namespace SeedAPI.Web.API.Controllers
{
[Route("api/Token")]
public class TokenController : Controller
{
private IConfiguration _config;
public TokenController(IConfiguration config)
{
_config = config;
}
[AllowAnonymous]
[HttpPost]
public dynamic Post([FromBody]LoginViewModel login)
{
IActionResult response = Unauthorized();
var user = Authenticate(login);
if (user != null)
{
var tokenString = BuildToken(user);
response = Ok(new { token = tokenString });
}
return response;
}
private string BuildToken(UserViewModel user)
{
var key = new SymmetricSecurityKey(Encoding.UTF8.GetBytes(_config["Jwt:Key"]));
var creds = new SigningCredentials(key, SecurityAlgorithms.HmacSha256);
var token = new JwtSecurityToken(_config["Jwt:Issuer"],
_config["Jwt:Issuer"],
expires: DateTime.Now.AddMinutes(30),
signingCredentials: creds);
return new JwtSecurityTokenHandler().WriteToken(token);
}
private UserViewModel Authenticate(LoginViewModel login)
{
UserViewModel user = null;
if (login.username == "pablo" && login.password == "secret")
{
user = new UserViewModel { name = "Pablo" };
}
return user;
}
}
}
|
The BuildToken method generates a token using the provided security code. The Authenticate method currently uses hard-coded validation but will eventually validate against the database.
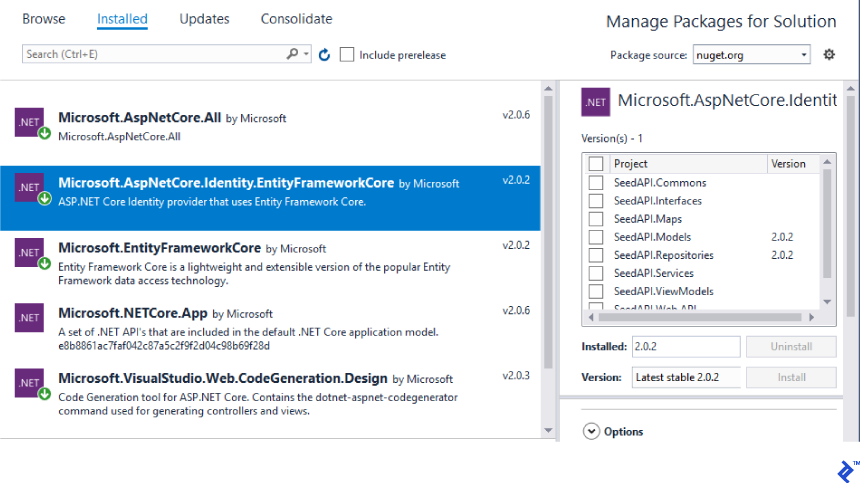
Setting Up the Application Context
Entity Framework Core 2 (EF Core 2) simplifies database interaction. We’ll implement a code-first model using identityDbContext. Ensure you’ve installed the necessary dependencies via NuGet:
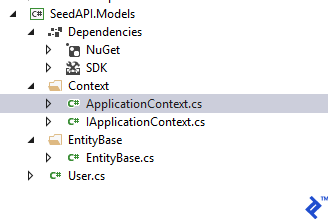
Create three files in the Models project’s Context folder: ApplicationContext.cs, IApplicationContext.cs, and EntityBase:
Each entity model will inherit from EntityBase, except for User.cs, which is an identity class inheriting from IdentityUser:
1
2
3
4
5
6
7
| namespace SeedAPI.Models
{
public class User : IdentityUser
{
public string Name { get; set; }
}
}
|
 1
 2
 3
 4
 5
 6
 7
 8
 9
10
11
12
13
14
15
16
17
18
19
20
21
| namespace SeedAPI.Models.EntityBase
{
public class EntityBase
{
public DateTime? Created { get; set; }
public DateTime? Updated { get; set; }
public bool Deleted { get; set; }
public EntityBase()
{
Deleted = false;
}
public virtual int IdentityID()
{
return 0;
}
public virtual object[] IdentityID(bool dummy = true)
{
return new List<object>().ToArray();
}
}
}
|
Now, let’s create ApplicationContext.cs:
 1
 2
 3
 4
 5
 6
 7
 8
 9
10
11
12
13
14
15
16
17
18
19
20
21
22
23
24
25
26
27
28
29
30
31
32
33
34
35
36
37
38
39
40
41
42
43
44
45
| namespace SeedAPI.Models.Context
{
public class ApplicationContext : IdentityDbContext<User>, IApplicationContext
{
private IDbContextTransaction dbContextTransaction;
public ApplicationContext(DbContextOptions options)
: base(options)
{
}
public DbSet<User> UsersDB { get; set; }
public new void SaveChanges()
{
base.SaveChanges();
}
public new DbSet<T> Set<T>() where T : class
{
return base.Set<T>();
}
public void BeginTransaction()
{
dbContextTransaction = Database.BeginTransaction();
}
public void CommitTransaction()
{
if (dbContextTransaction != null)
{
dbContextTransaction.Commit();
}
}
public void RollbackTransaction()
{
if (dbContextTransaction != null)
{
dbContextTransaction.Rollback();
}
}
public void DisposeTransaction()
{
if (dbContextTransaction != null)
{
dbContextTransaction.Dispose();
}
}
}
}
|
We’re almost there. Create two more classes in the App_Start folder within the Web.API project. The first initializes the application context, while the second generates sample data for development and testing.
 1
 2
 3
 4
 5
 6
 7
 8
 9
10
11
12
13
14
15
16
17
18
19
20
21
22
23
24
| namespace SeedAPI.Web.API.App_Start
{
public class DBContextConfig
{
public static void Initialize(IConfiguration configuration, IHostingEnvironment env, IServiceProvider svp)
{
var optionsBuilder = new DbContextOptionsBuilder();
if (env.IsDevelopment()) optionsBuilder.UseSqlServer(configuration.GetConnectionString("DefaultConnection"));
else if (env.IsStaging()) optionsBuilder.UseSqlServer(configuration.GetConnectionString("DefaultConnection"));
else if (env.IsProduction()) optionsBuilder.UseSqlServer(configuration.GetConnectionString("DefaultConnection"));
var context = new ApplicationContext(optionsBuilder.Options);
if(context.Database.EnsureCreated())
{
IUserMap service = svp.GetService(typeof(IUserMap)) as IUserMap;
new DBInitializeConfig(service).DataTest();
}
}
public static void Initialize(IServiceCollection services, IConfiguration configuration)
{
services.AddDbContext<ApplicationContext>(options =>
options.UseSqlServer(configuration.GetConnectionString("DefaultConnection")));
}
}
}
|
 1
 2
 3
 4
 5
 6
 7
 8
 9
10
11
12
13
14
15
16
17
18
19
20
| namespace SeedAPI.Web.API.App_Start
{
public class DBInitializeConfig
{
private IUserMap userMap;
public DBInitializeConfig (IUserMap _userMap)
{
userMap = _userMap;
}
public void DataTest()
{
Users();
}
private void Users()
{
userMap.Create(new UserViewModel() { id = 1, name = "Pablo" });
userMap.Create(new UserViewModel() { id = 2, name = "Diego" });
}
}
}
|
Call these classes from the startup.cs file:
 1
 2
 3
 4
 5
 6
 7
 8
 9
10
11
12
13
14
15
16
17
18
19
20
21
22
23
24
25
| // This method gets called by the runtime. Use this method to add services to the container.
public void ConfigureServices(IServiceCollection services)
{
DependencyInjectionConfig.AddScope(services);
JwtTokenConfig.AddAuthentication(services, Configuration);
DBContextConfig.Initialize(services, Configuration);
services.AddMvc();
}
// ...
// This method gets called by the runtime. Use this method to configure the HTTP request pipeline.
public void Configure(IApplicationBuilder app, IHostingEnvironment env, IServiceProvider svp)
{
if (env.IsDevelopment())
{
app.UseDeveloperExceptionPage();
}
DBContextConfig.Initialize(Configuration, env, svp);
app.UseCors(builder => builder
.AllowAnyOrigin()
.AllowAnyMethod()
.AllowAnyHeader()
.AllowCredentials());
app.UseAuthentication();
app.UseMvc();
}
|
Implementing Dependency Injection
Dependency injection promotes modularity and testability. We’ll use it to streamline communication between controllers, mappers, services, and repositories.
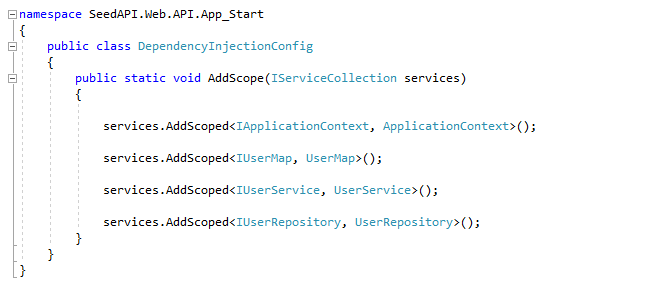
Create DependencyInjectionConfig.cs within the App_Start folder:
 1
 2
 3
 4
 5
 6
 7
 8
 9
10
11
12
13
| namespace SeedAPI.Web.API.App_Start
{
public class DependencyInjectionConfig
{
public static void AddScope(IServiceCollection services)
{
services.AddScoped<IApplicationContext, ApplicationContext>();
services.AddScoped<IUserMap, UserMap>();
services.AddScoped<IUserService, UserService>();
services.AddScoped<IUserRepository, UserRepository>();
}
}
}
|
For each new entity, you’ll create corresponding Map, Service, and Repository classes and register them here. Then, call this configuration from startup.cs:
1
2
3
4
5
6
7
8
| // This method gets called by the runtime. Use this method to add services to the container.
public void ConfigureServices(IServiceCollection services)
{
DependencyInjectionConfig.AddScope(services);
JwtTokenConfig.AddAuthentication(services, Configuration);
DBContextConfig.Initialize(services, Configuration);
services.AddMvc();
}
|
Now, to retrieve the user list from the database, create a controller utilizing dependency injection:
 1
 2
 3
 4
 5
 6
 7
 8
 9
10
11
12
13
14
15
16
17
18
19
20
21
22
23
24
25
26
27
28
29
30
31
32
33
34
35
36
37
38
39
40
| namespace SeedAPI.Web.API.Controllers
{
[Route("api/[controller]")]
[Authorize]
public class UserController : Controller
{
IUserMap userMap;
public UserController(IUserMap map)
{
userMap = map;
}
// GET api/user
[HttpGet]
public IEnumerable<UserViewModel> Get()
{
return userMap.GetAll(); ;
}
// GET api/user/5
[HttpGet("{id}")]
public string Get(int id)
{
return "value";
}
// POST api/user
[HttpPost]
public void Post([FromBody]string user)
{
}
// PUT api/user/5
[HttpPut("{id}")]
public void Put(int id, [FromBody]string user)
{
}
// DELETE api/user/5
[HttpDelete("{id}")]
public void Delete(int id)
{
}
}
}
|
Notice the Authorize attribute ensuring front-end authentication and how dependency injection works within the constructor.
We finally have a database call, but let’s first understand the Map project.
The Role of the Maps Project
This project’s purpose is to map between ViewModels and database models. Create a separate map for each entity. For instance, UserMap.cs would look like this:
 1
 2
 3
 4
 5
 6
 7
 8
 9
10
11
12
13
14
15
16
17
18
19
20
21
22
23
24
25
26
27
28
29
30
31
32
33
34
35
36
37
38
39
40
41
42
43
44
45
46
47
48
49
50
| namespace SeedAPI.Maps
{
public class UserMap : IUserMap
{
IUserService userService;
public UserMap(IUserService service)
{
userService = service;
}
public UserViewModel Create(UserViewModel viewModel)
{
User user = ViewModelToDomain(viewModel);
return DomainToViewModel(userService.Create(user));
}
public bool Update(UserViewModel viewModel)
{
User user = ViewModelToDomain(viewModel);
return userService.Update(user);
}
public bool Delete(int id)
{
return userService.Delete(id);
}
public List<UserViewModel> GetAll()
{
return DomainToViewModel(userService.GetAll());
}
public UserViewModel DomainToViewModel(User domain)
{
UserViewModel model = new UserViewModel();
model.name = domain.Name;
return model;
}
public List<UserViewModel> DomainToViewModel(List<User> domain)
{
List<UserViewModel> model = new List<UserViewModel>();
foreach (User of in domain)
{
model.Add(DomainToViewModel(of));
}
return model;
}
public User ViewModelToDomain(UserViewModel officeViewModel)
{
User domain = new User();
domain.Name = officeViewModel.name;
return domain;
}
}
}
|
Dependency injection connects Maps to the Services project through the constructor.
The Services Project
In this example, we have minimal business logic, so this project remains simple. Its value becomes apparent in more complex scenarios requiring calculations or operations before or after database interactions. The class would look like this:
 1
 2
 3
 4
 5
 6
 7
 8
 9
10
11
12
13
14
15
16
17
18
19
20
21
22
23
24
25
26
27
| namespace SeedAPI.Services
{
public class UserService : IUserService
{
private IUserRepository repository;
public UserService(IUserRepository userRepository)
{
repository = userRepository;
}
public User Create(User domain)
{
return repository.Save(domain);
}
public bool Update(User domain)
{
return repository.Update(domain);
}
public bool Delete(int id)
{
return repository.Delete(id);
}
public List<User> GetAll()
{
return repository.GetAll();
}
}
}
|
The Repositories Project
Finally, we arrive at database interactions. Create UserRepository.cs to handle reading, inserting, and updating users in the database:
 1
 2
 3
 4
 5
 6
 7
 8
 9
10
11
12
13
14
15
16
17
18
19
20
21
22
23
24
25
26
27
28
29
30
31
32
33
34
35
36
37
38
39
40
41
42
43
44
45
46
47
48
49
50
51
52
53
54
55
56
57
58
59
60
61
62
63
64
65
66
67
68
69
| namespace SeedAPI.Repositories
{
public class UserRepository : BaseRepository, IUserRepository
{
public UserRepository(IApplicationContext context)
: base(context)
{ }
public User Save(User domain)
{
try
{
var us = InsertUser<User>(domain);
return us;
}
catch (Exception ex)
{
//ErrorManager.ErrorHandler.HandleError(ex);
throw ex;
}
}
public bool Update(User domain)
{
try
{
//domain.Updated = DateTime.Now;
UpdateUser<User>(domain);
return true;
}
catch (Exception ex)
{
//ErrorManager.ErrorHandler.HandleError(ex);
throw ex;
}
}
public bool Delete(int id)
{
try
{
User user = Context.UsersDB.Where(x => x.Id.Equals(id)).FirstOrDefault();
if (user != null)
{
//Delete<User>(user);
return true;
}
else
{
return false;
}
}
catch (Exception ex)
{
//ErrorManager.ErrorHandler.HandleError(ex);
throw ex;
}
}
public List<User> GetAll()
{
try
{
return Context.UsersDB.OrderBy(x => x.Name).ToList();
}
catch (Exception ex)
{
//ErrorManager.ErrorHandler.HandleError(ex);
throw ex;
}
}
}
}
|
Conclusion
This article outlined the creation of a well-structured architecture using Angular 5 and Web API Core 2. You’ve established a foundation for a robust project capable of accommodating future growth.
JavaScript dominates front-end development, and C# with SQL Server and Entity Framework excels on the back end. This article aimed to combine these powerful technologies, and I hope you found it insightful.
Next Steps with Angular and .NET Core
For teams with dedicated front-end and back-end developers, integrating Swagger with Web API 2 can be beneficial. Swagger is an excellent tool for documenting and testing RESTful APIs. Refer to Microsoft’s guide: Get started with Swashbuckle and ASP.NET Core.
If you’re new to Angular 5, Toptaler Sergey Moiseev’s “An Angular 5 Tutorial: Step by Step Guide to Your First Angular 5 App” provides an excellent starting point. Additionally, Microsoft’s documentation offers a valuable resource for brushing up on your Angular and C# skills.