The Context API in React has been experimentally available for a period of time, but it was only with the release of React version 16.3.0 that it became stable enough for production use. This article will present two basic web store applications: one using the Context API and one without it.
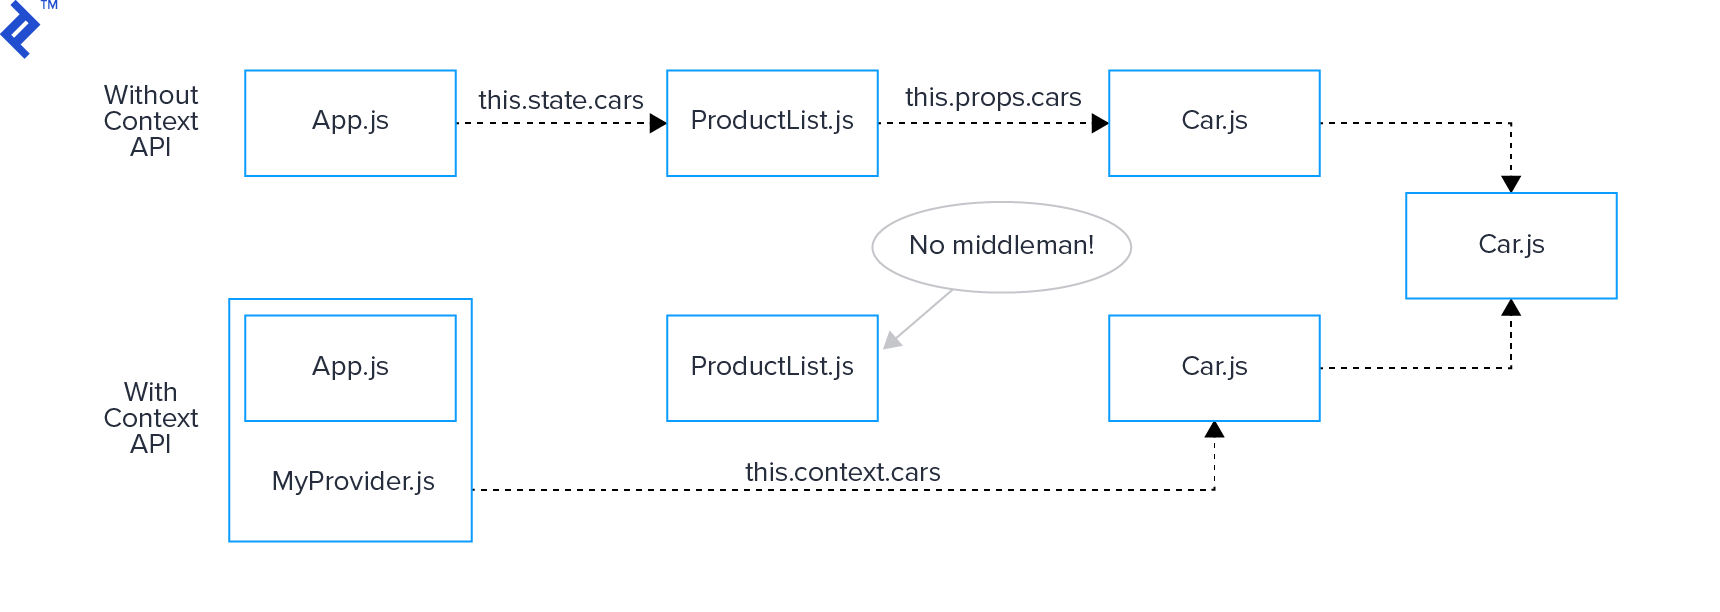
React’s new Context API effectively addresses a significant issue: prop drilling. Even if the term is unfamiliar, if you’ve developed a React.js application, you’ve likely encountered this challenge. Prop drilling involves passing data from component A to component Z through numerous intermediary React components. Component Z indirectly receives props, and as the React developer, you are responsible for ensuring the entire process functions seamlessly.
To begin this React Context API tutorial, let’s examine how you would typically handle these common issues without using the React Context API:
App.js
 1
 2
 3
 4
 5
 6
 7
 8
 9
10
11
12
13
14
15
16
17
18
19
20
21
22
23
24
25
26
27
28
29
30
31
32
33
34
35
36
37
38
39
40
41
42
43
44
45
46
| class App extends Component {
state = {
cars: {
car001: { name: 'Honda', price: 100 },
car002: { name: 'BMW', price: 150 },
car003: { name: 'Mercedes', price: 200 }
}
};
incrementCarPrice = this.incrementCarPrice.bind(this);
decrementCarPrice = this.decrementCarPrice.bind(this);
incrementCarPrice(selectedID) {
// a simple method that manipulates the state
const cars = Object.assign({}, this.state.cars);
cars[selectedID].price = cars[selectedID].price + 1;
this.setState({
cars
});
}
decrementCarPrice(selectedID) {
// a simple method that manipulates the state
const cars = Object.assign({}, this.state.cars);
cars[selectedID].price = cars[selectedID].price - 1;
this.setState({
cars
});
}
render() {
return (
<div className="App">
<header className="App-header">
<img src={logo} className="App-logo" alt="logo" />
<h1 className="App-title">Welcome to my web store</h1>
</header>
{/* Pass props twice */}
<ProductList
cars={this.state.cars}
incrementCarPrice={this.incrementCarPrice}
decrementCarPrice={this.decrementCarPrice}
/>
</div>
);
}
}
|
ProductList.js
 1
 2
 3
 4
 5
 6
 7
 8
 9
10
11
12
13
14
15
16
17
| const ProductList = props => (
<div className="product-list">
<h2>Product list:</h2>
{/* Pass props twice */}
<Cars
cars={props.cars}
incrementCarPrice={props.incrementCarPrice}
decrementCarPrice={props.decrementCarPrice}
/>
{/* Other potential product categories which we will skip for this demo: */}
{/* <Electronics /> */}
{/* <Clothes /> */}
{/* <Shoes /> */}
</div>
);
export default ProductList;
|
Cars.js
 1
 2
 3
 4
 5
 6
 7
 8
 9
10
11
12
13
14
15
| const Cars = props => (
<Fragment>
<h4>Cars:</h4>
{/* Finally we can use data */}
{Object.keys(props.cars).map(carID => (
<Car
key={carID}
name={props.cars[carID].name}
price={props.cars[carID].price}
incrementPrice={() => props.incrementCarPrice(carID)}
decrementPrice={() => props.decrementCarPrice(carID)}
/>
))}
</Fragment>
);
|
Car.js
1
2
3
4
5
6
7
8
| const Cars = props => (
<Fragment>
<p>Name: {props.name}</p>
<p>Price: ${props.price}</p>
<button onClick={props.incrementPrice}>↑</button>
<button onClick={props.decrementPrice}>↓</button>
</Fragment>
);
|
Admittedly, this isn’t the optimal approach for data management, but it highlights the frustration of prop drilling. So, how does React.js’s Context API provide a solution?
Introducing the Context Web Store
Let’s refactor the application and showcase the capabilities of the Context API. In essence, it enables you to establish a central store for your data (similar to Redux), which can be directly integrated into any component. You can eliminate the intermediaries!
The refactoring process is relatively straightforward, requiring no modifications to the component structure. However, we need to create a few new components: a provider and a consumer.
1. Initializing the Context
Firstly, we need to create the context, which we will subsequently use to create providers and consumers.
MyContext.js
1
2
3
4
5
6
7
8
| import React from 'react';
// this is the equivalent to the createStore method of Redux
// https://redux.js.org/api/createstore
const MyContext = React.createContext();
export default MyContext;
|
2. Creating the Provider
Having accomplished that, we can import the context and utilize it to create our provider, which we’ll name MyProvider. Within it, we initialize a state with some values, shareable through the provider component’s value prop. In our React Context API example, we’re sharing this.state.cars along with methods for manipulating the state. These methods can be likened to reducers in Redux.
MyProvider.js
 1
 2
 3
 4
 5
 6
 7
 8
 9
10
11
12
13
14
15
16
17
18
19
20
21
22
23
24
25
26
27
28
29
30
31
32
33
34
35
36
37
| import MyContext from './MyContext';
class MyProvider extends Component {
state = {
cars: {
car001: { name: 'Honda', price: 100 },
car002: { name: 'BMW', price: 150 },
car003: { name: 'Mercedes', price: 200 }
}
};
render() {
return (
<MyContext.Provider
value={{
cars: this.state.cars,
incrementPrice: selectedID => {
const cars = Object.assign({}, this.state.cars);
cars[selectedID].price = cars[selectedID].price + 1;
this.setState({
cars
});
},
decrementPrice: selectedID => {
const cars = Object.assign({}, this.state.cars);
cars[selectedID].price = cars[selectedID].price - 1;
this.setState({
cars
});
}
}}
>
{this.props.children}
</MyContext.Provider>
);
}
}
|
To make the provider accessible to other components, we need to wrap our app with it (again, similar to Redux). While we’re at it, we can remove the state and methods from App.js since they are now defined in MyProvider.js.
App.js
 1
 2
 3
 4
 5
 6
 7
 8
 9
10
11
12
13
14
15
| class App extends Component {
render() {
return (
<MyProvider>
<div className="App">
<header className="App-header">
<img src={logo} className="App-logo" alt="logo" />
<h1 className="App-title">Welcome to my web store</h1>
</header>
<ProductList />
</div>
</MyProvider>
);
}
}
|
3. Creating the Consumer
We’ll need to import the context once more and wrap our component with it, which injects the context argument into the component. From there, it’s quite straightforward. You utilize context just as you would props. It contains all the values shared in MyProducer, ready for use!
Cars.js
 1
 2
 3
 4
 5
 6
 7
 8
 9
10
11
12
13
14
15
16
17
18
| const Cars = () => (
<MyContext.Consumer>
{context => (
<Fragment>
<h4>Cars:</h4>
{Object.keys(context.cars).map(carID => (
<Car
key={carID}
name={context.cars[carID].name}
price={context.cars[carID].price}
incrementPrice={() => context.incrementPrice(carID)}
decrementPrice={() => context.decrementPrice(carID)}
/>
))}
</Fragment>
)}
</MyContext.Consumer>
);
|
What have we missed? The ProductList! This is where the advantage becomes evident. We don’t pass any data or methods. The component is simplified as it only needs to render a few components.
ProductList.js
 1
 2
 3
 4
 5
 6
 7
 8
 9
10
| const ProductList = () => (
<div className="product-list">
<h2>Product list:</h2>
<Cars />
{/* Other potential product categories which we will skip for this demo: */}
{/* <Electronics /> */}
{/* <Clothes /> */}
{/* <Shoes /> */}
</div>
);
|
Throughout this article, I’ve drawn some comparisons between Redux and the Context API. One of Redux’s major strengths is its ability to provide a central store accessible from any component. With React’s new Context API, you have that functionality by default. There’s been considerable discussion about the Context API potentially making Redux obsolete.
This might hold true for developers who solely utilize Redux for its central store capabilities. If that’s your primary use case, you can now replace it with the Context API and avoid prop drilling without relying on third-party libraries.
For those interested in analyzing and enhancing the performance of their (newly Context API-powered) React applications, I recommend reading A Guide to Optimizing React Performance by fellow Toptaler William Wang.