Verifying functionality is a crucial aspect of building mobile applications. No matter if they utilize automated testing or not, every responsible developer knows their job isn’t finished until they’ve checked their app.
A properly tested app typically goes through various stages of verification: Unit testing, integration testing, acceptance testing, etc. As your application scales, the significance of testing grows, making automation essential.
While other platforms, like web, have made significant progress in testing tools and frameworks, the mobile world isn’t far behind. This article explains how to use Calabash to automate the UI of your Android and iOS apps using natural language instructions, making acceptance testing effortless.
What’s the Point of UI Testing?
If you’ve been testing manually, you’re likely spending too much time on repetitive tasks. You modify the code, build the app, launch it on a device or emulator, and interact with it to ensure everything works as intended.
Automating UI testing allows you to perform these manual steps automatically. For apps of considerable size, this saves significant time and prevents embarrassing bugs, especially regressions.
“Sounds great,” you say, but how do you achieve this for Android or iOS apps?
UI Testing Frameworks for Android and iOS
Official Android and iOS documentation recommends writing and running UI tests in their respective IDEs: Android Studio and Xcode.
They even suggest specific frameworks. Android documentation covers Espresso, the Android UI testing framework. Similarly, Apple recommends the XCTest framework.
For serious UI testing, following these suggestions makes sense. Espresso, maintained by Google and part of the Android Support Repository, will likely support future Android features. The same applies to XCTest for iOS.
However, despite the numerous benefits of automated testing, many developers skip it altogether.
Deep down, every developer understands the value of test automation. But when it’s time to write tests, they question its worth. Manually “touching the button” seems faster than writing code to do it. Clients and managers eager to try the app don’t always help either.
Many developers prioritize new features over writing automated UI tests for existing ones.
However, as the application grows, manually “touching those buttons” after each update becomes increasingly time-consuming.
What if a framework simplified UI testing and eliminated excuses for not writing tests?
Meet Calabash.
Calabash: Automating Acceptance Testing for Mobile Apps
About a year ago, I began searching for a testing framework that was easy to use, even for non-developers. That’s when I discovered Calabash.
Developed and maintained by the Xamarin team, this open-source testing framework works for both Android and iOS, allowing you to write and execute automated acceptance tests for mobile applications.
Acceptance tests typically follow system tests, ensuring your app meets business requirements. Because it operates at the UI level, this is a suitable choice for our UI testing automation framework.
Calabash interacts with your app like Espresso or XCTest. However, its support for Cucumber makes it stand out.
Cucumber runs automated tests written in plain English (or any other language). Writing Cucumber tests doesn’t require knowing Java, Objective-C, or any programming language.
How Does Calabash Work?
Calabash consists of libraries that interact with Android and iOS apps. It runs on real devices, mimicking manual testing actions.
Two GitHub projects make Calabash possible:
calabash-android - for Android
calabash-ios - for iOS
Calabash works with any Ruby-based test framework. This article focuses on Cucumber, the most popular and convenient way to write Calabash tests.
To try Calabash alongside this article, ensure Ruby is installed on your machine. Detailed installation instructions are available here.
Next, install Calabash for your platform using the GitHub links above.
Writing Your First Calabash Test
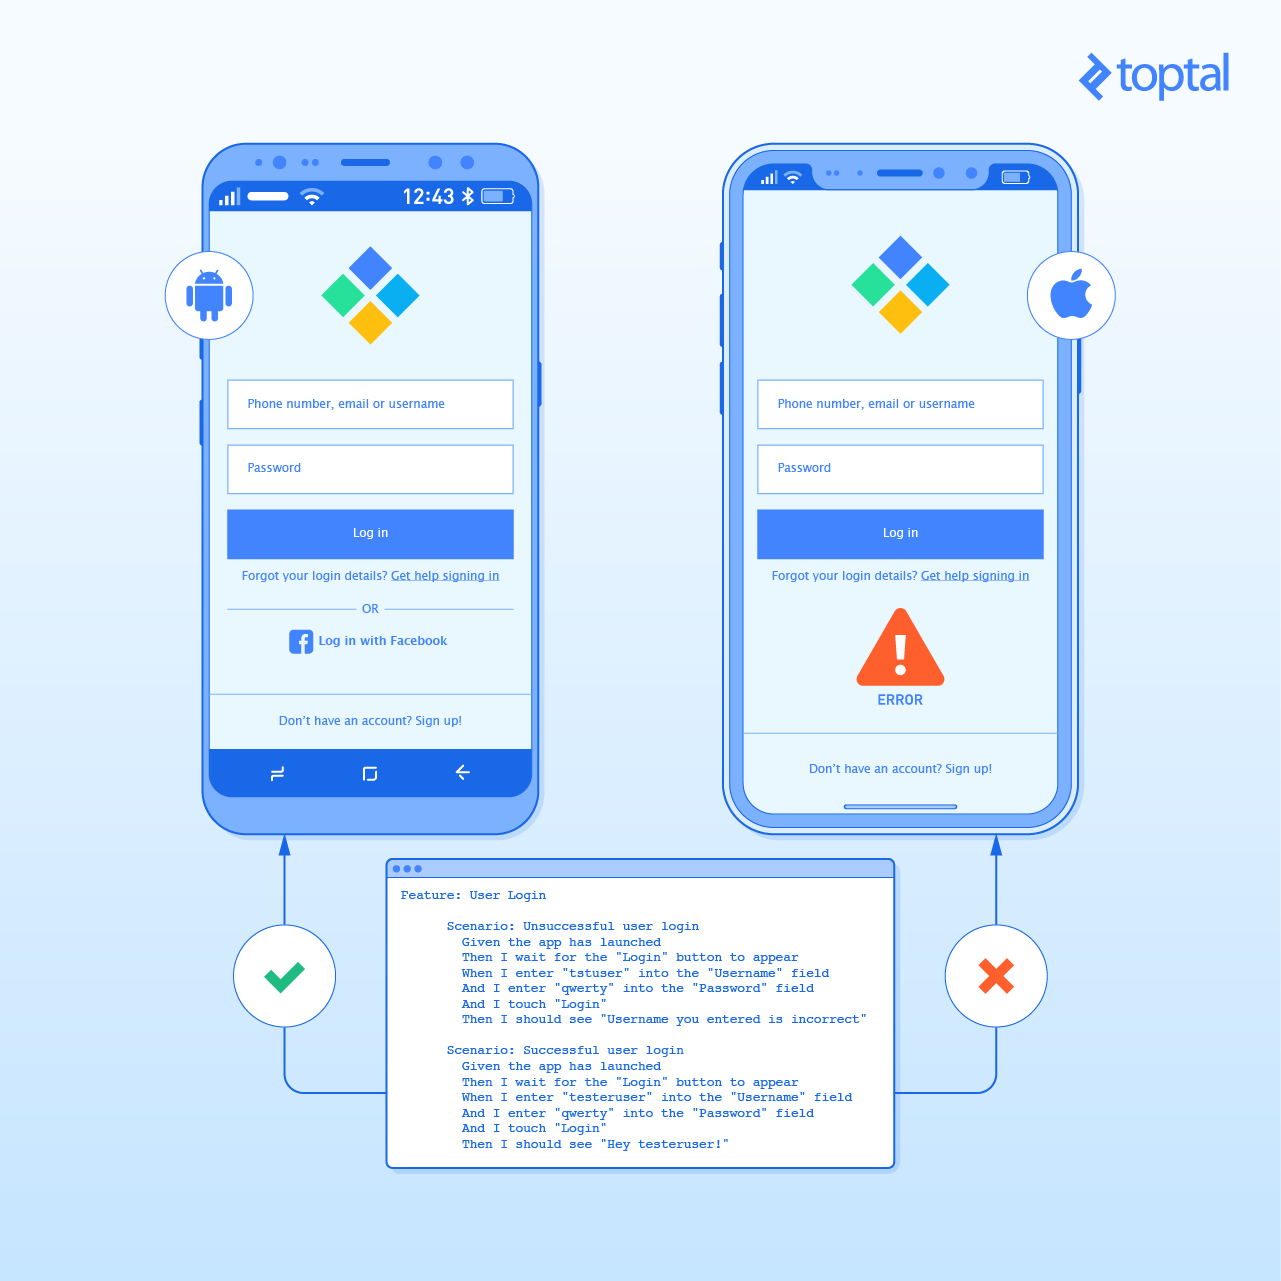
Writing Calabash tests is straightforward. Here’s a simple iOS app test:
| |
This test checks the app with incorrect credentials, then with correct ones. It expects login failure in the first scenario and success in the second.
You can create numerous scenarios by breaking down instructions into simple English sentences, like writing a story!
Those familiar with behavior-driven development (BDD) will find this familiar.
Behind the Scenes: How Calabash Operates
To understand the steps’ inner workings, check the project’s file on GitHub:
| |
Let’s examine the definition of this step:
| |
| |
This Ruby code snippet finds a field, touches it, waits for the keyboard, types text from the text_to_type variable, and pauses before moving to the next step.
The step’s first word can be “Given,” “When,” “Then,” “And,” or “But.” The keyword is flexible, use whichever improves clarity.
Adding Custom Steps
If you need a step not yet implemented in Calabash, you can write it yourself using the same syntax as predefined steps.
For instance, if you need to access an input field by placeholder instead of name:
| |
This step definition resembles the previous one but accesses the field by placeholder, potentially simplifying things for the tester.
It’s also developer-friendly. The developer implements the step once, and testers reuse it as needed. Writing custom steps doesn’t require extensive Ruby knowledge.
You can find usable Ruby functions here:
http://www.rubydoc.info/gems/calabash-cucumber/Calabash/Cucumber
Xamarin Test Cloud
Testing mobile applications on numerous devices and OS versions is crucial.
This is where Xamarin Test Cloud shines. With around 2,000 real devices in the cloud and support for Calabash tests, it’s a powerful tool.
The same Calabash tests that save you time by automating repetitive tasks can now test your application on a wide range of real devices.
Start Writing UI Tests
Whether or not Calabash is the perfect solution for your app, its advantages make it hard to justify not writing automated UI tests for your mobile applications. While Calabash might have limitations if your app heavily relies on specific device features (like the camera), it still significantly simplifies testing for most apps.