Introduction
A while back, Tomasz delved into Android development using Kotlin. As a refresher: Kotlin is a modern programming language created by Jetbrains, the minds behind the widely used Java IDE, IntelliJ IDEA. Similar to Java, Kotlin serves as a general-purpose language. Because it aligns with the Java Virtual Machine (JVM) bytecode, it can work seamlessly with Java, introducing no performance drawbacks.
This article will explore the top 10 handy Kotlin features to enhance your Android development process.
Important Note: when this article was written, the current versions in use were Android Studio 2.1.1 and Kotlin 1.0.2.

Setting Up Kotlin
Developed by JetBrains, Kotlin enjoys excellent support in both Android Studio and IntelliJ.
Start by install Kotlin plugin. Once complete, you’ll find new actions for transitioning your Java code to Kotlin. Here are two new options:
- Initiate a new Android project with Kotlin already configured.
- Integrate Kotlin support into an existing Android project.
For guidance on creating a new Android project, refer to the official step by step guide. To incorporate Kotlin support into a fresh or existing project, access the find action dialog using Command + Shift + A (Mac) or Ctrl + Shift + A (Windows/Linux) and execute the Configure Kotlin in Project action.
To generate a new Kotlin class, choose:
File>New>Kotlin file/class, orFile>New>Kotlin activity
Alternatively, create a Java class and convert it to Kotlin using the action mentioned earlier. This conversion works for any class, interface, enum, or annotation, simplifying Java-to-Kotlin code comparisons.
Kotlin extensions offer another timesaving tool. To utilize them, apply an additional plugin within your module’s build.gradle file:
| |
Important Note: Using the Kotlin plugin action for project setup will insert the following code into your main build.gradle file:
| |
This might prevent the extension from functioning correctly. To rectify this, copy that code snippet into each project module where you intend to use Kotlin.
With a successful setup, you can run and test your application as you would a standard Android project, now empowered by Kotlin.
Efficiency Gains with Kotlin
Let’s delve into key aspects of Kotlin and discover how it can save you valuable development time compared to Java.
Feature #1: Streamlined Static Layout Import
A common boilerplate in Android involves repeatedly using the findViewById() function to retrieve references to views within Activities or Fragments.
Solutions like the Butterknife library alleviate some typing, but Kotlin goes further by allowing the import of all view references from the layout with a single import statement.
Consider this example activity XML layout:
| |
And its corresponding activity code:
| |
To effortlessly acquire references for all views with defined IDs in the layout, employ the Android Kotlin extension Anko. Remember to include this import statement:
| |
Notice that semicolons at the end of lines are optional in Kotlin.
The TextView from the layout is imported as a TextView instance, with its name matching the view’s ID. Let’s clarify the syntax for setting the label:
| |
We’ll elaborate on this shortly.
Important Notes:
- Ensure you import the correct layout file; otherwise, imported View references will be
null. - When working with fragments, use imported View references after the
onCreateView()function call. Import the layout withinonCreateView()and utilize the View references for UI setup inonViewCreated(). References won’t be assigned until theonCreateView()method completes.
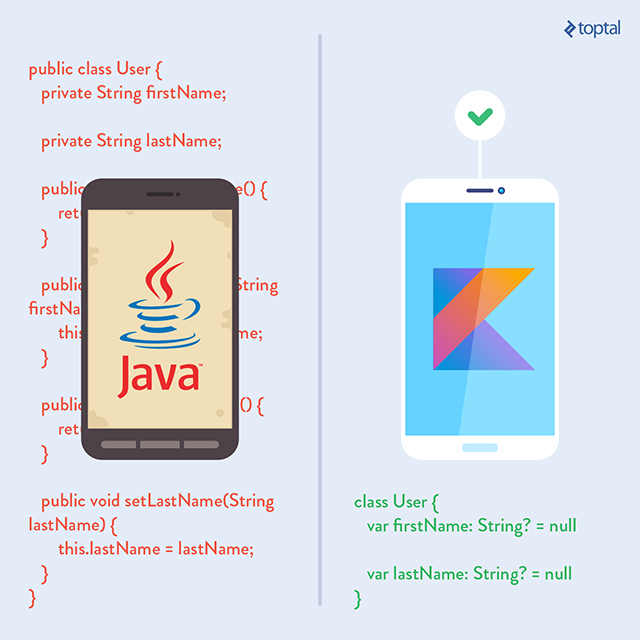
Feature #2: Effortless POJO Class Creation in Kotlin
Kotlin significantly streamlines the creation of POJO (Plain Old Java Object) classes, commonly used for storing data, such as in request and response bodies of RESTful APIs. Applications relying heavily on RESTful APIs often involve numerous such classes.
Kotlin handles much of the heavy lifting, resulting in concise syntax. Let’s compare a Java class:
| |
In Kotlin, the public keyword is implicit. Everything defaults to public scope. For example, declaring a class is as simple as:
| |
Here’s the Kotlin equivalent of the Java code:
| |
The reduction in typing is evident. Let’s break down the Kotlin code.
When defining variables in Kotlin, you have two choices:
var: Declares mutable variables.val: Declares immutable variables.
The syntax differs slightly from Java; the variable name comes first, followed by the type. By default, properties are non-nullable, meaning they cannot hold a null value. To allow a null value, append a question mark after the type. We’ll explore nullability in Kotlin later.
Another key distinction is that Kotlin doesn’t allow field declarations for classes; only properties are permitted. Therefore, in this case, firstName and lastName are properties with automatically assigned default getter/setter methods, both public by default in Kotlin.
Custom accessors can be defined, for example:
| |
Externally, properties behave like public fields in Java in terms of syntax:
| |
The new property fullName is read-only (declared using val) and has a custom getter that concatenates the first and last names.
In Kotlin, all properties must be assigned a value when declared or within a constructor. However, there are scenarios where this isn’t ideal, such as properties initialized via dependency injection. In such cases, use the lateinit modifier. Here’s an example:
| |
For a deeper dive into properties, refer to the official documentation.
Feature #3: Streamlined Class Inheritance and Constructors
Kotlin offers a more concise syntax for constructors.
Constructors
Kotlin classes can have a primary constructor and one or more secondary constructors. Here’s how to define a primary constructor:
| |
The primary constructor follows the class name in the class definition. If it doesn’t have any annotations or visibility modifiers, you can omit the constructor keyword:
| |
It’s crucial to note that a primary constructor cannot contain code; initialization must be done within the init code block:
| |
You can use the primary constructor to define and initialize properties:
| |
Like regular properties, those defined in the primary constructor can be immutable (val) or mutable (var).
Classes can have secondary constructors as well, defined as follows:
| |
Every secondary constructor must delegate to the primary constructor, similar to using the this keyword in Java:
| |
When instantiating classes, remember that Kotlin doesn’t use the new keyword like Java. To create an instance of the User class, simply use:
| |
Understanding Inheritance
In Kotlin, all classes implicitly inherit from Any, analogous to Object in Java. By default, classes are closed, similar to final classes in Java. To enable extension, declare a class as open or abstract:
| |
You must delegate to the default constructor of the parent class, akin to calling super() in Java’s constructor.
For further details on classes, refer to the official documentation.
Feature #4: Embracing Lambda Expressions
Lambda expressions, a favorite feature introduced in Java 8, face limitations on Android, which still primarily supports Java 7, with Java 8 support seemingly distant. Workarounds like Retrolambda bring lambda expressions to Android.
Kotlin, however, requires no additional libraries or workarounds for lambda expressions.
Functions in Kotlin
Let’s quickly review Kotlin’s function syntax:
| |
You can omit the function’s return type, in which case it defaults to Int. It’s worth reiterating that everything in Kotlin is an object, inheriting from Any; there are no primitive types.
Function arguments can have default values:
| |
Here, the add() function can be invoked with only the x argument. The equivalent Java code would be:
| |
Another convenient feature is the use of named arguments when calling functions:
| |
For a deeper understanding of functions, check out official documentation.
Using Lambda Expressions in Kotlin
In Kotlin, lambda expressions can be considered analogous to Java’s anonymous functions but with a more concise syntax. Let’s compare click listener implementations in Java and Kotlin.
Java:
| |
Kotlin:
| |
The Kotlin version achieves the same result with a single line of code. The lambda expression is enclosed in curly braces. Parameters are declared first, followed by the body after the -> symbol. For click listeners, the type of the view parameter is inferred. The body simply calls the toast() function (provided by Kotlin) to display a toast message.
If parameters aren’t used, they can be omitted:
| |
Kotlin optimizes Java libraries. Any function accepting an interface with a single method as an argument can be called with a function argument instead of the interface.
Moreover, if the function is the last parameter, it can be moved outside the parentheses:
| |
Finally, if a function has only one parameter, and that parameter is a function, you can omit the parentheses altogether:
| |
For more information, refer to Kotlin for Android developers book by Antonio Leiva and the official documentation.
Extending Functionality with Extension Functions
Similar to C#, Kotlin enables the extension of existing classes with new functionality through extension functions. Let’s create an extension function to calculate the MD5 hash of a String:
| |
The function name is prefixed with the name of the class being extended (in this case, String). The instance of the extended class is accessible using the this keyword within the function.
Extension functions are akin to Java utility functions. The equivalent Java code for the example function would be:
| |
This Java example would reside in a Utility class. Essentially, extension functions don’t modify the original class but offer a convenient way to write utility methods.
Feature #5: Embracing Null Safety
NullPointerExceptions are a common pain point in Java. Kotlin addresses this with its built-in null safety feature, which is so seamlessly integrated that you’ll rarely have to think about it. According to the official documentation, the only potential causes of NullPointerExceptions in Kotlin are:
- Explicitly throwing a
NullPointerException. - Using the
!!operator (explained later). - Interacting with external Java code.
- Accessing a
lateinitproperty before it’s initialized, resulting in anUninitializedPropertyAccessException.
By default, Kotlin treats all variables and properties as non-nullable (unable to hold a null value) unless explicitly declared as nullable. As mentioned earlier, to allow a variable to accept null, append a question mark to its type:
| |
However, the following code won’t compile:
| |
Kotlin’s compiler performs null checks, so you must explicitly handle the possibility of null:
| |
This code compiles successfully. Behind the scenes, Kotlin treats number as non-nullable (Int instead of Int?) within the if block.
You can simplify the null check using the safe call operator (?.):
| |
The second line executes only if number is not null. The Elvis operator (?:) offers further conciseness:
| |
If the expression on the left side of ?: is not null, it’s evaluated and returned; otherwise, the result of the expression on the right side is returned. You can use throw or return on the right side of the Elvis operator, as they are expressions in Kotlin:
| |
The !! Operator
If you need to replicate Java’s NullPointerException behavior, use the !! operator. The following code will throw a NullPointerException:
| |
Casting in Kotlin
Casting in Kotlin uses the as keyword:
| |
This is considered “unsafe” casting because it throws a ClassCastException if the cast fails, just like Java. Kotlin also provides a “safe” cast operator that returns null instead of throwing an exception:
| |
For more details on casting, refer to the Type Casts and Casts section of the official documentation. For a deeper dive into null safety, check out the Null-Safety section.
lateinit Properties and Exceptions
Using lateinit properties can lead to an exception similar to NullPointerException in a specific scenario. Consider this class:
| |
This code compiles without warnings. However, upon creating an instance of TestClass, an UninitializedPropertyAccessException is thrown because the property s is accessed before initialization.
Feature #6: Streamlining Code with the with() Function
Kotlin’s standard library includes the useful with() function. It helps reduce code verbosity when you need to access multiple properties of an object:
| |
The with() function takes an object and an extension function as parameters. The code block within the curly braces is a lambda expression representing the extension function of the object passed as the first parameter.
Feature #7: Customizing Behavior with Operator Overloading
Kotlin empowers you to provide custom implementations for a defined set of operators. To implement an operator, define a member function or extension function with the corresponding name.
For instance, to overload the multiplication operator, define a member function or extension function named times(argument):
| |
This example demonstrates overloading the binary * operator for the String class. Now, the following expression will assign the value “TestTestTestTest” to the newString variable:
| |
Since extension functions are eligible for operator overloading, you can modify the default behavior of operators for all objects. Use this powerful feature judiciously to avoid code readability issues. For a list of function names corresponding to overloadable operators, refer to the official documentation.
Another notable difference from Java is the behavior of the == and != operators. In Kotlin, == translates to:
| |
And != translates to:
| |
This means that == in Kotlin doesn’t perform an identity check like in Java (comparing object instance references) but behaves like the equals() method with added null checks.
For identity checks in Kotlin, use the === and !== operators.
Feature #8: Delegating Property Responsibility
Certain properties exhibit shared behaviors, such as:
- Lazy initialization, where a property is initialized upon first access.
- Observable properties, implementing the Observer pattern.
- Properties stored in a map instead of separate fields.
To simplify the implementation of such properties, Kotlin introduces Delegated Properties:
| |
This syntax signifies that the getter and setter functions for the property p are handled by an instance of the Delegate class.
Here’s an example of a delegate for a String property:
| |
This delegate prints a message when the property is assigned a value or read.
You can create delegates for both mutable (var) and read-only (val) properties.
For read-only properties, implement the getValue method. It takes two parameters (as documented in offical documentation):
receiver: Must be the same type as the property owner or a supertype (for extension properties, it’s the type being extended).metadata: Must be of typeKProperty<*>or a supertype.
The getValue function must return the same type as the property or a subtype.
For mutable properties, the delegate must also provide a setValue function with the following parameters:
receiver: Same as forgetValue().metadata: Same as forgetValue().new value: Must be the same type as the property or a supertype.
Kotlin offers several standard delegates covering common use cases:
LazyObservableVetoable
Lazy Initialization with Lazy
The Lazy delegate takes a lambda expression as a parameter and executes it the first time the getValue() method is called.
By default, lazy property evaluation is synchronized. If multi-threading isn’t a concern, use lazy(LazyThreadSafetyMode.NONE) { … } for potential performance gains.
Observing Changes with Observable
Use the Delegates.observable() delegate for properties that need to behave as Observables in the Observer pattern. It takes two parameters: the initial value and a function with three arguments (property, old value, new value).
The provided lambda expression is executed whenever the setValue() method is called:
| |
Conditional Assignment with Vetoable
The Vetoable delegate, a specialized Observable, allows you to control whether a new value assigned to a property should be stored. It’s useful for enforcing conditions before assignment. Like Delegates.observable(), it accepts two parameters: the initial value and a function.
The key difference is that the function returns a Boolean value. If true, the new value is stored; otherwise, it’s discarded:
| |
This example ensures that only positive numbers are assigned to the property.
For a comprehensive explanation of delegated properties, refer to the official documentation.
Feature #9: Mapping Objects to Maps
Storing property values within a map is a frequent requirement, particularly in applications working with RESTful APIs and parsing JSON objects. Kotlin allows you to use a map instance as a delegate for a delegated property. Here’s an example from the official documentation:
| |
In this example, the User class has a primary constructor that accepts a map. The two properties (name and age) will take their values from the map based on keys matching the property names:
| |
The name property of the new user instance will be “John Doe”, and the age property will be 25.
This approach also works with mutable (var) properties and MutableMap:
| |
Feature #10: Enhanced Collections with Functional Operations
Kotlin’s lambda support unlocks a new level of power for working with collections.
Firstly, Kotlin distinguishes between mutable and immutable collections. For example, there are two versions of the Iterable interface:
IterableMutableIterable
The same applies to Collection, List, Set, and Map interfaces.
For instance, the any operation returns true if at least one element satisfies the provided predicate:
| |
For an extensive list of functional operations available for collections, check out this blog post.
Conclusion
We’ve only scratched the surface of Kotlin’s capabilities. For those eager to delve deeper, here are some valuable resources:
- Antonio Leiva’s Kotlin blog posts and book.
- Official documentation and tutorials from JetBrains.
In summary, Kotlin, with its intuitive and concise syntax, empowers you to write native Android applications more efficiently. While still a relatively young language, it has matured enough to be a reliable choice for production-level apps.
Benefits of Kotlin:
- Seamless and excellent support in Android Studio.
- Straightforward conversion of existing Java projects.
- Coexistence of Java and Kotlin code within the same project.
- No performance overhead.
Potential Drawbacks:
- Kotlin adds its libraries to the generated
.apkfile, increasing its size (around 300KB larger). - Overuse of operator overloading can hinder code readability.
- IDE and Autocomplete might be slightly slower with Kotlin compared to pure Java Android projects.
- Compilation times could be slightly longer.