If your experience mirrors mine, the early years of your WordPress development journey involved a hefty dose of “cowboy coding.” This entailed making direct changes on live websites, hastily testing and uploading them via FTP, frequently leading to dreaded 500 Internal Server Error messages and site-wide crashes—all on full display for your valued visitors.
While the adrenaline rush of frantically searching for that missing semicolon was exhilarating, it became a serious issue for sites with an audience larger than zero (who actually noticed the downtime). As the saying goes, if a tree falls in a forest and no one is around to hear it, does it make a sound? The answer depends on your philosophical stance on the nature of reality.
However, if a website crashes and someone witnesses it, they will definitely make their displeasure known.
The Perils of Poorly Executed WordPress Continuous Deployment
Enter the concept of staging sites: duplicate WordPress installations (at least in theory) where changes could be tested before being replicated on the live site once deemed operational. While this approach mitigated visitor complaints, it shifted the burden to us developers. We were now tasked with managing two separate websites, manually syncing code between them, and conducting redundant tests to ensure functionality on the live site. This led to anxiety-inducing to-do lists filled with reminders like “don’t forget to update this on the live site” and “remember to toggle this on staging before copying the code.” Backing up this convoluted system was an absolute nightmare, resulting in a chaotic jumble of folders named “my-theme-staging-1,” “my-theme-live-before-menu-restyle-3,” and so on.
There had to be a more efficient solution, and indeed there was.
Git, a powerful version control system, emerged as the savior. Integrating version control into WordPress development instantly streamlined and organized the process. Countless hours previously wasted on manual backups were now dedicated to actual coding. Changes were tracked, and I could finally provide meaningful commit messages instead of resorting to generic labels like “my-theme-4-v2.”
While the codebase was now significantly cleaner, the challenge of deployment and ensuring the website was running the latest code persisted, introducing yet another avenue for human error. Relying on manual FTP uploads to overwrite existing code felt archaic and risky. Although CI/CD services offered a potential solution, many came with prohibitive costs and complex setup procedures. These often involved server reconfigurations, dependence on external services even for basic websites, and the need to master entirely new systems and their quirks.
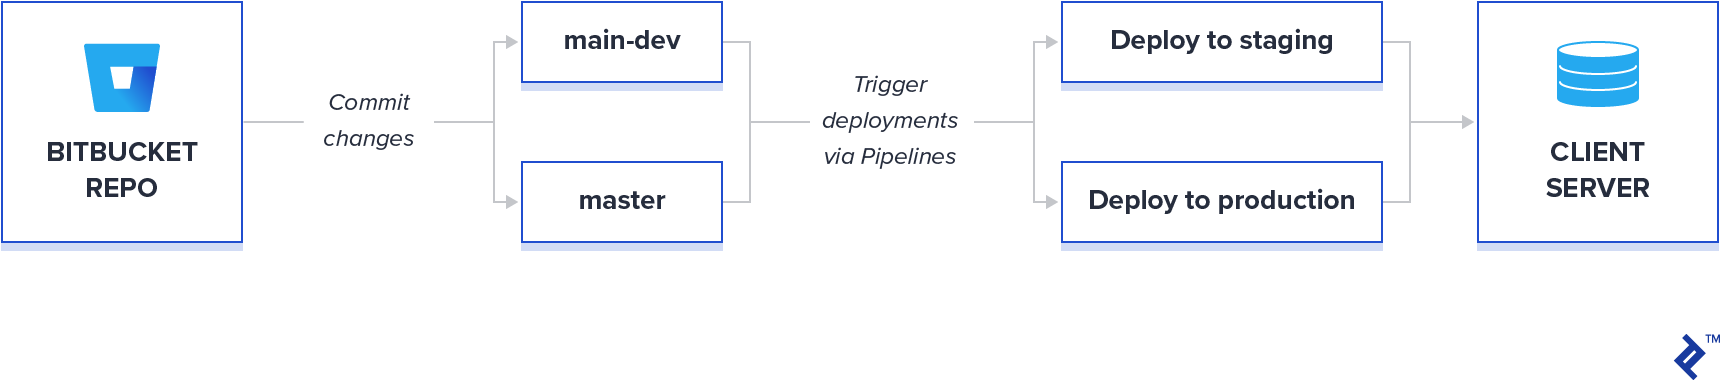
While setups similar to the one described in this tutorial are achievable using GitHub/GitLab and other services, my early adoption of Atlassian’s ecosystem was driven by their free private repositories (a feature only recently introduced by GitHub). The arrival of Bitbucket’s Pipelines and Deployments services was a game-changer. It enabled automatic deployment of new code to staging or production environments (or any other intermediary stage) without the need for manual FTP uploads or third-party services. Developers could now leverage the full potential of version control within their WordPress development workflow, seamlessly pushing changes to the appropriate destinations with minimal effort, all while monitoring the status through a centralized dashboard. This approach ensures consistent synchronization and provides a clear overview of the codebase deployed on each environment. Moreover, pricing for Bitbucket’s build minutes offers exceptional value—50 minutes free per month with the option of a “Free with Overages” plan.
Initially, it took some time to adapt to this new model, particularly in terms of effectively utilizing branches and other source control features, as well as configuring the specifics of Bitbucket Pipelines. Here’s the process I’ve established for initiating new WordPress projects. I won’t delve into the intricacies of setting up Git and WordPress installations, as abundant resources are readily available online. In essence, the workflow follows this sequence:
My Streamlined WordPress Deployment Workflow
The steps outlined below should be executed as required:
Client Server Setup
Establish a domain for the live website (e.g., clientsite.com) and a subdomain for staging (e.g., staging.clientsite.com).
Install WordPress on both the live and staging environments. This can be achieved through cPanel/Softaculous (if supported by the client’s hosting provider) or by downloading the latest version from wordpress.org. Ensure separate databases are configured for each environment.
Bitbucket Repository Configuration
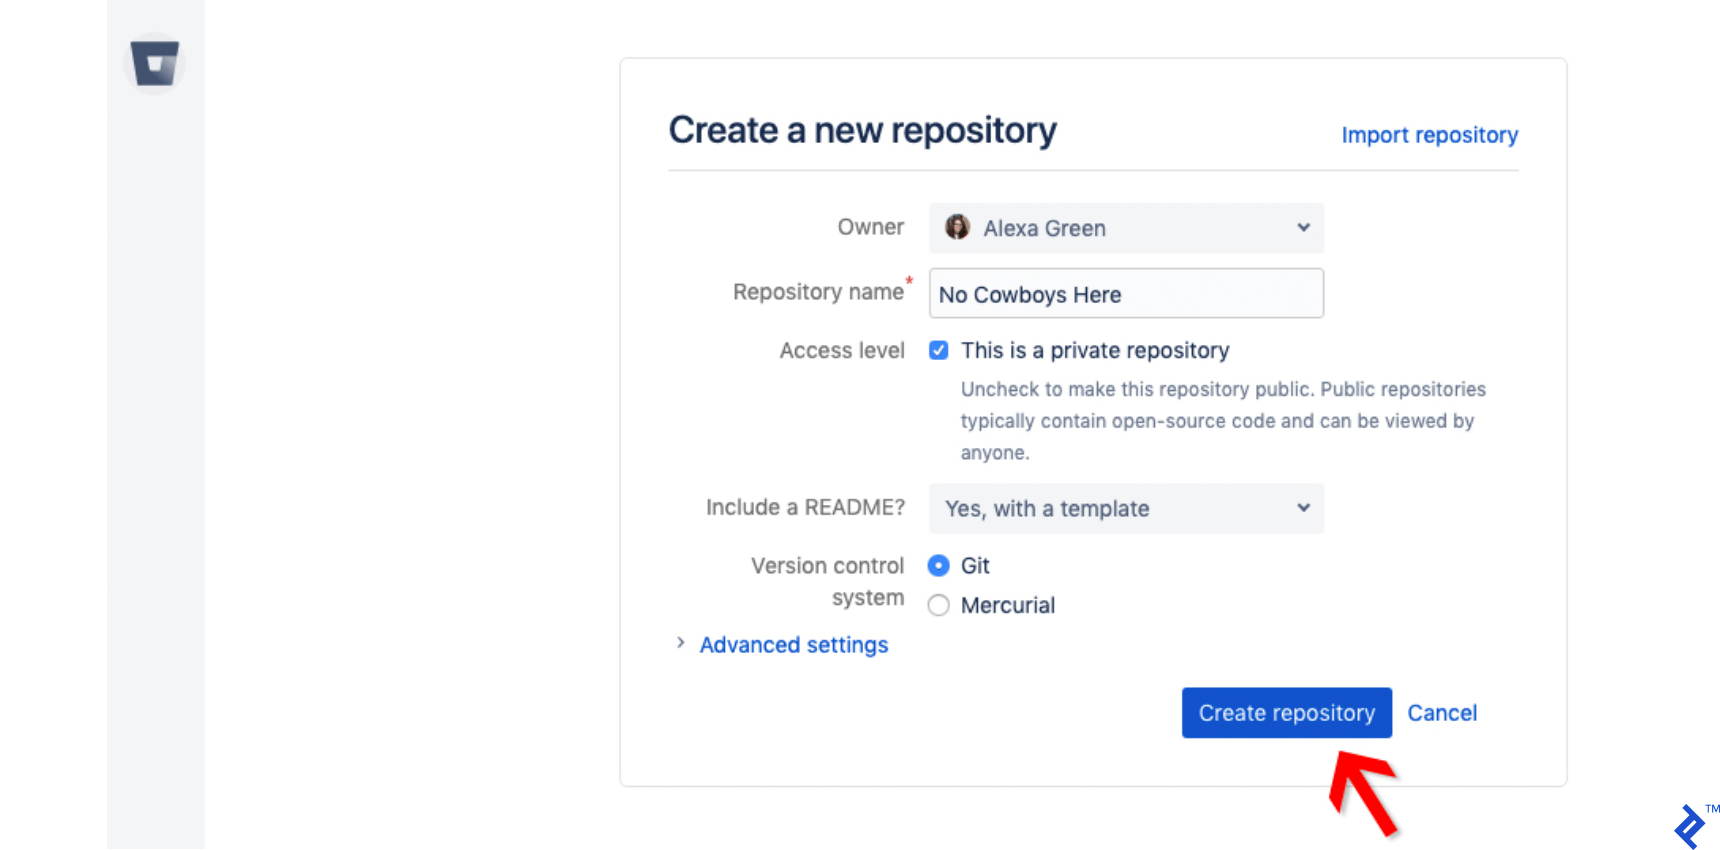
Create a new repository and populate it with a .README file to initiate version control.
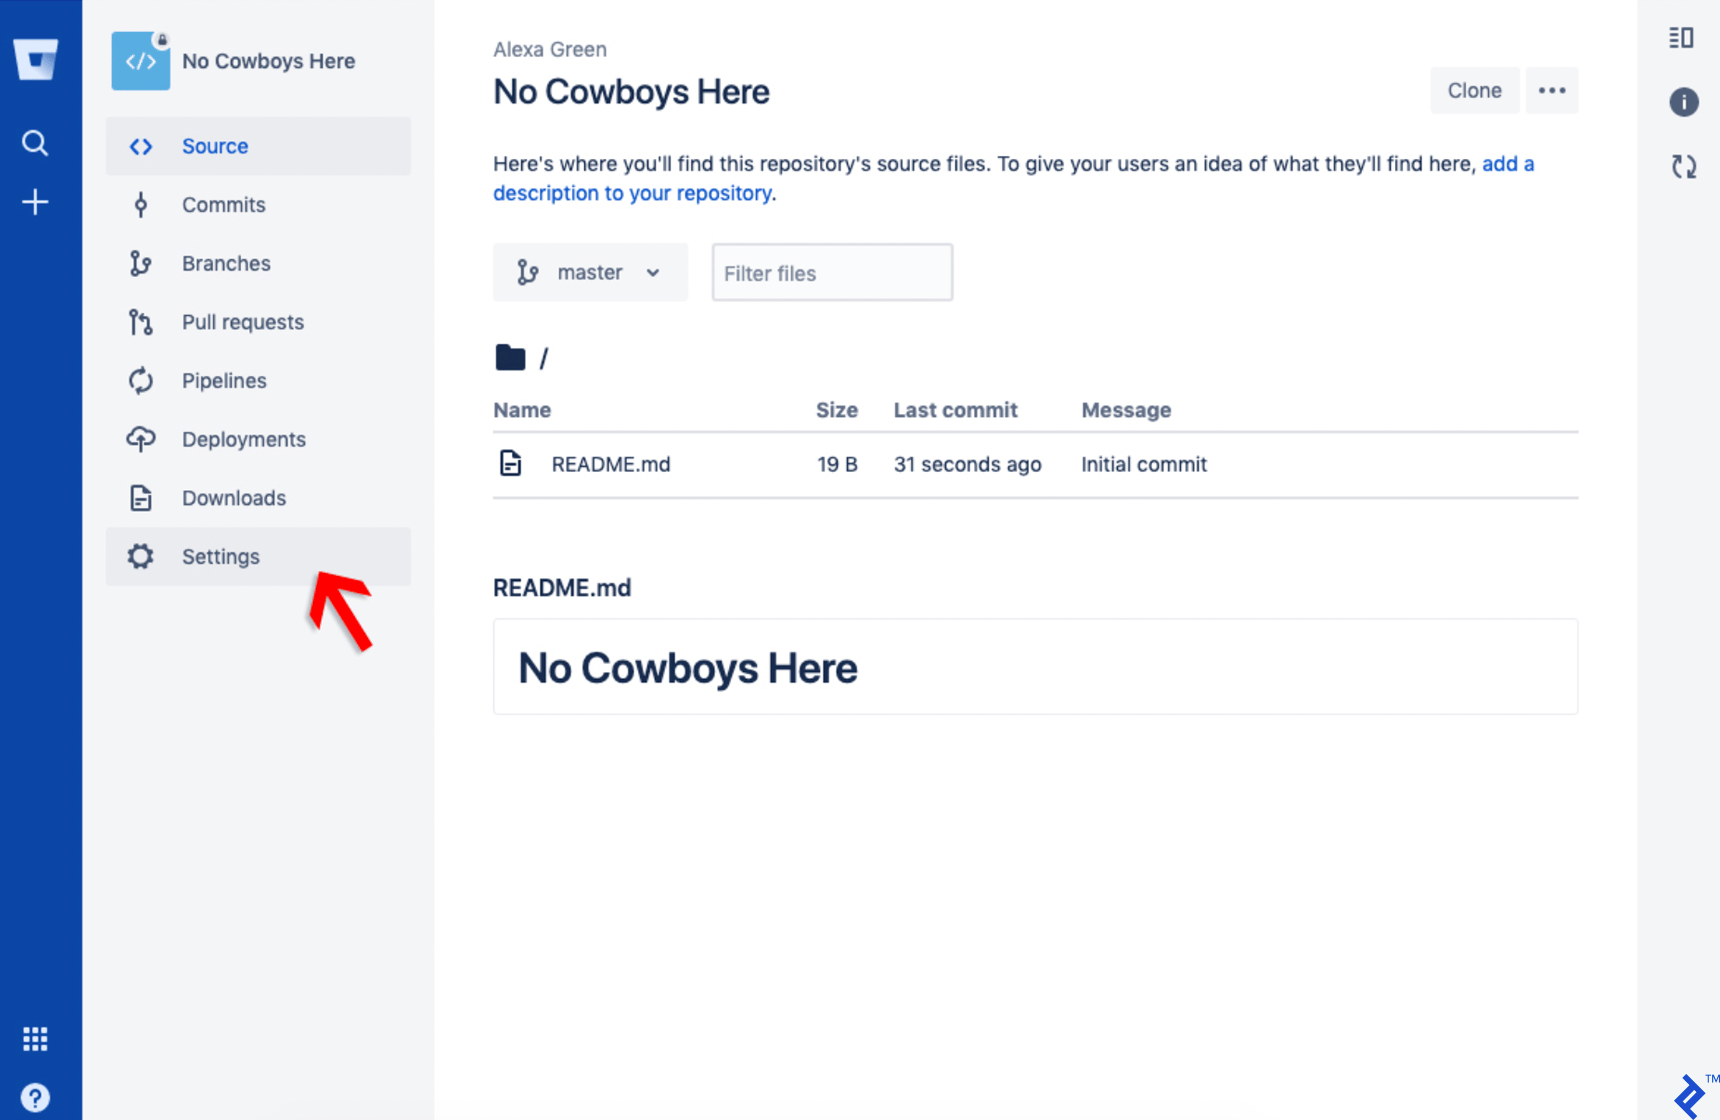
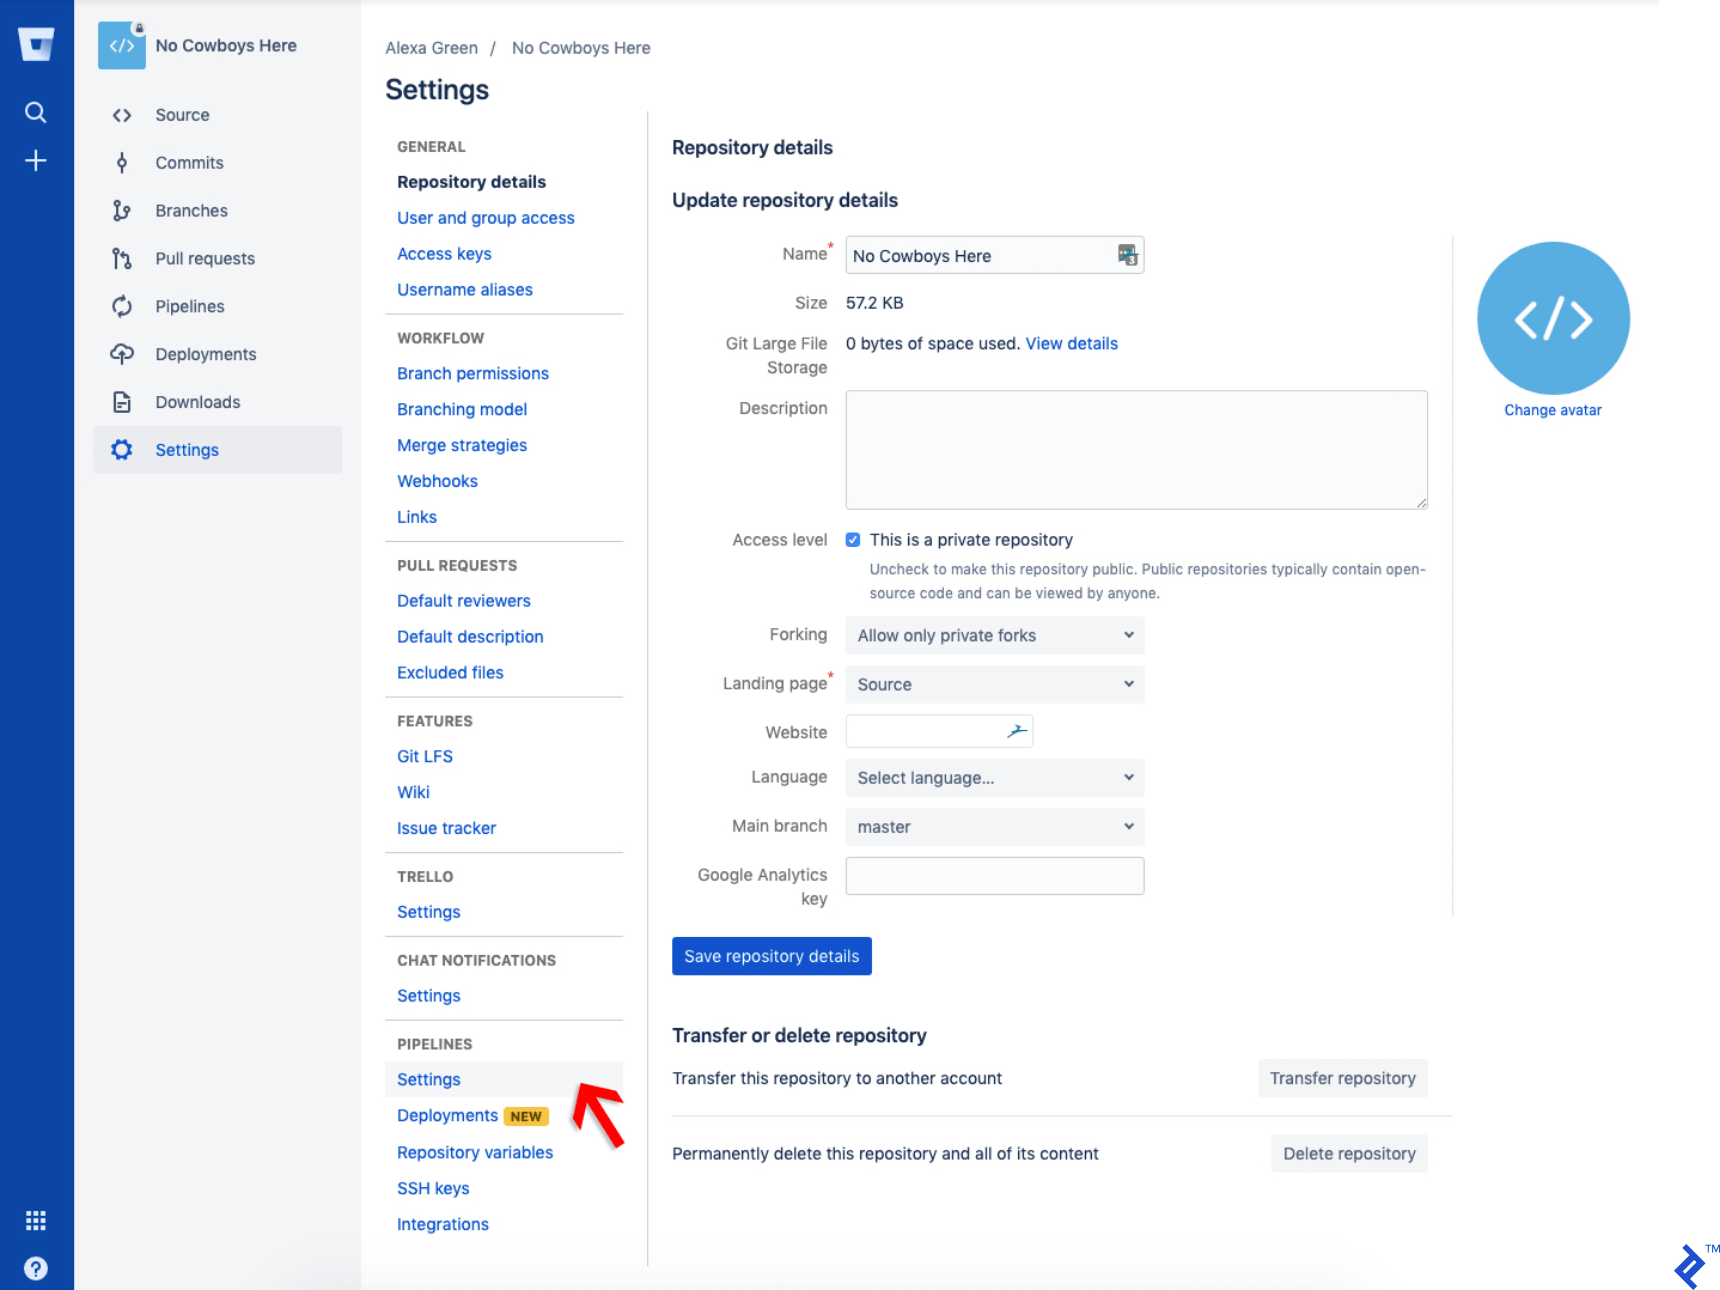
Navigate to Settings > Pipelines > Settings and enable Enable Pipelines.
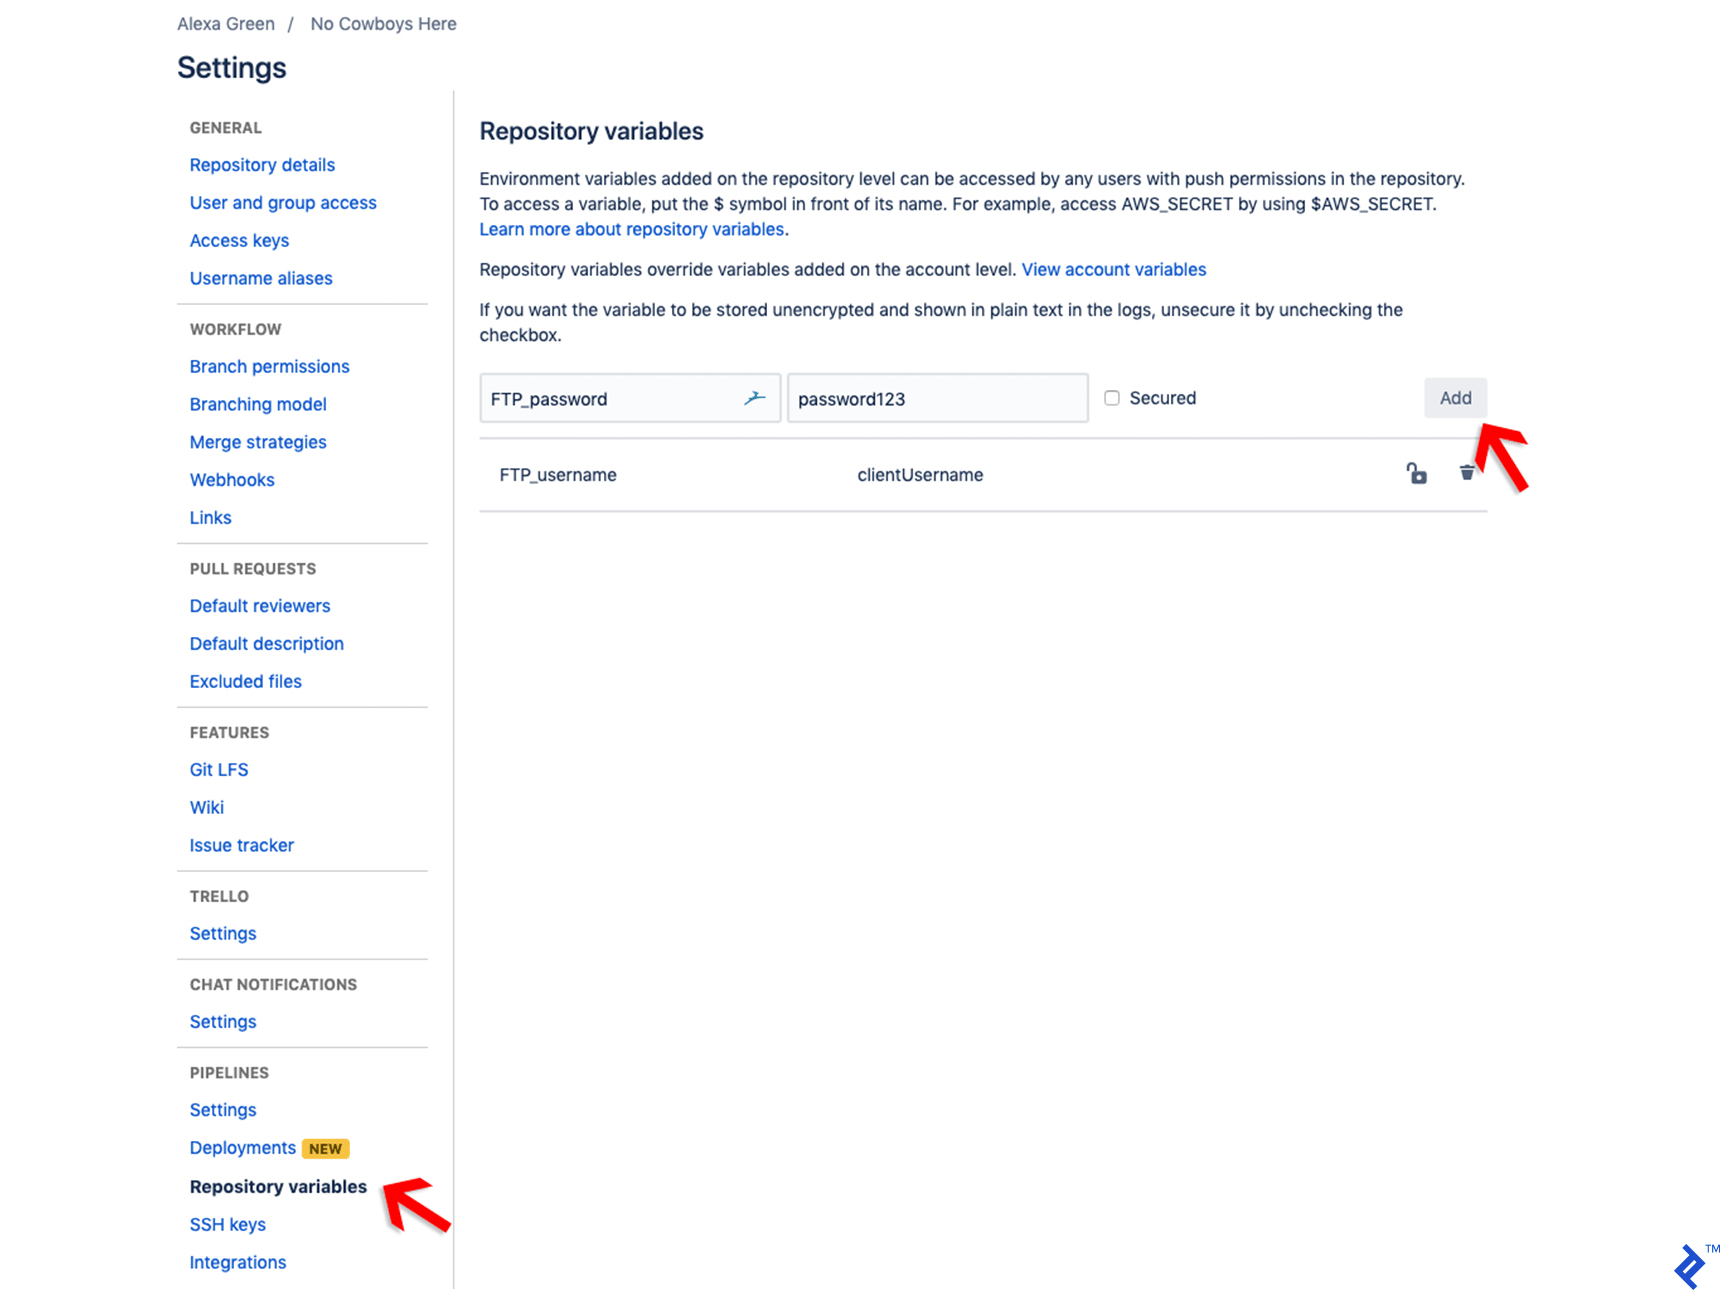
Under Settings > Pipelines > Repository variables, define the following variables:
Name: FTP_username
Value: The client FTP username
1
2
3
4
    ```
Name: FTP_password
Value: The client FTP password
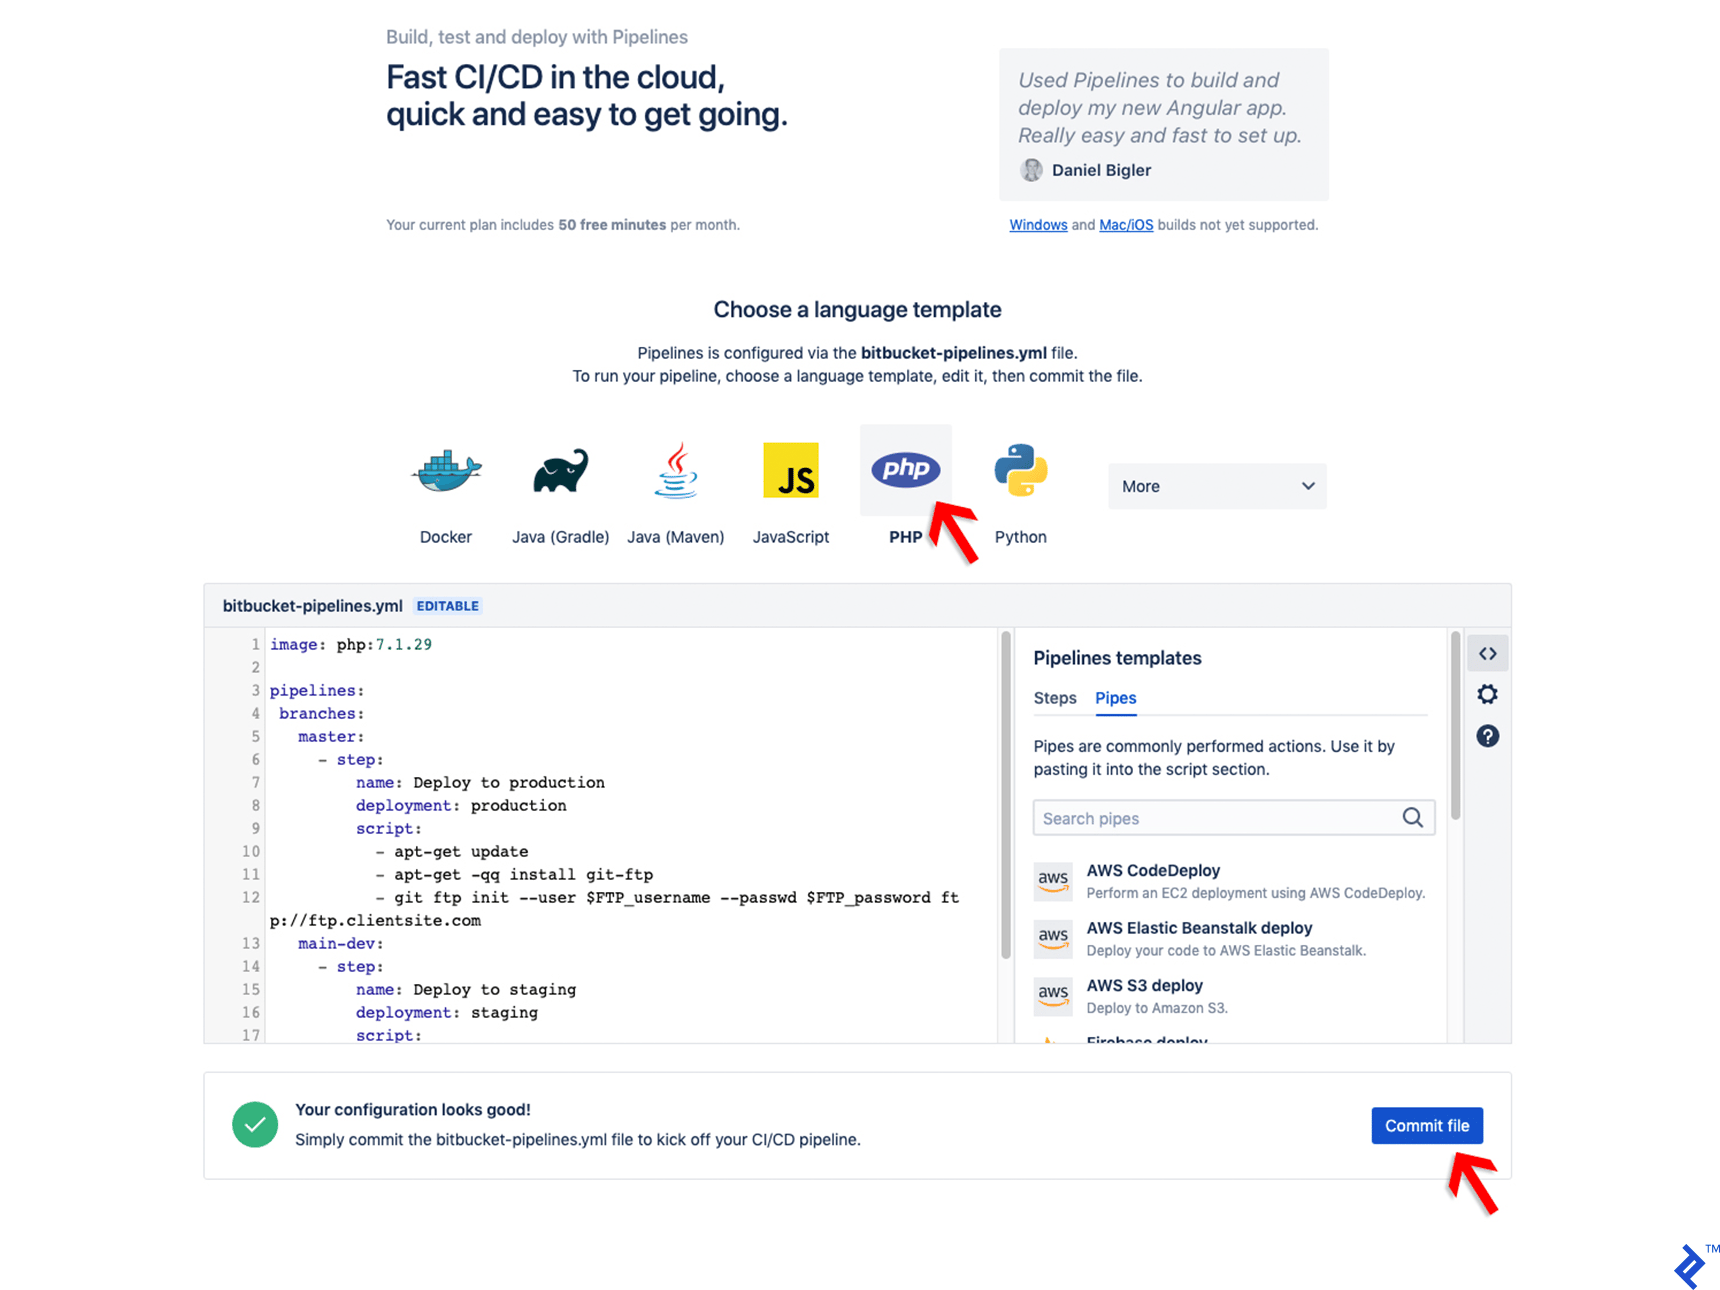
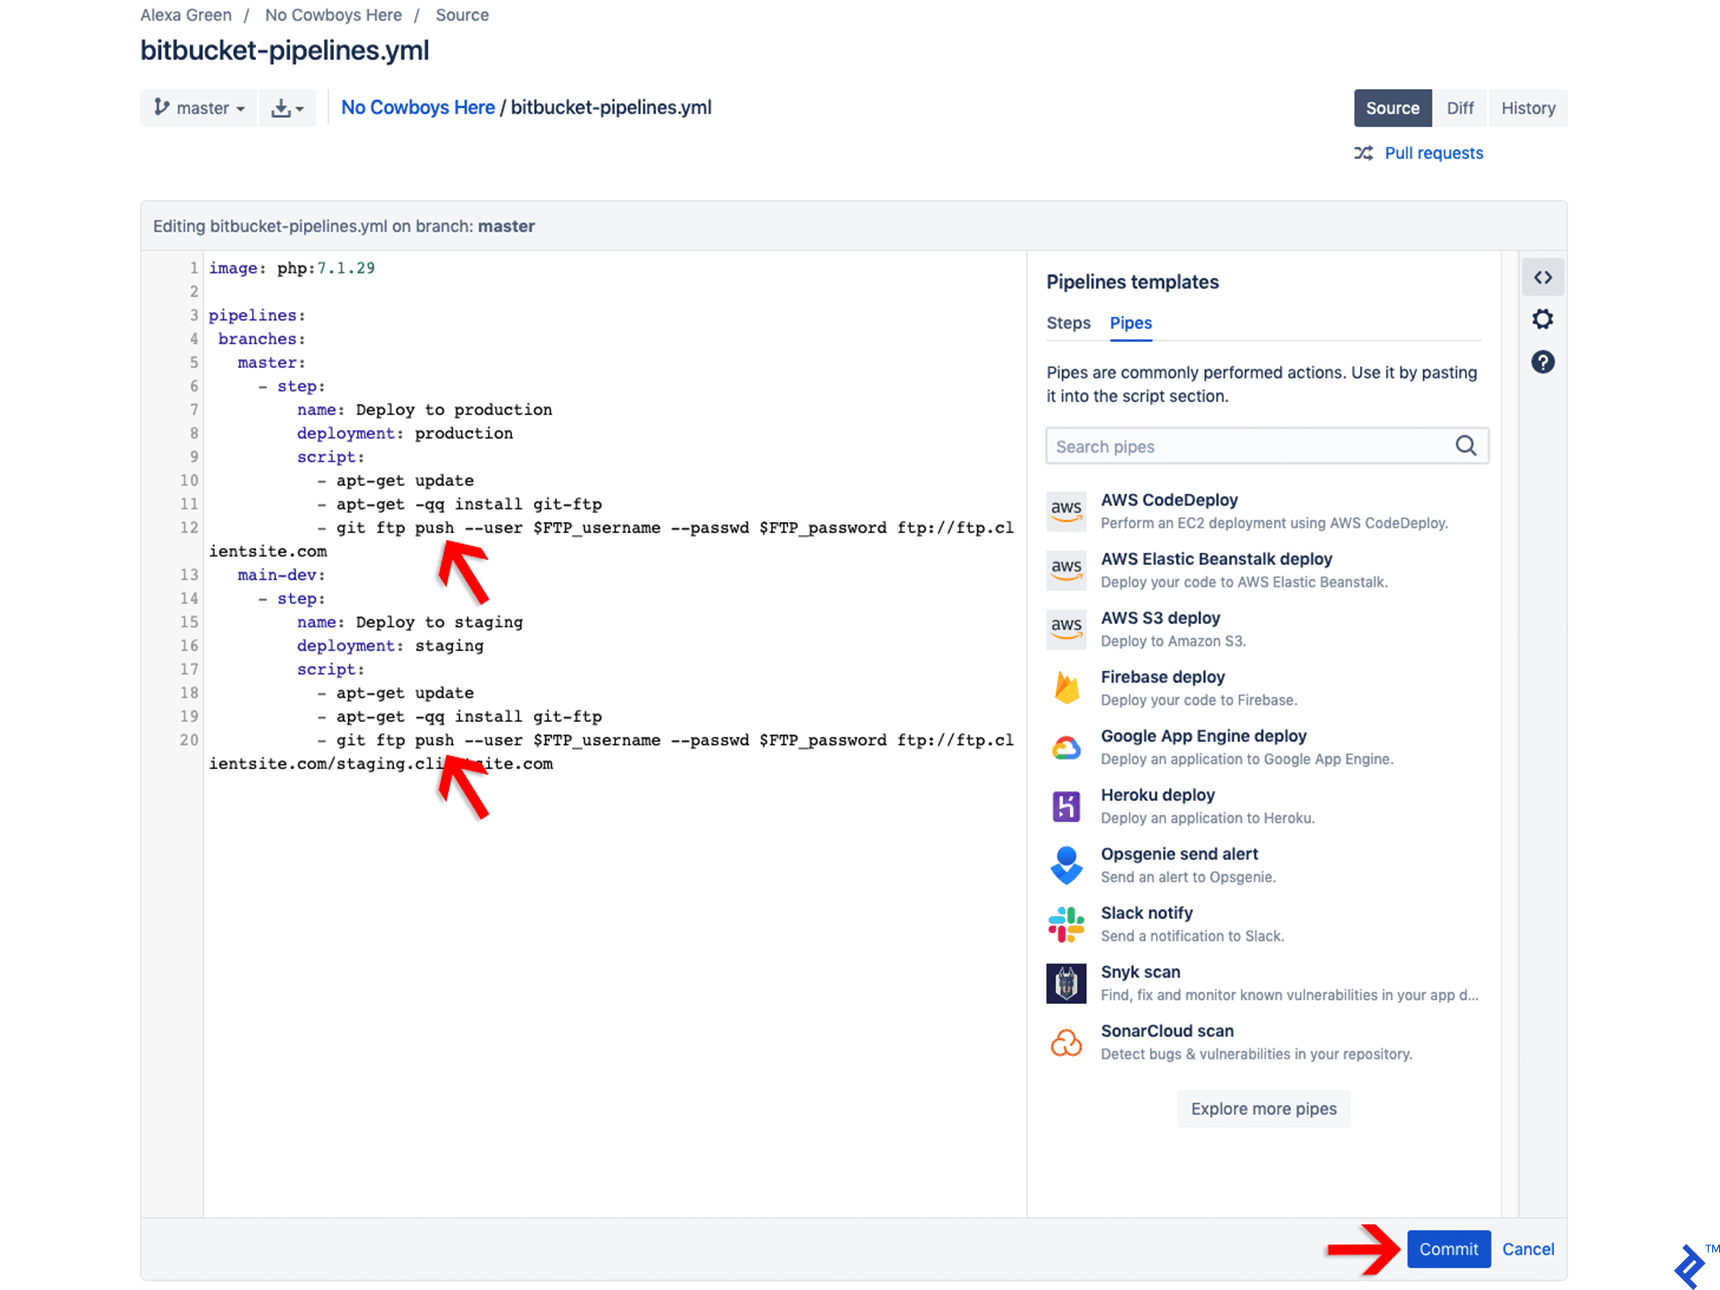
Return to Pipelines > Settings and select Configure bitbucket-pipelines.yml. Choose PHP as the language on the subsequent page. Utilize the following code snippet as a template, ensuring to replace the PHP version with the one used on the client’s server, and update the URLs/FTP servers with the actual client website (production and staging) URLs/FTP servers.
Clone the repository into an empty directory designated for local development. Switch to the main-dev branch.
Set up a local WordPress installation within the designated directory. Numerous tools are available for this purpose, including Local by Flywheel, MAMP, Docker, and others. Ensure that the local environment matches the client’s server configuration (WordPress version, PHP version, Apache/Nginx, etc.).
Create a .gitignore file with the following content to instruct Git to exclude unnecessary files from version control, preventing potential conflicts between installations. The primary goal is to track only the wp-content directory while ignoring other files. You can further customize this file to exclude large backup files, system-generated icons, and DS_Store files based on your preferences.
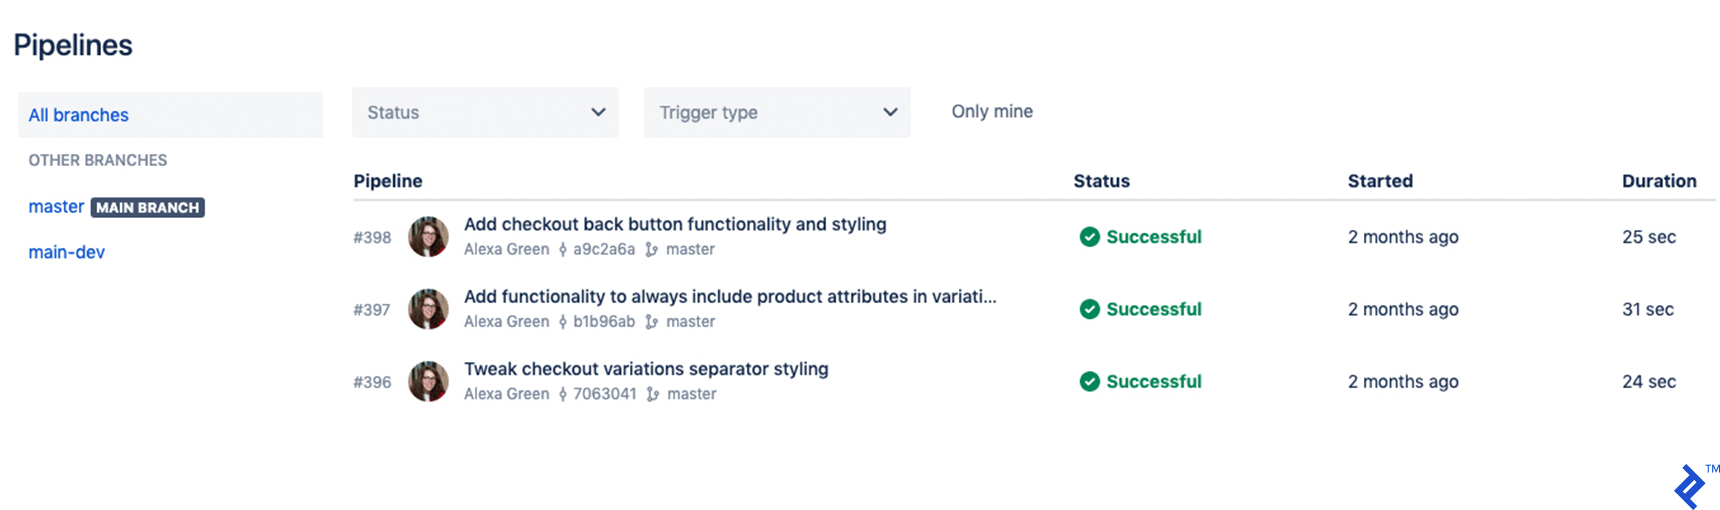
4.Saveandcommitthe`.gitignore`file.5.Implementchangesandcommitthemwithdescriptivemessages.Withthisworkflow,anycommitspushedtothemain-devbranchwilltriggeranautomaticFTPuploadtothestagingsite.Similarly,commitspushedtothemasterbranchwillinitiatedeploymenttotheproductionsite.Bemindfulthattheseactionsconsumebuildminutes,soit's advisable to perform most local development on a separate branch derived from main-dev and merge changes to main-dev at the end of each day.Mergingthemain-devbranchintothemasterbranchwillpropagateallstagingchangestotheliveenvironment.YoucanmonitorthestatusofPipelinesandDeploymentsonBitbucket.org.
## Synchronizing WordPress Databases Across EnvironmentsIt's important to note that the aforementioned steps only address file synchronization (themes, plugins, etc.). Database synchronization between production and staging environments requires a different approach, as clients often introduce changes directly on the live site that aren'treflectedinstaging,andviceversa.SeveralmethodsexistforsynchronizingdatabasesacrossWordPressinstallations.Traditionally,youcouldimport/exportdatabasesusing_phpmyadmin_.However,thismethodhasdrawbacksasitmaynothandletheupdateofspecificelementslikepermalinkswithinpostcontent.Apopulartoolforthispurposeisthe[VelvetBluesUpdateURLsplugin](https://wordpress.org/plugins/velvet-blues-update-urls/),whichallowsyoutoperformsearch/replaceoperationsonthedatabase,replacinginstancesoftheoldsiteURL(e.g.,https://staging.clientsite.com)withthenewone(e.g.,[https://clientsite.com](https://clientsite.com)).Thistoolcanalsobeusedwithrelativepathsandcustomstrings.However,thismanualprocessleavesconsiderableroomforhumanerror,asincorrectlyreplacingastringcanrendertheentirewebsiteinoperable.Pluginslike[All-in-OneWPMigration](https://wordpress.org/plugins/all-in-one-wp-migration/)provideauser-friendlysearch/replacefeatureoutoftheboxbutcomewiththecaveatoftransferringfiles,underminingthebenefitsofourPipelinesworkflow.Furthermore,sinceitreimportstheentirewp-uploadsdirectory,itcanleadtoexcessivelylargefilesandslowloadingtimes,makingitunsuitableformigratingchangesbetweeninstallations.Thistypeofpluginisbetterreservedforcreatingcomprehensivebackupsofthewebsiteforarchivalandsecuritypurposes.[VersionPress](https://versionpress.com/)presentsanintriguingsolution,butitsreliabilityinproductionenvironmentshasn't been extensively proven yet. At present, plugins such as [WP Sync DB](https://wp-sync-db.github.io/) or [WP Migrate DB Pro](https://deliciousbrains.com/wp-migrate-db-pro/) appear to be the most viable options for managing WordPress databases. They facilitate pulling and pushing databases between installations while providing the option to automatically update URLs and paths. These plugins allow for the migration of specific tables, such as wp\_posts for post content only, eliminating the need to waste time reimporting users and site-wide settings. My preferred approach is to always pull from the live environment to prevent the accidental overwriting of production data. Here'sanexamplesetupusingWPSyncDB(detailedwalkthroughscanbefoundon[theWPSyncDBgithub](https://wp-sync-db.github.io/)):1.**Onthelivesite:**InstallandconfigureWPSyncDBwiththe"Allow Pull from this repository"settingenabled.2.**Onthestagingsite:**InstallandconfigureWPSyncDBwithPullfromLivesettings.Namethisprofile"live-to-staging."3.**Onyourlocaldevelopmentsetup:**InstallandconfigureWPSyncDBwithPullfromLivesettings.Namethisprofile"live-to-dev."Additionally,youmightconsidersettingupa"dev-to-staging"pushruleandconfiguringthestagingsitetoallowdatabaseoverwrites.## ConclusionInmyexperience,thesemethodshaveproveneffectiveforawiderangeofusecases,includingdevelopingnewWordPresswebsitesandredesigning/restructuringexistinglivesites.Thisapproachenablescodedeploymentsthatkeepallsiteversionscurrentwithoutaddingunnecessarydevelopmentoverhead.Italsopromotesadeliberateandsecuredatabasemigrationstrategyforseamlesscollaborationbetweenenvironments.Pluginupdatesaremanagedwithintheversioncontrolsystem,allowingforthoroughtestingonthestagingenvironmentbeforedeploymenttothelivesite,minimizingtheriskofproductiondisruptions.Whilethere's certainly room for improvement in integrating a more robust source control workflow for database management, until tools like VersionPress gain wider adoption in production environments, selective database pulls/pushes using WP Sync DB or WP Migrate DB Pro appear to be the most reliable approach. I'meagertohearaboutthestrategiesthatworkbestforyourWordPressworkflow,orperhaps,afterreadingthis,you're feeling inspired to embrace the wild west and revert to your cowboy coding ways!