The use of mobile phones is continuously growing worldwide. By 2013, approximately 73% of people using the internet accessed it on a mobile device, and this number is projected to hit close to 90% by 2017.
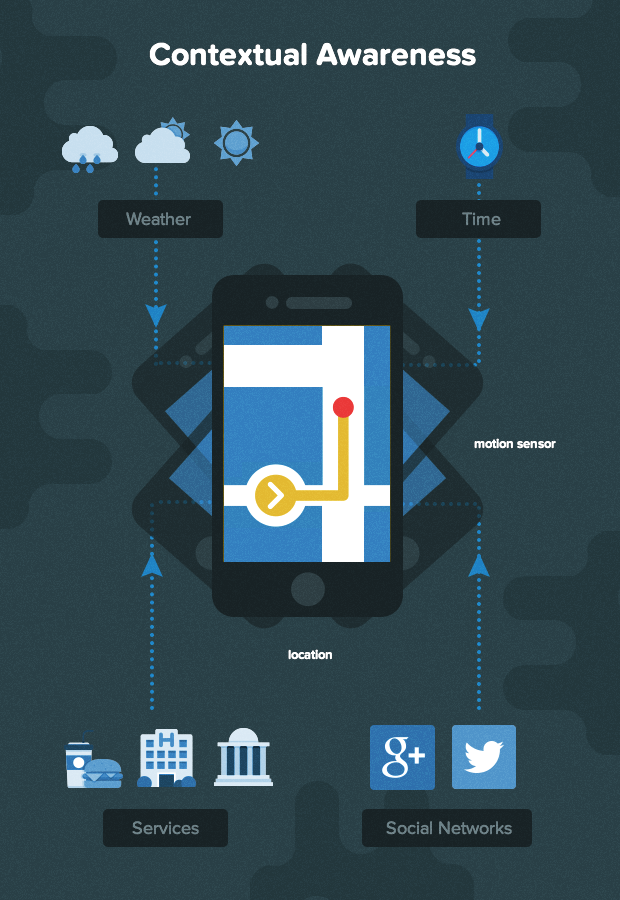
This mobile surge is happening for many reasons. A major one is that mobile applications generally have access to more contextual information because most modern smartphones include location sensors, motion sensors, Bluetooth, and Wi-Fi. Applications can leverage this data to achieve “context awareness,” which can greatly improve their usefulness, effectiveness, and popularity in app stores.
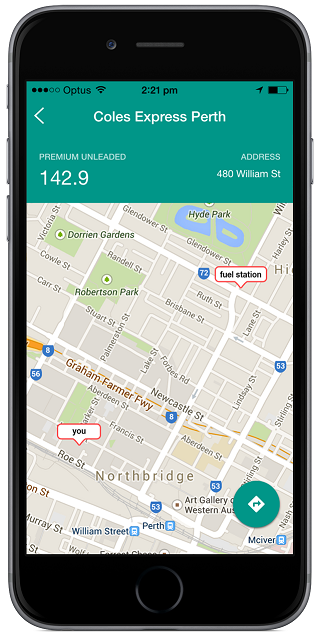
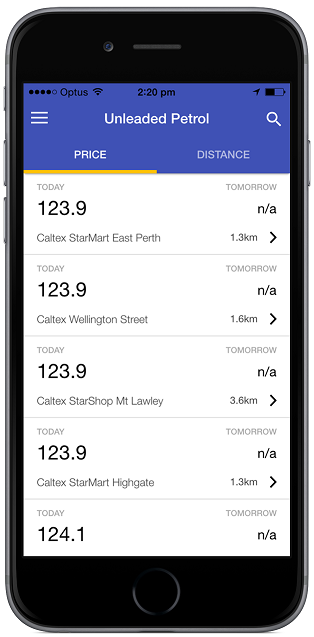
This tutorial will demonstrate how to develop context-aware apps using a complex event processing example. We’ll use a straightforward illustration: a gas price application that locates the most affordable fuel prices in the user’s vicinity.
Context-Aware Applications
In Designing Calm Technology, Mark Weiser and John Seely Brown define calm technology as “information that is relevant to the user’s current situation but does not require their direct attention.”
Context-aware mobile apps align perfectly with this concept and mark a significant advancement in this direction. They utilize contextual clues gathered from their sensors to provide the user with relevant information in the background, minimizing the need for user input. Mark Weiser and John Seely Brown, pioneers in ubiquitous computing, would surely appreciate this technological progress.
Context-awareness is the concept that an app can perceive and respond based on the contextual information available to it. These apps use the wealth of sensor data from a mobile device to deliver precise and relevant information to the user at the right time and place. By observing usage patterns and user feedback, such apps can even “learn” and become more intelligent and valuable over time.
Complex Event Processing
Complex event processing (CEP) is a type of event processing that involves analyzing streams of events to identify meaningful patterns and insights. It considers factors like time, source, and content to derive more comprehensive information.
In the realm of mobile apps, CEP can be applied to events generated by the device’s sensors as well as from external data sources accessible to the app.
Our Fuel Price App: Key Features
To keep our complex event processing tutorial focused, let’s limit our fuel price app’s features to the following:
- Automatic identification of the user’s geographically important locations (e.g., home and work).
- Automatic detection of gas stations within a reasonable radius of the user’s home and work locations.
- Automatic notification of the user regarding the most favorable fuel prices near their home and work.
Let’s begin!
Determining the User’s Home and Work Locations
First, we need logic to automatically figure out where the user lives and works. To keep our complex event processing example manageable, we’ll presume the user has a typical work schedule, generally being home between 2 and 3 AM and at the office between 2 and 3 PM.
Using these assumptions, we establish two CEP rules and collect location and time data from the user’s smartphone:
Home Location Rule
- Collect location data between 2 AM and 3 AM for a week.
- Group similar location data points to estimate the user’s home address.
Work Location Rule
- Collect location data between 2 PM and 3 PM on weekdays.
- Group similar location data points to estimate the user’s work location.
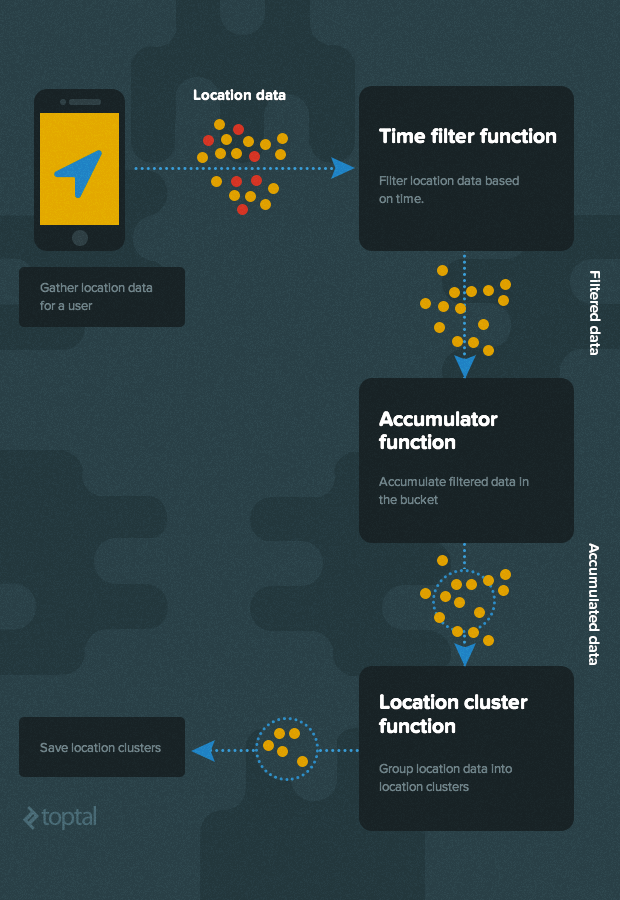
The high-level algorithm for determining these locations is shown below:
Let’s use the following simple JSON data structure for location data:
| |
Important: It’s always best to make sensor data unchangeable (or value type) to ensure different parts of the CEP workflow can use it safely.
Putting It into Practice (Implementation)
We’ll use a modular approach, where each module has a single task and calls the next module when it’s done. This aligns with the Unix Rule of Modularity principle.
Each module is essentially a function that receives a config object and a next function. It calls the next function to pass data to the following module. Therefore, each module returns a function that can handle incoming sensor data. Here’s the basic structure of a module:
| |
To implement our algorithm for figuring out the user’s home and work locations, we’ll need these modules:
- Time Filter Module
- Accumulator Module
- Clustering Module
Let’s dive into each module in more detail:
Time Filter Module
This module acts like a sieve for location data. It only lets data through to the next module if the data falls within a specific time window. This module’s config data consists of the start and end times of the time window we’re interested in. (We could make it more complex by filtering based on multiple time windows.)
Here’s a simplified way to write the time filter module:
| |
Accumulator Module
This module’s job is simple: gather location data and pass it on. It keeps a container of a set size to store data. Every new location is added to this container until it’s full. Once full, the accumulated data is sent as an array to the next module.
There are two types of containers, and the type determines what happens to the container’s contents after data is forwarded:
Tumbling Window: After sending the data, it empties the entire container and starts fresh (resets the container size to 0).
Running Window: After sending the data, it only discards the oldest data point (reduces the container size by 1).
Here’s a basic implementation of the accumulator module:
| |
Clustering Module
Many sophisticated methods in coordinate geometry can group 2D data points. Here’s a simple approach for clustering location data:
- Identify neighboring points for each location within the dataset.
- If some neighbors already belong to an existing cluster, merge the current point and its neighbors with that cluster.
- If the number of locations in the neighborhood set exceeds a predefined threshold, establish a new cluster with those neighboring points.
Let’s implement this clustering algorithm (using Lo-Dash):
| |
This code assumes we have a distance() function that calculates the straight-line distance (in meters) between two geographical points. It takes two location points as input in the format [longitude, latitude] and returns the distance between them. Here’s an example of how such a function could be implemented:
| |
With our clustering algorithm defined and implemented (in the createClusters() function), we can use it as the foundation for our clustering module:
| |
Putting It All Together
Now that we have all the necessary component functions, we can code our home/work location rules.
Here’s how we might implement the home location rule:
| |
Now, every time the smartphone provides location data (through methods like WebSocket, TCP, or HTTP), we send it to the home_rule function. This function, in turn, identifies clusters representing the user’s home.
The user’s “home location” is then assumed to be the center point of the home location cluster.
Note: While this might not be perfectly accurate, it’s sufficient for our simple example. Remember, the app’s goal is to understand the area around the user’s home, not pinpoint their exact house location.
Here’s a basic function that calculates the “center” of a group of points in a cluster by averaging their latitudes and longitudes:
| |
A similar method can be used to determine the work location, but with the time filter set between 2 PM and 3 PM instead of 2 AM and 3 AM.
Our fuel app can now automatically figure out the user’s work and home locations without requiring any input from the user. This is the essence of context-aware computing!
Locating Nearby Gas Stations
We’ve laid the groundwork for context awareness, but we still need one more rule to determine which gas station prices to track (i.e., which stations are close enough to the user’s home or work). This rule requires access to the locations of all gas stations in the regions supported by the fuel app. The rule is as follows:
- Fuel Station Rule
- For each home and work location, identify the closest gas stations.
We can easily implement this using our previously defined distance function as a filter for all gas stations known to the app.
Keeping Tabs on Fuel Prices
Once our app knows the user’s preferred (nearby) gas stations, it can monitor them for the best prices. It can also alert the user about special deals or offers at those stations, especially when the user is detected to be in the vicinity.
Wrapping Up
In this complex event processing tutorial, we’ve just begun to explore the potential of context-aware computing.
We took a basic fuel price app and, by adding location context, made it smarter. The app now functions differently on each device and learns the user’s location patterns over time to improve the usefulness of the information it delivers.
Imagine the possibilities! We could add much more logic and use even more sensor data to further enhance our app’s accuracy and helpfulness. A creative mobile developer could integrate social network data, weather information, point-of-sale transaction details, and much more to add even richer context-awareness, making our app even more valuable and marketable.
The future of app development is exciting. Context-aware computing opens up endless possibilities, and we can expect to see more and more intelligent apps in app stores, making our lives easier and more efficient.