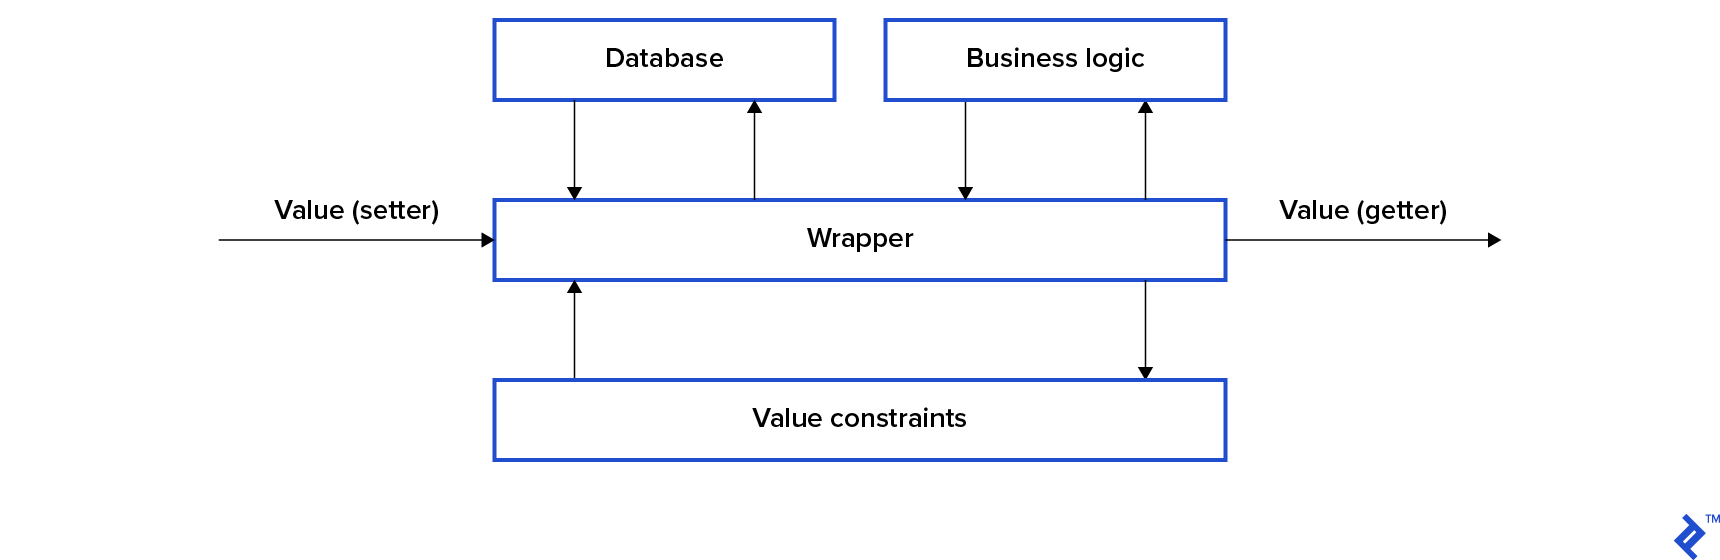
To put it simply, a property wrapper acts like a container, a generic structure managing how a property is accessed (read and written) and introduces additional functionalities. It’s useful when we want to set limits on the values a property can hold, incorporate extra actions during reading or writing (like interacting with databases or user preferences), or add extra methods to the property.
This piece explores a new method introduced in Swift 5.1 for handling property wrappers. This new approach utilizes a cleaner and more intuitive syntax.
Looking Back: The Old Way
Let’s say you’re creating an application, and you have an object that stores user profile information.
| |
You decide to implement email verification. If the email address provided by the user isn’t valid, the email property should be set to nil. This scenario presents a perfect opportunity to employ a property wrapper to manage this logic.
| |
We can then utilize this wrapper within our Account structure:
| |
Now we have the assurance that the email property will only hold a valid email address.
Everything seems to be working correctly, except for one aspect: the syntax.
| |
When using a property wrapper, the process of initializing, reading, and writing to such properties becomes more complex. This begs the question: is it possible to bypass this complexity and use property wrappers without altering the syntax? With the introduction of Swift 5.1, the answer is yes.
Embracing the New: The @propertyWrapper Annotation
Swift 5.1 offers a more elegant approach to creating property wrappers. This approach permits the use of a @propertyWrapper annotation to mark a property wrapper. These annotated wrappers benefit from a more concise syntax compared to their traditional counterparts, leading to code that is both compact and easier to understand. The @propertyWrapper annotation comes with a single requirement: your wrapper object must include a non-static property named wrappedValue.
| |
To define such a wrapped property in our code, we’ll utilize this new syntax.
| |
As you can see, we’ve marked the property using the @ annotation. It’s essential that the property type aligns with the type of the wrappedValue within the wrapper. Now you can interact with this property in the same way you would with a regular property.
| |
This already looks much cleaner than the old approach. However, our current wrapper implementation has a drawback: it doesn’t allow for setting an initial value for the wrapped value.
| |
To address this, we can add the following initializer to our wrapper:
| |
And that’s all there is to it.
| |
Here’s the complete code for our wrapper:
| |
Configurable Wrappers: Adding Flexibility
Let’s consider another scenario. Imagine you’re developing a game, and you have a property responsible for storing the user’s score. The requirement is that this score must always fall within the range of 0 to 100 (inclusive). You can enforce this rule using a property wrapper.
| |
While this code functions as intended, it lacks a certain level of generality. Reusing it with different constraints (values other than 0 and 100) is not possible. Furthermore, it only works with integer values. It would be more versatile to have a configurable wrapper capable of handling any type that conforms to the Comparable protocol. To achieve this configurability, we need to introduce all configuration parameters through an initializer. It’s important to note that if the initializer includes a wrappedValue attribute (representing the initial value of our property), it should be positioned as the first parameter.
| |
To initialize a wrapped property, we define all configuration attributes within parentheses following the annotation.
| |
There’s no limit to the number of configuration attributes you can define. They need to be specified within the parentheses, following the same order as in the initializer.
Accessing the Wrapper Directly
In cases where you require access to the wrapper itself (not just the wrapped value), you can prefix the property name with an underscore. Let’s revisit our Account structure as an example.
| |
We need to access the wrapper directly to leverage the additional functionality we’ve incorporated. Let’s say we want our Account structure to conform to the Equatable protocol. Two accounts should be considered equal if their email addresses are equal, with a case-insensitive comparison for email addresses.
| |
While this approach works, it’s not ideal. It requires us to remember to apply the lowercased() method every time we compare emails. A more streamlined solution involves making the Email structure itself Equatable:
| |
and then comparing the wrappers directly instead of the wrapped values:
| |
Projected Value: Adding Another Layer
The @propertyWrapper annotation offers an additional syntactic convenience known as a projected value. This property is not restricted to a specific type and can be defined as needed. To access this property, simply prefix the property name with a $. To illustrate its usage, let’s borrow an example from the Combine framework.
The @Published property wrapper is designed to create a publisher for a property and expose it as a projected value.
| |
As demonstrated, we use message to interact with the wrapped property, while $message provides access to the publisher. Adding a projected value to your wrapper is straightforward; simply declare it.
| |
As previously mentioned, you have the flexibility to assign any type to the projectedValue property, depending on your requirements.
Limitations: Points to Consider
While the new property wrapper syntax offers enhanced readability, it comes with certain limitations. The primary ones are:
Error Handling: They cannot directly participate in error handling mechanisms. Because the wrapped value is a property (not a method), we cannot mark its getter or setter with the
throwskeyword. For instance, in ourEmailexample, we cannot throw an error if the user attempts to set an invalid email address. Our options are limited to returningnilor terminating the app usingfatalError(), which might not be suitable in all situations.Multiple Wrappers: Applying multiple wrappers to a single property is not permitted. For example, it would be cleaner to have a separate
@CaseInsensitivewrapper and combine it with our@Emailwrapper, rather than incorporating case insensitivity within@Email. However, such constructs are not allowed and will result in compilation errors.
| |
One workaround for this specific scenario is to inherit the Email wrapper from the CaseInsensitive wrapper. However, inheritance itself has limitations: only classes support inheritance, and a class can only inherit from a single base class.
Conclusion: Weighing the Pros and Cons
The use of @propertyWrapper annotations significantly improves the readability of property wrapper syntax, allowing us to work with wrapped properties in a manner similar to regular properties. This leads to code that is more concise and easier to comprehend, which is always a plus for Swift developers. However, it’s crucial to be mindful of the limitations associated with this approach. Hopefully, some of these limitations will be addressed in future versions of Swift.
If you’re interested in delving deeper into Swift properties, be sure to check out the official docs.