Angular 9 Tutorial: Enjoy all the perks without any hassle

The internet seems to break annually, requiring developers to patch it up. Many anticipated that the release of Angular version 9 would follow suit, necessitating significant migration efforts for applications built on previous versions.

However, that’s not the reality! The Angular team revolutionized its compiler, yielding faster build and test execution, reduced bundle sizes, and crucially, backward compatibility with older versions. Essentially, Angular 9 delivers all the advantages without the usual headaches.

This Angular 9 tutorial guides you through building an Angular application from the ground up. We’ll utilize some of the latest Angular 9 features and explore other enhancements as we proceed.

Angular 9 Tutorial: Building a New Angular Application

Let’s embark on our Angular project example by installing the latest version of Angular’s CLI:

1
npm install -g @angular/cli

Verify the Angular CLI version with the command ng version.

Next, create an Angular application:

1
ng new ng9-app --create-application=false --strict

We’re employing two arguments in our ng new command:

  • --create-application=false instructs the CLI to generate only workspace files. This enhances code organization when dealing with multiple apps and libraries.
  • --strict enforces stricter rules for TypeScript typing and code cleanliness.

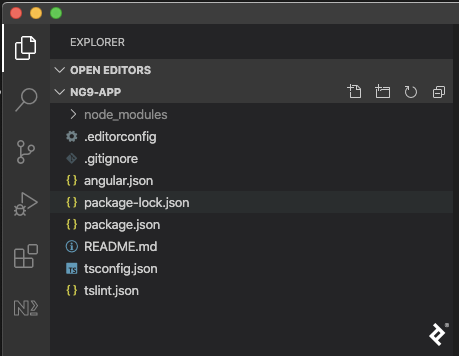
This results in a basic workspace folder and files.

A screenshot of an IDE showing the ng9-app folder, containing node_modules, .editorconfig, .gitignore, angular.json, package-lock.json, package.json, README.md, tsconfig.json, and tslint.json.

Now, add a new app:

1
ng generate application tv-show-rating

You’ll be prompted:

1
2
3
4
5
? Would you like to share anonymous usage data about this project with the Angular Team at
Google under Google's Privacy Policy at https://policies.google.com/privacy? For more
details and how to change this setting, see http://angular.io/analytics. No
? Would you like to add Angular routing? Yes
? Which stylesheet format would you like to use? SCSS

Running ng serve will launch the app with its initial scaffolding.

A screenshot of Angular 9's scaffolding, with a notice that "tv-show-rating app is running!" There are also links to resources and next steps.

Executing ng build --prod displays the list of generated files.

A screenshot of Angular 9's "ng build --prod" output. It starts with "Generating ES5 bundles for differential loading..." After that's done, it lists several JavaScript file chunks—runtime, polyfills, and main, each with a -es2015 and -es5 version—and one CSS file. The final line gives a timestamp, hash, and a runtime of 23,881 milliseconds.

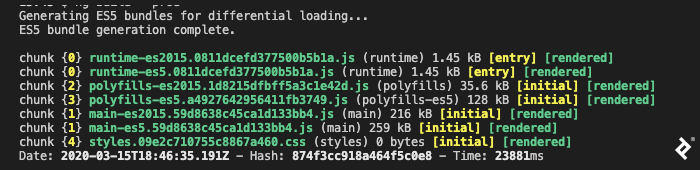
Notice two versions of each file: one for legacy browsers, and another compiled for ES2015, leveraging newer APIs and requiring fewer polyfills.

A significant enhancement in Angular 9 is bundle size reduction. The Angular team reports up to 40% reduction for large applications.

While bundle sizes for newly created apps are comparable to Angular 8, you’ll observe significant reductions as your application scales compared to previous versions.

Another new feature is the ability to receive warnings when a component’s style CSS file exceeds a specified size threshold.

A screenshot of the "budgets" section of an Angular 9 JSON configuration file, with two objects in an array. The first object has "type" set to "initial," "maximumWarning" set to "2mb," and "maximumError" set to "5mb." The second object has "type" set to "anyComponentStyle," "maximumWarning" set to "6kb," and "maximumError" set to "10kb."

This helps identify problematic style imports or excessively large component style files.

Building a TV Show Rating Form

Let’s add a form for rating TV shows. First, install bootstrap and ng-bootstrap:

1
npm install bootstrap @ng-bootstrap/ng-bootstrap

Angular 9 improves internationalization (i18n). Previously, building for each locale was necessary. Now, a single build generates all i18n files post-build, significantly reducing build times. Since ng-bootstrap relies on i18n, add the new package:

1
ng add @angular/localize

Next, include the Bootstrap theme in your app’s styles.scss:

1
@import "~bootstrap/scss/bootstrap";

Import NgbModule and ReactiveFormsModule in AppModule within app.module.ts:

 1
 2
 3
 4
 5
 6
 7
 8
 9
10
11
// ...
import { ReactiveFormsModule } from '@angular/forms';
import { NgbModule } from '@ng-bootstrap/ng-bootstrap';

@NgModule({
  imports: [
    // ...
    ReactiveFormsModule,
    NgbModule
  ],
})

Update app.component.html with a basic grid for our form:

1
2
3
4
5
6
7
<div class="container">
  <div class="row">
    <div class="col-6">

    </div>
  </div>
</div>

Generate the form component:

1
ng g c TvRatingForm

Add the form to rate TV shows in tv-rating-form.component.html:

 1
 2
 3
 4
 5
 6
 7
 8
 9
10
11
12
13
14
15
16
17
18
<form [formGroup]="form"
      (ngSubmit)="submit()"
      class="mt-3">
  <div class="form-group">
    <label>TV SHOW</label>
    <select class="custom-select"
            formControlName="tvShow">
      <option *ngFor="let tvShow of tvShows"
              [value]="tvShow.name">{{tvShow.name}}</option>
    </select>
  </div>
  <div class="form-group">
    <ngb-rating [max]="5"
                formControlName="rating"></ngb-rating>
  </div>

  <button [disabled]="form.invalid || form.disabled" class="btn btn-primary">OK</button>
</form>

And define tv-rating-form.component.ts like so:

 1
 2
 3
 4
 5
 6
 7
 8
 9
10
11
12
13
14
15
16
17
18
19
20
21
22
// ...
export class TvRatingFormComponent implements OnInit {

  tvShows = [
    { name: 'Better call Saul!' },
    { name: 'Breaking Bad' },
    { name: 'Lost' },
    { name: 'Mad men' }
  ];


  form = new FormGroup({
    tvShow: new FormControl('', Validators.required),
    rating: new FormControl('', Validators.required),
  });

  submit() {
    alert(JSON.stringify(this.form.value));
    this.form.reset();
  }

}

Finally, incorporate the form into app.component.html:

1
2
3
4
<!-- ... -->
<div class="col-6">
  <app-tv-rating-form></app-tv-rating-form>
</div>

We now have basic UI functionality. Running ng serve again demonstrates this.

A screencap of an Angular 9 tutorial app showing a form titled "TV SHOW," with a dropdown listing a handful of show titles, a star-meter, and an OK button. In the animation, the user selects a show, selects a rating, and then clicks the OK button.

Before proceeding, let’s examine some valuable new debugging features introduced in Angular 9, aiming to simplify this common development task.

Debugging with Angular 9 Ivy

Angular 9 and Angular Ivy bring significant improvements to debugging. The compiler now detects more errors and presents them more clearly.

Let’s observe this firsthand. Activate template checking in tsconfig.json:

1
2
3
4
5
6
7
8
{
  // ...
  "angularCompilerOptions": {
    "fullTemplateTypeCheck": true,
    "strictInjectionParameters": true,
    "strictTemplates": true
  }
}

Now, update the tvShows array, renaming name to title:

1
2
3
4
5
6
  tvShows = [
    { title: 'Better call Saul!' },
    { title: 'Breaking Bad' },
    { title: 'Lost' },
    { title: 'Mad men' }
  ];

…and the compiler will flag an error.

A screenshot of Angular 9/Angular Ivy compiler output, with a file name and position, saying "error TS2339: Property 'name' does not exist on type '{ title: string; }'." It also shows the line of code in question and underlines the reference, in this case in the tv-rating-form.component.html file where tvShow.name is mentioned. After that, the reference to this HTML file is traced to the corresponding TypeScript file and similarly highlighted.

This type checking helps prevent typos and incorrect usage of TypeScript types.

Angular Ivy Validation for @Input()

Enhanced validation is also present for @Input(). For instance, add this to tv-rating-form.component.ts:

1
@Input() title: string;

…bind it in app.component.html:

1
<app-tv-rating-form [title]="title"></app-tv-rating-form>

…and modify app.component.ts as follows:

1
2
3
4
// ...
export class AppComponent {
  title = null;
}

These changes will trigger another compiler error.

A screenshot of Angular 9/Angular Ivy compiler output, in a format similar to the previous one, highlighting app.component.html with "error TS 2322: Type 'null' is not assignable to type 'string'."

While you could use $any() in the template to cast the value to any and suppress the error:

1
<app-tv-rating-form [title]="$any(title)"></app-tv-rating-form>

…the correct approach is to make title nullable in the form:

1
@Input() title: string | null ;

Tackling ExpressionChangedAfterItHasBeenCheckedError in Angular 9 Ivy

Ivy provides clearer output for the dreaded ExpressionChangedAfterItHasBeenCheckedError, simplifying the process of locating the source of the problem.

Let’s intentionally trigger this error. Generate a service:

1
ng g s Title

Add a BehaviorSubject and methods to access the Observable and emit new values.

 1
 2
 3
 4
 5
 6
 7
 8
 9
10
11
12
13
14
export class TitleService {

  private bs = new BehaviorSubject < string > ('');

  constructor() {}

  get title$() {
    return this.bs.asObservable();
  }

  update(title: string) {
    this.bs.next(title);
  }
}

Include this in app.component.html:

1
2
3
4
5
6
7
      <!-- ... -->
      <div class="col-6">
        <h2>
          {{title$ | async}}
        </h2>
        <app-tv-rating-form [title]="title"></app-tv-rating-form>
      </div>

In app.component.ts, inject the TitleService:

 1
 2
 3
 4
 5
 6
 7
 8
 9
10
11
12
13
14
export class AppComponent implements OnInit {

  // ...
  title$: Observable < string > ;

  constructor(
    private titleSvc: TitleService
  ) {}

  ngOnInit() {
    this.title$ = this.titleSvc.title$;
  }
  // ...
}

Finally, in tv-rating-form.component.ts, inject TitleService and update the title of the AppComponent, which will throw an ExpressionChangedAfterItHasBeenCheckedError error.

 1
 2
 3
 4
 5
 6
 7
 8
 9
10
11
  // ...

  constructor(
    private titleSvc: TitleService
  ) {

  }

  ngOnInit() {
    this.titleSvc.update('new title!');
  }

The browser’s developer console now displays a detailed error message, and clicking on app.component.html pinpoints the error’s location.

A screencap of the browser's dev console, showing Angular Ivy's reporting of the ExpressionChangedAfterItHasBeenCheckedError error. A stack trace in red text gives the error, along with previous and current values, and a hint. In the middle of the stack trace is the only line not referring to core.js. The user clicks it and is brought to the line of app.component.html that's causing the error.

Resolve this error by wrapping the service call in setTimeout:

1
2
3
setTimeout(() => {
  this.titleSvc.update('new title!');
});

For a deeper understanding of the ExpressionChangedAfterItHasBeenCheckedError and potential solutions, this Maxim Koretskyi’s post provides valuable insights.

Angular Ivy presents errors more clearly and enforces TypeScript typing rigorously. Next, let’s explore common scenarios where Ivy and enhanced debugging come in handy.

Writing Tests with Component Harnesses in Angular 9

Angular 9 introduces component harnesses, a new testing API designed to simplify DOM interaction, resulting in more straightforward and reliable tests.

The component harness API is part of the @angular/cdk library. Install it:

1
npm install @angular/cdk

Now, let’s write a test using component harnesses. In tv-rating-form.component.spec.ts, set up the test:

 1
 2
 3
 4
 5
 6
 7
 8
 9
10
11
12
13
14
15
16
17
18
19
20
import { NgbModule } from '@ng-bootstrap/ng-bootstrap';
import { ReactiveFormsModule } from '@angular/forms';

describe('TvRatingFormComponent', () => {
  let component: TvRatingFormComponent;
  let fixture: ComponentFixture < TvRatingFormComponent > ;

  beforeEach(async (() => {
    TestBed.configureTestingModule({
      imports: [
        NgbModule,
        ReactiveFormsModule
      ],
      declarations: [TvRatingFormComponent]
    }).compileComponents();
  }));

  // ...

});

Implement a ComponentHarness for our component. We’ll create two harnesses: one for TvRatingForm and another for NgbRating. ComponentHarness requires a static hostSelector field containing the component’s selector.

 1
 2
 3
 4
 5
 6
 7
 8
 9
10
11
12
13
14
// ...

import { ComponentHarness, HarnessLoader } from '@angular/cdk/testing';
import { TestbedHarnessEnvironment } from '@angular/cdk/testing/testbed';

class TvRatingFormHarness extends ComponentHarness {
  static hostSelector = 'app-tv-rating-form';
}

class NgbRatingHarness extends ComponentHarness {
  static hostSelector = 'ngb-rating';
}

// ...

For TvRatingFormHarness, create a selector for the submit button and a function to simulate a click event. Notice the improved simplicity.

1
2
3
4
5
6
7
8
9
class TvRatingFormHarness extends ComponentHarness {
  // ...
  protected getButton = this.locatorFor('button');

  async submit() {
    const button = await this.getButton();
    await button.click();
  }
}

Next, add methods to set a rating. Here, locatorForAll finds all <span> elements representing the clickable rating stars. The rate function retrieves all rating stars and clicks the one corresponding to the provided value.

 1
 2
 3
 4
 5
 6
 7
 8
 9
10
class NgbRatingHarness extends ComponentHarness {
  // ...

  protected getRatings = this.locatorForAll('span:not(.sr-only)');

  async rate(value: number) {
    const ratings = await this.getRatings();
    return ratings[value - 1].click();
  }
}

Finally, connect TvRatingFormHarness to NgbRatingHarness by adding the locator to the TvRatingFormHarness class.

1
2
3
4
5
6
7
class TvRatingFormHarness extends ComponentHarness {
  // ...
 
  getRating = this.locatorFor(NgbRatingHarness);

  // ...
}

Now, write the test:

 1
 2
 3
 4
 5
 6
 7
 8
 9
10
11
12
13
14
15
16
17
18
19
20
describe('TvRatingFormComponent', () => {
  // ...

  it('should pop an alert on submit', async () => {
    spyOn(window, 'alert');

    const select = fixture.debugElement.query(By.css('select')).nativeElement;
    select.value = 'Lost';
    select.dispatchEvent(new Event('change'));
    fixture.detectChanges();

    const harness = await TestbedHarnessEnvironment.harnessForFixture(fixture, TvRatingFormHarness);
    const rating = await harness.getRating();
    await rating.rate(1);
    await harness.submit();

    expect(window.alert).toHaveBeenCalledWith('{"tvShow":"Lost","rating":1}');
  });

});

We haven’t implemented setting the select element’s value via a harness because the API doesn’t yet support option selection. This provides an opportunity to compare how element interaction worked before component harnesses.

Before running the tests, fix app.component.spec.ts since we made title nullable.

1
2
3
4
5
6
7
8
9
describe('AppComponent', () => {
  // ...
  it(`should have as title 'tv-show-rating'`, () => {
    const fixture = TestBed.createComponent(AppComponent);
    const app = fixture.componentInstance;
    expect(app.title).toEqual(null);
  });

});

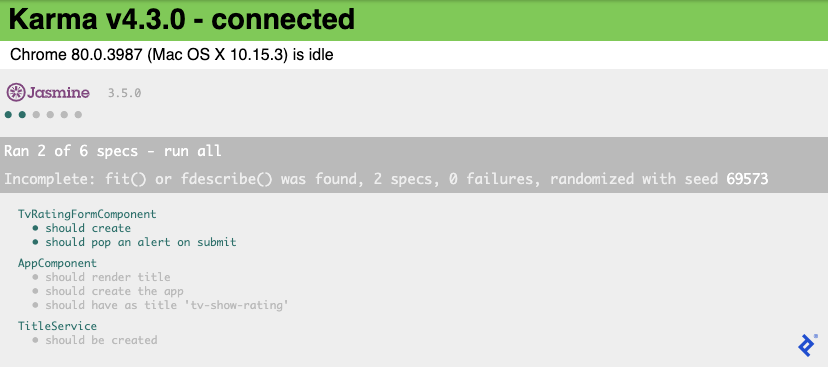
Running ng test now passes the test.

A screenshot of Karma running tests on our Angular 9 app. It shows "Ran 2 of 6 specs" with the message "Incomplete: fit() or fdescribe() was found, 2 specs, 0 failures, randomized with seed 69573." The TvRatingFormComponent's two tests are highlighted. AppComponent's three tests and TitleService's one test are all grey.

Saving Data to a Database in Our Angular 9 App

Let’s conclude our Angular 9 tutorial by connecting to Firestore to save ratings.

First, create a Firebase Project. Then, install the necessary dependencies:

1
npm install @angular/fire firebase

Retrieve the Firebase project configuration from the Firebase Console’s project settings and add it to environment.ts and environment.prod.ts:

 1
 2
 3
 4
 5
 6
 7
 8
 9
10
11
12
export const environment = {
  // ...
  firebase: {
    apiKey: '{your-api-key}',
    authDomain: '{your-project-id}.firebaseapp.com',
    databaseURL: 'https://{your-project-id}.firebaseio.com',
    projectId: '{your-project-id}',
    storageBucket: '{your-project-id}.appspot.com',
    messagingSenderId: '{your-messaging-id}',
    appId: '{your-app-id}'
  }
};

Import the required modules in app.module.ts:

 1
 2
 3
 4
 5
 6
 7
 8
 9
10
11
12
13
import { AngularFireModule } from '@angular/fire';
import { AngularFirestoreModule } from '@angular/fire/firestore';
import { environment } from '../environments/environment';

@NgModule({
  // ...
  imports: [
    // ...
    AngularFireModule.initializeApp(environment.firebase),
    AngularFirestoreModule,
  ],
  // ...
})

In tv-rating-form.component.ts, inject the AngularFirestore service and save new ratings on form submission:

 1
 2
 3
 4
 5
 6
 7
 8
 9
10
11
12
13
14
15
16
17
import { AngularFirestore } from '@angular/fire/firestore';

export class TvRatingFormComponent implements OnInit {

  constructor(
    // ...
    private af: AngularFirestore,
  ) { }

  async submit(event: any) {
    this.form.disable();
    await this.af.collection('ratings').add(this.form.value);
    this.form.enable();
    this.form.reset();
  }

}
A screencap of an Angular 9 tutorial app showing a form titled "TV SHOW" beneath a larger page title "new title!" Again, it has a dropdown listing a handful of show titles, a star-meter, and an OK button, and again the user selects a show, selects a rating, and then clicks the OK button.

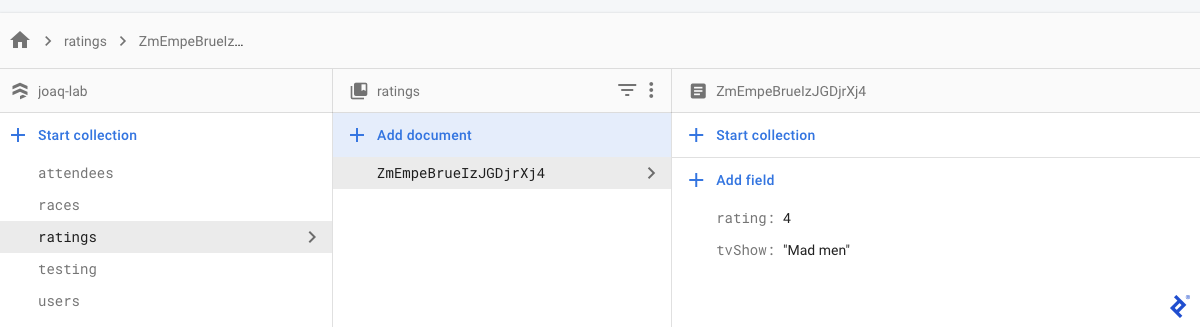
The Firebase Console will now display the newly created item.

A screenshot of the Firebase Console. In the left column is joaq-lab with some collections: attendees, races, ratings, testing, and users. The ratings item is selected and is featured in the middle column with an ID selected—it's the only document. The right column shows two fields: "rating" is set to 4, and "tvShow" is set to "Mad men."

Lastly, list all ratings in AppComponent. In app.component.ts, retrieve the data from the collection:

 1
 2
 3
 4
 5
 6
 7
 8
 9
10
11
12
13
14
15
16
import { AngularFirestore } from '@angular/fire/firestore';

export class AppComponent implements OnInit {
  // ... 
  ratings$: Observable<any>;

  constructor(
    // ...
    private af: AngularFirestore
  ) { }

  ngOnInit() {
    // ...
    this.ratings$ = this.af.collection('ratings').valueChanges();
  }
}

…and display them in app.component.html:

 1
 2
 3
 4
 5
 6
 7
 8
 9
10
11
12
<div class="container">
  <div class="row">
    // ...
    <div class="col-6">
      <div>
        <p *ngFor="let rating of ratings$ | async">
          {{rating.tvShow}} ({{rating.rating}})
        </p>
      </div>
    </div>
  </div>
</div>

This is the completed Angular 9 tutorial app.

A screencap of an Angular 9 tutorial app showing a form titled "TV SHOW" beneath a larger page title "new title!" Again, it has a dropdown listing a handful of show titles, a star-meter, and an OK button. This time, a right-hand column already lists "Mad men (4)," and the user rates Lost at three stars, followed by "Mad men" again at four stars. The right-hand column remains alphabetically ordered after both new ratings.

Angular 9 and Angular Ivy: Enhanced Development, Improved Applications, and Seamless Compatibility

This Angular 9 tutorial covered building a basic form, saving data to Firebase, and retrieving data from it.

Along the way, we explored the improvements and new features introduced in Angular 9 and Angular Ivy. For a comprehensive list, refer to the official Angular blog’s latest release post.


Google Cloud Partner badge.

Toptal, a Google Cloud Partner, offers on-demand access to Google-certified experts for your most critical projects.

Licensed under CC BY-NC-SA 4.0