Introduction
qmake is a build system tool included with Qt library that streamlines the building process for projects across various platforms. Unlike CMake and Qbs, qmake has been an integral part of Qt from its inception and is considered its “native” tool. Unsurprisingly, Qt Creator, the default IDE for Qt, provides the most seamless out-of-the-box support for qmake. While you can choose CMake and Qbs build systems for new projects in Qt Creator, their integration is not as robust. While CMake support in Qt Creator is expected to improve over time (potentially warranting a future edition of this guide focused on CMake), there are compelling reasons to consider qmake, especially as a secondary build system for public libraries or plugins. The majority of third-party Qt-based libraries and plugins offer qmake files for smooth integration into qmake-based projects, with only a handful providing dual configuration (e.g., qmake and CMake). You might find qmake particularly advantageous if you resonate with the following scenarios:
- You are developing a cross-platform project based on Qt.
- You utilize Qt Creator IDE and leverage most of its features.
- You are developing a standalone library or plugin intended for use by other qmake-based projects.
This guide delves into the most practical qmake features, accompanied by real-world examples for each. For readers who are new to Qt, this guide serves as a tutorial to Qt’s build system. Experienced Qt developers can treat this guide as a cookbook when embarking on a new project or selectively incorporate specific features into their existing projects with minimal disruption.
Basic Qmake Usage
Project specifications for qmake are defined within .pro files. Below is an example of the simplest possible .pro file:
| |
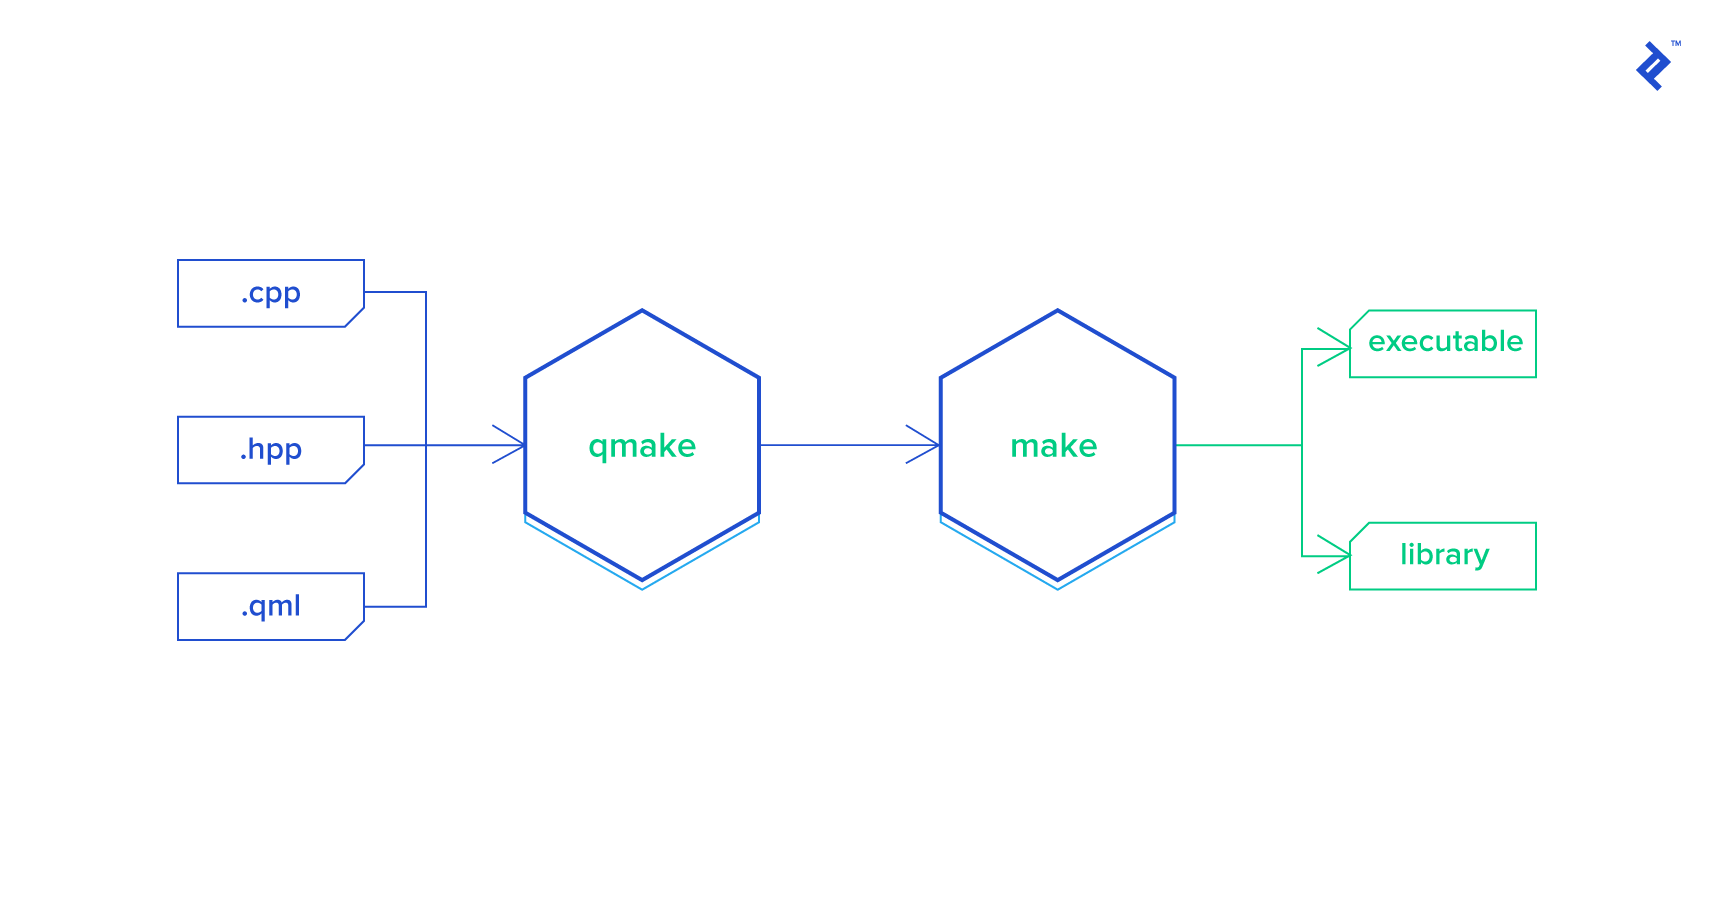
By default, this will generate a Makefile designed to build an executable from a single source code file, hello.cpp.
To build the binary (in this instance, an executable), you first need to execute qmake to produce a Makefile. Subsequently, depending on your toolchain, you would utilize make, nmake, or mingw32-make to build the target.
In essence, a qmake specification is essentially a series of variable definitions, potentially interspersed with control flow statements. Each variable, generally, holds a collection of strings. Control flow statements provide the capability to include other qmake specification files, manage conditional sections, and even invoke functions.
Understanding the Syntax of Variables
When examining existing qmake projects, the diverse ways to reference variables might catch your attention: \(VAR,\){VAR}, $$(VAR), and more…
Refer to this concise cheat-sheet as you familiarize yourself with the rules:
VAR = value: Assigns a value to the variable VAR.VAR += value: Appends a value to the VAR list.VAR -= value: Removes a value from the VAR list.$$VARor$${VAR}: Retrieves the value of VAR at the time qmake is executed.$(VAR): Represents the contents of an environment variable VAR at the time the Makefile (not qmake) is executed.$$(VAR): Represents the contents of an environment variable VAR at the time qmake (not the Makefile) is executed.
Common Templates
A comprehensive list of qmake variables is available in the official specification: http://doc.qt.io/qt-5/qmake-variable-reference.html
Let’s examine a few commonly used project templates:
| |
To utilize these templates, simply populate the SOURCES += ... and HEADERS += ... sections with a list of all your source code files.
Up to this point, we have explored fundamental templates. More intricate projects typically consist of several sub-projects with interdependencies. Let’s delve into how qmake facilitates the management of such projects.
Sub-projects
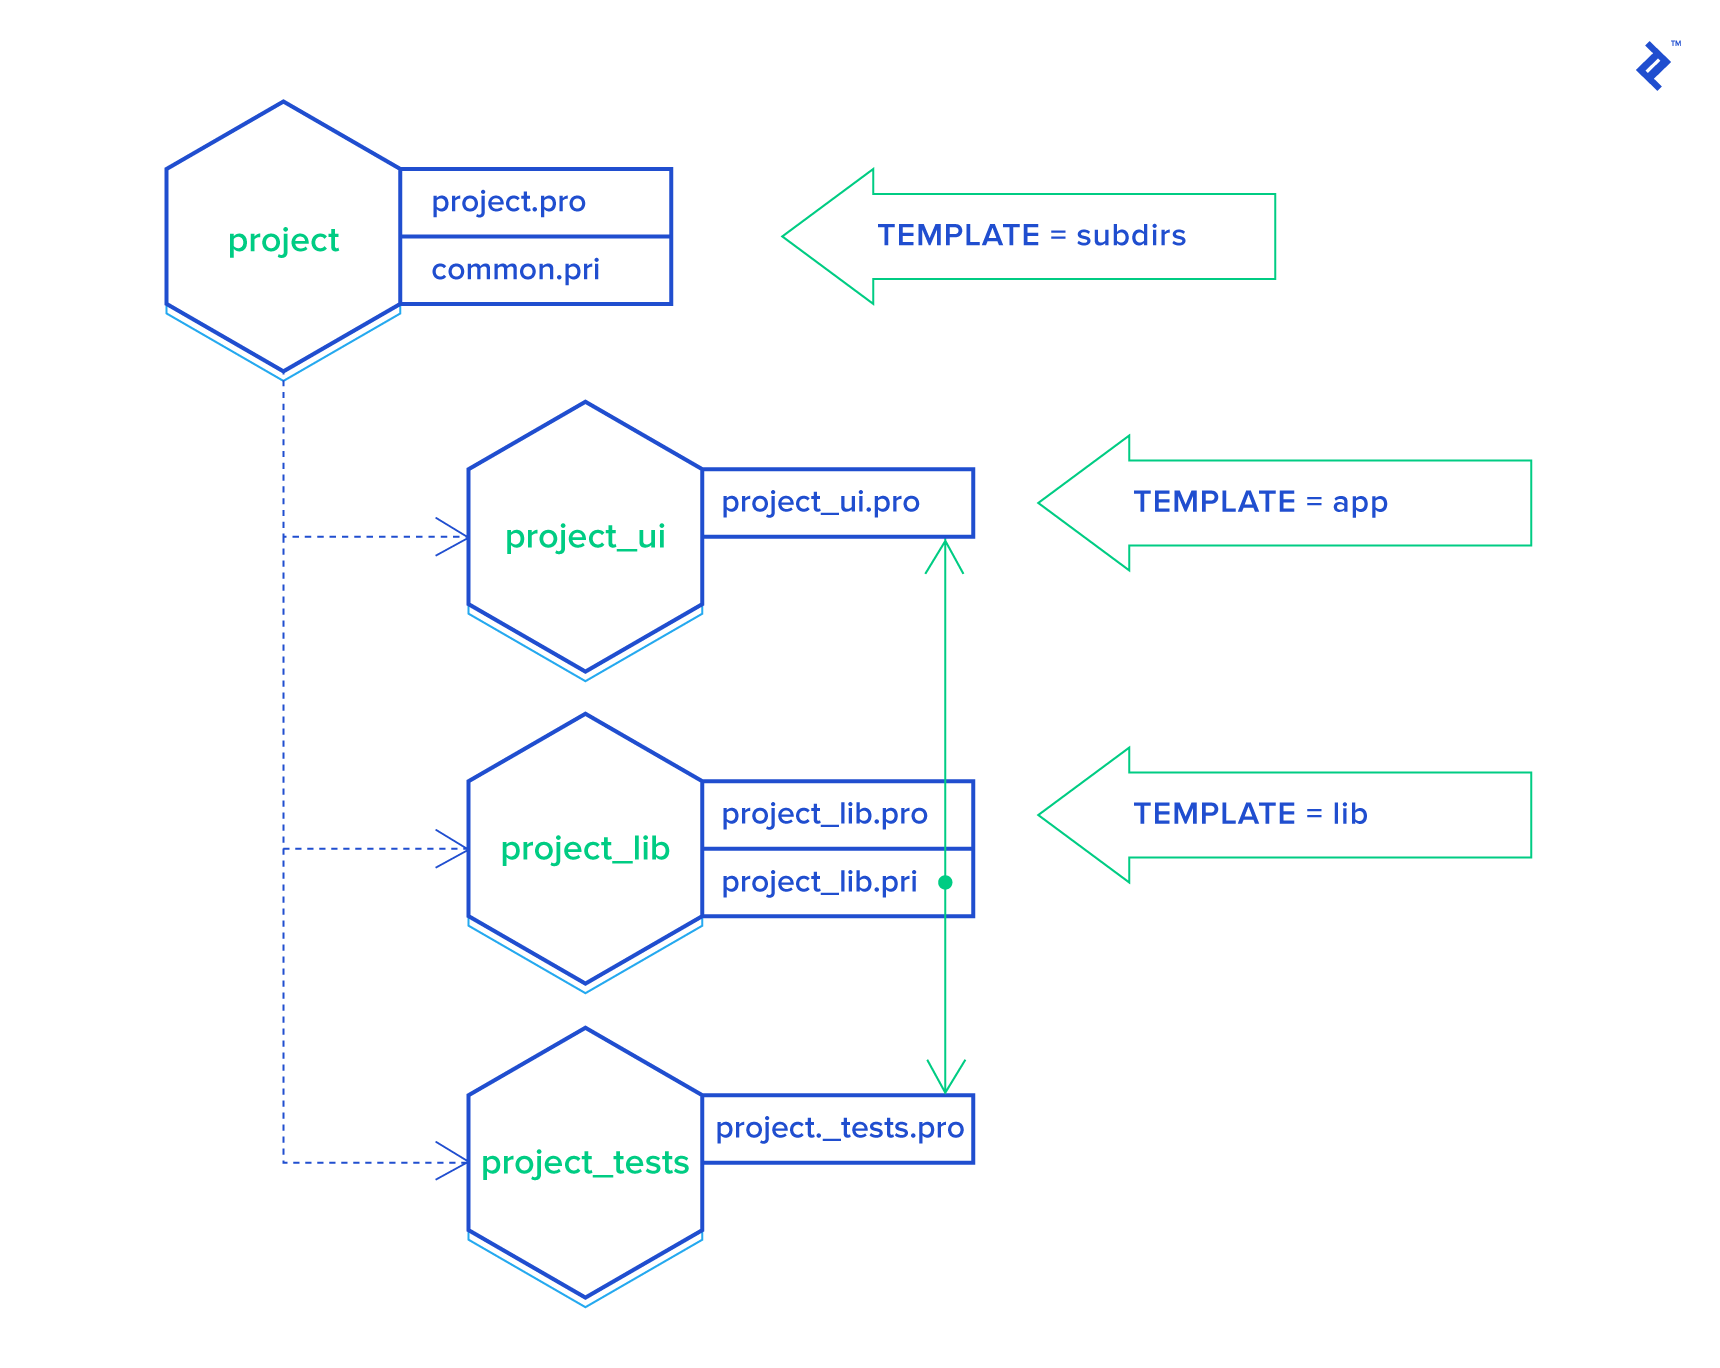
A common scenario involves an application distributed with one or more libraries and accompanied by test projects. Consider the following project structure:
| |
Naturally, our goal is to build all components with a single command, such as:
| |
To achieve this, we need a qmake project file within the /project directory:
| |
NOTE: It’s worth noting that using CONFIG += ordered is considered suboptimal—utilizing .depends is the preferred approach.
This specification directs qmake to build the library sub-project first due to its dependency by other targets. Subsequently, it can build library-tests and the main application in any order, as they are independent of each other.
Linking Libraries
In the preceding example, we have a library that needs to be linked with the application. In the realm of C/C++, this necessitates a few additional configurations:
- Specifying
-Ito provide search paths for #include directives. - Specifying
-Lto define search paths for the linker. - Specifying
-lto indicate the library that needs to be linked.
Given our aim for sub-project portability, using absolute or relative paths is not feasible. For instance, we should avoid: INCLUDEPATH += ../library/include. Similarly, we cannot reference the library binary (e.g., a .a file) from a temporary build directory. Adhering to the principle of “separation of concerns,” it becomes evident that the application project file should remain agnostic to library-specific details. Instead, it is the library’s responsibility to communicate the locations of header files and other relevant information.
Let’s utilize qmake’s include() directive to address this challenge. Within the library project, we’ll introduce an additional qmake specification file with the extension .pri (the extension is flexible, but here, i signifies “include”). Thus, our library project now comprises two specification files: library.pro and library.pri. The former is used for building the library, while the latter is intended to provide all necessary details to consuming projects.
The content of the library.pri file would be as follows:
| |
BASEDIR designates the library project’s directory (more precisely, the location of the active qmake specification file, which is library.pri in our case). As you might anticipate, INCLUDEPATH will resolve to /project/library/include. DESTDIR represents the directory where the build system deposits the output artifacts, such as .o, .a, .so, .dll, or .exe files. The DESTDIR is usually configured within your IDE, so making assumptions about the location of output files should be avoided.
In your application.pro file, simply add include(../library/library.pri), and the linking is configured.
Let’s break down how the application project is built in this scenario:
The top-level
project.profile is asubdirsproject. It instructs qmake to build the library project first. Consequently, qmake navigates to the library’s directory and builds it according to the instructions inlibrary.pro. During this stage,library.ais generated and placed into theDESTDIRfolder.Next, qmake proceeds to the application sub-folder and parses the
application.profile. Upon encountering theinclude(../library/library.pri)directive, qmake immediately reads and interprets the contents oflibrary.pri. This action appends new definitions to theINCLUDEPATHandLIBSvariables, effectively informing the compiler and linker about the search paths for include files, library binaries, and the specific library to be linked.
We omitted the building of the library-tests project, but the process is analogous to that of the application project. Naturally, our test project also needs to link against the library it is designed to test.
With this setup, you can effortlessly move the library project to another qmake project and integrate it seamlessly by referencing its corresponding .pri file. This is precisely the mechanism employed by the community for distributing third-party libraries.
config.pri
In complex projects, it’s commonplace to have shared configuration parameters used across numerous sub-projects. To mitigate duplication, the include() directive can be leveraged to create a config.pri file in the top-level directory. This file can house common qmake configurations and “utilities” that are shared among sub-projects, similar to the concepts discussed in the subsequent sections of this guide.
Copying Artifacts to DESTDIR
Projects often involve additional files that need to be distributed alongside a library or application. Our objective is to copy these files into the DESTDIR during the build process. Consider the following code snippet:
| |
Note: This pattern enables you to define your own reusable functions designed to work with files.
Placing this code within /project/copyToDestDir.pri allows you to include() it in any sub-project that requires it, as demonstrated below:
| |
Note: While DISTFILES was introduced for a similar purpose, its functionality is limited to Unix-based systems.
Code Generation
An excellent illustration of code generation as a pre-build step is when a C++ project utilizes Google Protocol Buffers. Let’s explore how to integrate protoc execution into the build process.
Finding a suitable solution online is straightforward, but a crucial corner case requires attention. Consider a scenario where you have two Protocol Buffer contracts, A and B, where A references B:
| |
If we were to generate code for A.proto first (resulting in A.pb.h and A.pb.cxx) and then attempt to compile it, the compilation would fail due to the missing dependency, B.pb.h. To address this, the code generation for all Protocol Buffer files must precede the compilation of the generated source code.
The following snippet, sourced from https://github.com/jmesmon/qmake-protobuf-example/blob/master/protobuf.pri, effectively tackles this task:
| |
Examining the protobuf.pri file reveals a generic pattern that can be readily applied to any custom compilation or code generation process:
| |
Scopes and Conditions
Frequently, declarations need to be tailored to specific platforms, such as Windows or MacOS. Qmake offers three predefined platform indicators: win32, macx, and unix. Here’s the syntax:
| |
Scopes can be nested, combined using operators like !, |, and even employ wildcards:
| |
Note: It’s essential to remember that unix is also defined on Mac OS! To specifically target Mac OS (excluding generic Unix), utilize the unix:!macx condition.
In Qt Creator, the scope conditions debug and release might not behave as anticipated. To ensure their proper functionality, utilize the following pattern:
| |
Useful Functions
Qmake provides several built-in functions that enhance automation.
Our first example showcases the files() function. Let’s assume you have a code generation step that yields a variable number of source files. Here’s how to include all of them in the SOURCES variable:
| |
This code snippet locates all files with the .c extension within the generated sub-folder and appends them to the SOURCES variable.
Our second example mirrors the previous one, but in this case, the code generation process produces a text file containing a list of output file names:
| |
This snippet reads the content of the specified file and treats each line as an entry for the SOURCES variable.
Note: A complete list of embedded functions is documented here: http://doc.qt.io/qt-5/qmake-function-reference.html
Treating Warnings as Errors
The following code snippet leverages the conditional scope feature discussed earlier:
| |
This slightly more complex approach is necessary because MSVC uses a different flag to activate this option.
Generating Git Version
The subsequent code snippet proves useful when you need to define a preprocessor macro containing the current software version extracted from Git:
| |
This solution functions seamlessly across platforms, provided that the git command is accessible. If you employ Git tags, it will retrieve the most recent tag, even if the branch has advanced beyond it. Feel free to customize the git describe command to tailor the output to your preferences.
Conclusion
Qmake is a powerful tool specifically designed for building cross-platform Qt-based projects. In this guide, we covered fundamental tool usage and the most prevalent patterns that contribute to a flexible project structure and a maintainable, easy-to-read build specification.
For those seeking to enhance the visual appeal of their Qt applications, the following resource might be of interest: How to Get Rounded Corner Shapes In C++ Using Bezier Curves and QPainter: A Step by Step Guide.