
Introduction
OSSIM is a robust, open-source security information and event management (SIEM) operating system. It’s the open-source counterpart to AlienVault, a product offered by AT&T.
I’ve used OSSIM professionally and currently utilize it for vulnerability scanning, asset management, and security alerts. Setting up and installing OSSIM can be quite complex, and troubleshooting resources are limited. I’ve picked up some useful tips through trial and error over the years.
Interestingly, OSSIM leans towards a Windows-centric approach, despite being built on Debian. Consequently, deploying the host intrusion detection system (HIDS) on Linux endpoints can be a bit challenging.
This post will guide you through installing the OSSEC HIDS necessary for an OSSIM deployment and configuring Linux syslog forwarding to OSSIM. If your Linux distribution isn’t supported on the OSSEC site, I’ll also explain how to compile the HIDS agent and configure it via the command-line interface.
Adding an Agent to OSSIM
This guide assumes you have a working OSSIM installation (either virtualized or on bare metal) and can access the web interface. If you’re not at this stage yet, I suggest referring to AT&T’s official documentation. I previously wrote a post on installing OSSIM as a VM on Unraid if you prefer that platform.
Start by navigating to your OSSIM web interface. Go to ENIORONMENT > DETECTION > AGENTS and click ADD AGENT. Locate your Linux endpoint under the “All Assets” section (this requires you to have previously added assets to OSSIM, either manually or through a scan). Upon selecting your endpoint, the IP/CIDR field should auto-populate with its IP address. Click SAVE. See the screenshot below:
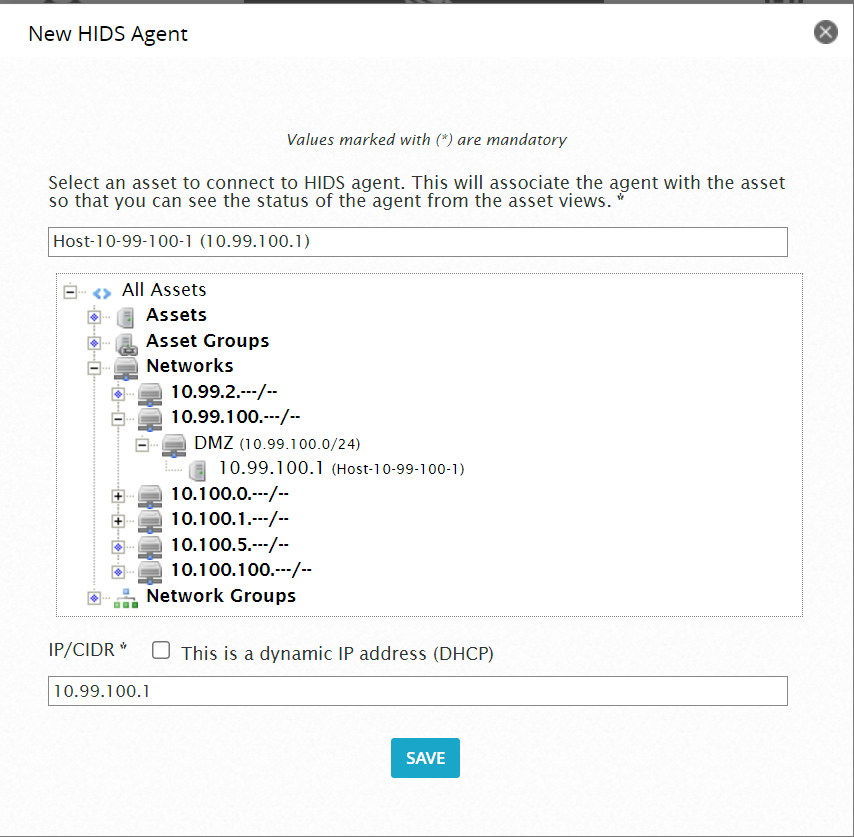
Note: If your endpoint doesn’t have a static IP address, I highly recommend assigning one if feasible. While HIDS might function with a dynamic IP (by checking the “This is a dynamic IP address (DHCP)” checkbox), static IPs tend to be more reliable and have caused fewer issues in my experience.
After saving, you should see your endpoint listed as shown in the image below. The status in my image is already “Active,” which is how yours will appear once we complete this tutorial.

Take note of this location, as you’ll need the Base64 encoded key (accessible by clicking the key icon next to your endpoint) later on for your Linux OS.
Installing OSSEC HIDS
The installation process has been simplified and is now fairly straightforward for most Linux distributions. Looking at the OSSEC.net downloads, we can see that all supported Linux distributions can utilize the same wget command to add the source. The necessary wget command, followed by the appropriate package manager commands for agent installation, is provided below. Note that the commands for Ubuntu and Debian are identical, as are those for Centos/RedHat, Fedora, and Amazon Linux. The configuration process will also be the same across all distributions.
Ubuntu & Debian
For Ubuntu and Debian, execute the following to install the agent:
| |
Centos/RedHat, Fedora, & Amazon Linux
For Centos/RedHat, Fedora, & Amazon Linux, run the following to install the agent:
| |
From Source
Compiling from source is another installation method. I’ve personally only tested this on Ubuntu and two Raspberry Pis. Your results may differ, and you’ll need to install the following:
| |
The next set of steps covers the actual installation:
| |
Upon running the final script, you’ll be prompted to answer a few straightforward questions. I’ve listed my responses, corresponding to the numbered steps in the script, below:
| |
Once the script finishes execution, assuming no errors are encountered, the HIDS agent should be installed on your endpoint. While troubleshooting this process is beyond the scope of this post, I’ve generally had success with it.
Configuring OSSEC HIDS
As previously mentioned, the configuration process for OSSEC HIDS should be consistent across different Linux distributions. All screenshots provided here are from SSH connections to Ubuntu endpoints using RoyalTS.
Editing OSSEC.conf
First, we’ll need to modify the ossec.conf file, which is an XML configuration file generated during installation. Open /var/ossec/etc/ossec.conf with your preferred text editor on your Linux endpoint. (Replace nano in the command below with your editor of choice)
| |
Within the file, locate the client section, typically at the beginning. Replace the
| |
Still in the same file, insert a new localfile node under the ossec_config node. You’ll notice several existing localfile nodes; I suggest adding the new one near the bottom for easy identification later on if needed. Use the following code:
| |
Save your changes and close the file (CTRL+X if using nano).
Connect Endpoint to OSSIM Server
Once the agent is configured, we can connect it to the OSSIM server. Go back to the OSSIM web interface and return to where you initially added the endpoint. Click the Extract Key icon next to your endpoint and copy the key, ensuring you capture all characters, including any trailing “=”, and avoid copying extra spaces.
On the endpoint, execute the following command:
| |
Follow the prompts to import the key. Press “I” to initiate the import, then paste the key you copied from the server. Confirm with “y”, then press “Enter” and “Q” to quit. This sequence should resemble the following:
To finalize the configuration, run:
| |
Your endpoint is now successfully configured.
Wrapping Up
Congratulations on reaching this point! Give it a few minutes, and your endpoint will establish a connection with your server. This connection will be reflected in the web interface, with the endpoint’s status changing to “Active,” as shown in the screenshot earlier. You’ll also start seeing events populated on the dashboard and in the event logs.
OSSIM is a powerful yet potentially complex tool. If you’re new to OSSIM, I recommend conducting thorough research on SIEM tools in general and specifically on OSSIM configuration best practices. While it might be overkill for a home lab, it’s a valuable tool for any security professional to be familiar with.