In the always-on digital landscape, reliability is paramount. For websites and applications, this means minimizing downtime and ensuring seamless user experiences, especially during updates. Imagine you have a successful application with a growing user base. You’ve collected feedback and tasked your developers with implementing new features. When it’s time to deploy, you have two options: halt the application for the update or build a system that seamlessly integrates these changes without interrupting service.
This article focuses on the latter, guiding you through building a continuous deployment pipeline for a three-tier web application. Our example utilizes Node.js, deploys on AWS Cloud, and leverages Terraform for infrastructure orchestration. We’ll use Jenkins for continuous deployment and Bitbucket for code hosting.
Code Repository
Our demo application is a three-tier web application. You can find the code here.
The repository contains code for both the web frontend and the API backend. It’s a straightforward application: the web module requests data from the API layer, which fetches the current time from the database and returns it to the user.
Here’s the repo structure:
- API: Houses the API layer code.
- Web: Contains the web layer code.
- Terraform: Holds the infrastructure orchestration code using Terraform.
- Jenkins: Includes code for orchestrating the Jenkins server used in the CI/CD pipeline.
With a grasp of our deployment target, let’s examine the steps to deploy this application on AWS and integrate it into our CI/CD pipeline.
Creating Images
When using Terraform for infrastructure orchestration, it’s best to utilize pre-built images for each application tier. For this, we’ll use another Hashicorp tool called Packer.
Packer is an open-source tool that helps build Amazon Machine Images (AMIs), used for deployment on AWS. It supports various platforms like EC2, VirtualBox, VMware, and more.
Below is a snippet from the Packer configuration file (terraform/packer-ami-api.json) demonstrating how to create an AMI for the API layer.
| |
Execute the following command to create the AMI:
| |
We’ll trigger this command from the Jenkins build later. Similarly, we’ll use the terraform/packer-ami-web.json Packer configuration file for the web layer.
Let’s dissect the Packer config file and understand its function.
- As mentioned, Packer can build images for many platforms. Since we’re deploying to AWS, we’ll use the “amazon-ebs” builder for its simplicity.
- The config file then lists “provisioners” – scripts or code blocks that configure the image.
- Step 1 utilizes a shell provisioner with the
inlineproperty to create an API folder and install Node.js on the image by executing a series of commands. - Step 2 employs a file provisioner to copy the API folder’s source code onto the instance.
- Step 3 runs another shell provisioner, this time using the
scriptproperty to execute commands from a designated file (terraform/scripts/install\_api\_software.sh). - Step 4 copies a configuration file required by Cloudwatch, installed in the subsequent step, onto the instance.
- Step 5 utilizes a shell provisioner to install the AWS Cloudwatch agent, utilizing the config file copied in the previous step. We’ll delve into Cloudwatch later.
- Step 1 utilizes a shell provisioner with the
In essence, the Packer config file defines the builder and outlines a series of provisioners, executed in a specific order to configure the image.
Establishing a Jenkins Continuous Deployment Setup
Next, we’ll set up a Jenkins server for our CI/CD pipeline. We’ll be using Terraform and AWS for this setup as well.
The Terraform code for configuring Jenkins resides in the jenkins/setup folder. Let’s highlight some key aspects of this setup.
- AWS credentials: You can provide AWS access key ID and secret access key directly to the Terraform AWS provider (
instance.tf) or specify the credentials file location using theshared_credentials_fileproperty in the AWS provider. - IAM role: Our Jenkins server will execute Packer and Terraform, requiring access to various AWS services like S3, EC2, RDS, IAM, load balancing, and autoscaling. Instead of embedding credentials directly within Jenkins, we’ll create an IAM Profile (
iam.tf) to launch the Jenkins instance. - Terraform state: Terraform needs to store the infrastructure state. Utilizing S3 (
backend.tf) enables collaboration as the state is remotely stored, allowing anyone to modify and deploy. - Public/private key pair: Uploading your key pair’s public key during instance creation enables SSH access to the Jenkins server once it’s running. We define an
aws_key_pairresource (key.tf) and specify the public key location using Terraform variables.
Steps to set up Jenkins:
Step 1: Manually create an S3 bucket for storing the Terraform remote state. This is the only step performed outside Terraform. Before proceeding, run AWS configure to set up your AWS credentials.
| |
Step 2: Execute terraform init to initialize the state, configure S3 as the storage backend, and download the AWS provider plugin.
Step 3: Run terraform apply. This analyzes the Terraform code, creates an execution plan, and displays the resources to be created.
Step 4: Type yes to proceed with resource creation based on the plan. The command output will provide the Jenkins server’s public IP address.
Step 5: SSH into the Jenkins server using your private key. Use the IP address from the terraform apply command output. The default username for AWS EBS-backed instances is ubuntu.
| |
Step 6: Access the Jenkins web UI at http://34.245.4.73:8080. The initial password can be found at /var/lib/jenkins/secrets/initialAdminPassword.
Step 7: Choose “Install Suggested Plugins” and create an admin user for Jenkins.
Establishing the CI Pipeline Between Jenkins and Bitbucket
Install the Bitbucket plugin in Jenkins. Navigate to Manage Jenkins → Manage Plugins, locate the Bitbucket plugin in the Available plugins section, and install it.
In your Bitbucket repository settings, go to Settings → Webhooks and add a new webhook. This hook will trigger pipelines in Jenkins by sending notifications about repository changes.
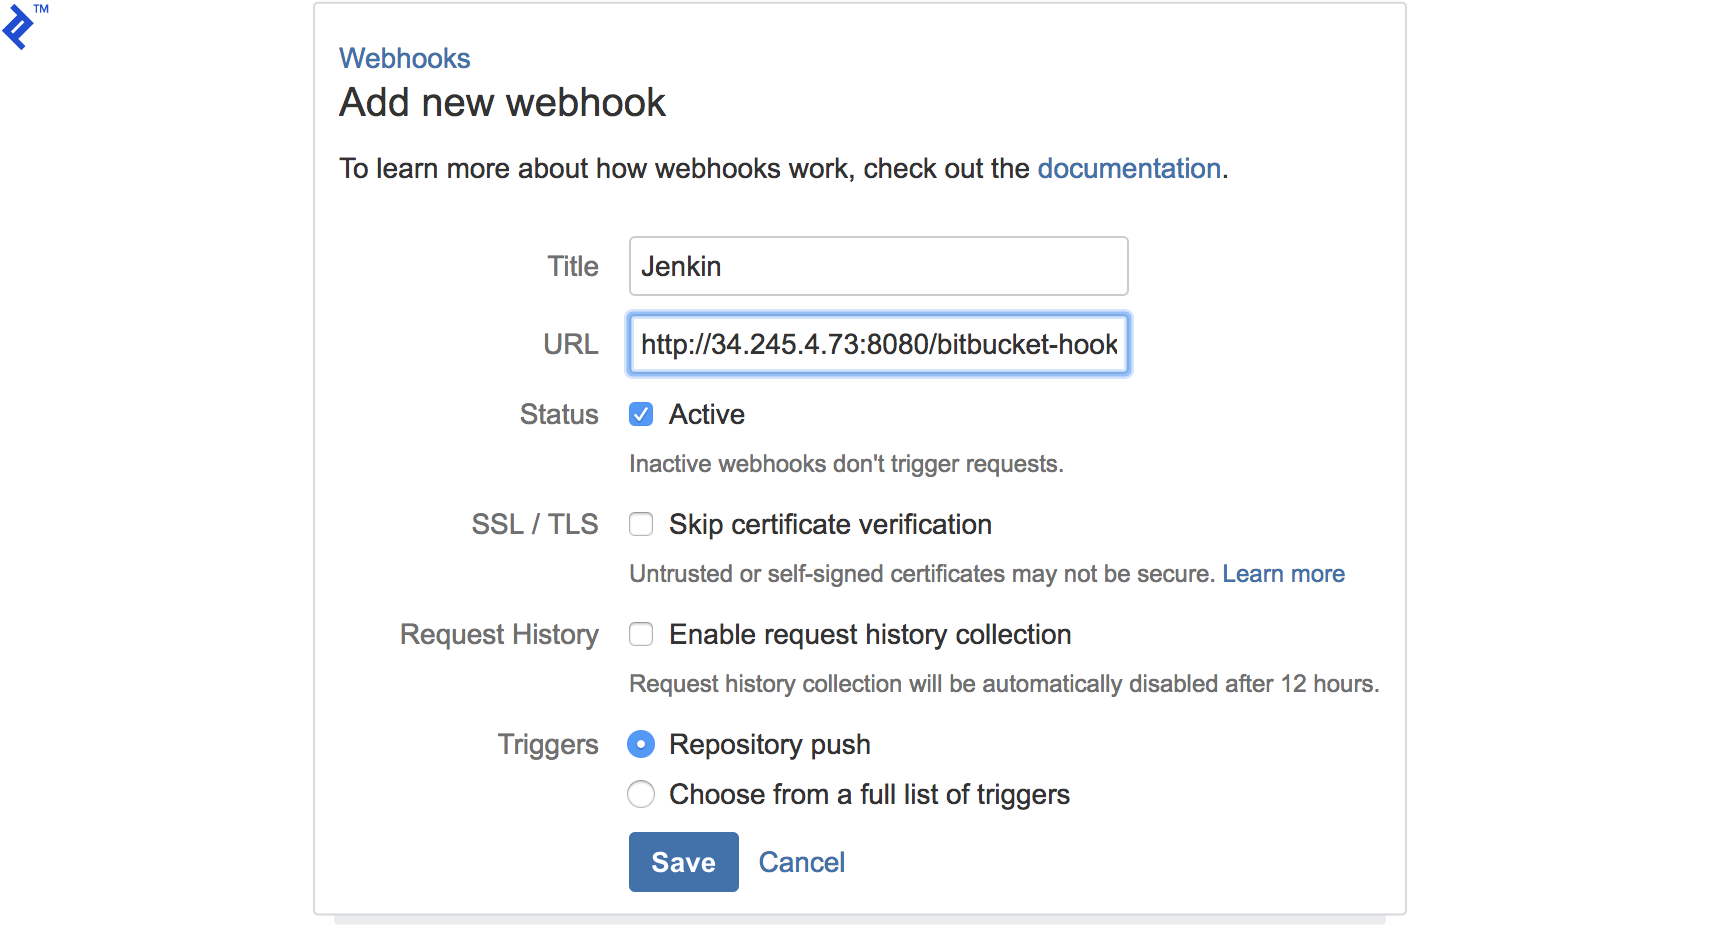
Jenkins Pipeline for Baking/Building Images
Create pipelines in Jenkins.
The first pipeline will be a Freestyle project responsible for building the application’s AMI using Packer.
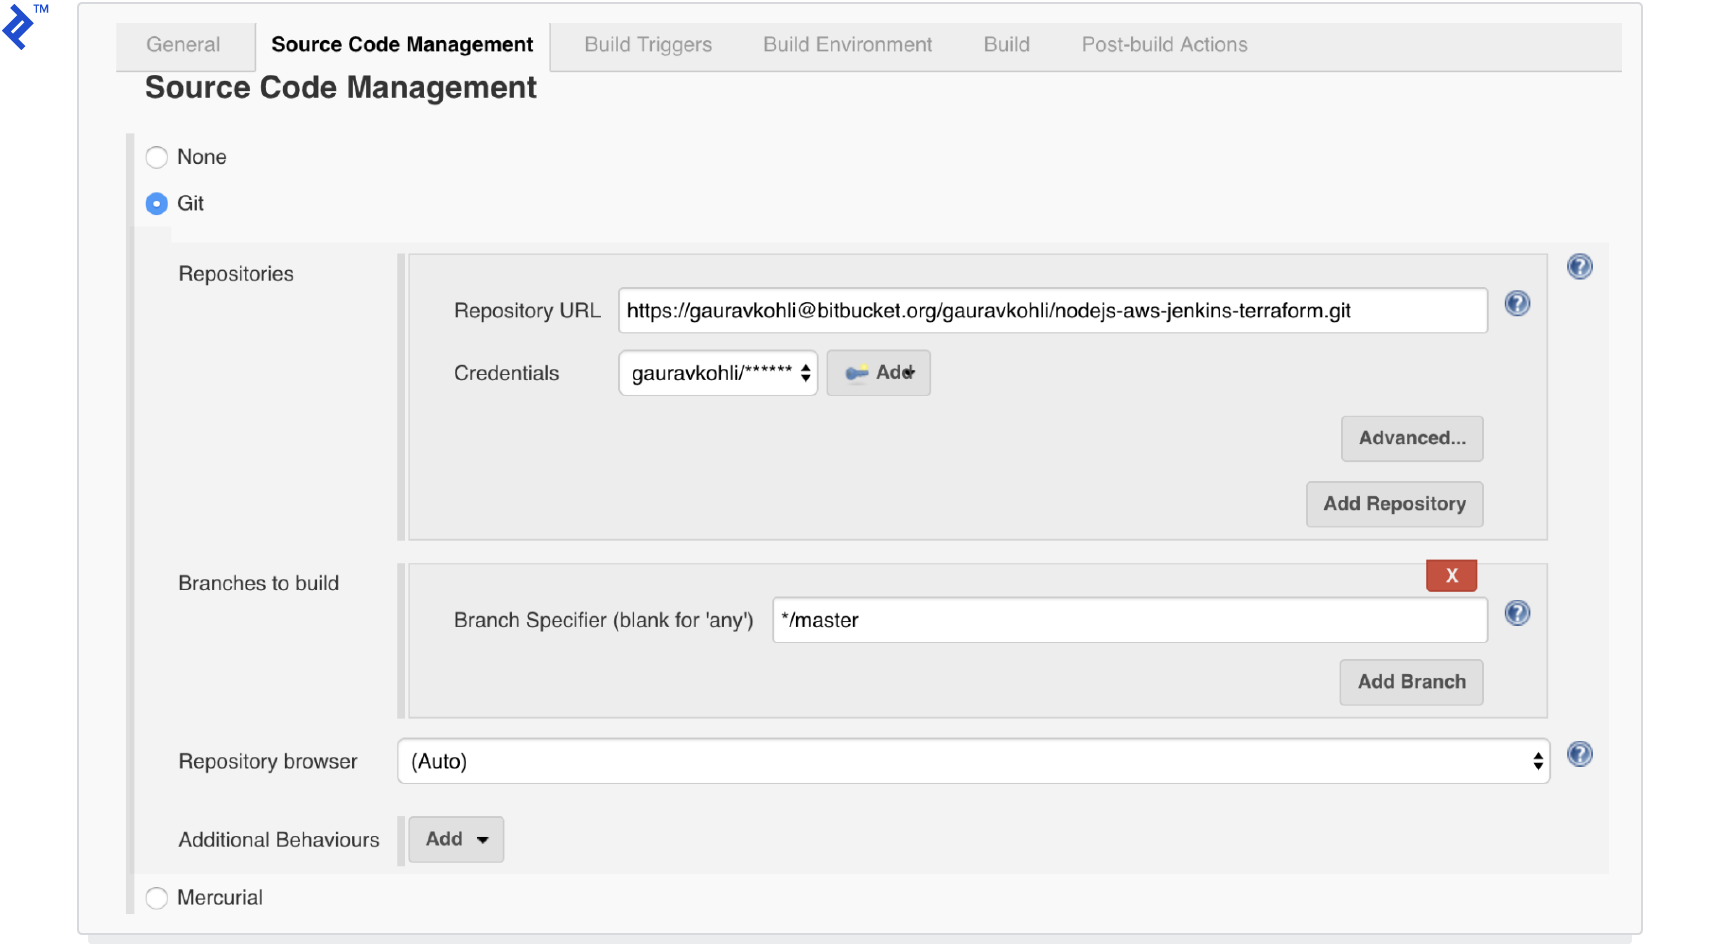
Provide credentials and the URL for your Bitbucket repository.
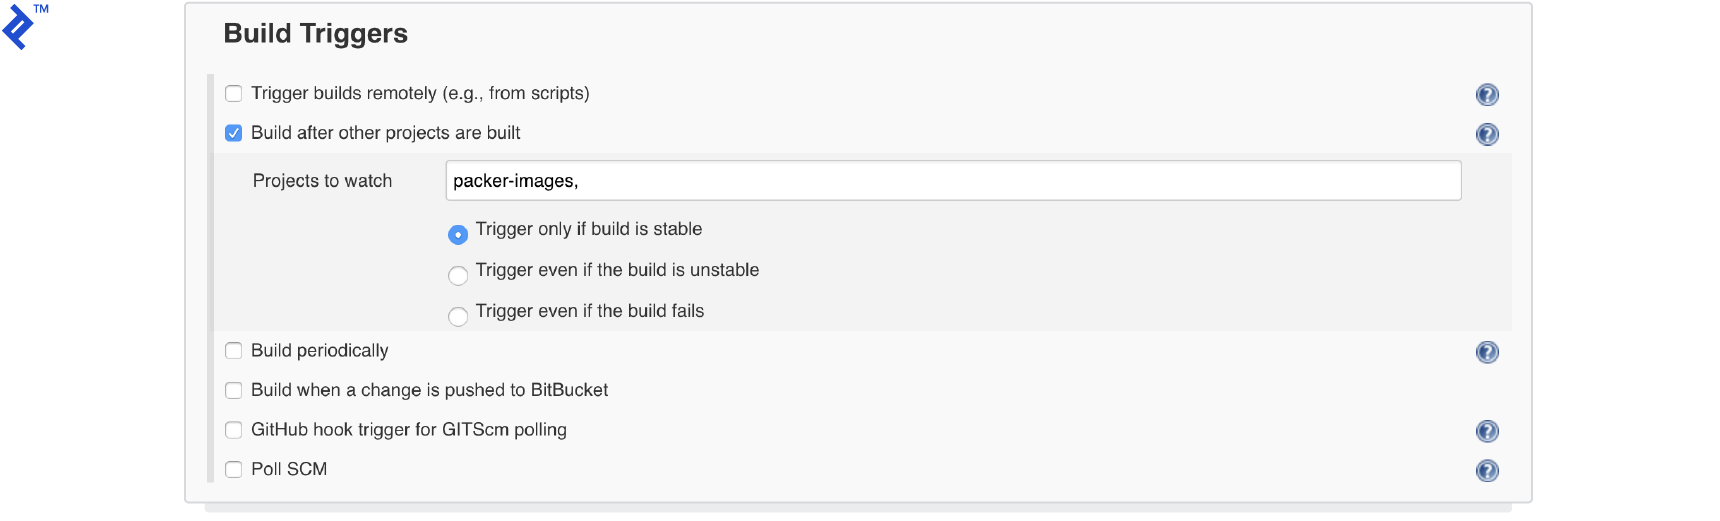
Configure the build trigger.

Add two build steps: one to build the AMI for the application module and the other for the web module.
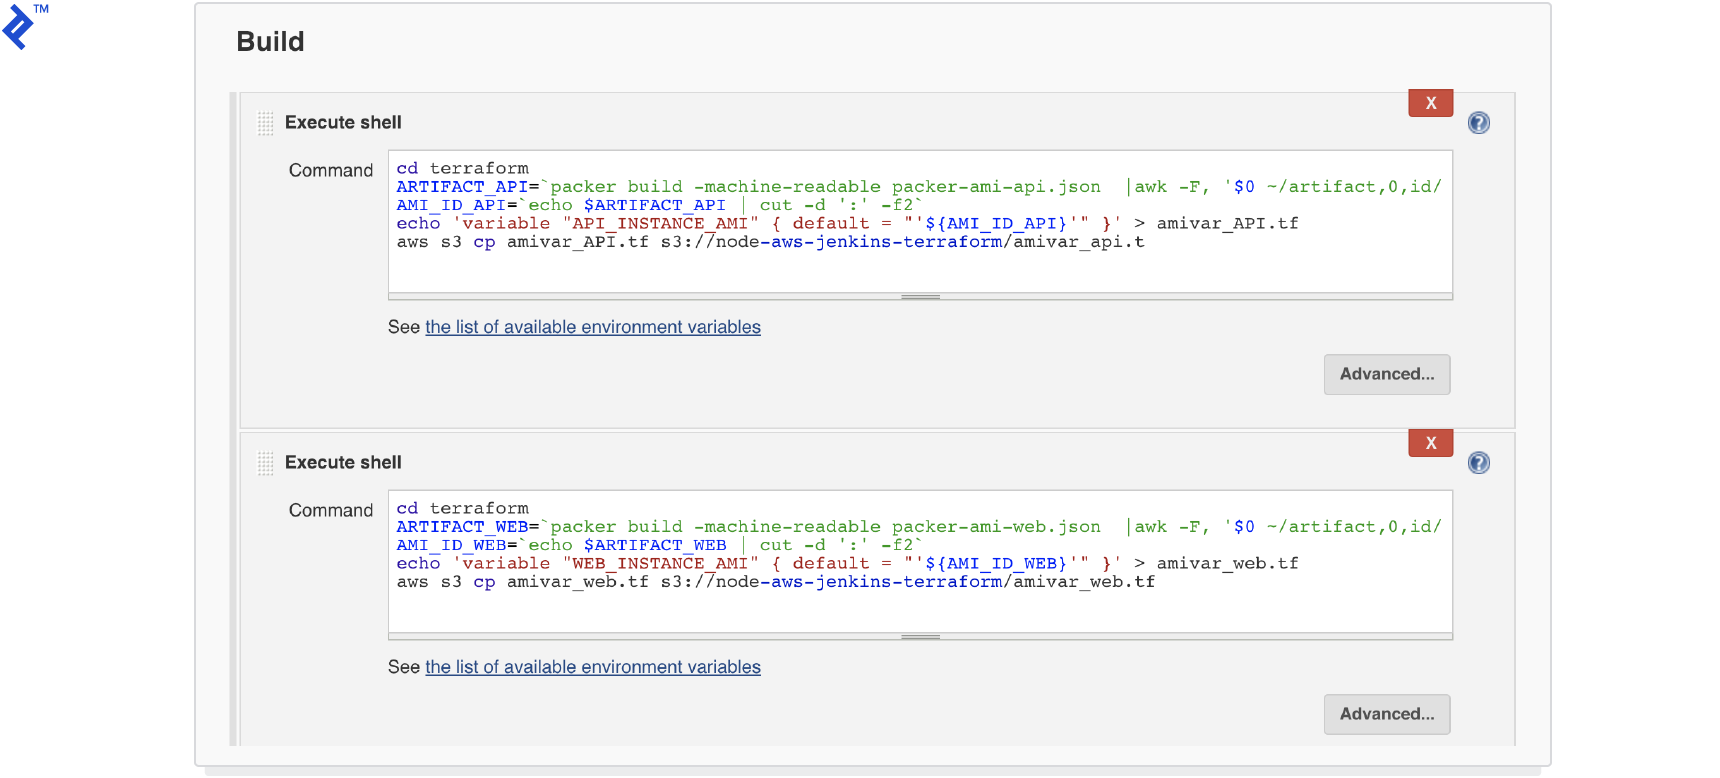
Save the Jenkins project. Now, any push to your Bitbucket repository will trigger a new build in Jenkins. This build generates the AMIs and uploads a Terraform file containing the AMI ID to the S3 bucket (refer to the last two lines in the build step).
| |
Jenkins Pipeline to Execute Terraform Script
With the AMIs for the API and web modules ready, we’ll set up another pipeline to run the Terraform code, deploying the entire application. We’ll explore the Terraform components that enable zero-downtime deployment.
Create another Freestyle Jenkins project named
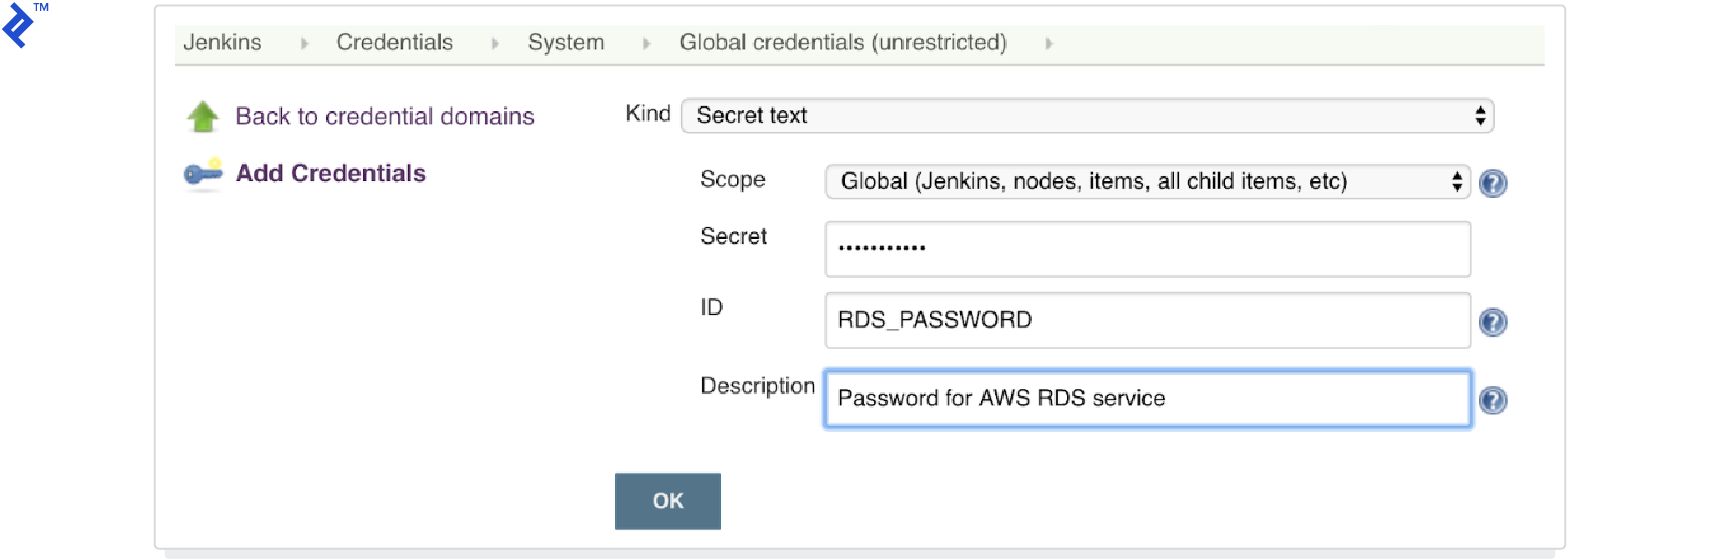
nodejs-terraform. This project will execute the Terraform code for application deployment.Create a “secret text” credential in the global credentials domain. This will store the RDS password and be passed as an input to the Terraform script, avoiding hardcoding sensitive information.
Similar to the previous project, configure the credentials and URL for your Bitbucket repository.
In the build trigger section, configure this project to start upon successful completion of the previous project.
Use bindings to inject the previously added credentials into the project, making them accessible during the build process.

Add a build step to download the Terraform script files (
amivar_api.tfandamivar_web.tf) uploaded to S3 by the previous project. This step then executes the Terraform code to deploy the application on AWS.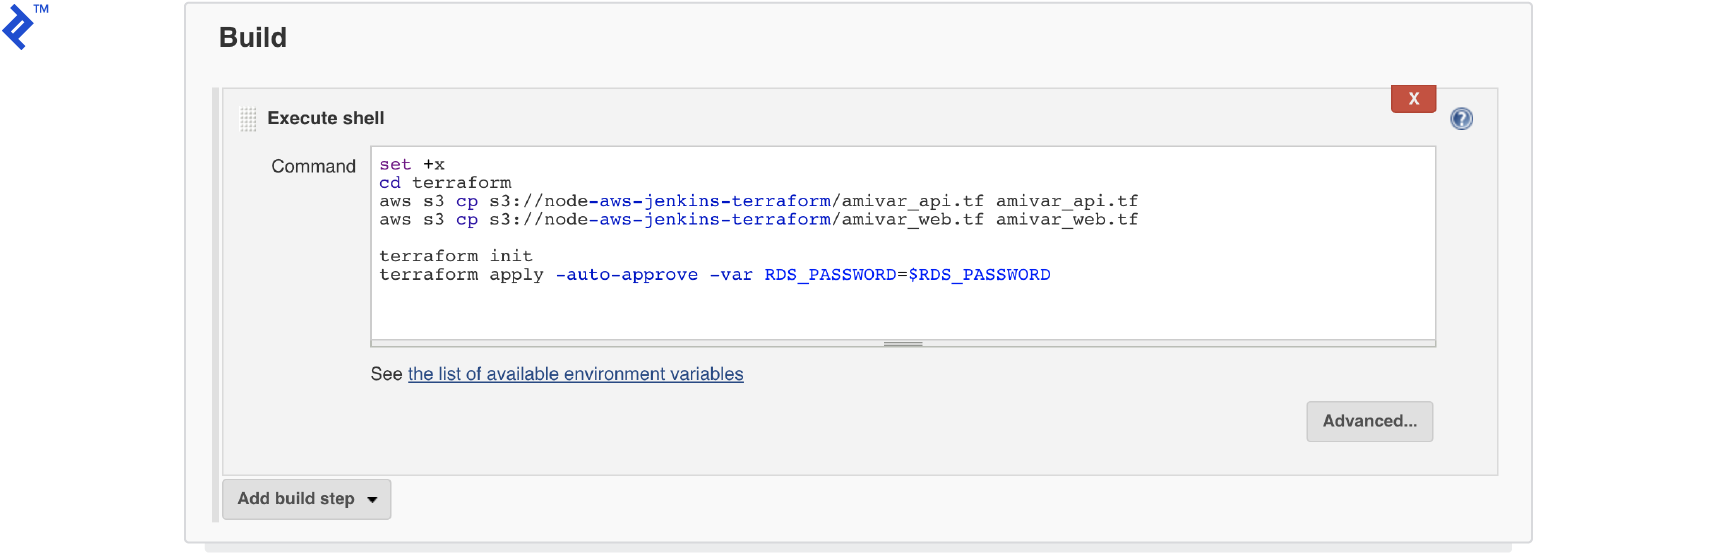
With proper configuration, pushing code to your Bitbucket repository should trigger the first Jenkins project, followed by the second. This results in your application being deployed to AWS.
Terraform Zero Downtime Configuration for AWS
Let’s delve into the Terraform code and understand how it achieves zero-downtime deployment.
Terraform offers lifecycle configuration blocks for resources. These resources include the create_before_destroy flag, ensuring Terraform creates a new resource before destroying the existing one.
We’ll utilize this feature for the aws_autoscaling_group and aws_launch_configuration resources. aws_launch_configuration defines the EC2 instance type and software installation process, while aws_autoscaling_group manages the AWS autoscaling group.
Terraform enforces unique name and type combinations for all resources. To create a new aws_autoscaling_group and aws_launch_configuration without conflicts, we need unique names for them.
Terraform addresses this by providing the name_prefix property in the aws_launch_configuration resource. By defining this property, Terraform appends a unique suffix to each aws_launch_configuration resource, allowing us to use these unique names to create the aws_autoscaling_group resource.
You can review the implementation in the terraform/autoscaling-api.tf file.
| |
Another crucial aspect of zero-downtime deployments is ensuring the new deployment is ready to handle requests. Simply deploying and starting a new EC2 instance might not suffice.
The user_data property in aws_launch_configuration solves this. It utilizes the native AWS autoscaling user_data property to execute custom scripts during instance startup within the autoscaling group. In our example, we tail the app server log, waiting for the startup message. You could also monitor the HTTP server status.
| |
Additionally, enable an ELB check at the aws_autoscaling_group resource level. This ensures the newly added instance passes the ELB check before Terraform decommissions the old instances. Below is an example of the ELB check for the API layer, verifying the /api/status endpoint returns a success response.
| |
Conclusion and Next Steps
This concludes our exploration of building a zero-downtime CI/CD pipeline. You should now have the knowledge to deploy your application with minimal manual intervention, leveraging Jenkins and Terraform best practices.
This article demonstrated the Blue-Green deployment strategy. In this approach, the current installation (Blue) serves live traffic while the new version (Green) undergoes deployment and testing. Once ready, traffic is switched over to the new version. Other deployment strategies exist, as explained in this article: Intro to Deployment Strategies. Adapting to a different strategy involves modifying your Jenkins pipeline.
We assumed backward compatibility between API, web, and data layer changes. However, in real-world scenarios, this might not always hold true. Consider backward compatibility while designing new releases or features. Alternatively, adjust your deployment strategy to accommodate such situations.
This pipeline lacks integration testing, a crucial aspect of any deployment process. Before releasing to end users, ensure thorough testing is implemented.
To further your understanding of Terraform and AWS deployments, consider exploring Terraform AWS Cloud: Sane Infrastructure Management. In this resource, Toptaler Radosław Szalski elucidates Terraform concepts and guides you through setting up a multi-environment, production-ready Terraform configuration for team collaboration.