Welcome back for another exciting installment of Unearthing ClojureScript! This post will cover taking your ClojureScript skills to the next level with state management using React.
State management is crucial in front-end development. React offers a couple of default ways to handle state:
- Managing state at the top level and passing it down (or passing handlers for specific state) to child components.
- Abandoning purity and resorting to global variables or complex dependency injection.
Generally, neither of these options is ideal. Top-level state management is straightforward, but passing application state to every component that needs it creates significant overhead.
Conversely, using global variables (or other simplistic state management approaches) can lead to difficult-to-track concurrency problems, causing unpredictable component updates.
So, how do we address this? If you’re familiar with React, you may have encountered Redux, a state container for JavaScript apps. You might have discovered it while seeking a manageable state management system or stumbled upon it while exploring JavaScript and web tools.
Regardless of how developers encounter Redux, my experience is that they generally have two reactions:
- “Everyone seems to think Redux is mandatory.”
- “I don’t fully grasp why this is an improvement.”
In essence, Redux provides an abstraction that aligns state management with React’s reactive nature. By delegating all statefulness to a system like Redux, you maintain React’s purity, resulting in fewer issues and a more understandable codebase.
For Those Unfamiliar with Clojure
While this might not be a complete ClojureScript tutorial for beginners, I’ll recap some fundamental state concepts in Clojure[Script]. Feel free to skip these sections if you’re already a seasoned Clojurian!
Remember one of the core principles of Clojure that also applies to ClojureScript: data is data is immutable by default. This immutability is fantastic for development as it guarantees that data remains consistent over time. However, ClojureScript also offers a convenient way to handle mutable state when needed, using the atom concept.
In ClojureScript, an atom is very similar to an AtomicReference in Java: It provides a new object that ensures concurrent access to its contents is safe. As in Java, you can store anything you want in this object, making the atom an atomic reference to your desired data.
Once you have your atom, you can atomically update its value using the reset! function (notice the ! in the function name—a common convention in Clojure to indicate stateful or impure operations).
Unlike Java, Clojure is dynamically typed, so it doesn’t restrict what you store in your atom. You can use strings, lists, objects, or anything else!
| |
Reagent extends this atom concept with its own version. (If you’re unfamiliar with Reagent, refer to the previous post.) Reagent’s atom behaves identically to the ClojureScript atom, with the added benefit of triggering render events in Reagent, similar to React’s built-in state store.
Consider the following example:
| |
This code renders a <div> element containing a <span> that displays “Hello, world!” and a button. Clicking the button atomically changes the value of my-atom to "there!", triggering a re-render of the component and updating the span to display “Hello, there!”.

While this approach seems sufficient for simple, component-level mutations, what happens when dealing with a more complex application with multiple layers of abstraction? Or when you need to share state among numerous sub-components and their children?
A More Complex Scenario
Let’s illustrate this with a basic login page example:
| |
Now, let’s embed this login component within our primary app.cljs file:
| |
This setup implies the following workflow:
- The user enters their username and password and clicks submit.
- This action triggers the
do-login-iofunction in the parent component. - The
do-login-iofunction performs an I/O operation (like logging in to a server and retrieving a token).
If this operation is blocking, our application freezes, which is problematic. If it’s asynchronous, we have to deal with async complexities!
Moreover, we need to distribute this token to all sub-components that require it for server communication, making code refactoring more challenging.
Finally, our component is no longer purely reactive. It’s now responsible for managing application state, initiating I/O operations, and generally becoming more cumbersome.
ClojureScript Tutorial: Introducing Redux
Redux is the solution to all your state-related challenges. When implemented correctly, it provides a safe, efficient, and user-friendly state-sharing abstraction.
While a deep dive into Redux’s inner workings and underlying theory is beyond this article’s scope, I will demonstrate its capabilities with a practical ClojureScript example.
We’ll be utilizing a ClojureScript library called re-frame to implement Redux. This library provides a Clojure-friendly wrapper around Redux, making it incredibly enjoyable to work with.
Fundamentals
Redux elevates your application state, keeping components lightweight. A Redux-powered component only needs to concern itself with:
- Its visual representation
- The data it consumes
- The events it triggers
Everything else is handled behind the scenes.
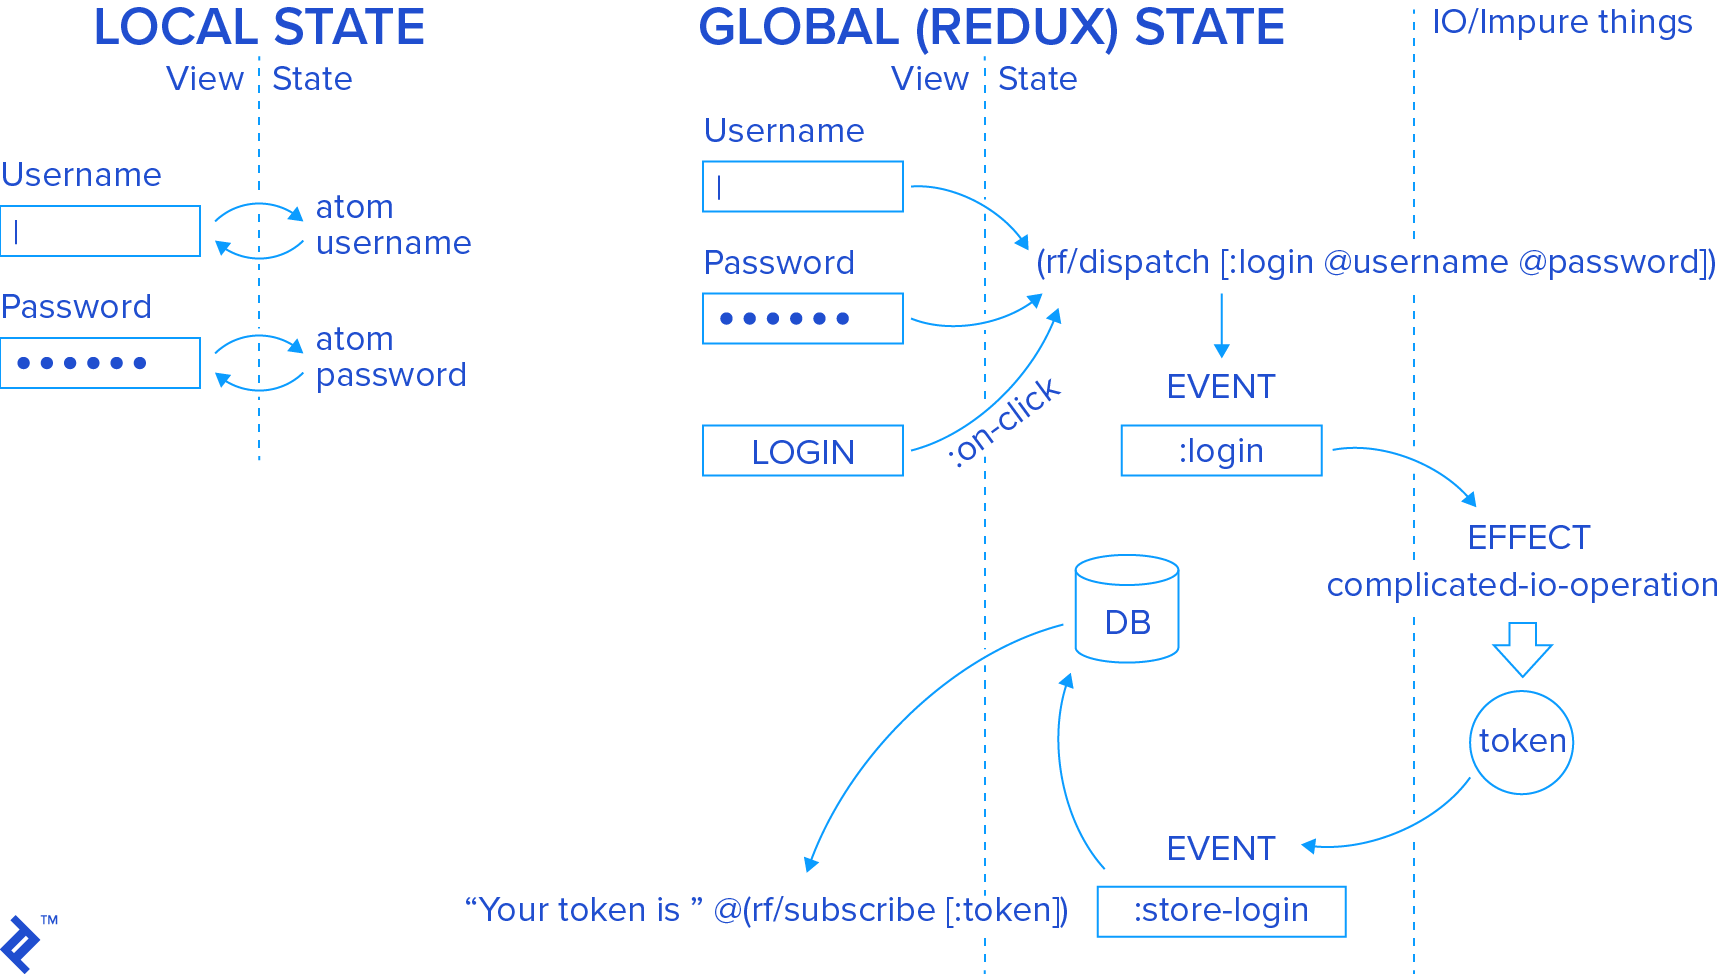
To illustrate this, let’s Reduxify our login page from earlier.
The Data Model
First, we need to define our application’s data model by specifying the structure of our data, which will be accessible throughout the app.
A good rule of thumb is to store data in the Redux database if it’s shared across multiple components or has a long lifespan (like our token). Conversely, data local to a component (like username and password fields) should remain as local component state.
Let’s create the basic structure for our database and define our token:
| |
Several interesting points here deserve attention:
- We use Clojure’s
speclibrary to define the expected format of our data. This practice is particularly valuable in a dynamically typed language like Clojure[Script]. - In this example, we’re only tracking a global token representing the logged-in user. This token is a simple string.
- Before the user logs in, we won’t have a token, represented by the
:opt-unkeyword, which stands for “optional, unqualified.” (In Clojure, a regular keyword might be:cat, while a qualified keyword could be:animal/cat. Qualification usually occurs at the module level to prevent keyword collisions across different modules.) - Finally, we set the default state of our database, which determines its initial state.
We can be certain that the data in our database consistently adheres to this specification.
Connecting the View: Subscriptions
Now that we have our data model, we need to establish how our view reflects that data. We’ve already defined the appearance of our view in the Redux component; now we just need to link it to the database.
Redux discourages directly accessing the database to prevent lifecycle and concurrency issues. Instead, we register our interest in specific database facets through subscriptions.
A subscription informs re-frame (and Reagent) about our dependency on a particular part of the database. When that part changes, our Redux component should re-render.
Defining subscriptions is simple:
| |
Here, we register a single subscription to the token itself. A subscription consists of its name and a function that extracts the relevant data from the database. We have complete freedom to manipulate that value and modify the view as needed. In this case, we’re simply extracting and returning the token from the database.
Subscriptions offer much more flexibility, like defining views on specific database subsections for more targeted re-rendering. However, we’ll keep it simple for now.
Triggering Actions: Events
With our database and view in place, it’s time to introduce some events! In this example, we have two types of events:
- The pure event (without side effects) of writing a new token to the database.
- The I/O event (with side effects) of requesting our token through user interaction.
Let’s start with the straightforward one. Re-frame provides a dedicated function for this:
| |
Once again, it’s quite straightforward. We’ve defined two events. The first initializes our database (notice how it ignores both arguments, as we always initialize the database with our default-db). The second stores the token after retrieval.
Crucially, neither event has side effects—no external calls or I/O operations. This purity is essential for upholding the sanctity of the Redux process. Avoid introducing impurities to prevent unexpected consequences.
Lastly, let’s define our login event alongside the others:
| |
The reg-event-fx function shares similarities with reg-event-db, but with some nuances:
- The first argument is not just the database but includes various elements for managing application state.
- The second argument is similar to that in
reg-event-db. - Instead of simply returning the updated
db, we return a map representing all the effects (“fx”) associated with this event. In this case, we invoke the:request-tokeneffect defined below. Another valid effect is:dispatch, which simply calls another event.
Once dispatched, our :request-token effect executes, performing the potentially long-running I/O login operation. Upon completion, it dispatches the result back into the event loop, completing the cycle.
ClojureScript Tutorial: The Final Product
With our storage abstraction defined, how does our component look now?
| |
And our app component:
| |
Finally, accessing our token in a remote component becomes as simple as:
| |
Combining everything:
Effortless and elegant.
Decoupling Components with Redux/Re-frame for Clean State Management
Using Redux (through re-frame), we successfully separated our view components from the intricacies of state handling, making it incredibly easy to extend our state abstraction.
Redux in ClojureScript is genuinely this approachable. Give it a try!
For further exploration, check out the fantastic re-frame docs and our simple worked example. I’m eager to hear your thoughts on this ClojureScript tutorial in the comments below. Happy coding!