Internet users are becoming increasingly resistant with conventional email/password registration methods. One-click login options using Facebook, Google, or GitHub accounts are proving to be a much more appealing choice. However, this convenience does come with a downside.
Advantages of social media login integration:
- Eliminates tedious form-filling.
- No need to memorize another username/password combination.
- The entire process takes mere seconds instead of minutes.
Disadvantages of social media login integration:
- Because user data is pulled from external platforms, it raises significant privacy concerns regarding how these platforms utilize this personal information. For instance, as of this writing, Facebook is dealing with data privacy issues.
This piece presents a novel login approach for blockchain development: A one-click, cryptographically secured login procedure employing the MetaMask extension, with all data housed on our own backend system. We’ve dubbed it: “Login with MetaMask”.
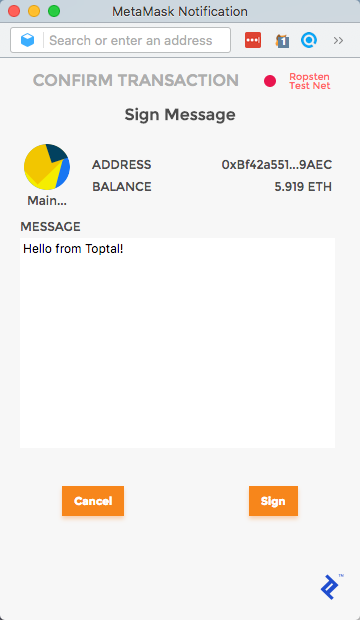
A picture is worth a thousand words, so here’s a demonstration of the login process we’ll be constructing:

Looks promising? Let’s dive in!
Utilizing Metamask Authentication for a One-Click Login Process
The fundamental concept is that cryptographically, it’s simple to verify account ownership by signing a piece of information using a private key. If you can successfully sign a specific piece of data produced by our back end, our system will recognize you as the owner of that public address. Consequently, we can build an authentication mechanism based on message signing, using a user’s public address as their unique identifier.
If this seems unclear, don’t worry, our MetaMask tutorial will break it down step by step:
- The MetaMask Browser Extension
- How the Login Flow Works
- Why the Login Flow Works
- Building It Together
- Production-Ready Today
- Limitations on Mobile
It’s important to note that although we’ll be using tools associated with the Ethereum blockchain (MetaMask, Ethereum public addresses), this login method doesn’t actually require the blockchain: It solely utilizes its cryptographic functions. With MetaMask becoming increasingly such a popular extension, now seems like an opportune moment to introduce this login process.
The MetaMask Browser Extension
Feel free to bypass this section if you’re already familiar with MetaMask.
MetaMask is a browser plugin available for MetaMask Chrome extension or Firefox Add-on. At its heart, it acts as an Ethereum wallet: Installing it grants you a unique Ethereum public address, which you can use to send and receive ether or tokens.
However, the MetaMask wallet does more than a typical Ethereum wallet. Being a browser extension, it can interact with the webpage you’re browsing. It achieves this by injecting a JavaScript library called web3.js into every webpage you visit. Once injected, a ‘web3’ object becomes accessible through ‘window.web3’ within the website’s JavaScript code. If you have MetaMask installed, you can examine this object by typing ‘window.web3’ in your Chrome or Firefox DevTools console. MetaMask also injects a global API at window.ethereum, and the extension allows exporting the private MetaMask API key through the Account Details button.
Web3.js serves as a JavaScript interface for the Ethereum blockchain. It provides functions to:
- Retrieve the latest block in the chain (
web3.eth.getBlockNumber) - Verify the currently active account on MetaMask (
web3.eth.coinbase) - Fetch the balance of any account (
web3.eth.getBalance) - Transmit transactions (
web3.eth.sendTransaction) - Sign messages using the private key of the active account (
web3.personal.sign) - …and much more
With MetaMask installed, any front-end code gains access to these functions and can interact with the blockchain. Such applications are known as dapps or DApps (short for decentralized apps—sometimes even styled “ĐApps”).
Most functions in web3.js are read functions (e.g., get block, get balance) and ‘web3’ will provide an immediate response. However, certain functions (like ‘web3.eth.sendTransaction’ and ‘web3.personal.sign’) require the active account to sign data with its private key. These functions trigger MetaMask to display a confirmation window, ensuring the user is aware of what they’re signing.
Let’s see how MetaMask is used for this. Paste the following line into the DevTools console for a quick test:
| |
This command instructs: Sign my message, converting it from UTF-8 to hexadecimal, using the coinbase account (i.e., the current account), and as a callback, print the signature. A MetaMask popup will appear, and upon signing, the signed message will be displayed.
Our login flow will utilize ‘web3.personal.sign’.
One final point regarding this section: Although MetaMask injects web3.js into your browser, other standalone browsers like Mist also inject web3.js. However, I believe MetaMask currently offers the smoothest user experience and simplest transition for regular users exploring dapps.
The Login Process: A Breakdown
Let’s begin with the “how,” which will hopefully demonstrate its security, allowing me to keep the “why” concise.
As previously mentioned, we’ll disregard the blockchain for now. We’re working with a traditional Web 2.0 client-server RESTful architecture. We’ll make one assumption: Every user accessing our front-end webpage has MetaMask installed. With this in mind, we’ll illustrate how a passwordless, cryptographically secure login process functions.
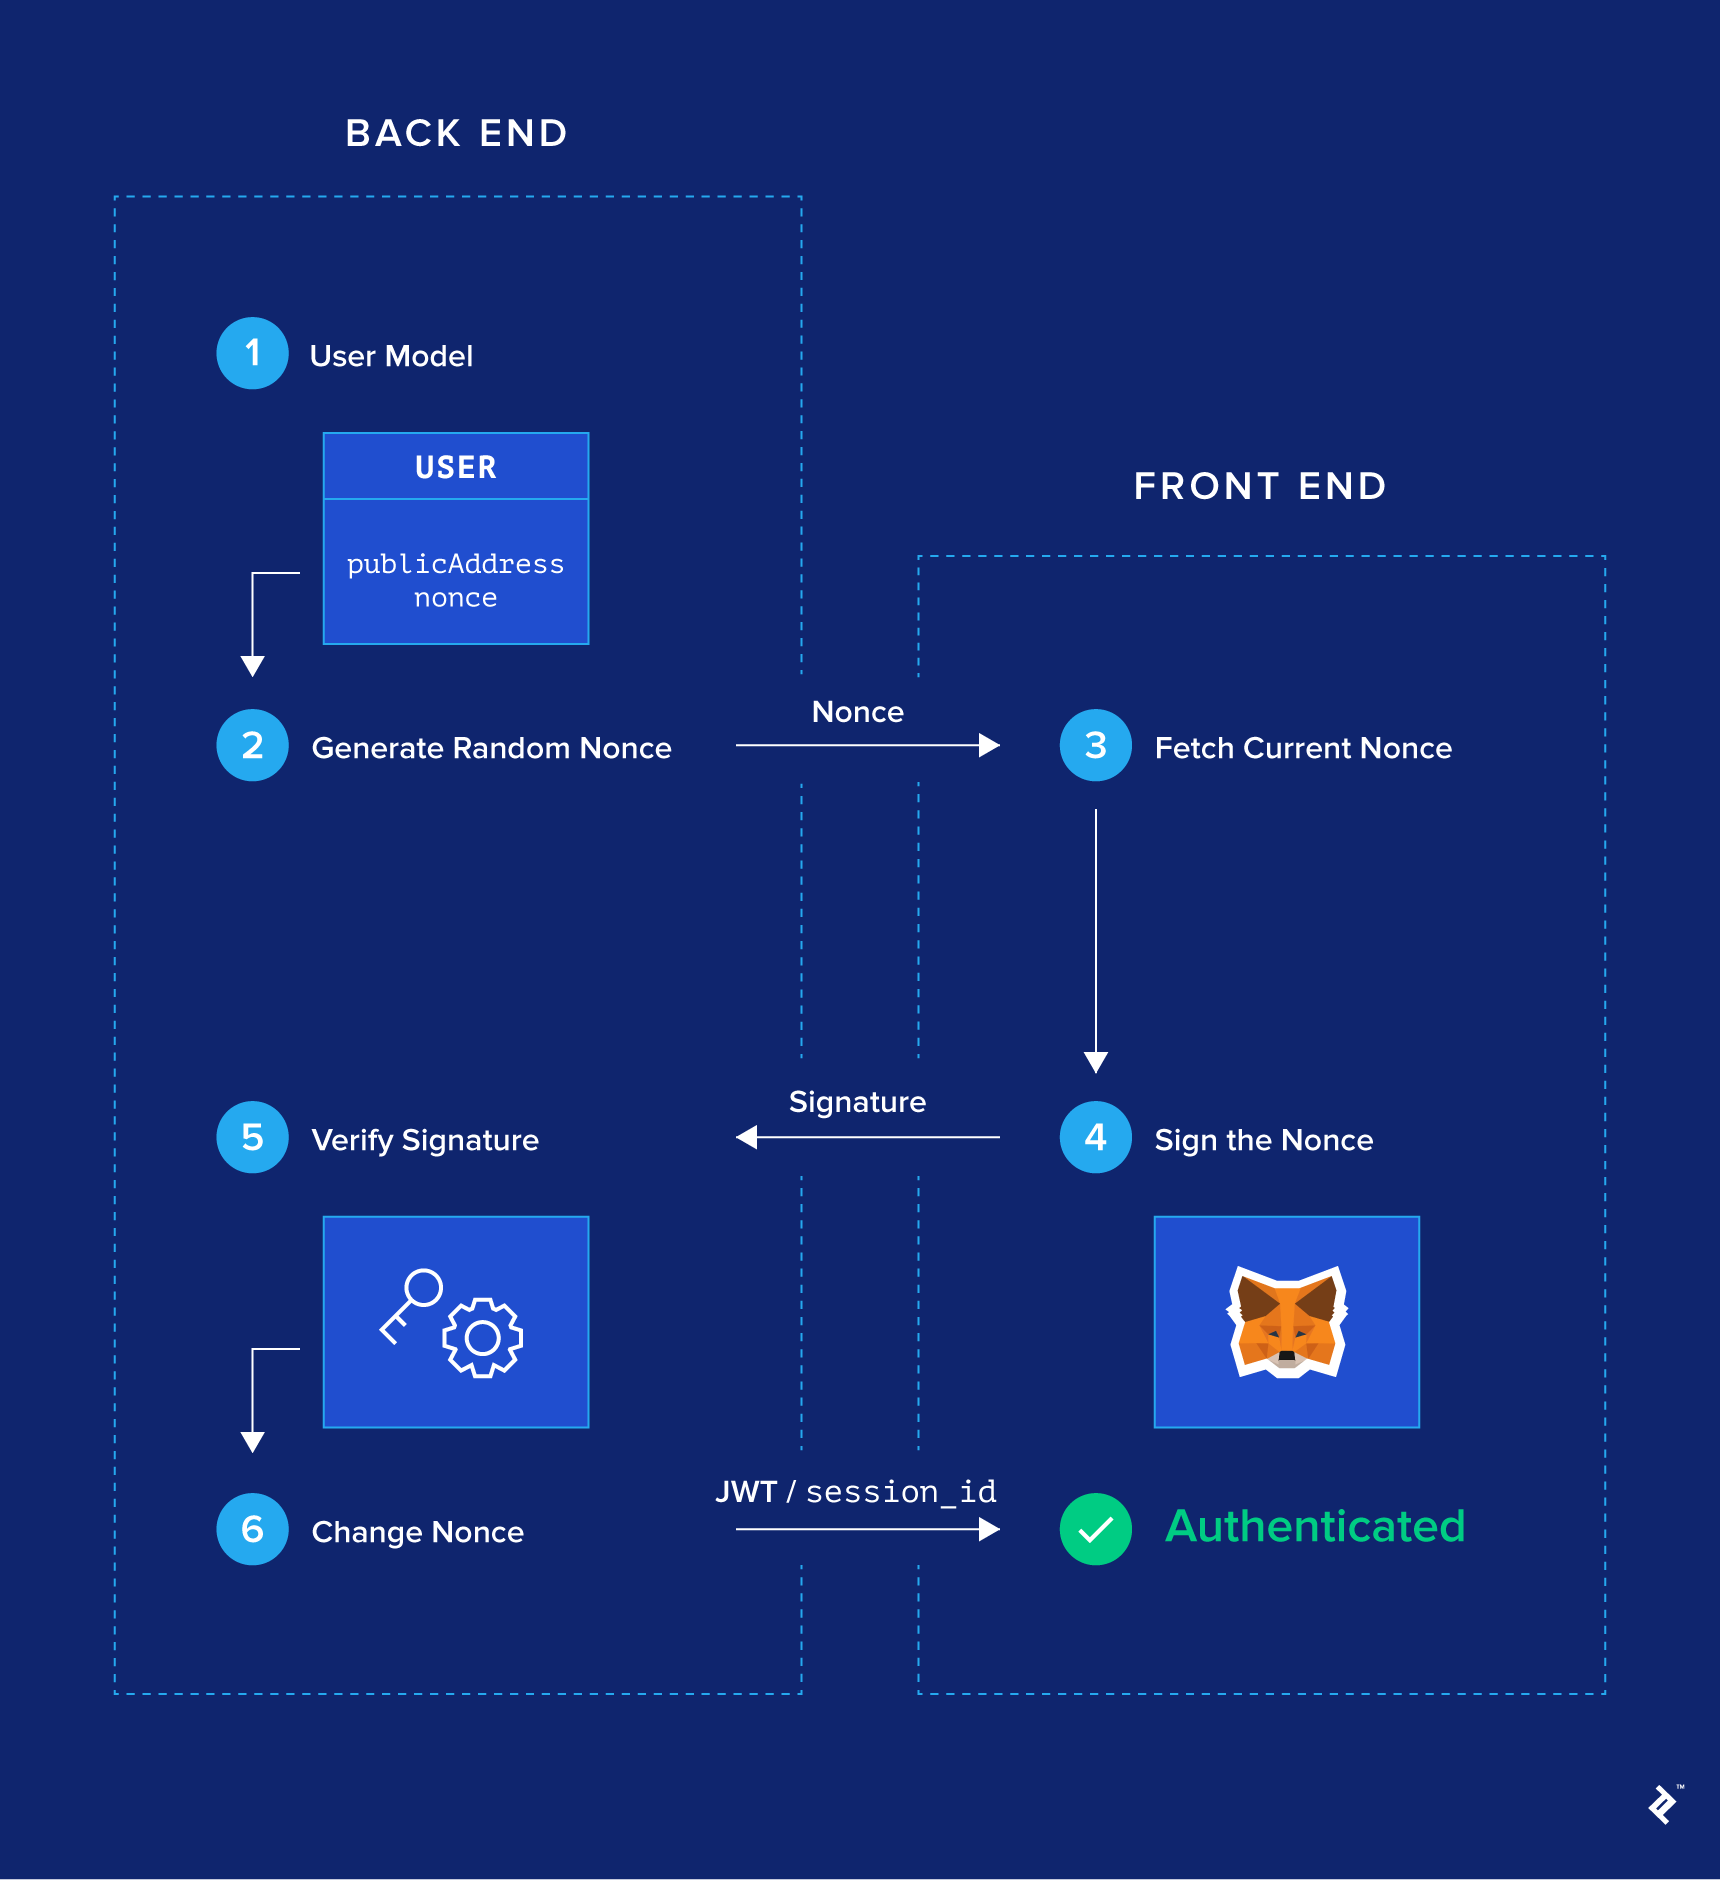
Step 1: Modifying the User Model (Back-end)
Firstly, our ‘User’ model needs two new mandatory fields: ‘publicAddress’ and ’nonce.’ Furthermore, ‘publicAddress’ must be unique. You can retain the usual ‘username’, ’email’, and ‘password’ fields—especially if you want to implement MetaMask login alongside email/password login—but these become optional.
The signup process will also change slightly, as ‘publicAddress’ will be a required field during signup for users wishing to utilize MetaMask login. Rest assured, users will never manually input their ‘publicAddress,’ as it can be fetched via ‘web3.eth.coinbase’.
Step 2: Generating Nonces (Back-end)
Generate a random string in the ’nonce’ field for every user in the database. For example, ’nonce’ could be a large random integer.
Step 3: User Retrieves Their Nonce (Front-end)
Assuming MetaMask is present, our front-end JavaScript code has access to ‘window.web3’. We can then call ‘web3.eth.coinbase’ to get the public address of the active MetaMask account.
When the user clicks the login button, we trigger an API call to the backend to fetch the nonce associated with their public address. A route with a filter parameter like ‘GET /api/users?publicAddress=${publicAddress}’ should suffice. Naturally, being an unauthenticated API call, the back end should only expose public information (including ’nonce’) on this route.
If this request yields no results, it signifies that the current public address hasn’t signed up yet. We’ll need to create a new account using ‘POST /users’, including ‘publicAddress’ in the request body. Conversely, if there’s a result, we store its associated ’nonce’.
Step 4: User Signs the Nonce (Front-end)
Upon receiving the ’nonce’ from the previous API call, the front-end executes the following code:
| |
This prompts MetaMask to show a confirmation popup for signing the message. The nonce will be displayed within this popup, assuring the user they aren’t signing any malicious data.
Upon acceptance, the callback function is invoked with the signed message (referred to as ‘signature’) as an argument. The front-end then makes another API call to ‘POST /api/authentication’, sending a body containing both ‘signature’ and ‘publicAddress’.
Step 5: Verifying the Signature (Back-end)
When the back end receives a ‘POST /api/authentication’ request, it first retrieves the user from the database matching the ‘publicAddress’ provided in the request body, specifically fetching their associated nonce.
With the nonce, public address, and signature, the back end can now cryptographically verify that the user correctly signed the nonce. If confirmed, the user has proven ownership of the public address, and we can consider them authenticated. A JWT or session identifier can then be sent back to the front end.
Step 6: Updating the Nonce (Back-end)
To prevent users from logging in repeatedly with the same signature (in case of compromise), we ensure that the next time they log in, they’ll need to sign a new nonce. We achieve this by generating a new random ’nonce’ for that user and persisting it to the database.
And there you have it! That’s how we manage a nonce-signing, passwordless login process.
The Logic Behind the Login Flow
Authentication, at its core, is simply proving ownership of an account. If you uniquely identify your account using a public address, cryptographically demonstrating ownership becomes quite straightforward.
To prevent situations where a hacker obtains a specific message and your signature for it (without your actual private key), we enforce the message to be signed as:
- Generated by the back end, and
- Regularly updated
We changed it after each successful login in our example, but a timestamp-based mechanism could also be implemented.
Building It Together: A Practical Guide
This section walks through the six steps outlined earlier, providing code snippets to demonstrate building this login flow from scratch or integrating it into an existing back end with minimal effort.
For this article, I developed a small demo app using the following stack:
- Node.js, Express, and SQLite (with the Sequelize ORM) to implement a RESTful API on the back end. It returns a JWT upon successful authentication.
- React single-page application on the front-end.
I’ve aimed to minimize library usage, keeping the code simple enough for easy adaptation to other tech stacks.
You can find the complete project on this GitHub repository, with a demo hosted here.
Step 1: User Model Modification (Back-end)
We require two fields: ‘publicAddress’ and ’nonce’. We initialize ’nonce’ as a large random number, which should be changed after each successful login. I’ve also added an optional ‘username’ field for user customization.
| |
For simplicity, the ‘publicAddress’ field is set to lowercase. A more rigorous approach would include a validation function to ensure all addresses are valid Ethereum addresses.
Step 2: Generating Nonces (Back-end)
This is handled within the defaultValue() function within the model definition shown above.
Step 3: User Fetches Their Nonce (Front-end)
The next step involves adding boilerplate code to the back end for handling CRUD operations on the ‘User’ model, which we won’t cover here.
On the front-end side, when the user clicks the login button, our ‘handleClick’ handler performs the following:
| |
Here, we retrieve the active MetaMask account using ‘web3.eth.coinbase’. We then check if this ‘publicAddress’ already exists on the backend. If it does, we retrieve the user; otherwise, we create a new account using the ‘handleSignup’ method.
Step 4: Signing the Nonce (Front-end)
Moving on within our ‘handleClick’ method, we now have a user object (either retrieved or newly created) provided by the back end. This includes their ’nonce’ and ‘publicAddress’. We’re ready to sign the nonce using the private key associated with this ‘publicAddress’ via ‘web3.personal.sign’, which is done within the ‘handleSignMessage’ function.
Remember that ‘web3.personal.sign’ expects a hexadecimal representation of the string as its first argument. We need to convert our UTF-8 encoded string to hexadecimal format using ‘web3.fromUtf8’. Instead of signing just the nonce, I opted to sign a more user-friendly message displayed in the MetaMask confirmation popup: I am signing my one-time nonce: ${nonce}.
| |
Once the user successfully signs the message, we proceed to the ‘handleAuthenticate’ method. Here, we simply send a request to the ‘/auth’ route on the backend, transmitting both the ‘publicAddress’ and the ‘signature’ of the message signed by the user.
Step 5: Signature Verification (Back-end)
This is where things get slightly more complex. The back end receives a request on the ‘/auth’ route containing a ‘publicAddress’ and a ‘signature’. It needs to verify if this ‘publicAddress’ correctly signed the correct ’nonce’.
The first step is retrieving the user associated with the provided ‘publicAddress’ from the database. There should only be one match since we defined ‘publicAddress’ as a unique field. We then construct the message ‘msg’ as “I am signing my…”, mirroring the front-end implementation in Step 4, using this user’s nonce.
Next comes the verification itself, which involves some cryptography. If you’re feeling adventurous, I recommend exploring elliptic curve signatures further.
In essence, this block uses the ’ecrecover’ function to determine the public address used to sign the ‘msg’ (containing the ’nonce’) based on the provided ‘signature’. If this matches the ‘publicAddress’ from the request body, the requester has successfully proven ownership of the ‘publicAddress’, and we consider them authenticated.
| |
Upon successful authentication, the back end generates a JWT and sends it back to the client. This is a standard authentication scheme, and you can find code for integrating JWT with your back end you can find in the repo.
Step 6: Changing the Nonce (Back-end)
Lastly, we update the nonce for security purposes. Add the following code somewhere after successful authentication:
| |
Not too complicated, right? If you’d like to see how the entire app is structured (JWT generation, CRUD routes, localStorage, etc.), take a look at the GitHub repo.
Production-Ready Today: The Case for MetaMask Login
While the blockchain has its limitations and is still in its early stages, it’s important to highlight that this login flow can be implemented on any existing website today. Here’s why this method surpasses both email/password and social logins:
- Enhanced security: Proof of ownership through public-key encryption is arguably more secure than email/password or third-party verification, especially since MetaMask stores credentials locally on your computer, reducing the attack surface.
- Streamlined user experience: This is a one-click (okay, maybe two-click) login process completed in seconds, eliminating the need to type or remember any passwords.
- Increased privacy: No email address is required, and no third parties are involved.
Of course, a MetaMask login flow can coexist with other traditional login methods. You’ll need to map each account to its associated public address(es).
However, this login method isn’t suitable for everyone:
- MetaMask requirement: This login flow won’t function without MetaMask or a ‘web3’-enabled browser. If your audience isn’t interested in cryptocurrencies, they might not be inclined to install MetaMask. Hopefully, the recent crypto boom will lead to greater Web 3.0 internet.
- Backend modifications: While implementing a basic version of this login flow is straightforward, integrating it into a complex existing system requires changes in areas related to authentication: Signup, database, authentication routes, etc. This is mainly because each account will be linked to one or more public addresses.
- Mobile limitations: This point deserves its own section—read on.
Web3 Authentication and its Mobile Challenges
As we’ve seen, ‘web3’ is essential for this login flow. MetaMask injects it on desktop browsers. However, mobile browsers lack extensions, so this login method won’t work directly on mobile Safari, Chrome, or Firefox. Some standalone mobile browsers inject ‘web3’—essentially MetaMask packaged as a browser. These are still in their early stages, but if you’re interested, check out Cipher, Status, and Toshi. “Login with MetaMask” is compatible with these mobile browsers.
Regarding mobile apps, the login flow can work, but it requires significant groundwork. Essentially, you’d need to build a basic Ethereum wallet within your app, including public address generation, seed word recovery, secure private key storage, ‘web3.personal.sign’ functionality, and the confirmation popup. Thankfully, libraries can assist with this. Naturally, security is paramount since the app itself holds the private key. On desktop browsers, this responsibility falls on MetaMask.
Therefore, the short answer is no, this login flow isn’t readily available on mobile devices. While efforts are underway, the easiest solution for now remains offering a parallel traditional login method for mobile users.
Empowering Users with MetaMask Login
This article introduced “Login with MetaMask,” a one-click, cryptographically secure login flow that eliminates third-party involvement. We explained how a digital signature of a randomly generated backend nonce can prove account ownership, enabling web3 authentication. We also discussed the advantages and disadvantages of this method compared to traditional email/password or social logins, both on desktop and mobile platforms.
While the target audience for this login flow is currently limited, I genuinely hope this inspires some of you to offer “Login with MetaMask” alongside traditional methods in your web apps. If you do, I’d love to hear about your experiences. Feel free to reach out in the comments below if you have any questions.