Understanding Microservices
Microservices represent a modern approach to software design. In this paradigm, numerous self-contained services interact with each other, each possessing its own dedicated processes and resources. This approach deviates from the traditional client-server model. Typically, client-server applications are composed of one or more clients, a monolithic backend encompassing all domain data and logic, and an API that enables clients to interact with the backend and utilize its functionality.
In the realm of microservices, the aforementioned monolithic backend is deconstructed into a collection of distributed services. This architecture offers several advantages: improved segregation of responsibilities, streamlined maintenance, enhanced flexibility in selecting technologies for individual services, and greater scalability and fault tolerance. However, complex distributed systems introduce their own set of challenges. They are more susceptible to race conditions and debugging becomes more intricate because problems are not localized to a single service but spread across multiple ones. Without adhering to best practices during development, managing such a system can become overwhelming. Careful attention must be paid to service payload contracts, as modifications in one service can impact all its clients and, consequently, the entire backend service suite.
While these considerations are crucial, let’s assume you’ve already addressed them. Now, you’re eager to learn how to construct a microservices backend independently. Let’s delve into that.
Establishing a Microservices Architecture
Numerous approaches exist for setting up microservices. This guide will concentrate on a broker architecture.
Exploring Broker Architectures
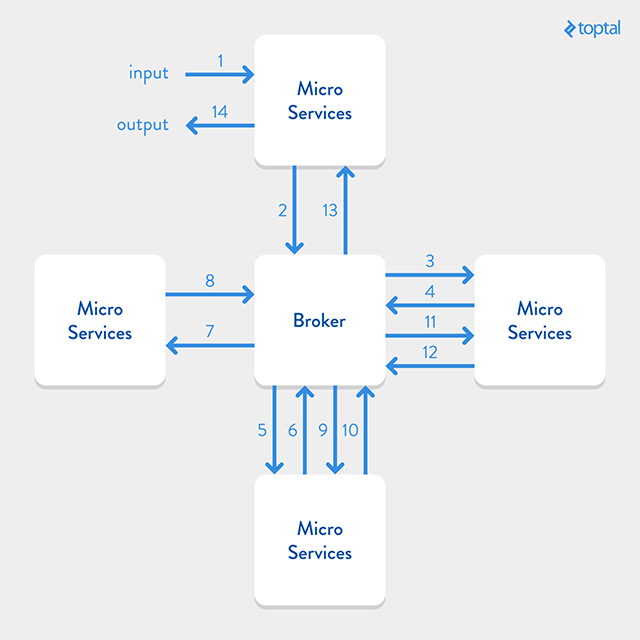
A broker architecture facilitates communication among services. In this setup, services connect to a central messaging server, the broker. Services transmit messages to the broker, which then determines the appropriate service(s) to receive those messages. This eliminates the need for services to retain information about each other. Instead, they rely on the broker for messaging, enabling them to remain isolated and focused solely on their specific domain. Brokers can also temporarily store messages when intended recipients are unavailable, allowing senders and receivers to operate asynchronously. While advantageous, this approach has drawbacks. The broker can become a bottleneck as all communication flows through it, and it can also represent a single point of failure. However, these issues can be mitigated. Implementing multiple broker instances in parallel enhances system fault tolerance. Another solution is utilizing other architectures. Alternative architectures differ from this guide’s implementation by either not employing a broker, using a different broker architecture, or adopting a different messaging protocol like HTTP.
Inter-Service Communication
This guide employs ZeroMQ for managing communication between services and the broker.

ZeroMQ provides a protocol abstraction layer for handling multipart asynchronous messages across various transports. The advantages of using ZeroMQ for service-broker communication fall outside this guide’s scope. For a deeper understanding, refer to the following Quora article. To explore alternative inter-service communication methods, consider examining Broker vs. Brokerless article.
Constructing the Microservices Suite
This article will guide you through creating your microservices suite. Our system comprises a broker and a service. A small client script will be used to test calls to the service suite; this client code can be easily repurposed.
Let’s commence building.
Getting Started
Ensure you have the necessary components to run the broker and the service. Download and install Node.js, ZeroMQ, and Git. OSX users can find Homebrew packages, while most Linux distributions offer packages as well. Windows users can utilize the provided download links.
Broker Operation
After installing dependencies, let’s initiate the broker. This guide uses a Node.js broker implementation from the ZMQ Service Oriented Suite. The code and documentation are available on GitHub. Clone the Broker bootstrap to your machine. This repository provides a bootstrap for using the broker library, offering the flexibility to modify default configurations.
Execute the following Git command:
| |
Navigate to the created directory:
| |
Install package dependencies:
| |
The broker is ready. Run:
| |
Configuration files for various environments reside in the config/ directory. The default development configuration:
| |
The backend parameter specifies the ip:port address for the broker’s backend and frontend. The backend address handles requests and replies from services, while the frontend interacts with service clients. The log.consolePlugin.level controls logging verbosity. Options include trace, debug, info, warn, and error, dictating the amount of logging information generated by the broker.
Service Operation
With the broker running, let’s create your first Ruby microservice. Open a new console window and navigate to your desired service directory. This guide utilizes the Ruby client and service of ZMQ SOA Suite. A bootstrap “Hello world” service is available to expedite the process.
Clone the bootstrap repository:
| |
Navigate to the new directory:
| |
Install dependencies:
| |
Start the service:
| |
Your first service is running.
The broker’s console window should display:
| |
This indicates that the broker recognizes the new service and is receiving heartbeat messages, confirming the service instance’s availability.
Service Consumption
How do we use the running service?
The bootstrap repository includes a dummy client for testing the “Hello World” service. In a new console window or tab, navigate to your service directory and execute:
| |
You should observe:
| |
The service’s console window should show:
| |
You’ve successfully launched and consumed your “Hello World” microservice. Now, let’s move beyond the basics and build custom services.
Service Development
Stop the “Hello World” service (Ctrl+C in its console window). We’ll transform it into a “Person” service.
Code Structure
Let’s examine the project’s code structure:
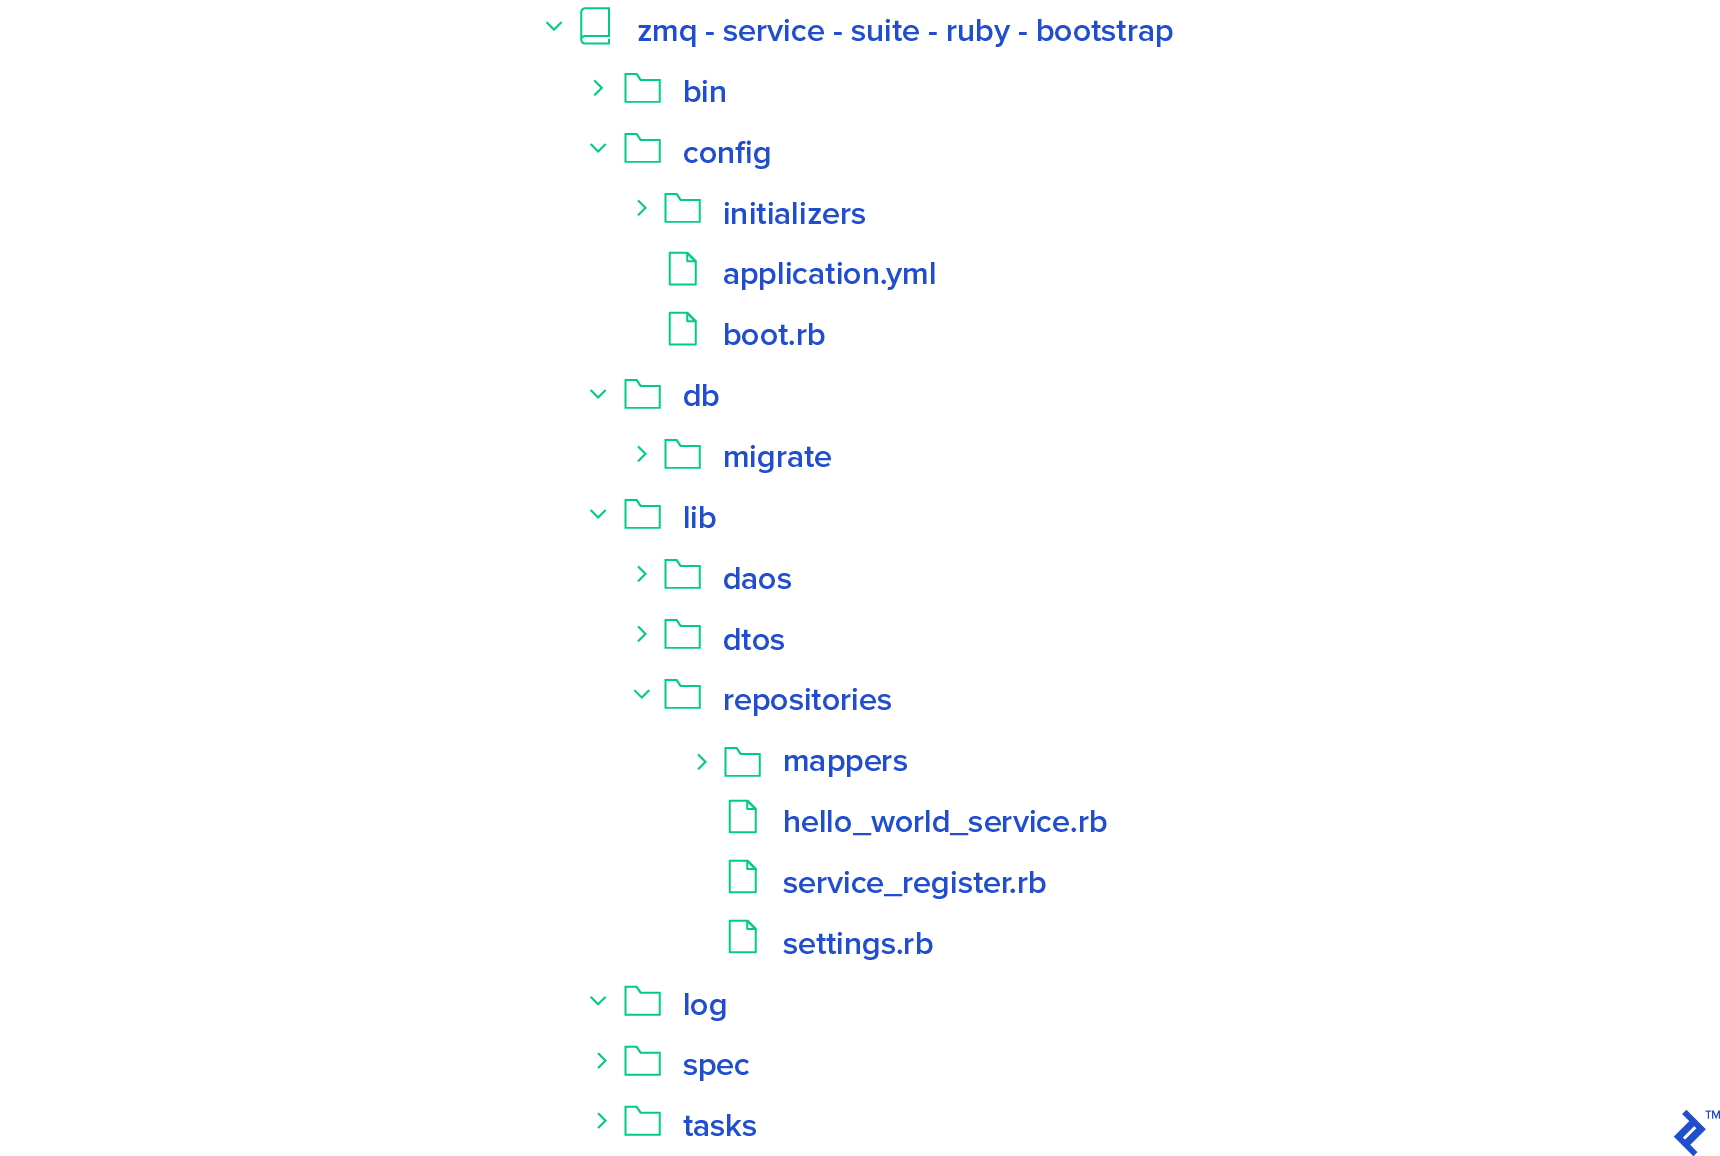
bin: Contains scripts for launching your service.config: Stores configuration files.boot.rb: Add service dependencies. Existing dependencies are listed; add more as needed.application.yml: Stores application settings (explored later).config/initializers: Add initializer scripts (e.g., ActiveRecord, Redis) executed on service startup.
db/migrate: Store database migrations (ActiveRecord, Sequel). This directory can be removed if not used.lib: Houses your main application code.settings.rb: Loadsapplication.yml, making configurations accessible throughout the service.service_register.rb: Register services and service routes (explained later).hello_world_service.rb: Defines the “Hello World” service’s endpoints.lib/daos: Store ActiveModel objects (ActiveRecord) or other data access objects (e.g., Sequel models).lib/dtos: Store data transfer objects (DTOs) representing data sent to clients.lib/repositories: Store repositories responsible for data access (using DAOs) and returning DTOs.lib/repositories/mappers: Store mappers for converting between DAOs and DTOs.
The application.yml file in the config directory:
| |
This sets the broker’s backend and frontend addresses, and the logging level.
Don’t worry if this seems overwhelming; it will become clearer as we proceed.
Implementing the “Person” Service
Let’s configure the database connection. Open config/initializers/active_record.rb and uncomment the line within. In application.yml, add the following to your development configuration:
| |
Create the database. For a default PostgreSQL database, run:
| |
For other databases, add the appropriate gem to the Gemfile and run bundle install.
Next, create a migration file named 000_creates_persons.rb in db/migrate:
| |
Define the migration:
| |
Run the migration:
| |
Create a model for the table in lib/daos/person.rb:
| |
Edit the model:
| |
Create a DTO model for “Person” in lib/dtos/person.rb:
| |
Define the DTO:
| |
Create a Mapper to convert between the DAO and DTO in lib/repositories/mappers/person.rb:
| |
Mapper::Base requires implementing self.to_dao and self.to_dto or overriding self.map to handle DAO-DTO conversions.
Now, create the repository in lib/repositories/person.rb:
| |
Define the repository:
| |
This repository’s get method retrieves all persons from the database and maps them into a collection of person DTOs.
Create the service and its endpoint in lib/person_service.rb:
| |
Define the service:
| |
The “Person” service initializes the repository. Public instance methods have optional payload and headers (both Hashie::Mash instances) for storing data sent to the endpoint. Replies mimic HTTP responses with status codes (e.g., 200 for success, 500 for server errors, 400 for parameter errors). The get endpoint returns a 404 status code if no people are found, similar to HTTP. DTOs are serialized into JSON objects by default.
Register the service by modifying lib/service_register.rb. Replace all instances of “HelloWorld” with “Person”:
| |
The string in add_route is omitted if the service verb matches the method name (e.g., GET verb maps to get method).
The ServiceRegister class defines self.get_service for initializing, connecting, and binding the service:
| |
| |
| |
| |
Create an executable script for the “Person” service. Modify bin/zss-service, replacing “hello-word” with “person”. Run the service:
| |
Test the service by editing bin/zss-client. Change sid to “person” and the call from hello_world() to get(). Run the client:
| |
A ZSS::Error occurs because the database is empty.
Handle the error by modifying zss-client:
| |
Run the client again:
| |
Add people to the database:
| |
| |
Run the client:
| |
You have a working “Person” service.
Concluding Thoughts
While the code might seem verbose, following the repository pattern (depicted below) is beneficial.

Contributions to the SOA service suite are encouraged.
This guide provided a starting point for building microservices. A complete version is available on GitHub.