Seasoned developers understand that their most effective code isn’t something they personally wrote, but rather code they’ve integrated from other developers’ work.
While developers are known for being innovative problem-solvers, many challenges we encounter have already been addressed. Solutions to these common problems have been packaged into readily available libraries. It simply doesn’t make sense to reinvent the wheel when there are readily available solutions.
Android development is no different. The primary resource for code reuse is the Android SDK itself, which provides robust constructs and services that handle a significant portion of the work for you.
However, for situations where the SDK falls short, the Android community has stepped up to create exceptional libraries. These libraries have the potential to save you countless hours of coding by providing highly optimized, thoroughly tested, and well-established implementations. And I’m not referring to commonly used libraries like the Android Support Library, Android Design Support Library, or Gson. I’m talking about tools that you may not be familiar with or, even if you are, you’re probably not utilizing yet.
Over the years, I’ve been involved in developing, mentoring, and leading Android teams. During this time, I’ve had the opportunity to explore and implement numerous external tools and libraries. I’ve even delved into their implementation code and engaged in discussions about their inner workings with the developers. While many of these tools have proven highly effective in streamlining my workflow, the reality is that a majority haven’t lived up to their promise.
That’s the driving force behind this guide. By sharing my experiences, along with insights from other mobile developers, I aim to ensure that you’re leveraging the most effective libraries available. I’ve carefully selected seven libraries that I believe will soon become some of your favorites.
Choosing the Right Android Library
When evaluating a library, I prioritize four essential criteria:
- Does it offer a dependable and high-quality solution to a genuine and significant problem?
- Is the API straightforward and easy to use?
- Does it avoid imposing changes on my overall application architecture?
- Does it have a substantial user base, ideally with an active developer community?
The first three criteria are non-negotiable. If a library doesn’t meet these requirements, I either explore other options or opt to code the solution manually.
The libraries I’ll be discussing below successfully meet all four criteria. Moreover, they address some of the most demanding aspects of mobile development, including:
- Two libraries for dependency injection, layout-to-Java binding, and mock objects.
- An in-app pub/sub messaging model.
- A secure, efficient, and self-recovering HTTP communication layer.
- Image manipulation: downloading, caching, resizing, and loading into RAM.
- Real-time video streaming.
- Memory leak detection.
ButterKnife: Simplifying Dependency Injection
This library stands out as the ultimate dependency injection tool for Android. It’s straightforward, dependable, incredibly fast (no reflection involved!), and has the power to eliminate a significant amount of boilerplate code from your app.
ButterKnife eliminates the tedious task of manually binding each view using findViewById(). Instead, it utilizes annotated views for direct code access. Additionally, ButterKnife streamlines boilerplate UI events like onClick and onTouch, replacing them with automatically injected code.
Let’s move beyond the explanations and take a look at some code examples:
View Field Binding:
| |
Resource Binding:
| |
UI Event Binding:
| |
AndroidAnnotations: Elevating Dependency Injection
Coming in as a close contender to ButterKnife in the realm of dependency injection, AndroidAnnotations employs a slightly different method: auto-generated classes. Once you become accustomed to them, you’ll find them remarkably easy to work with. What makes AndroidAnnotations even more valuable is its support for “name-based” dependency injection. For instance, the code @ViewById ListView myUserList; instructs the library to associate this field with a layoutListView that shares the same name.
Just like ButterKnife, AndroidAnnotations is exceptionally fast, but it achieves this speed through a different approach. Instead of relying on runtime binding for dependency injection, AndroidAnnotations generates duplicate copies of all relevant activities during the build process. It then incorporates its connection logic into these duplicates, resulting in performance comparable to manually written code.
However, AndroidAnnotations’ injection capabilities extend even further. It allows you to inject both state and layout directly into an activity.
AndroidAnnotations Implementation:
| |
Let’s break down the last annotation, as it requires further clarification. In multi-threaded Android applications, a frequent task involves transitioning from background (or worker) threads to the foreground (or main or UI) thread. This transition is necessary because only the main thread can access UI components. While this task isn’t overly complex, it arises frequently and often leads to somewhat messy code:
| |
With AndroidAnnotations, all you need to do is annotate your function using @UiThread, and the library guarantees that it will always execute on the main thread:
| |
It’s important to note that this annotation applies to standard Android component classes, such as activities and services. But what about situations where you want to annotate your own custom classes?
AndroidAnnotations introduces a new concept to address this: the EBean. To enable annotation for your custom classes, simply mark them with @EBean, and you’re all set:
| |
EventBus: Effortless Cross-Component Communication
The EventBus library transforms a challenge that has long plagued Android developers—cross-component communication—into a surprisingly easy task. By implementing a simple pub/sub model, EventBus enables seamless communication between any two parts of your system.
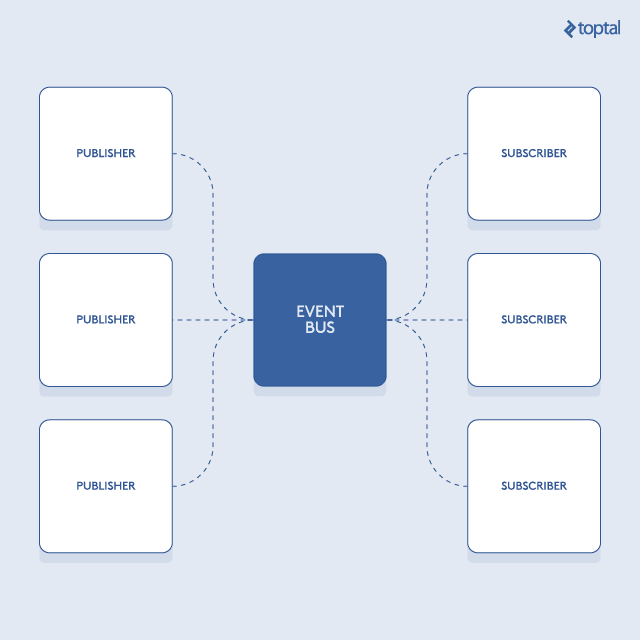
With EventBus, your background polling service no longer needs direct knowledge of your fragments to deliver change events.
Using EventBus is incredibly straightforward.
a. Start by defining event classes. Sticking with POJOs (Plain Old Java Objects) is generally the preferred approach:
| |
b. Next, create event handling methods within the classes that need to subscribe to these events:
| |
Now, any seasoned Android developer would likely pause at this point and inquire about the threading model employed by these handlers. They might also ask if it’s possible to force a handler to run on the main thread, especially if it involves interacting with UI components. These are valid and important questions.
By default, EventBus executes all handler methods on worker threads drawn from a thread pool that it manages internally. If you require a handler method to run on the main thread, you can modify your subscription annotations like this:
| |
A word of caution: Exercise restraint when using this feature! It’s crucial to avoid executing long-running operations on the main thread. Even with quick operations, proceed with care. Overburdening the main thread is a surefire way to degrade your app’s performance, making it sluggish, unresponsive, and ultimately less enjoyable for your users.
c. Effectively managing the EventBus registration lifecycle of your subscriber class is essential. This involves determining when it should connect to and disconnect from the bus. A typical registration flow for an activity might look like this:
| |
Keep in mind that this is just an example. You have the flexibility to perform the registration and unregistration steps wherever it makes the most sense in your code.
d. Finally, let’s trigger an event:
| |
EventBus offers a wide range of features beyond the basics covered here, including event multicasting (the default behavior), sticky events, configurable delivery threads, priorities, and much more. However, this basic understanding should be sufficient to get you started with this simple yet remarkably powerful library.
OkHttp: Supercharging Android’s HttpClient
OkHttp embodies how Android’s HttpClient should have been designed in the first place. It’s incredibly straightforward yet incredibly intelligent. The OkHttp library takes care of tasks such as retry loops, automatic payload compression, Http/2 support, connection pooling, and response caching, all working behind the scenes to minimize unnecessary network requests.

Using OkHttp is incredibly intuitive. Here are some examples:
Http POST Request:
| |
Http GET Request:
| |
OkHttp also provides support for valuable features like asynchronous networking, request redirect route queries, local cache queries, and more. You can leverage these features whenever needed. Many developers have adopted OkHttp as a more sophisticated replacement for Android’s default HTTP client, HttpURLConnection. In fact, this entire project originated as a private fork of HttpURLConnection.
The robustness of OkHttp is a standout feature. It instantly enhances the reliability and efficiency of your network layer.
Picasso: The Image Loading Powerhouse
Picasso emerges as the most straightforward and robust solution for handling image downloading, caching, resizing, and cropping operations.
Consider this concise code snippet:
| |
With just this single line, Picasso accomplishes the following:
- Establishes a connection to a remote URL.
- Downloads the specified image.
- Stores the downloaded image in a local LRU cache, which it manages automatically.
- Resizes the original image before loading it into memory.
- Executes all of these operations on a thread pool managed by Picasso itself.
- Populates your
ImageViewwith the resized image. - Before initiating any subsequent downloads, checks the local cache to avoid redundant network requests.
Implementing this set of tasks manually would require a significant amount of effort, even for a highly skilled developer. And that’s assuming you remembered every single step involved. What if you overlooked the resizing aspect, for instance?

Consider that on an average Android device, an app typically has access to only 50 to 60 Megabytes of RAM, and the pixels-to-bytes conversion factor for most Android devices is 4. Attempting to load a 13-megapixel image directly from the SD card would consume a staggering 52 Megabytes of RAM, leading to an immediate app crash.
This scenario highlights just one of Picasso’s strengths. When I’m tasked with optimizing or debugging a legacy project that heavily relies on media, one of the first steps I take is to migrate all image loading operations to Picasso. The positive impact of this single change on the app’s overall quality is often remarkable.
A testament to the power of this library is its adoption by Google itself. Many of Google’s own Android code samples released over the past two years demonstrate the use of Picasso for image loading.
ActiveAndroid: Streamlining ORM Without Performance Tradeoffs
ORM, short for Object-Relational Mapping, gained prominence during the era of J2EE. It provides a mechanism to store your POJOs (Plain Old Java Objects) in a database and retrieve them without the need to manually convert them into individual fields.

The value proposition of ORM is undeniable. It empowers you to develop a significant portion of your app without writing a single line of SQL code.
Furthermore, modern ORM platforms are highly efficient. Gone are the days when ORMs heavily relied on reflection and were notorious for their slow performance. Current implementations, including ActiveAndroid, have significantly improved in speed. For most practical use cases, you won’t experience any noticeable performance overhead compared to writing raw SQL queries.
Let’s delve into how to use ActiveAndroid:
a. Begin by initializing ActiveAndroid within your application object. You can achieve this by extending a custom Application class:
| |
b. Create POJOs that inherit from a model class. You’ll need a separate class for each type of record you intend to store in the database. Each of these POJOs can reside in its own dedicated table. Annotations are used to specify the corresponding database field names for each stored member variable:
| |
If you want to define an index for a particular member variable, use the following annotation:
| |
c. By default, ActiveAndroid iterates through all your classes during startup. To prevent this behavior, which can impact startup time, it’s highly recommended to explicitly list all your model classes in a specific section of your AndroidManifest.xml file:
| |
Important Note: Model classes that are not included in this list will not be recognized by ActiveAndroid.
d. Writing data to the database is straightforward:
| |
For scenarios involving multiple write operations, it’s more efficient to batch them within a single transaction:
| |
e. Retrieving POJOs from the database is equally simple:
| |
ORM was an indispensable tool during my time as a server-side developer. Its adoption in the Android world came a bit later, but it’s now here to stay, making database programming remarkably accessible. Embrace its power and simplicity.
LibStreaming: Demystifying Video Streaming
Real-time video streaming was once a major headache for developers due to poorly documented APIs, inconsistencies across different SDK versions, heavy reliance on reflection, and other challenges.

Fortunately, libStreaming emerged as a game-changer, abstracting away much of the inherent complexity of streaming. It provides a clean and developer-friendly API that enables you to build a basic streaming application in a matter of hours.
Here’s how to utilize LibStreaming for H.264 and AAC streaming:
a. Start by initializing a session object within the onCreate method of your main activity. Session objects represent a media stream directed towards a peer:
| |
b. Once initialized, you can initiate the streaming session:
| |
c. When you’re finished streaming, remember to halt the session:
| |
It’s important to understand that real-time streaming is inherently complex, and LibStreaming doesn’t completely eliminate this complexity. There will be times when you need to delve into the intricacies, such as when defining the peer signaling policy, selecting camera encoding settings (typically MediaCodec/surface-to-buffer), or handling packetization.
However, you’ll find that the developers behind LibStreaming have gone to great lengths to seamlessly integrate these complexities into an easy-to-use API.
LibStreaming provides support for a wide range of encoders commonly used in Android apps, including H.264, H.263, AAC, and AMR.
I’ve personally achieved excellent results using this library, and it serves as a core component in several widely used streaming applications. If you ever encounter the need for real-time streaming, I’m confident that LibStreaming will greatly simplify your development experience.
LeakCanary: One Line of Code for Memory Leak Detection
Let’s address a critical aspect of Android development: memory leaks. Android apps are susceptible to memory leaks, especially if coding practices aren’t meticulous. In fact, introducing a memory leak can happen quite easily. All it takes is storing an activity reference outside of its intended context. Even storing a reference to a single view object outside its activity’s context can result in a leak.
Why is this the case? Because views, internally, hold a context reference to their parent activity. If a reference to the view persists, the garbage collector cannot reclaim the associated activity, along with its contents—drawables, view hierarchy, and resources.
Identifying a leaking activity reference isn’t always as straightforward as spotting a static parameter. When you create inner classes or spawn threads within an activity, a reference to that activity is implicitly created. Consequently, the activity may not be eligible for garbage collection until the inner class or thread completes its execution.
Leaking a reference to even a single resource-intensive activity can be sufficient to crash your app with an “Out of Memory” exception.

So, how can you effectively protect your app from memory leaks? The foundation lies in adopting rigorous coding practices. However, even experienced developers can occasionally overlook these rules, and not everyone possesses extensive Android development experience.
While periodic code reviews with a focus on identifying memory leaks can be beneficial, they require dedicated time and effort. Additionally, some leaks can be quite elusive and difficult to spot solely through code review.
The DDMS memory tool provides valuable insights into your app’s memory usage over time, helping you determine if leaks are occurring. It’s definitely a tool you should incorporate into your workflow. However, it won’t pinpoint the root cause of the leaks.
This is where leakCanary comes to the rescue. LeakCanary stands out as the most effective memory leak detector available. It offers automatic leak detection for all your activities, requiring minimal setup—often just one or two lines of code.
To integrate LeakCanary, simply initialize it within your app’s onCreate() method:
| |
And that’s it! LeakCanary will continuously monitor for memory leaks and notify you if it detects any.
LeakCanary achieves this magic by automatically injecting an object called ActivityRefWatcher into all your activities. It then keeps track of their reference counts after the onDestroy() method has been called. If an activity that has been destroyed still has a reference count greater than 0, it indicates a memory leak.
Important: Leak detection using LeakCanary is only operational in debug mode applications. Never use LeakCanary to test for leaks in a release mode APK.
LeakCanary also provides flexibility for testing other parts of your system for leaks. The refWatcher object, returned by the initialization call, enables this functionality:
| |
You can utilize refWatcher to monitor values that you anticipate will be eligible for garbage collection soon. In essence, you’re monitoring values that you believe should be reclaimed. To do so, simply invoke the watch() method:
| |
If the object being watched hasn’t been released within a short period after the watch() call, LeakCanary will alert you.
While I haven’t been able to find specific documentation on the exact duration of this “short time” period, it’s not particularly crucial. With LeakCanary, things tend to “just work”—an invaluable trait in a tool.
Conclusion
By leveraging these libraries, experienced developers can significantly reduce the time spent coding and debugging, often saving days or even weeks of effort. You can reap the same benefits by incorporating them into your workflow.
Here’s a quick recap of the value proposition offered by my curated selection of Android libraries:
ButterKnife – Say goodbye to tedious boilerplate code with ButterKnife’s auto-injected code. It’s the ultimate code injection tool for Android.
AndroidAnnotations – Embrace the speed of auto-generated classes and name-based code injection with AndroidAnnotations. Enjoy time savings without compromising performance compared to hand-coded logic.
EventBus – Decouple your components for increased code robustness. EventBus makes cross-component communication a breeze.
OkHttp – Upgrade your network layer with OkHttp, a smarter alternative to HttpURLConnection. It boasts features like asynchronous networking, request redirect route queries, local cache queries, and more.
Picasso – Streamline image manipulation with Picasso, a library so exceptional that even Google uses it. It’s a true time-saver for media-heavy and legacy projects.
ActiveAndroid – Experience the ease of ORM without performance compromises with ActiveAndroid.
LibStreaming – Power your real-time video streaming applications with LibStreaming, a library trusted by major streaming apps.
While this list is by no means exhaustive, I can assure you that incorporating any of these libraries into your next project will make you a more proficient and efficient Android developer. If you’d like to see these libraries in action, feel free to explore my GitHub.
Whether you’re already using some or all of these libraries, or if you prefer alternative solutions, I encourage you to share your insights and experiences in the comments below. Let’s foster a collaborative learning environment.