Around a billion individuals and workplaces rely on Microsoft Office, which makes its DOCX format the most widely used standard for sharing documents. Its main competitor, the ODT format, lacks this reach, supported only by specific software like Open/LibreOffice and some open-source options. Although commonly used, PDFs are not a direct competitor. Their lack of editing capabilities and comprehensive document structure limits them to minor additions like watermarks or signatures. This dominance of the DOCX format stems from the absence of a viable alternative.
Despite its intricate structure, manual parsing of the DOCX format is possible for tasks like indexing, converting to TXT, or implementing small modifications. This article aims to provide a developer-friendly explanation of DOCX internals, simplifying the extensive 5,000-page ECMA specifications.
Creating a basic one-word document in MSWord and observing the underlying XML changes upon editing is key to understanding the format. This approach helps decipher formatting issues and understand the XML structure’s impact on the document’s appearance.
Drawing from my year-long experience developing a collaborative DOCX editor, CollabOffice, I aim to share insights with the developer community. This article bridges the gap between the complex ECMA specification and oversimplified online tutorials, providing a comprehensive understanding of the DOCX file structure. Accompanying files are available in the “toptal-docx” project on my github account.
Inside a Simple DOCX
A DOCX file is essentially a ZIP archive containing XML files. Creating a simple document with the word “Test” in MSWord and unzipping it reveals this structure:
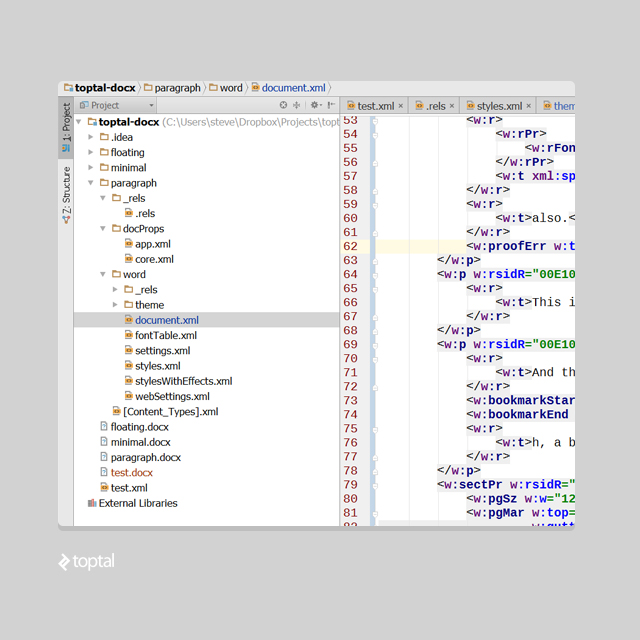
Despite the document’s simplicity, MSWord generates default themes, properties, font tables, and more, all in XML format.
For clarity, let’s focus on document.xml, containing the main text elements. Ensure that when deleting any files, you remove all references to them from other XML files. Here is a code-diff example on how dependencies for app.xml and core.xml were removed. Any unresolved or missing references will render the file corrupt in MSWord.
Here’s the streamlined structure of our minimal DOCX document (and here’s the project on github):

Let’s break down each file:
_rels/.rels
This file directs MS Word to the document’s content, in this instance, word/document.xml:
| |
_rels/document.xml.rels
Defining references to resources like embedded images, this file is empty in our example due to the absence of such elements:
| |
[Content_Types].xml
[Content_Types].xml provides information about the document’s media types, which, in this case, is solely text:
| |
document.xml
This XML file holds the document’s core text content. While some namespace declarations are omitted here for brevity (refer to the GitHub project for the complete version), note that removing seemingly unused namespace references from the full file is not recommended, as MSWord relies on them.
Simplified example:
| |
The primary node, <w:document>, represents the entire document. <w:body> houses paragraphs, with page dimensions defined by nested <w:sectPr> tags.
You can disregard the <w:rsidR> attribute; it pertains to MS Word’s internal workings.
Expanding on this, let’s examine a document with three paragraphs. The XML highlighting corresponds to the colors in the Microsoft Word screenshot, illustrating the correlation:
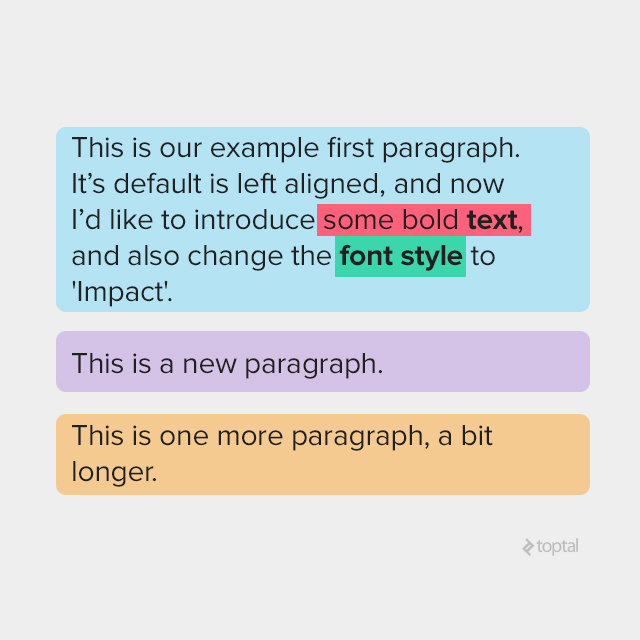
<w:p w:rsidR=“0081206C” w:rsidRDefault=“00E10CAE”> <w:r> <w:t xml:space=“preserve”>This is our example first paragraph. It’s default is left aligned, and now I’d like to introduce</w:t> </w:r> <w:r> <w:rPr> <w:rFonts w:ascii=“Arial” w:hAnsi=“Arial” w:cs=“Arial”/> <w:color w:val=“000000”/> </w:rPr> <w:t>some bold</w:t> </w:r> <w:r> <w:rPr> <w:rFonts w:ascii=“Arial” w:hAnsi=“Arial” w:cs=“Arial”/> <w:b/> <w:color w:val=“000000”/> </w:rPr> <w:t xml:space=“preserve”> text</w:t> </w:r> <w:r> <w:rPr> <w:rFonts w:ascii=“Arial” w:hAnsi=“Arial” w:cs=“Arial”/> <w:color w:val=“000000”/> </w:rPr> <w:t xml:space=“preserve”>, </w:t> </w:r> <w:proofErr w:type=“gramStart”/> <w:r> <w:t xml:space=“preserve”>and also change the</w:t> </w:r> <w:r w:rsidRPr=“00E10CAE”> <w:rPr><w:rFonts w:ascii=“Impact” w:hAnsi=“Impact”/> </w:rPr> <w:t>font style</w:t> </w:r> <w:r> <w:rPr> <w:rFonts w:ascii=“Impact” w:hAnsi=“Impact”/> </w:rPr> <w:t xml:space=“preserve”> </w:t> </w:r> <w:r> <w:t>to ‘Impact’.</w:t></w:r> </w:p> <w:p w:rsidR=“00E10CAE” w:rsidRDefault=“00E10CAE”> <w:r> <w:t>This is new paragraph.</w:t> </w:r></w:p> <w:p w:rsidR=“00E10CAE” w:rsidRPr=“00E10CAE” w:rsidRDefault=“00E10CAE”> <w:r> <w:t>This is one more paragraph, a bit longer.</w:t> </w:r> </w:p>
Dissecting Paragraph Structure
A basic document comprises paragraphs, each consisting of runs (text sharing the same font, color, etc.), which are further broken down into individual characters within <w:t> tags. Multiple characters can reside within a single <w:t> tag, and a single run can contain multiple <w:t> tags.
Again, disregard <w:rsidR>.
Properties of Text
Basic text properties encompass font, size, color, style, etc., with approximately 40 tags dictating text appearance. As seen in our three-paragraph example, each run defines properties like <w:color>, <w:rFonts>, and boldness (<w:b>) within <w:rPr>.
Importantly, property distinctions exist between normal and complex script characters (e.g., Arabic). Corresponding tags are used for each.
Most normal script tags have complex script counterparts distinguished by an appended “C.” For example, <w:i> (italic) becomes <w:iCs>, and <w:b> (bold) becomes <w:bCs>.
Styles - A Deep Dive
MS Word’s style toolbar, offering options like Normal, No Spacing, Heading 1, etc., stores these styles in /word/styles.xml (absent in our simplified example; create a new DOCX to observe this file).
Defining text with a particular style results in a reference within the paragraph properties tag, <w:pPr>. Here’s an example using the “Heading 1” style:
| |
And the corresponding style definition from styles.xml:
| |
The <w:style/w:rPr/w:b> XPath specifies bold text, while <w:style/w:rPr/w:color> dictates font color. <w:basedOn> instructs MSWord to inherit missing properties from the “Normal” style.
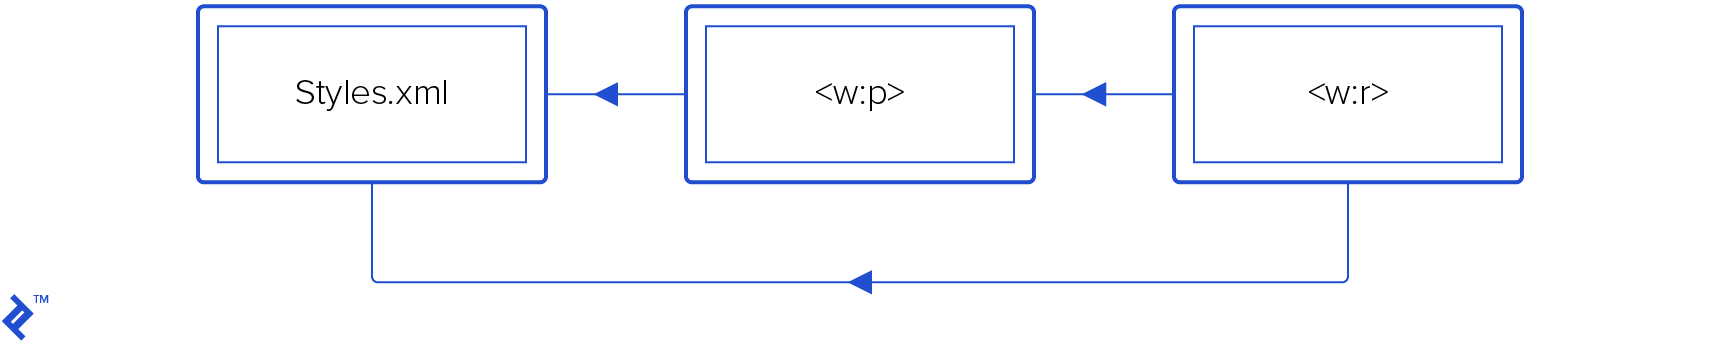
The Cascade of Properties
Text properties follow an inheritance model. A run possesses individual properties (w:p/w:r/w:rPr/*) while inheriting from the paragraph level (w:r/w:pPr/*). Both can reference style properties within /word/styles.xml.
| |
Default properties apply to both paragraphs and runs: w:styles/w:docDefaults/w:rPrDefault/* and w:styles/w:docDefaults/w:pPrDefault/*. Determining the final rendered properties of a character involves this order:
- Apply default run/paragraph properties.
- Append run/paragraph style properties.
- Append local run/paragraph properties.
- Override paragraph properties with final run properties.
“Appending” B to A involves iterating through B’s properties, overriding corresponding properties in A while preserving non-intersecting properties.
Another potential source for default properties is the <w:style> tag with w:type="paragraph" and w:default="1". Note that characters within a run never have default styles, so <w:style w:type="character" w:default="1"> has no impact.
1554402290400-dbb29eef3ba6035df7ad726dfc99b2af.png)
The Toggle Effect
Some properties, like <w:b> (bold) or <w:i> (italic), function as “toggle” attributes, behaving like an XOR operation.
If both a parent style and a child run are bold, the resulting text will be regular (non-bold).
Thorough testing and reverse-engineering are crucial for accurate handling of these toggle attributes. For a deeper understanding of their behavior, refer to paragraph 17.7.3 of the ECMA-376 Open XML specification.
Fonts and their Definitions
Fonts adhere to the same principles as other text attributes, with default values defined within a separate theme file referenced in word/_rels/document.xml.rels, as follows:
| |
Following this reference, the default font name resides in word/theme/themes1.xml, specifically within the <a:theme> tag under a:themeElements/a:fontScheme/a:majorFont or a:minorFont.
Unless otherwise specified by w:docDefaults/w:rPrDefault, the default font size is 10. If this tag is absent, the default size becomes 11.
Text Alignment - A Closer Look
The <w:jc> tag controls text alignment, offering four w:val modes: "left", "center", "right", and "both".
"left" (the default) aligns text to the left margin of the paragraph rectangle, typically the page width. (This sentence demonstrates left alignment.)
"center" positions text centrally within the page width. (This sentence exemplifies center alignment.)
"right" aligns text to the right margin. (As you can see, this sentence is right-aligned.)
"both" increases inter-word spacing to stretch lines across the full paragraph width, except for the final line, which defaults to left alignment. (This sentence showcases the “both” alignment mode.)
Incorporating Images
DOCX supports two image types: inline and floating.
Inline images, appearing within a paragraph alongside text, utilize the <w:drawing> tag instead of <w:t> (text). Extract the image ID using this XPath:
w:drawing/wp:inline/a:graphic/a:graphicData/pic:pic/pic:blipFill/a:blip/@r:embed
This ID helps locate the corresponding filename within word/_rels/document.xml.rels, which should point to a GIF or JPEG file within the “word/media” subfolder. (Refer to the word/_rels/document.xml.rels file in the GitHub project for a practical example.)
Floating images are positioned relative to paragraphs, with text flowing around them. (The GitHub project’s sample document provides a visual representation of this.)
Floating images employ <wp:anchor> instead of <w:drawing>. Exercise caution when deleting text within <w:p> to avoid unintentional image removal, especially if anchors are involved.

Tables and Their Structure
Similar to HTML, XML tags for tables resemble their HTML counterparts: <w:tbl> acts like
| |
Column widths can be explicitly defined using <w:tblW>. In its absence, MS Word automatically calculates optimal widths to minimize the table’s overall size.
Decoding Units
Numerous XML attributes within DOCX denote sizes or distances. Despite appearing as integers in the XML structure, these values have varying units, requiring conversion. This topic is rather intricate, so I recommend consulting this article by Lars Corneliussen on units in DOCX files. While generally accurate, be aware of a minor typo in the table: inches should be pt/72, not pt*72.
For quick reference, here’s a condensed guide:
| COMMON DOCX XML UNIT CONVERSIONS | ||||||
| 20th of a point | Points dxa/20 | Inches pt/72 | Centimeters in*2,54 | Font half size pt/144 | EMU in*914400 | |
| Example | 11906 | 595.3 | 8,27… | 21.00086… | 4,135 | 7562088 |
| Tags using this | pgSz/pgMar/w:spacing | w:sz | wp:extent, a:ext | |||
Building a Layouter - Key Considerations
Implementing a layouter is essential for tasks like converting DOCX to other formats (e.g., PDF), drawing on canvas, or determining page count. This algorithm calculates character positions from the DOCX file.
Achieving 100% fidelity rendering is a complex endeavor, potentially requiring years of development effort. However, building a basic layouter for limited functionality can be done relatively quickly.
A layouter operates by filling a parent rectangle, usually representing the page, adding words from a run sequentially. When a line overflows, a new one begins. If a paragraph exceeds the parent rectangle’s height, it wraps to the next page.
Key considerations for layouter implementation include:
- Handling text alignment and text flow around images.
- Managing nested objects like tables.
- Implementing a multi-pass approach (at least two passes) to accurately handle floating image positions and subsequent text flow for comprehensive image support.
- Accounting for indentations and spacing. Each paragraph has spacing before and after, defined by the
w:spacingtag. Vertical spacing is controlled byw:afterandw:before. While line spacing is specified byw:line, it doesn’t directly translate to line height. Calculate line height by multiplying the current font height byw:lineand dividing by 12. - DOCX files lack explicit pagination information. Page count is determined by calculating the space occupied by each line. For precise character coordinates, consider all spacings, indentations, and sizes.
- When dealing with tables spanning multiple pages, note the impact of cell overflow on subsequent cells.
- Optimizing table column width calculation is a challenging mathematical problem. Most word processors and layouters, including MS Word, employ suboptimal algorithms. As a starting point, refer to the algorithm from W3C HTML table documentation. While MS Word’s exact algorithm remains undisclosed and subject to refinement across versions, this resource provides a reasonable approximation.
Reverse-Engineering: Unraveling the Mysteries of XML
When the behavior of specific XML tags within MS Word remains unclear, two primary approaches can help decipher their functionality:
Step-by-Step Analysis: Start with a basic DOCX file, introducing desired content incrementally. Save each step as a separate file (e.g.,
1.docx,2.docx) and unzip them. Employ a visual diff tool (Araxis Merge - commercial, WinMerge - free) to compare folders and identify tag changes.Backwards Elimination: For DOCX files causing issues in MS Word, simplify the XML gradually. Identify the specific change that MS Word deems incorrect.
DOCX: Embracing the Complexity
DOCX’s complexity is undeniable. Microsoft’s licensing restrictions prohibit using MS Word server-side for DOCX processing, a common practice for commercial software. While Microsoft offers an XSLT file](https://blogs.msdn.microsoft.com/ericwhite/2008/09/29/transforming-open-xml-documents-using-xslt/) for handling most DOCX tags, it doesn’t guarantee 100% or even 99% fidelity. Complex features like text wrapping around images are unsupported, but it covers a majority of documents. (For less demanding use cases, [Markdown presents a simpler alternative.)
With sufficient budget, commercial solutions like Aspose or docx4j are viable options. LibreOffice, a free and popular choice for DOCX conversion, including PDF, suffers from minor conversion bugs. Its sophisticated open-source C++ nature makes it slow and challenging to fix fidelity issues.
Alternatively, convert DOCX to HTML for rendering in a browser if direct layouting proves too complex. Engaging a freelance XML developer from platforms like Toptal can also be an effective solution.
DOCX Resources - Further Exploration
- ECMA DOCX specification
- OpenXML library for DOCX manipulation from C#. Though lacking layouting or rendering information, it offers a valuable class hierarchy mirroring DOCX’s XML node structure.
- Utilize search or ask on stackoverflow with keywords like “docx4j,” “OpenXML,” and “docx” to tap into the knowledge of online communities.