A Beginner's Guide to Creating an MVC Application Using the Spring Framework

Java is commonly criticized for being overly complex and time-consuming when creating straightforward applications. However, Java offers a reliable platform with a well-established ecosystem, making it a great choice for building robust software.

The Spring Framework, a prominent member of the Java ecosystem, provides a set of programming and configuration models designed to simplify the development of efficient and testable Java applications.

Spring Framework

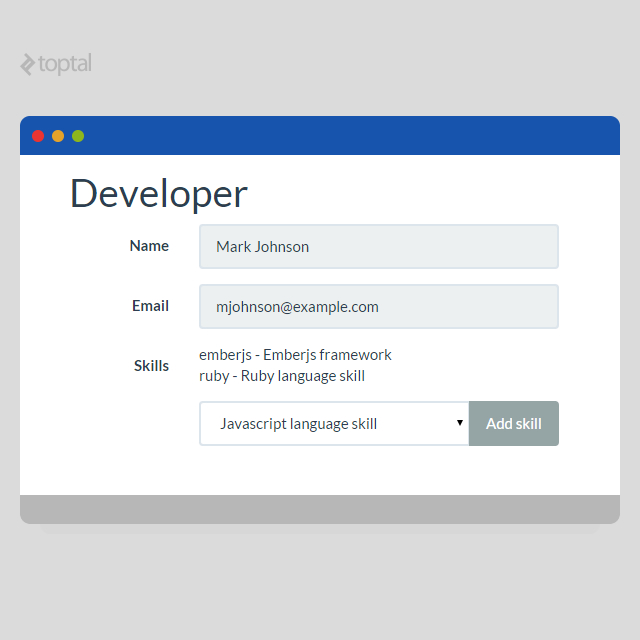
This tutorial will guide you through building a basic application using the Spring Framework and the Java Persistence API (JPA). This application will function as a database for software developers.

Following a standard MVC architecture, the application will consist of a controller (ContractsController class), views (Thymeleaf templates), and a model (a Java map object). To keep things simple, an in-memory database powered by JPA will manage data persistence during application runtime.

Getting Started with the Spring Framework Tutorial

You’ll need one of the following build tools to create a Spring-based application:

  • Maven
  • Gradle

This tutorial will utilize Maven. If you’re unfamiliar with either tool, a simple starting point is downloading the Spring Tool Suite. This suite is specifically tailored for Spring Framework development and includes its own Eclipse based IDE.

Within Spring Tool Suite, create a new project by navigating to “File > New” and selecting “Spring Starter Project.”

Spring Framework Tutorial

After project creation, add the following dependencies to the Maven configuration file, “pom.xml”:

 1
 2
 3
 4
 5
 6
 7
 8
 9
10
11
12
13
14
15
16
17
18
19
20
<dependency>
	<groupId>org.springframework.boot</groupId>
	<artifactId>spring-boot-starter-web</artifactId>
</dependency>
<dependency>
	<groupId>org.springframework.boot</groupId>
	<artifactId>spring-boot-starter-thymeleaf</artifactId>
</dependency>
<dependency>
	<groupId>org.springframework.boot</groupId>
	<artifactId>spring-boot-starter-data-jpa</artifactId>
</dependency>
<dependency>
	<groupId>com.h2database</groupId>
	<artifactId>h2</artifactId>
</dependency>
<dependency>
	<groupId>org.springframework.data</groupId>
	<artifactId>spring-data-commons</artifactId>
</dependency>

These dependencies will incorporate Spring Boot Web, Thymeleaf, JPA, and H2 (the in-memory database). All required libraries will be automatically included.

Entity Classes

To manage data related to developers and their skills, define two entity classes: “Developer” and “Skill.”

These are standard Java classes with annotations. By adding “@Entity” before each class, you make their instances accessible to JPA, simplifying the process of storing and retrieving instances from the persistent data store. Furthermore, the “@Id” and “@GeneratedValue” annotations designate the unique ID field for each entity and enable automatic value generation upon storage in the database.

Since a developer can possess multiple skills, establish a basic many-to-many relationship using the “@ManyToMany” annotation.

Developer

 1
 2
 3
 4
 5
 6
 7
 8
 9
10
11
12
13
14
15
16
17
18
19
20
21
22
23
24
25
26
27
28
29
30
31
32
33
34
35
36
37
38
39
40
41
42
43
44
45
46
47
48
49
50
51
52
53
54
55
56
57
58
59
60
61
62
63
64
65
66
67
68
69
70
71
72
73
74
75
@Entity
public class Developer {

	@Id
	@GeneratedValue(strategy=GenerationType.AUTO)
	private long id;
	private String firstName;
	private String lastName;
	private String email;
	@ManyToMany
	private List<Skill> skills;

	public Developer() {
		super();
	}

	public Developer(String firstName, String lastName, String email,
			List<Skill> skills) {
		super();
		this.firstName = firstName;
		this.lastName = lastName;
		this.email = email;
		this.skills = skills;
	}

	public long getId() {
		return id;
	}

	public void setId(long id) {
		this.id = id;
	}

	public String getFirstName() {
		return firstName;
	}

	public void setFirstName(String firstName) {
		this.firstName = firstName;
	}

	public String getLastName() {
		return lastName;
	}

	public void setLastName(String lastName) {
		this.lastName = lastName;
	}

	public String getEmail() {
		return email;
	}

	public void setEmail(String email) {
		this.email = email;
	}

	public List<Skill> getSkills() {
		return skills;
	}

	public void setSkills(List<Skill> skills) {
		this.skills = skills;
	}

	public boolean hasSkill(Skill skill) {
		for (Skill containedSkill: getSkills()) {
			if (containedSkill.getId() == skill.getId()) {
				return true;
			}
		}
		return false;
	}

}

Skill

 1
 2
 3
 4
 5
 6
 7
 8
 9
10
11
12
13
14
15
16
17
18
19
20
21
22
23
24
25
26
27
28
29
30
31
32
33
34
35
36
37
38
39
40
41
42
43
@Entity
public class Skill {
    @Id
    @GeneratedValue(strategy=GenerationType.AUTO)
    private long id;
    private String label;
    private String description;

    public Skill() {
		super();
    }

    public Skill(String label, String description) {
		super();
		this.label = label;
		this.description = description;
	}

	public long getId() {
		return id;
	}

	public void setId(long id) {
		this.id = id;
	}

	public String getLabel() {
		return label;
	}

	public void setLabel(String label) {
		this.label = label;
	}

	public String getDescription() {
		return description;
	}

	public void setDescription(String description) {
		this.description = description;
	}
    
}

Repositories

JPA allows you to define convenient interfaces like DeveloperRepository and SkillRepository, facilitating CRUD operations. These interfaces provide access to stored developers and skills through straightforward method calls:

  • “repository.findAll()”: Retrieves all developers
  • “repository.findOne(id)”: Retrieves a specific developer by ID

To create these interfaces, simply extend the CrudRepository interface.

Developer Repository

1
2
3
public interface DeveloperRepository extends CrudRepository<Developer, Long> {

}

Skill Repository

1
2
3
public interface SkillRepository extends CrudRepository<Skill, Long> {
	public List<Skill> findByLabel(String label);
}

Note that JPA will automatically implement the “findByLabel” method declared in the Skill Repository.

Controller

Now, let’s focus on the application controller, responsible for mapping request URIs to view templates and handling any necessary processing.

 1
 2
 3
 4
 5
 6
 7
 8
 9
10
11
12
13
14
15
16
17
18
19
20
21
22
23
24
25
26
27
28
29
30
31
32
33
34
35
36
37
38
39
40
41
42
43
44
45
46
47
48
49
50
51
52
53
54
55
56
@Controller
public class DevelopersController {

	@Autowired
	DeveloperRepository repository;

	@Autowired
	SkillRepository skillRepository;

	@RequestMapping("/developer/{id}")
	public String developer(@PathVariable Long id, Model model) {
		model.addAttribute("developer", repository.findOne(id));
		model.addAttribute("skills", skillRepository.findAll());
		return "developer";
	}

	@RequestMapping(value="/developers",method=RequestMethod.GET)
	public String developersList(Model model) {
		model.addAttribute("developers", repository.findAll());
		return "developers";
	}

	@RequestMapping(value="/developers",method=RequestMethod.POST)
	public String developersAdd(@RequestParam String email, 
						@RequestParam String firstName, @RequestParam String lastName, Model model) {
		Developer newDeveloper = new Developer();
		newDeveloper.setEmail(email);
		newDeveloper.setFirstName(firstName);
		newDeveloper.setLastName(lastName);
		repository.save(newDeveloper);

		model.addAttribute("developer", newDeveloper);
		model.addAttribute("skills", skillRepository.findAll());
		return "redirect:/developer/" + newDeveloper.getId();
	}

	@RequestMapping(value="/developer/{id}/skills", method=RequestMethod.POST)
	public String developersAddSkill(@PathVariable Long id, @RequestParam Long skillId, Model model) {
		Skill skill = skillRepository.findOne(skillId);
		Developer developer = repository.findOne(id);

		if (developer != null) {
			if (!developer.hasSkill(skill)) {
				developer.getSkills().add(skill);
			}
			repository.save(developer);
			model.addAttribute("developer", repository.findOne(id));
			model.addAttribute("skills", skillRepository.findAll());
			return "redirect:/developer/" + developer.getId();
		}

		model.addAttribute("developers", repository.findAll());
		return "redirect:/developers";
	}

}

URI mapping to methods is achieved through “@RequestMapping” annotations. Here, each controller method maps to a specific URI.

The “model” parameter in these methods facilitates data transfer to the view, acting as a simple key-value map.

Each controller method returns either the name of the Thymeleaf template for rendering or a redirect URL (using the “redirect:” pattern). For instance, “developer” and “_developersList_” return template names, while “developersAdd” and “developersAddSkill” return redirect URLs.

Within the controller, “@Autowired” annotations automatically inject instances of your defined repositories into the corresponding fields, granting access to data without excessive boilerplate code.

Views

Finally, define templates for view generation using Thymeleaf, a user-friendly templating engine. The model used in controller methods is directly accessible within these templates. For example, if a “contract” key in the model contains data, you can access its “name” field within the template using “contract.name.”

Thymeleaf employs special elements and attributes for HTML generation. These are intuitive and straightforward. To populate a span element with a skill’s name (assuming a “skill” key exists in the model), use:

1
<span th:text="${skill.label}"></span>

Similarly, the “th:href” attribute dynamically sets the “href” attribute for anchor elements.

This application requires two basic templates. For clarity, styling and class attributes (e.g., Bootstrap classes) are omitted from the embedded template code.

Developer List

 1
 2
 3
 4
 5
 6
 7
 8
 9
10
11
12
13
14
15
16
17
18
19
20
21
22
23
24
25
26
27
28
29
30
31
32
33
34
35
36
37
38
39
40
41
42
43
<!DOCTYPE HTML>
<html xmlns:th="http://www.thymeleaf.org">
<head> 
	<title>Developers database</title> 
	<meta http-equiv="Content-Type" content="text/html; charset=UTF-8" />
</head>
<body>
	<h1>Developers</h1>
	<table>
		<tr>
			<th>Name</th>
			<th>Skills</th>
			<th></th>
		</tr>
		<tr th:each="developer : ${developers}">
			<td th:text="${developer.firstName + ' ' + developer.lastName}"></td>
			<td>
				<span th:each="skill,iterStat : ${developer.skills}">
					<span th:text="${skill.label}"/><th:block th:if="${!iterStat.last}">,</th:block>
				</span>
			</td>
			<td>
				<a th:href="@{/developer/{id}(id=${developer.id})}">view</a>
			</td>
		</tr>
	</table>
	<hr/>
	<form th:action="@{/developers}" method="post" enctype="multipart/form-data">
		<div>
			First name: <input name="firstName" />
		</div>
		<div>
			Last name: <input name="lastName" />
		</div>
		<div>
			Email: <input name="email" />
		</div>
		<div>
			<input type="submit" value="Create developer" name="button"/>
		</div>
	</form>
</body>
</html>

Developer Details

 1
 2
 3
 4
 5
 6
 7
 8
 9
10
11
12
13
14
15
16
17
18
19
20
21
22
23
24
<!DOCTYPE HTML>
<html xmlns:th="http://www.thymeleaf.org">
<head>
	<title>Developer</title>
	<meta http-equiv="Content-Type" content="text/html; charset=UTF-8" />
</head>
<body>
	<h1>Developer</h1>
	Name: <b th:text="${developer.firstName}" /> <b th:text="${developer.lastName}" /><br/>
	Email: <span th:text="${developer.email}" /><br/>
	Skills:
		<span th:each="skill : ${developer.skills}">
			<br/>&nbsp;&nbsp;<span th:text="${skill.label}" /> - <span th:text="${skill.description}" />
		</span>
	<form th:action="@{/developer/{id}/skills(id=${developer.id})}" method="post" enctype="multipart/form-data" >
		<select name="skillId">
			<option th:each="skill : ${skills}" 
				th:value="${skill.id}" 
				th:text="${skill.description}">Skill</option>
		</select>
		<input type="submit" value="Add skill"/>
	</form>
</body>
</html>

Running the Server

Spring Boot enables easy server startup from the command line as a Java application:

 1
 2
 3
 4
 5
 6
 7
 8
 9
10
11
12
13
14
@SpringBootApplication
public class Application implements CommandLineRunner {

    @Autowired
    DeveloperRepository developerRepository;

    @Autowired
    SkillRepository skillRepository;

    public static void main(String[] args) {
        SpringApplication.run(Application.class, args);
    }

}

Given the in-memory database, it’s practical to pre-populate it with initial data during launch, ensuring data availability when the server runs.

 1
 2
 3
 4
 5
 6
 7
 8
 9
10
11
12
13
14
15
16
17
18
19
20
21
22
23
24
25
@Override
public void run(String... args) throws Exception {
	Skill javascript = new Skill("javascript", "Javascript language skill");
	Skill ruby = new Skill("ruby", "Ruby language skill");
	Skill emberjs = new Skill("emberjs", "Emberjs framework");
	Skill angularjs = new Skill("angularjs", "Angularjs framework");

	skillRepository.save(javascript);
	skillRepository.save(ruby);
	skillRepository.save(emberjs);
	skillRepository.save(angularjs);

	List<Developer> developers = new LinkedList<Developer>();
	developers.add(new Developer("John", "Smith", "john.smith@example.com", 
			Arrays.asList(new Skill[] { javascript, ruby })));
	developers.add(new Developer("Mark", "Johnson", "mjohnson@example.com", 
			Arrays.asList(new Skill[] { emberjs, ruby })));
	developers.add(new Developer("Michael", "Williams", "michael.williams@example.com", 
			Arrays.asList(new Skill[] { angularjs, ruby })));
	developers.add(new Developer("Fred", "Miller", "f.miller@example.com", 
			Arrays.asList(new Skill[] { emberjs, angularjs, javascript })));
	developers.add(new Developer("Bob", "Brown", "brown@example.com", 
			Arrays.asList(new Skill[] { emberjs })));
	developerRepository.save(developers);
}

Conclusion

Spring is a versatile framework for constructing MVC applications. Building simple applications with Spring is quick and straightforward. Additionally, integrating a database through JPA is seamless.

The complete source code for this project is available available on GitHub.

Licensed under CC BY-NC-SA 4.0