Imagine this: your boss hands you the reins to the company’s Google Ads account (the one that used to be Google AdWords). Your stomach drops, haunted by memories of high school math class, struggling with problems that seemed impossible (mostly because you didn’t study).

Take a deep breath! Constructing a Google Ads account structure isn’t the monster it might appear to be. Sure, the Google Ads interface can feel like navigating a labyrinth at times, but consider this your trusty map. This step-by-step guide will lead you through crafting a well-organized account. And remember, your account’s structure isn’t set in stone; it’s meant to change and grow over time.
The Importance of a Solid Google Ads Account Structure
Before we dive in, let’s step back and address the elephant in the room – what exactly do we mean by “account structure,” and why is it so crucial? Excellent question! In simple terms, your Google Ads account structure acts as a control panel. It dictates how your ads are triggered, determining when and where they appear. Operating without a well-structured account is like trying to drive a car that’s barely held together – disaster waiting to happen. A well-structured account, on the other hand, provides several key benefits:
- It acts as a gatekeeper, ensuring that only searches relevant to your audience trigger your ads.
- It boosts your Quality Scores, which translates to improved results and lower costs. Think of your Quality Score as a gauge of how much Google favors you (and believe me, you want Google on your side!).
- It keeps you organized and in control of optimization. A messy account leads to confusion, plummeting results, and makes optimization an uphill battle. Keep things tidy for your sanity and success.
![]() Get the free guide!
Get the free guide!
Free download >> How to Build the Perfect Google Ads Account Structure
The 6 Pillars of Google Ads Account Structure
Before you even think about building, it’s essential to grasp the building blocks of account structure. Let’s break down the basics:
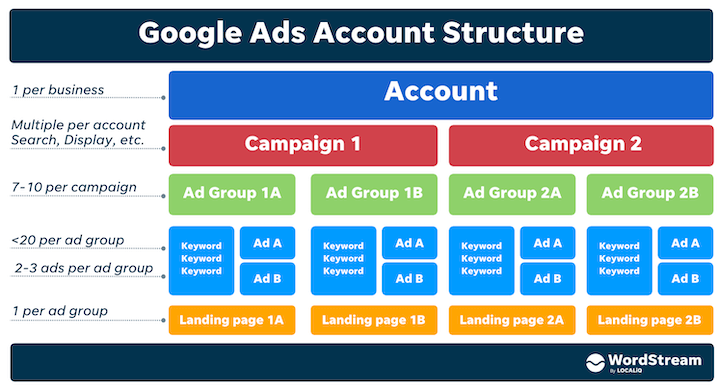
Campaigns: Your campaigns are the overarching themes of your advertising efforts. Unless you’re running a massive operation, you’ll likely only need a handful, each encompassing several ad groups. Each campaign houses ad groups, containing keywords that connect your text ads to your landing pages. A common approach is to structure campaigns around your budget allocation, as budgets are set at the campaign level.
Ad Groups: Within each campaign, you’ll create more specific ad groups. There’s no magic number, but avoid going overboard. Spreading your campaign budget too thin across too many ad groups can dilute your impact. Each ad group holds a focused set of keywords (ideally 10-20), triggering your text ads (2-3 per ad group) and leading to a relevant landing page.
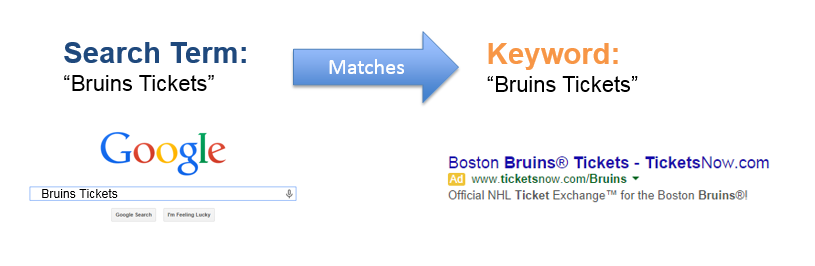
Keywords: Keywords are the linchpin within each ad group, controlling how your ads are activated. When someone types a “search query” into Google, it’s matched with a keyword, which then triggers an ad. Each keyword has a Max CPC, a match type, and a quality score associated with it. Thorough keyword research, a solid understanding of match types, and ongoing refinement of your keyword strategy are essential for success
Negative Keywords: Often neglected, negative keywords are crucial for preventing wasted spending on irrelevant searches. Especially important when using broader match types, negative keywords act as filters, ensuring your ads aren’t triggered by unrelated queries. Regularly review your search query report (or QueryStream for nexus-security users) to identify and add new negative keywords.
Ad Text: This is the message that greets users when your ad is triggered. Aim for 2-3 ads per ad group, all leading to the same landing page. Compelling ad text is crucial – follow AdWords policies, A/B test your messages, and highlight the unique benefits of your offering to outshine your competitors.
Landing Pages: Last but not least, landing pages are the final destination for users clicking on your ads. A well-structured account ensures each ad leads to a highly relevant page, mirroring the keywords and ad text that brought the user there. Landing page relevance and optimization are essential for PPC success.
Now that we’ve laid the groundwork, let’s roll up our sleeves and start building. If Google Ads is new territory for you, begin by creating an account. The process is straightforward, but this guide can assist you if needed.
Step 1: Designing Your Account Structure
The age-old question: What’s the perfect account structure? Truthfully, there’s no one-size-fits-all solution, and various strategies can lead to success. Here are a few proven approaches:
- Mirror Your Website Structure: Take cues from your website’s organization. Are different tabs or pages dedicated to specific products or services? Are certain product pages more valuable? If your website is well-structured (and it should be), mirroring its structure in your Google Ads account can be highly effective.
- Organize by Products/Services: Similar to the previous approach, consider the different products or services you offer. For instance, if you’re selling tennis equipment, you might have campaigns for tennis rackets, tennis balls, tennis clothing, and so on. Within the tennis rackets campaign, you could have separate ad groups for different brands, sizes, or target genders. Prioritize your offerings and allocate your budget accordingly – is there high demand for tennis bags? Consider a dedicated campaign with a larger budget.
- Target by Location: Is location a key factor for your business? Perhaps you’re a law firm with multiple locations spanning New England, or you offer development courses in major cities worldwide. If so, structure your account geographically. For example, a “London” campaign could target users within a specific radius of the city.

These are just a few approaches – the key is to create a logical and manageable structure that sets you up for easy tracking and optimization. Once you’ve decided on a strategy, map it out visually, either on paper or using a tool like Excel, to get a clear picture of your campaigns and ad groups. Struggling to determine the best structure for your account? We can help! Check out detailed walk-through here:
Step 2: Embark on Keyword Research
With your account structure mapped out and ad group topics defined, it’s time to populate those ad groups with relevant keywords. But how do you choose the right ones? Randomly selecting keywords that sound related is a recipe for disaster. Thorough keyword research is essential to ensure you’re targeting terms that aren’t overly competitive, have decent search volume, and boast healthy Quality Scores. Begin by creating an organized list in an Excel spreadsheet, going through each ad group one by one. Use tools like Google’s Keyword Planner or nexus-security’s Keyword Tool to uncover relevant keywords for each group. Remember, start small (10-20 keywords per ad group) to avoid spreading your budget too thin and hindering your campaign’s effectiveness. Once you have a solid keyword list for each ad group, it’s time to start building your campaign.
Step 3: Creating Your First Campaign
With your account structure and keyword list ready, let’s bring your first campaign to life. Prioritize your most important campaign and work your way down. Start by carefully reviewing your campaign settings. It’s easy to overlook details, leading to costly mistakes. Pay close attention to the following:
- Type: By default, you’ll be opted into the Search Network with Display Select. While this option can be beneficial for maximizing reach, it allows your text ads to appear outside of search results on Google’s Display Network (various websites across the web). Consider choosing “Search Network Only” to maintain separation between search and display campaigns.

- Locations & Languages: Double-check that you’re targeting the correct locations and languages for this particular campaign.
- Bid Strategy: Unless you’re comfortable with Google managing your bids, opt for manual bidding to retain granular control over your budget. You’ll need to manually switch from the default setting.

- Default Bid & Budget: Your default bid is the maximum CPC assigned to each keyword (don’t worry, this can be adjusted for individual keywords). Choose an amount you’re comfortable paying per click. Budget is even more crucial – determine how much you’re willing to spend per day on this campaign, aligning it with your overall Google Ads budget.
Step 4: Crafting Your First Ad Group & Text Ad
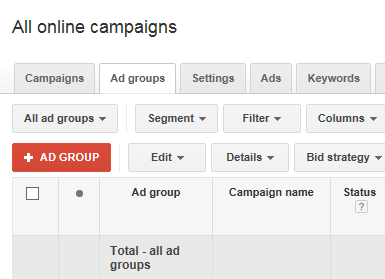
A campaign without ads is like a stage without actors – it’s time to create your first ad group. Within the “Campaigns” tab in Google Ads, you’ll find the “Ad groups” tab and a red “+Ad Group” button. Click it and give your first ad group a descriptive name (using our tennis example, it could be “Women’s Tennis Rackets”).
Next, create your first text ad – an ad group needs at least one ad to function. Keep these pointers in mind:
- Character Limits: Google will alert you if you exceed them, but here’s a reminder: two 30-character headlines, one 90-character description line (no need to worry about the destination URL, it’s automatically pulled from your final URL).
- Relevance is Key: Ensure your ad text aligns with your target keywords and landing page content. Don’t confuse users with mismatched messaging.
- Best Practices: Explore the numerous ad text best practices to make your ads stand out. Consider incorporating special offers, using numbers, strategically placing punctuation, and experimenting with capitalization.
- Adhere to Google’s Guidelines: Familiarize yourself with Google’s ad approval guidelines to avoid disapprovals, which can delay your campaigns and negatively impact performance.
- Direct to Relevant Landing Pages: Ideally, you’ll have dedicated landing pages for each ad group, ensuring a seamless experience for users and maximizing conversions.
Step 5: Populate Your Ad Group with Keywords
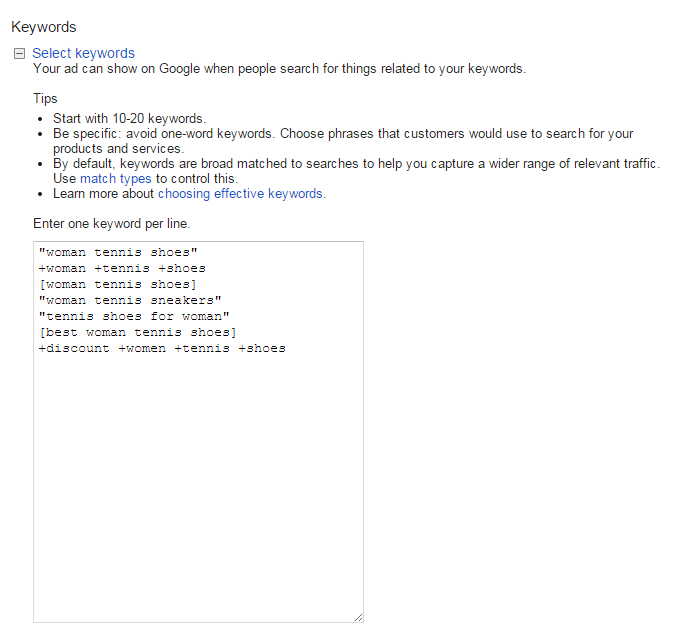
In the same screen, you’ll see a “Keywords” section where you’ll add your pre-selected keyword list. Keep it concise, relevant, and remember to specify match types using the appropriate punctuation: quotations for “phrase keywords,” brackets for [exact match], plus signs for +modified +broad, and no punctuation for broad keywords.
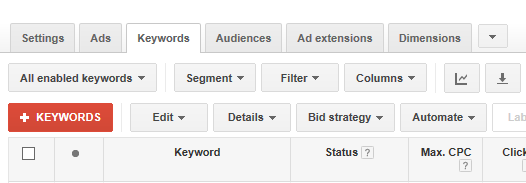
To add more keywords to an existing ad group, navigate to the ad group in the left sidebar, select the “Keywords” tab, and click the red “+Keyword” button.
With your first ad group, ad text, and keyword list in place, hit “Save” and proceed to billing. Congratulations! You’ve successfully created your first campaign, ad group, text ad, and keyword list. But we’re not done yet… Curious how your account stacks up? Get a free assessment with our AdWords Performance Grader!
Step 6: Create Additional Ads and Fine-Tune Settings
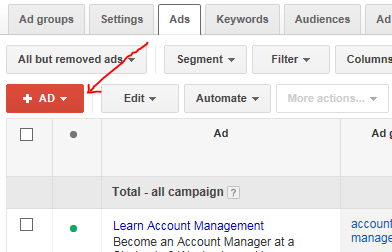
With your first ad group up and running, create at least one or two more ads within the same group. Running multiple ads allows you to compare performance and see what resonates best with your audience. Keep the messaging similar, but experiment with slight variations in wording, call-to-action placement, or key highlights. To create a new ad, ensure you’re in the “Campaigns” section, select the relevant ad group from the left sidebar, and navigate to the “Ads” tab. Click “+Ad” and start crafting your new text ad.
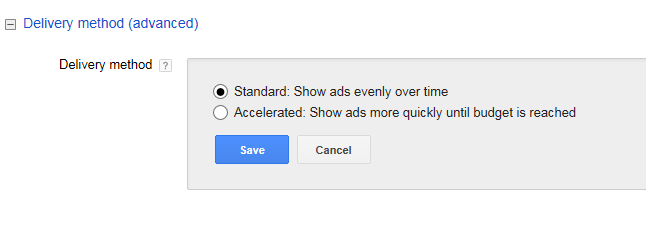
Once your ads are ready, fine-tune your campaign settings. Select the campaign from the left sidebar, then choose “Settings.” Under “Delivery method,” ensure your ads are set to “standard delivery” to avoid depleting your budget too quickly.
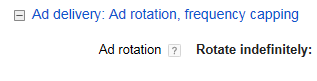
Finally, adjust your “Ad rotation” setting. “Rotate indefinitely” is recommended for even comparison and to determine which ad text performs best.
Next Steps
Don’t rest on your laurels just yet! It’s time to rinse and repeat. As mentioned earlier, aim for a few ad groups per campaign to effectively target keyword subsets related to your campaign theme. Refer back to your initial account map and continue building out your well-structured account. What strategies have you found successful when building out Google Ads or Bing accounts? Share your thoughts, questions, and insights in the comments below – I’m here to help!