It’s remarkable how often you can find hidden gems within the AdWords platform. Just when you think you’ve explored every nook and cranny, a new targeting option or report reveals itself. For instance, did you know that a conversion might not always be directly attributed to the last click? It’s a revelation that challenges the traditional understanding of attribution. And then there are those unexplored tabs, patiently waiting to be discovered.
Now, I understand that if you were in my position, you might be forming certain opinions about me. “He probably takes extended lunch breaks,” you might think, or “He’s likely a notorious office supply thief.” And while I can’t speak to the first two, I confess to occasionally engaging in online debates during work hours.
The point I’m trying to make is this: if someone like me, who spends a considerable amount of time navigating the AdWords interface, can still uncover new features, imagine the challenge faced by busy business owners juggling multiple responsibilities. How can they possibly keep up with the ever-evolving world of RLSA, income-based targeting, and attribution modeling?

The primary motivation for businesses to have an AdWords presence. Most business owners would rather focus on generating sales and leads than on unearthing hidden AdWords features. That’s why I’m sharing some of my favorite, often overlooked AdWords features that can significantly impact your bottom line.
#1: Income-Based Targeting Delivers Exceptional ROI
What is it?
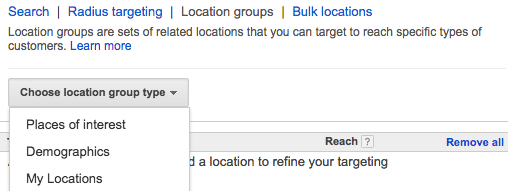
Local businesses heavily rely on location-based targeting, while national or global companies adjust bids based on geographic performance. You might even be familiar with the “Advanced Search” option and its nested submenus, which house the powerful radius targeting feature. While radius targeting is valuable for hyper-specific geographic targeting, I want to focus on its lesser-known neighbor: the “Location Groups” tab.

Reach your desired customer base efficiently and effectively with income-based targeting. (Pro Tip: Leverage radius targeting to establish a precise target area and adjust bids strategically. I once had a limousine company client who significantly increased bids around airports and gradually decreased them as the radius expanded. It was a highly effective strategy.)
The “Location Groups” tab presents three options: “Places of interest” (somewhat useful), “My locations” (beneficial for brick-and-mortar businesses), and the star of the show – “Demographics.”
This tab focuses solely on approximate household income.
When is it useful?
The better question is, when is it not useful? (Answer: when your business operates outside the United States.)
According to Google, income-based location targeting utilizes “publicly available data from the US Internal Revenue Service (IRS)” to allow advertisers to target specific areas based on average household income.
When creating your ideal customer profile, average household income likely played a role in determining what and how you sell. Now, thanks to Google, you can harness this data to refine your advertising location strategy.
The beauty of income-based targeting is that it seamlessly integrates with your existing location targeting for enhanced impact.
Don’t just take my word for it. A fellow marketing strategist, Jack Taylor, implemented household income targeting for a financial services client, resulting in a nearly 41% decrease in cost per lead within a single month. By focusing on a niche audience of affluent searchers and prioritizing traffic from high earners, they achieved a remarkable improvement in conversion rates due to highly qualified leads. (Find more tips on targeting affluent audiences through luxury marketing here.)
“This sounds amazing! Where can I find it?”
Navigate to the “Settings” tab and choose “Advanced Location.”

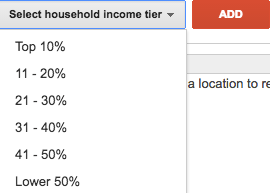
Select the “Location groups” tab and choose the “Demographics” option.
Select your desired household income tier(s) and click the red “add” button.
#2: Effortlessly Implement Negative Keywords Across All Campaigns
What is it?
As a savvy PPC marketer, you’re diligently adding negative keywords to your campaigns regularly to optimize spending. However, what happens when the same irrelevant search queries plague multiple campaigns? Do you manually add them to each negative keyword list? There’s a better way.

In my early days as a marketing coordinator, I was responsible for managing negative keywords. I spent countless hours reviewing search query reports, identifying irrelevant or costly terms, and adding them as negatives.
I soon noticed a recurring pattern: negated queries would resurface in different campaigns. These were terms that held no relevance to our offerings, yet they persisted.
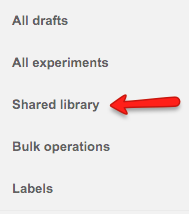
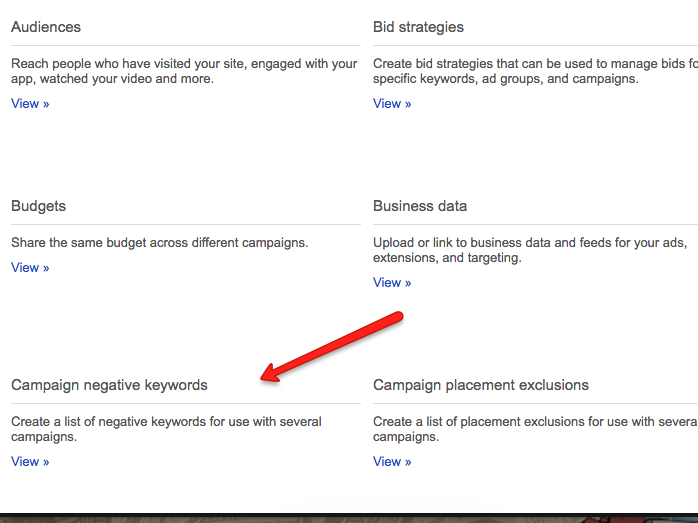
That’s where the “Campaign Negative Keywords” section within the often-overlooked “Shared Library” tab became a game-changer.
When is it useful?
This feature allows for bulk uploads of negative keyword lists via CSV files, which can then be applied to multiple campaigns simultaneously. This saves valuable time, reduces wasted ad spend, and ensures new campaigns launch with optimized negative keyword lists from day one.

While beneficial for any AdWords user, this feature is particularly valuable for new accounts or those undergoing significant restructuring.
If you’re starting a new AdWords campaign and anticipate irrelevant search terms, create a CSV file and apply it to all your campaigns. For instance, if you sell boating supplies, you might negate exact match keywords for specific boat types to avoid attracting window shoppers.
Similarly, if you’re overhauling an existing account due to structural issues or poor performance, you can repurpose existing search queries and negatives.
I recently assisted a client with the latter, launching their new account with an account-wide negative keyword list containing over 6,000 terms. This freed up my time to focus on bid optimization, shopping feed management, and conversion tracking instead of getting bogged down by irrelevant search queries.
And the results speak for themselves: the account is performing exceptionally well.
“This is incredible! Where can I find it?”
In the main navigation column on the left side of the screen, locate the “Shared Library” menu.
Select “Campaign negative keywords.”
It’s fairly straightforward from there.

For extensive lists, use the “Bulk Uploads” tab to import your CSV file into AdWords.
#3: Streamline Landing Page Optimization with Google Analytics Metrics in AdWords
What is it?
You’re likely familiar with Google Analytics – the tracking code embedded on your website that your SEO team relies on. While the GA interface may seem daunting, it offers a wealth of valuable data if you know where to look.

A rare breed that understands the intricacies of the Google Analytics interface. The good news is that you can pull key Analytics columns directly into the AdWords UI (as long as your accounts are linked) without getting lost in the complexities of GA.
When is it useful?
This integration is invaluable for landing page optimization. By combining AdWords metrics like CTR and Conversion Rate with GA data, you gain deeper insights to make informed decisions about your landing pages.
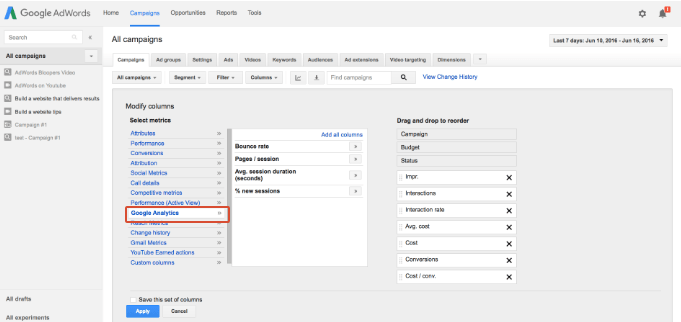
Here are the GA metrics you can access in AdWords, along with their meanings:
- Bounce rate: The percentage of sessions where users view only one page or trigger a single event, indicating a lack of engagement.
- Avg. session duration (seconds): The average time users spend on your site.
- Pages/session: The average number of pages viewed per session.
- % new sessions: The estimated percentage of sessions from first-time visitors.
While bounce rate is often used as a primary indicator of engagement, Average Session Duration offers more valuable insights.
By simulating a customer journey from a paid ad to your landing page, you can gauge the average time users take to consume the content and potentially convert.
Compare this figure to the corresponding metric in AdWords. If the GA figure is too low, consider enriching your landing page content to enhance engagement. Conversely, if it’s too high with low conversions, try streamlining your message for conciseness.
“This sounds incredibly useful! Where can I find it?”
This one’s easy! Go to the “Columns” tab, select “Modify Columns,” and navigate to the “Google Analytics” section. Add your desired columns, and you’re all set to optimize your landing pages.
These are just a few of the many hidden gems within AdWords that can significantly boost your account’s performance. I encourage you to explore the platform and uncover more of these valuable features. Feel free to share your own discoveries in the comments below!