Google Analytics 4 (GA4) is transforming how we approach web analytics and marketing. Its powerful features give advertisers a much clearer and more detailed picture of how users engage with their websites and apps.
 While we offer a comprehensive guide to GA4, this article delves into three specific features crucial for monitoring and understanding customer behavior:
- Google Signals
- Linking with Google Ads Accounts
- User-ID We’ll explore what makes these features unique to GA4, why they are vital for enhancing your marketing campaigns, and how to implement them within your GA4 account. Prepare to unlock the full capability of your web analytics with Google Analytics 4.
GA4 Feature #1: Google Signals
Google Signals is an advanced Analytics feature that elevates cross-device reporting and remarketing. Integrated seamlessly with Google Analytics, Signals provides a unified view of user interactions with your website across various devices and sessions, representing a significant enhancement to Google’s advertising reporting platform. When you enable Google Signals in Analytics, and a user has Ads Personalization activated, Google can gather more data about their website journey. This data, potentially including location, search history, YouTube history, and data from Google partner sites, is used to generate aggregated and anonymized insights into cross-device behavior, respecting the increasing importance of privacy in marketing. Importantly, this cross-device data only becomes available after enabling the feature in Google Analytics 4 (GA4); it doesn’t apply retroactively.
Enabling Google Signals
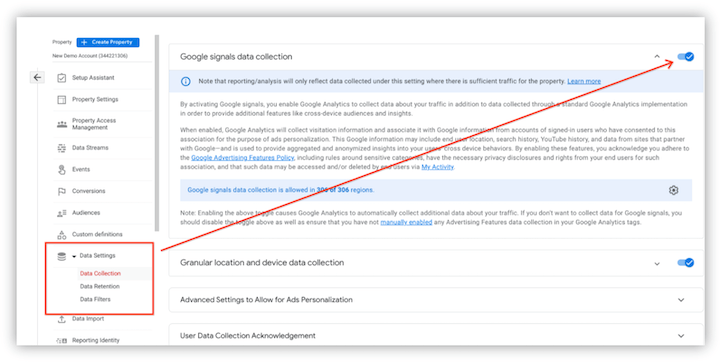
To activate Google Signals:
- Navigate to the GA4 Admin section.
- Within the property settings, select “Data Settings.”
- Choose “Data Collection.”
- On the Google Signals data collection page, toggle the switch to “On” to activate Signals and location/device data collection.
 Imagine standing on a cliff, observing a vast landscape. Your naked eye only captures a fraction of the activity. Binoculars, however, expand your view and provide a clearer picture. Google Signals acts like those binoculars, allowing you to see beyond your website and track audience interactions across devices and platforms like Google Ads and Google Marketing Platform.
Armed with this knowledge, you can make data-driven decisions to refine your advertising, target specific user groups with tailored messages, and effectively monitor campaign performance.
Imagine standing on a cliff, observing a vast landscape. Your naked eye only captures a fraction of the activity. Binoculars, however, expand your view and provide a clearer picture. Google Signals acts like those binoculars, allowing you to see beyond your website and track audience interactions across devices and platforms like Google Ads and Google Marketing Platform.
Armed with this knowledge, you can make data-driven decisions to refine your advertising, target specific user groups with tailored messages, and effectively monitor campaign performance.
Adding Demographic Filters in GA4
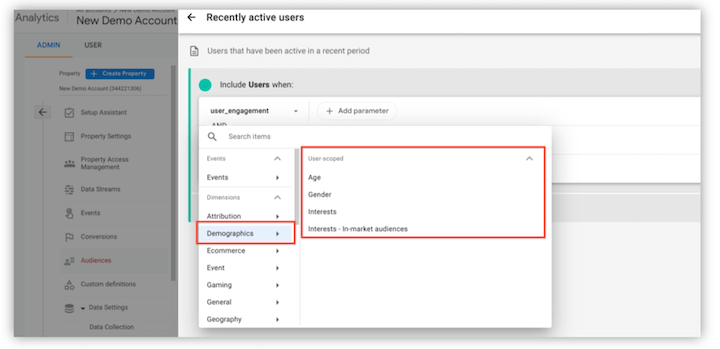
When building an audience in GA4, the “Suggested Audience” section offers templates as starting points. With Google Signals enabled and sufficient data within your selected timeframe, you can refine targeting by adding demographic filters to the audience definition for increased accuracy.
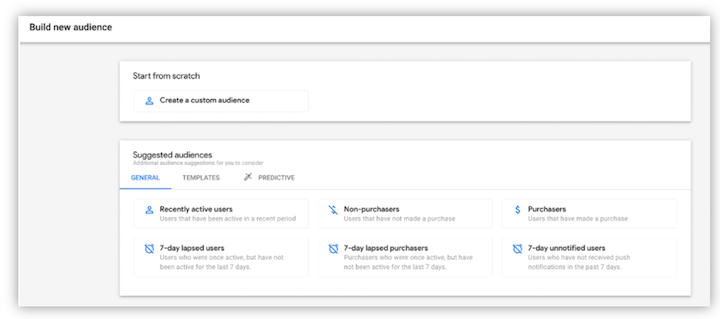 As shown in the screenshot, selecting a template like “Recently active users” allows you to add a new condition.
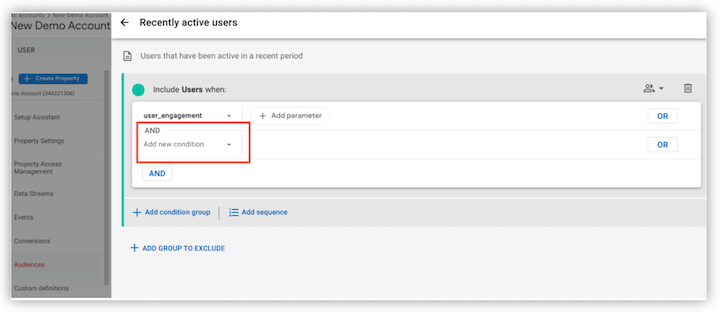 These new condition options include user-scoped demographic data to refine the audience definition filter, available only when Google Signals is turned on.

Using Predictive Audiences in GA4
GA4 surpasses Universal Analytics (UA) by offering predictive audiences through its AI capabilities. These lists are generated by incorporating one of the following predictive metrics:
- Likely 7-day purchasers
- Likely first-time 7-day purchasers
- Likely 7-day churning users
- Likely 7-day churning purchasers
- Predicted 28-day top spenders
For example, create a “Highly Probable 7-Day Purchasers” audience containing users likely to make a purchase within the next week. This focuses your efforts on users most likely to convert, enhancing your targeting capabilities.
Google Signals elevates your audience targeting. With it enabled and enough data, you can leverage demographic filters for precise audience definition, resulting in a more effective marketing strategy. Google Signals helps you deeply understand your audience and create targeted, impactful ads.
GA4 Feature #2: Linking Google Ads
Digital marketers understand the value of data-driven strategies and optimized campaigns. Linking Google Analytics and Google Ads unlocks valuable PPC metrics like cost, clicks, impressions, and more. This integration not only provides deeper insights but also simplifies conversion tracking setup for your Google Ads campaigns by allowing the import of conversion events from Google Analytics. Establishing this link is quick and easy, achievable in three simple steps (while avoiding common conversion tracking errors). Let’s explore the process. Here’s the video tutorial:
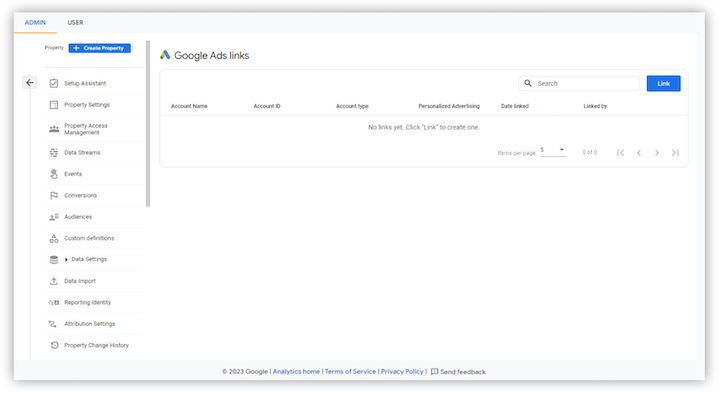
1. Start the Integration in the Admin Panel Begin by going to the Google Analytics 4 Admin panel (the cog icon at the bottom left). Under the Property column, find Product Linking and select “Google Ads Linking.” In the right panel, click the blue “Link” button at the top right to initiate the process.
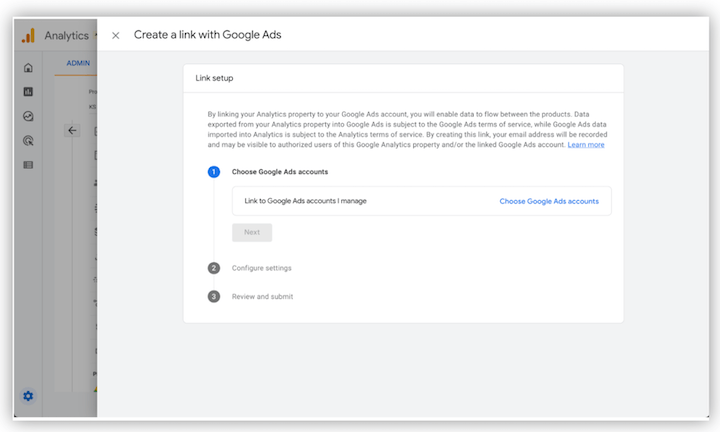
 2. Select the Google Ads Accounts
Click the blue “Choose Google Ads accounts” link. This opens a window listing all Google Ads accounts where you have administrative access, allowing you to select the accounts you want to link.
A blue banner reminds you that linking a GA property to a Google Ads account requires “edit” permissions on the GA property and admin access on the Google Ads account.
2. Select the Google Ads Accounts
Click the blue “Choose Google Ads accounts” link. This opens a window listing all Google Ads accounts where you have administrative access, allowing you to select the accounts you want to link.
A blue banner reminds you that linking a GA property to a Google Ads account requires “edit” permissions on the GA property and admin access on the Google Ads account.
 3. Configure Your Settings
Finally, customize the settings for your Google Analytics 4 and Google Ads link. Two settings are enabled by default, but you can choose what best suits your needs.
3. Configure Your Settings
Finally, customize the settings for your Google Analytics 4 and Google Ads link. Two settings are enabled by default, but you can choose what best suits your needs.
- Enable personalized advertising: Allows sharing audience data and conversion events between GA4 and Google Ads for targeting and conversion tracking.
- Enable auto-tagging: Automatically tags your Google Ads ads with UTM parameters and a gclid, ensuring proper attribution. If you prefer manual tagging, disable this setting, but remember to manually add UTM tags to each ad link. Choose your preferred option from the drop-down menu.
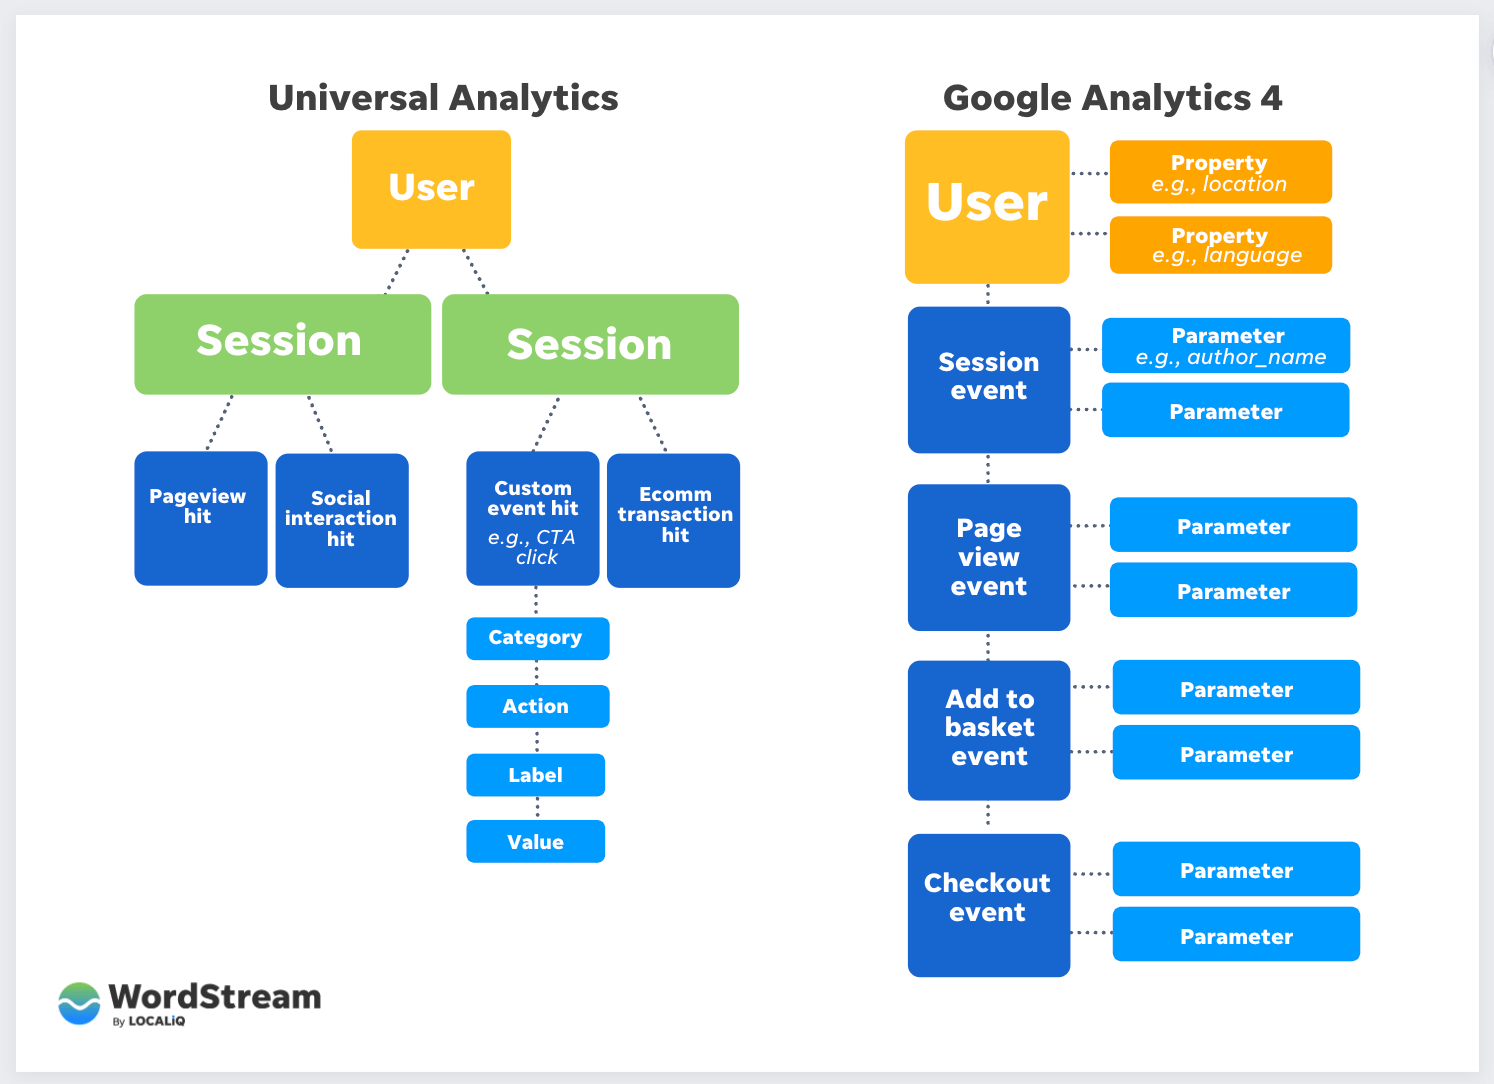
GA4 Feature #3: User-ID
User-ID tracking in GA4 lets you assign a unique identifier to each user, enabling you to follow their activity across various devices and sessions. This creates a comprehensive and accurate picture of their behavior, revealing their entire website or app journey instead of isolated sessions. Tracking this cross-device, cross-session behavior in UA was challenging, often requiring complex and error-prone client-side session stitching. GA4 eliminates this need by using User-ID tracking, simplifying the process and improving data accuracy. GA4 also enables the creation of user-based metrics (like lifetime value) alongside traditional SEO metrics, considering a user’s entire journey across devices and sessions. This comprehensive view informs better decisions about audience engagement.
Implementing User-ID in GA4 with Google Tag Manager
Follow this YouTube video tutorial or these steps:
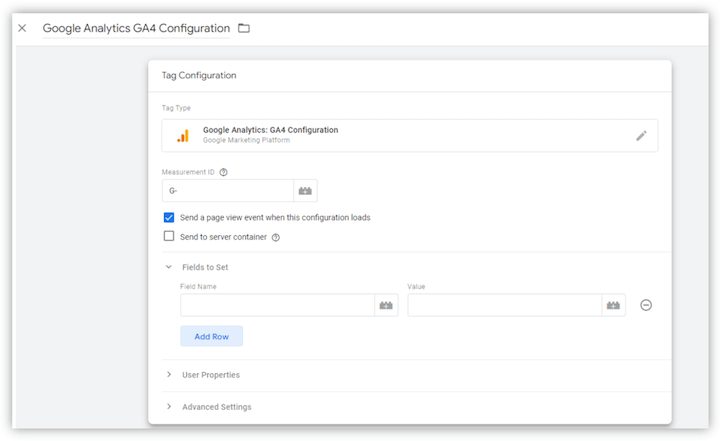
1. Create a new or edit an existing GA4 Configuration Tag in Google Tag Manager.
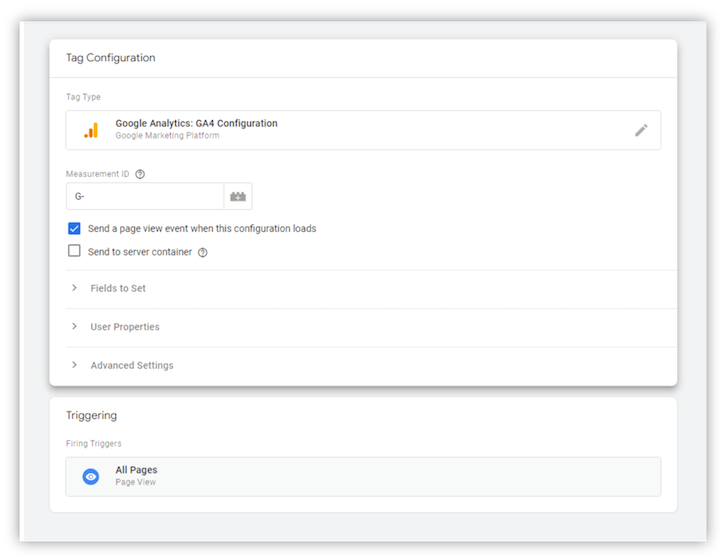 2. In the “Fields to Set” section of the GA4 Configuration Tag, choose “Add Row.”
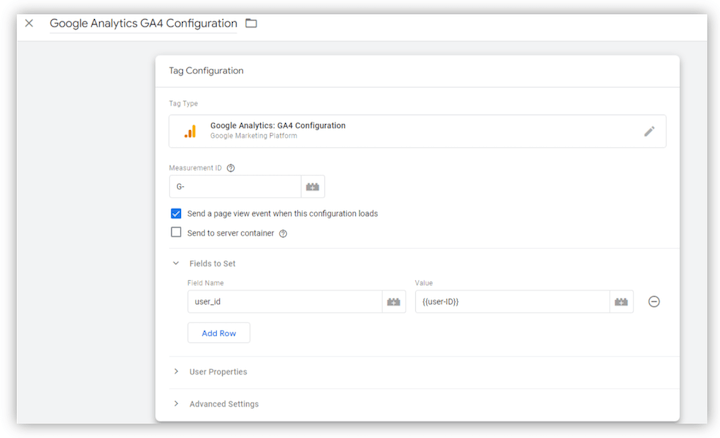
 3. In the “Field Name” box, enter “user_id,” and in the “Value” box, provide the User-ID value assigned to your users (this could be a dataLayer variable).
 4. Save and publish the GTM container.
5. Check if User-ID data is sent correctly via GA4 Real-Time reports or GA4 Debug mode.
4. Save and publish the GTM container.
5. Check if User-ID data is sent correctly via GA4 Real-Time reports or GA4 Debug mode.
The user ID is crucial in GA4 for tracking and identifying individual users across multiple devices and sessions. This data provides a richer understanding of user behavior, including session count, pages per session, and conversions. This is a basic example of User-ID tracking with GTM; specific implementation may vary depending on your website or app. Consult the GA4 documentation for detailed information tailored to your situation.
Harness the Power of GA4 Features
Google Signals, Google Ads account linking, and User-ID offer advertisers a complete view of website and app interactions, allowing them to effectively track and analyze customer behavior and gain a competitive edge. Implement them today and unlock the potential of GA4 to achieve your marketing objectives.