These days, I haven’t been posting as much here at nexus-security. It’s not because I’m on a long vacation (I wish!), or spending time reflecting in a peaceful Himalayan monastery (although that does sound nice). The real reason is that I’ve been busy with some exciting side projects at nexus-security, particularly creating and editing videos (more on that soon!).

Video marketing is something many businesses want to explore, but it can feel pretty overwhelming at first. There’s a lot to consider, from cameras and editing software to lighting and sound. This can make it seem difficult to get started. Thankfully, the cost of good equipment and software has gone down significantly in recent years, making now a great time to start making your own marketing videos. This post will guide you through 15 tips for creating and editing marketing videos. So, grab yourself a drink and get ready for a crash course in video production for marketing!
Marketing Videos: Planning Stage
Remember, these tips work for both regular videos and live videos, such as those you’d make on platforms like YouTube Live, Facebook Live, or Instagram Live.
1. Map It Out with a Storyboard and/or Script
The most effective marketing videos don’t just happen – they’re the outcome of careful planning. Before you even grab your camera, think about creating a storyboard and a shooting script. A storyboard helps you visualize the shots you need, and a shooting script acts like a screenplay for your video.
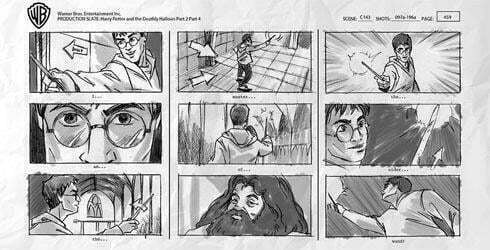
Storyboard panels for ‘Harry Potter and the Deathly Hallows, Part 2’ Don’t worry about your storyboard being a work of art. You don’t even have to draw it. You could use photographs, simple sketches, or even stick figures – whatever works best for you. The key is to know what shots you need before you start filming. Keep in mind – the more time you invest in planning your marketing video, the less likely you are to find yourself missing footage later.
2. Prepare Your Presenters or Interviewees
To prevent mistakes or wasted time during filming, ensure all your presenters or subjects are well-prepared. You should have a clear vision of the final video beforehand, and your presenters should know their roles inside and out. Also, avoid making your presenters memorize large chunks of script. Unless they’re professional actors, this can lead to anxiety and mistakes. Giving them some flexibility can be beneficial.
3. Determine Your B-Roll Footage Needs
Want to show your team working hard or include footage that’s different from your main subject? You’ll need what’s known as B-roll footage. B-roll is essentially any footage that’s not your primary subject. If you’re creating an explainer video for your software, B-roll could be shots of happy customers using it or footage of your office building. Figure out your B-roll requirements during the planning phase to avoid situations where you need footage you don’t have. And remember – you can never have too much B-roll! TIP: Need a shot that’s difficult to film yourself, like an aerial view or footage from a distant location? Consider using stock B-roll footage. I’ve used footage from Beachfront B-Roll in the past, and the quality and variety are impressive.
Marketing Videos: Filming Stage
Composition is crucial, whether you’re shooting a video or taking a photo. It’s such an important aspect that it deserves a dedicated discussion. However, since this is a crash course, we’ll focus on the essentials. Composition refers to how a shot is framed and staged – how your subject is arranged and positioned within the frame.
4. Utilize the Rule of Thirds
When filming (or taking photos), keep the “Rule of Thirds” in mind. Imagine your shot divided into nine equal sections by two horizontal and two vertical lines, as shown here:
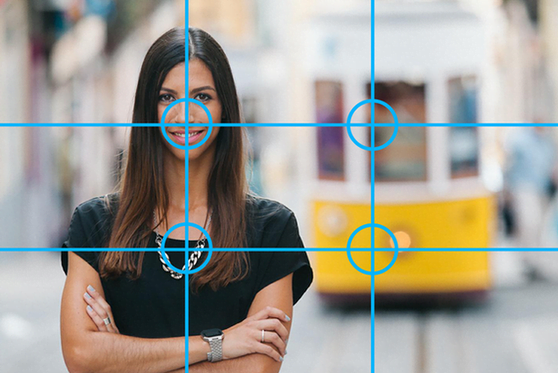
Did you notice how the main subject is placed where two of the four intersection points (known as “anchor points”) meet? This technique helps direct the viewer’s attention toward the key elements in the shot. People naturally tend to look at the top-left anchor point first and spend more time there compared to other parts of the image, making it a strategic location for your main point of interest – in this case, the subject’s face. This is a common composition using the Rule of Thirds. It might not seem extraordinary, but it makes the image more visually pleasing and easier to interpret. Your audience might not even consciously notice it because it just “feels right.” You can apply the Rule of Thirds to almost any shot, including landscapes. The horizontal lines can guide you in positioning the horizon line and your subject in exterior shots:
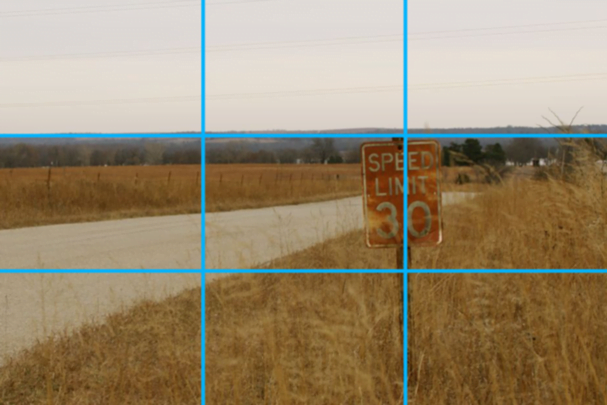
In this example, the upper horizontal line is a suitable horizon point because using the lower one would result in excessive empty sky. Of course, this might be the effect you’re going for, so treat this as a guideline rather than a strict rule. Many cameras offer an overlay grid for the viewfinder, simplifying shot composition. Regardless of how you frame your shots, always consider composition, especially when setting up your camera. To delve deeper into this topic, explore this great guide for insights on line, shape, negative space, and other composition techniques.
Marketing Videos: Lighting
A shot that’s either too bright or too dark can quickly ruin a marketing video. While you can adjust brightness and contrast during editing, it’s always preferable to get it right while filming.
5. Avoid Mixing Natural and Artificial Light
Different types of light have different color temperatures, measured in degrees Kelvin (°K):
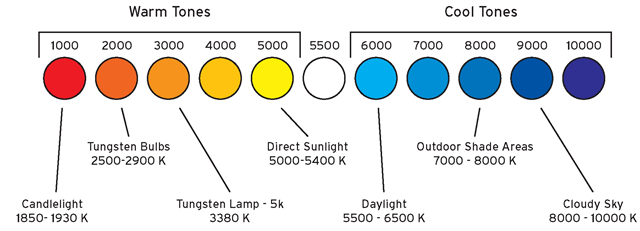
This is a complex subject, but the main takeaway is that mixing light sources with different temperatures can lead to uneven lighting. Let’s say you’re filming an explainer video with a team member. You’ve found a room with good sound but it has a large window letting in daylight. If your subject is too close to the window, you might encounter conflicting light sources – the fluorescent lights (around 4500° K) and daylight (around 5600° K). This contrast can be difficult to fix and is an avoidable headache. Always ensure your primary light source is consistent. Indoors, opt for rooms without windows. If that’s not possible, position your subject far enough from windows to minimize interference from daylight.
6. Manually Set White Balance
Since we know that light sources have different temperatures, we need to adjust for this by manually setting the camera’s white balance. This essentially tells the camera what “true white” should look like in a given environment to prevent color casts.

In this image, the left side has a blue color cast due to the daylight’s natural temperature. The right side’s white balance is correct, capturing accurate colors. While many cameras offer auto-white balance, I highly recommend mastering manual adjustment. This prevents reliance on your camera for achieving correct color balance. Consult your camera’s manual for specific instructions. Even if you want a specific color cast, film with the correct white balance and adjust the color during editing. Avoid relying on poor camerawork for stylistic choices.
7. Don’t “Spotlight” Your Subject
Unless you’re filming a theatrical performance, avoid placing your subject under direct, intense light. This can result in blown-out highlights, harsh shadows, and unflattering reflections. Various lighting techniques can help you achieve specific effects.
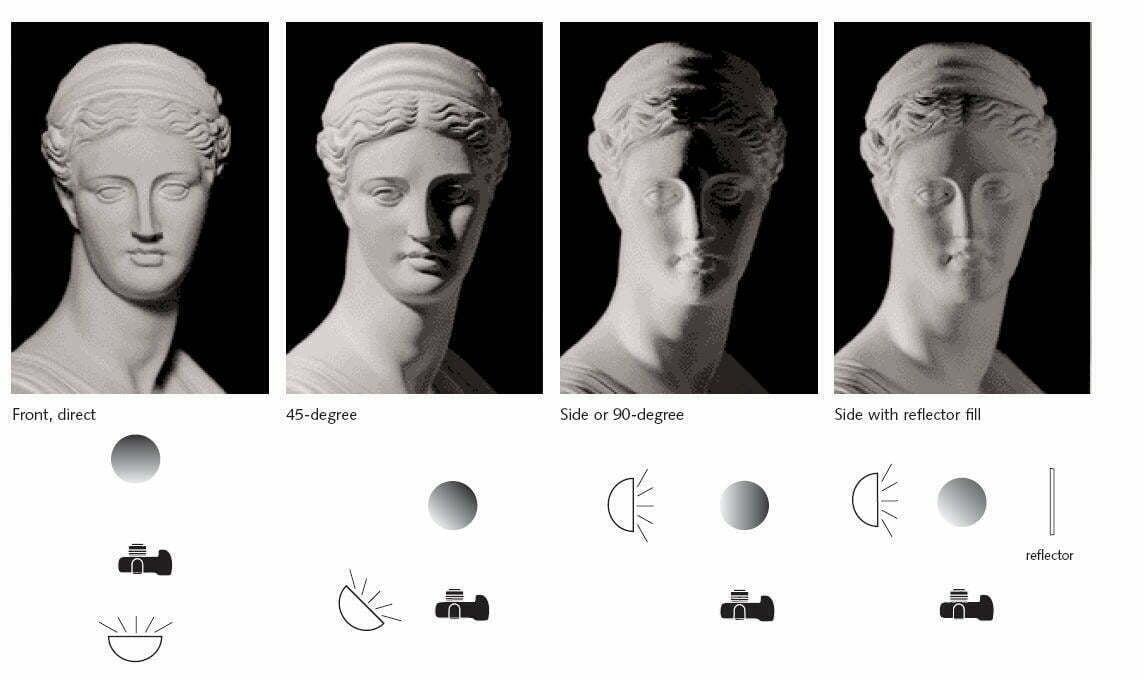
If you have a professional lighting setup, don’t just point it at your subject. Ensure even lighting and use a reflector and/or diffuser to minimize harsh spotlights and shadows, like the “mustache” effect in the leftmost example. For more insights into video lighting, check out the excellent videos on the Vimeo Video School.
8. Check Your Location’s Acoustics
Before hitting record, evaluate the acoustics of your filming location. Is there an echo? If so, find another spot. While you can fix some audio issues during editing, even a slight echo can be difficult to remove completely. You don’t need a soundproof studio, but be mindful of acoustics when choosing filming locations. It can save you a lot of trouble later.
9. Capture Multiple Takes
Even experienced presenters make mistakes, and you don’t want to end up with only one take of a crucial part of your video.

Everyone makes mistakes, even Norse gods. Always film multiple takes. This provides a safety net if something goes wrong and allows you to edit together the final sequence from various clips instead of relying on just one. Even if the first take is perfect, capture another one – just in case.
Marketing Videos: Editing Stage
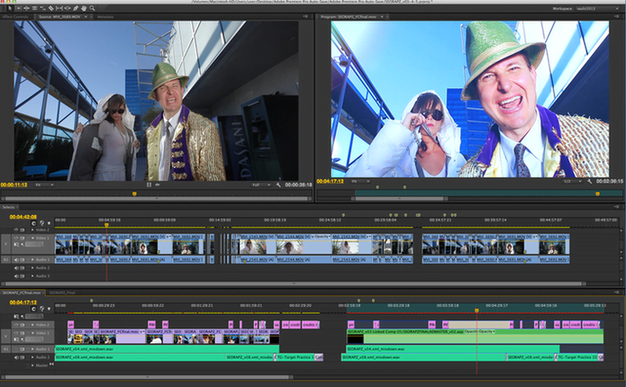
Before diving into editing tips, you’ll need to choose and familiarize yourself with video editing software. I highly recommend Adobe Premiere Pro, which has been my preferred editing program for almost a decade. This powerful software has everything you need to create professional-quality marketing videos at a reasonable price (around $250 per year for an individual license). This accessibility has made video editing much easier for businesses of all sizes. Despite its comprehensive features, Adobe Premiere Pro is surprisingly user-friendly, and its learning resources and community at the Adobe website are exceptional. If you’re using a Mac, Apple’s Final Cut Pro might seem tempting. While it’s a capable program, I still recommend Premiere Pro. Its seamless integration with other Adobe programs like After Effects and Photoshop makes it a stronger choice overall.
10. Clean Up Your Clips Before Editing
When importing footage into your editing program, clean up your clips as you go. Most editing software allows you to set “in” and “out” points, trimming pauses, laughter, and false starts. Editing with trimmed clips is significantly easier than adjusting each clip on the fly.
11. “Cut on the Action”
When editing a shot of someone performing an action, cut to the next shot during the action. For example, if you’re editing a sequence of someone opening a door and walking through, cut to the next shot at the exact moment the person grabs the doorknob. Cutting before or after the action can look awkward and distract viewers. While this might not always be a concern, it’s worth considering for more complex videos.
12. Assemble a Rough Cut First
Once you have all your clips imported, it’s time to start putting together a rough cut of your marketing video.
Editing can get complicated quickly, so organize your clips as you work. Before fine-tuning the timing, get your clips in roughly the right order. Don’t worry about precision editing yet – focus on creating the video’s basic structure. It won’t look polished, but it will give you a clearer idea of which parts need the most work.
13. Avoid Overusing Transitions and Effects
Unless you’re creating a Star Wars parody (which could be a fun marketing idea!), avoid using flashy transitions like radial wipes or star wipes. Overusing these effects can make your video look amateurish. If necessary, use simple cross-fades for transitions. Let your content shine, not your editing tricks.
14. Choose Music Wisely
Not every video needs background music, but if yours does, choose carefully. You wouldn’t use heavy metal in a video for an animal shelter, right? Make sure your music aligns with your message and target audience.

Pay attention to music licensing. Unless you’re using royalty-free music or composing your own, most music is copyrighted and using it without permission can lead to legal issues. Check out our guide on using music in ads legally! Remember, copyright holders won’t overlook infringement just because it’s a short marketing video. Always err on the side of caution and ensure you have the necessary permissions. TIP: Several websites offer royalty-free background music and sound effects, including:
- FreeStockMusic.com
- Incompetech.com
- AudioMicro.com
- RoyaltyFreeMusic.com You can also use music and compositions in the public domain. Learn more about public domain music at the Public Domain Information Project, and explore a selection of artists and genres at Public Domain Music.
15. Don’t Expect Miracles in Post-Production
Editing software is powerful, but it has limitations. Don’t assume you can fix every problem in post-production. Sometimes, you can’t salvage poorly lit or noisy footage. While it might be possible with significant time and skill, approach post-production as a way to enhance your video, not fix avoidable mistakes.
That’s a Wrap!
I hope this post has given you some insights into what to avoid when creating marketing videos. Feel free to ask any questions about video production in the comments – I’m always happy to help! Happy filming!